
Quick Answer: You can convert an MBR disk to GPT during Windows installation by using DiskPart or a bootable partition manager. DiskPart requires cleaning the selected disk first, which removes its existing partition information. If you need to preserve existing partitions, consider a partition management tool that supports MBR-to-GPT conversion, and back up important data before making changes.
Should You Convert MBR to GPT During Windows Installation
Before you convert MBR to GPT during Windows installation, it helps to know whether you actually need to. MBR and GPT are two partition styles, and the right one depends on your disk size, your firmware mode (Legacy BIOS or UEFI), and the Windows version you plan to install.
What is MBR? What advantages or disadvantages does it have?
A Master Boot Record (MBR) is a boot sector at the very start of a disk that stores how its logical partitions and file systems are organized. It is the standard partition style for IBM PC-compatible systems running in Legacy BIOS mode.
Keep using an MBR disk if:
- Your computer only supports Legacy BIOS mode.
- You are installing an older system that does not support UEFI.
However, this partition style only supports at most four primary partitions or three primary partitions and one extended partition containing many logical partitions (If you have some questions about how to create more partitions on an MBR disk, you can read the post: How to Create More Than 4 Partitions on MBR Disk in Windows 10).
Furthermore, this partition style only supports a single partition no more than 2TB. It means that you should set the disk more than 2TB as a GPT disk or you will run into a problem like 3TB hard Drive only using 2TB.
What is GPT? What advantages does it have?
Standing for GUID Partition Table, GPT is a new standard with many advantages. Why is it called GUID Partition Table? The reason is that every partition on your drive has a “globally unique identifier”.
Converting to GPT disk, you have the following reasons:
- The hard disk is larger than 2TB;
- To create more than 4 primary partitions on the disk (In theory, this type of hard disk drive can support 128 primary partitions);
- Your computer supports UEFI mode and this mode is enabled;
- You plan to install Windows 11, which requires UEFI boot.
For more details, read MBR vs. GPT Guide: What’s The Difference and Which One Is Better.
If you decide to convert, first make sure your computer supports UEFI and that UEFI mode is enabled in the BIOS.
If it does not, you cannot install Windows on a GPT disk, and Setup may show: “Windows cannot be installed to this disk. The selected disk is of the GPT partition style.” See: Windows Cannot Be Installed to a Disk? Here Are Solutions.
If UEFI is enabled but the target disk uses MBR, Setup may show: “Windows cannot be installed to this disk. The selected disk has an MBR partition table. On EFI systems, Windows can only be installed to GPT disks.” In this case, convert the disk to GPT with one of the methods below.
Which Method Should You Choose?
| Method 1: DiskPart | Method 2: MiniTool Partition Wizard | |
| Data loss | Yes, the disk is cleaned | No |
| What you need | Windows installation media only | A bootable USB made on another PC |
| Best for | New or empty disks | Disks that contain data |
Method 1: Convert MBR to GPT During Windows Installation with DiskPart Commands
DiskPart is a command-line tool included in Windows Setup, so you can use it to convert MBR to GPT during Windows installation without extra software. Note that the clean command erases everything on the selected disk. Use this method only on a new or empty disk, or after backing up your data.
Step 1: At the Windows Setup screen, press Shift + F10 to open Command Prompt. (On some laptops, press Fn + Shift + F10.)
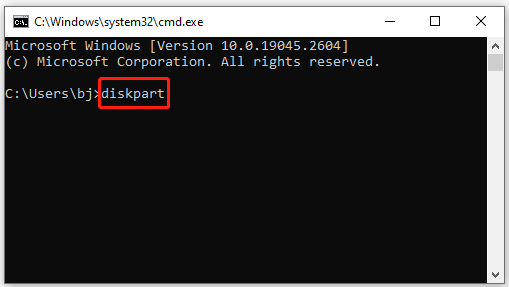
Step 2: After getting a cmd.exe window, please input diskpart and hit Enter key on the keyboard.
Step 3: After getting a newly popping-up window, please input the following commands in order, and then hit Enter key on the keyboard after inputting each command.
- list disk
- select disk 1
- clean
- convert gpt
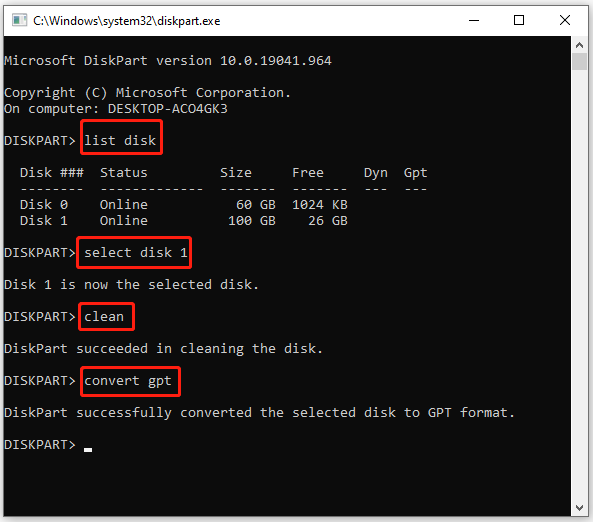
When you see “DiskPart successfully converted the selected disk to GPT format”, the conversion completes.
As you see, this method can help you convert MBR to GPT during Windows installation with few steps. But it can also clean your data stored in the selected disk. If you don’t want to lose any data and complete this conversion, you can move to the following method.
Method 2: Convert MBR to GPT During Windows Installation Using Partition Manager – No Data Loss
If you need to convert MBR to GPT during Windows installation without losing data, MiniTool Partition Wizard is a safer choice than DiskPart because it converts the disk without deleting its partitions.
Since your PC cannot boot into Windows yet, you first create a bootable USB drive on another working computer, then use it to run the conversion.
Make a USB Boot Disk with MiniTool Partition Wizard
Since no running OS is installed on your computer, you need to create a USB boot disk on another normally running computer at first. To do that, you should pay some money for the bootable edition of MiniTool Partition Wizard.
How to create a USB boot disk? Please refer to the following tutorial.
Step 1: Prepare a normally running computer and a USB (CD/DVD is also allowed) in advance.
Step 2: Restart the PC and enter BIOS by pressing the key shown on the startup screen (commonly Del, F2, F10, F12, or Esc, depending on the manufacturer).
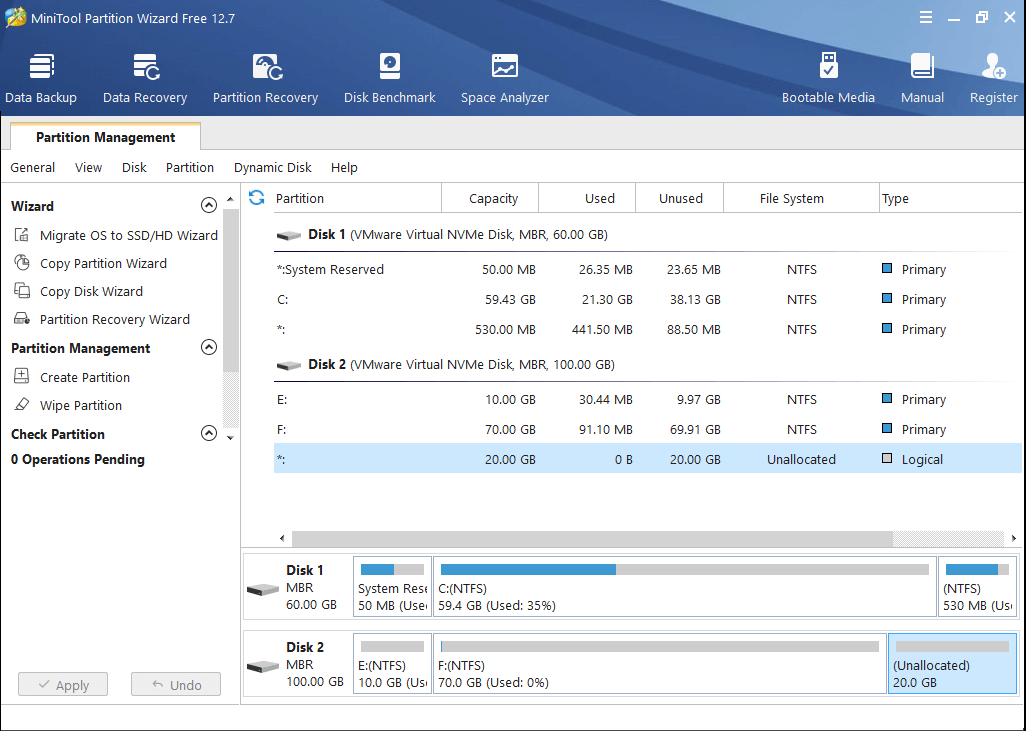
Step 3: Buy MiniTool Partition Wizard Pro by clicking the following button and then launch it to get its main interface showing like the following image.
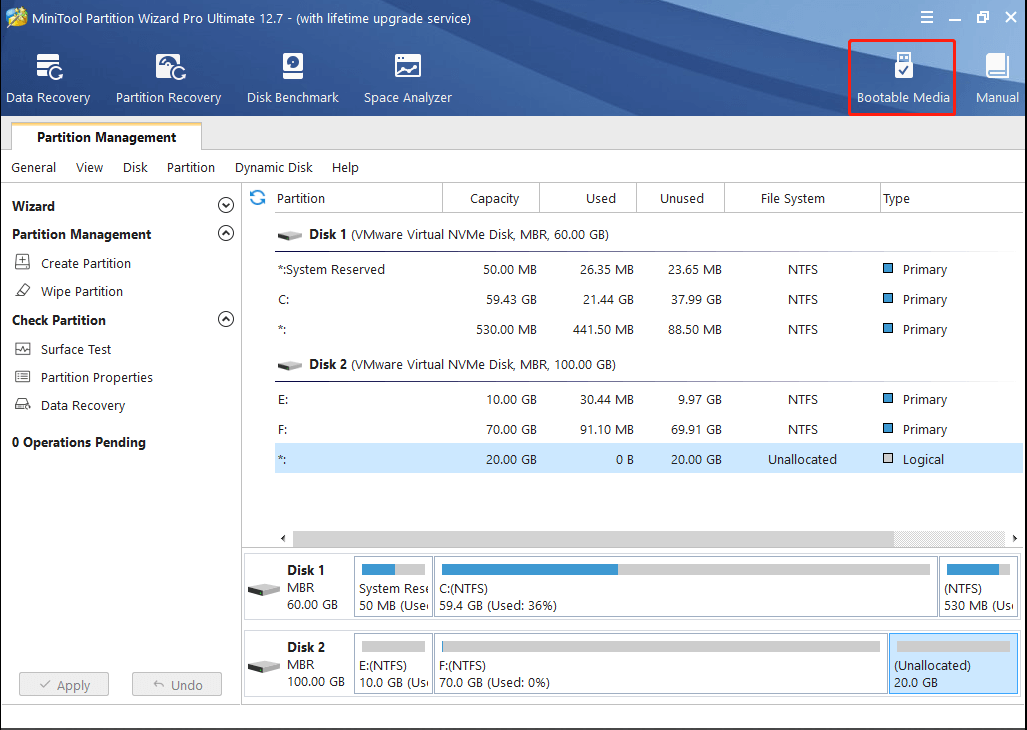
Step 4: Click Bootable Media feature in the toolbar. This feature can help you create a bootable disk easily.
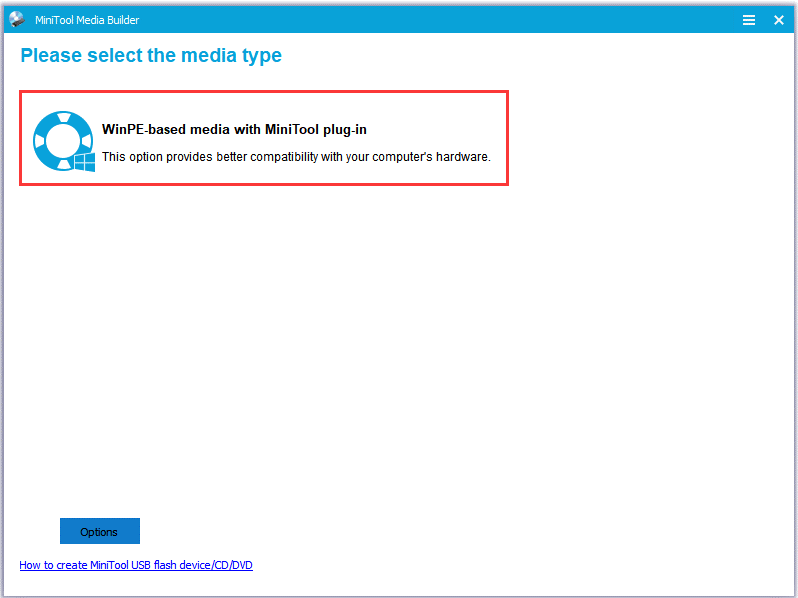
Step 5: When you get a new pop-up window like the following image shows, please click WinPE based media with MiniTool plug-in.
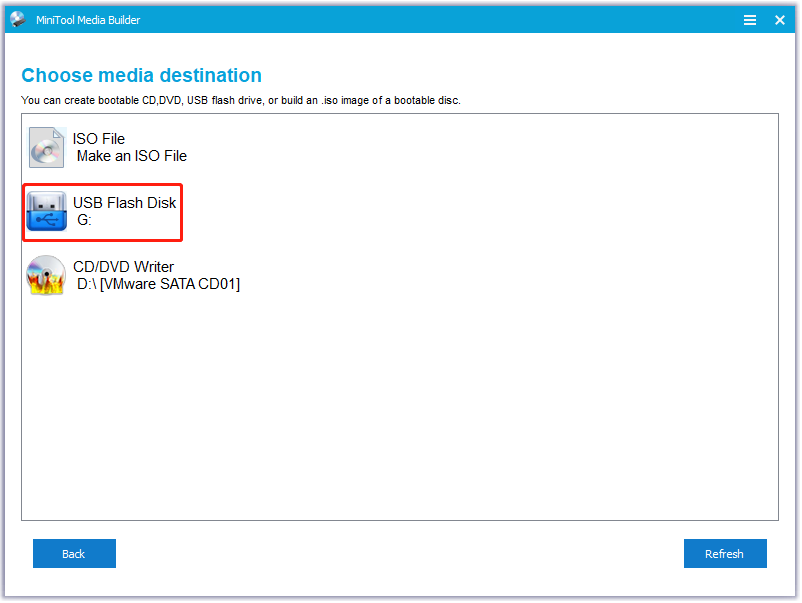
Step 6: Click the USB Flash Disk option to make a bootable USB flash drive. (You can also click CD/DVD Writer if you want to make a bootable CD/DVD).
Step 7: When you get the message “The data on the USB disk will be destroyed. Are you sure you want to build a USB boot disk?”, click Yes if all the important data has been backed up and all data stored in the USB flash drive will be cleaned.
Step 8: After you confirm the change, the feature works to build a USB bootable disk for you. Please wait patiently.
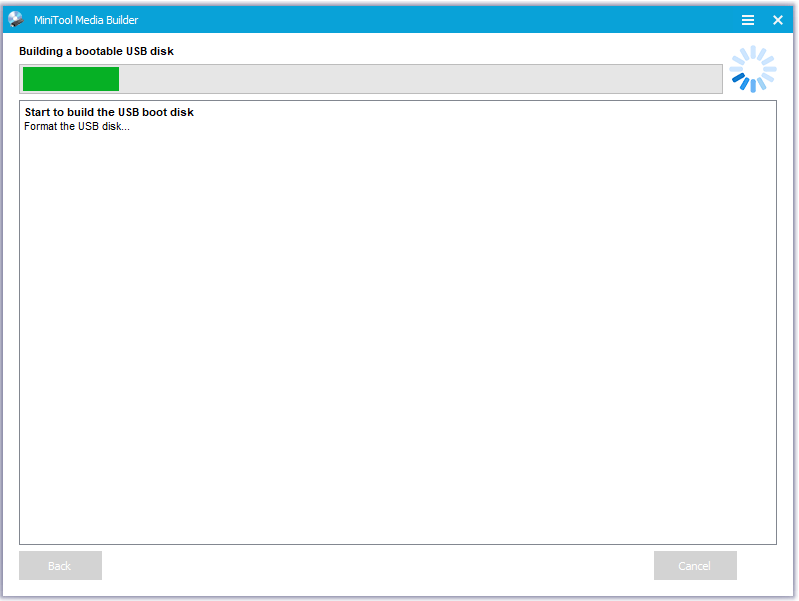
Step 9: Click Finish after the building process comes to an end.
Now, you get a USB bootable disk. All preparations have been accomplished. Therefore, let’s keep reading on how to convert MBR to GPT with MiniTool Partition Pro during Windows installation without losing data.
Convert MBR to GPT via MiniTool Partition Wizard
In this part, you will get detailed instructions about converting MBR to GPT with MiniTool Partition Wizard.
Step 1: Connect the USB boot disk with the computer where Windows is installing.
Step 2: Enter BIOS by pressing F8 key on the keyboard.
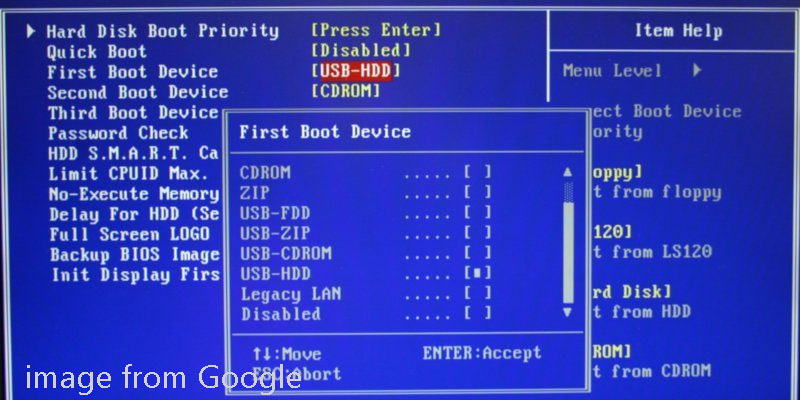
Step 3: Set USB as the First Boot Device and save configuration changes and exit from BIOS.
Step 4: Enter the interface of the bootable edition of MiniTool Partition Wizard Pro.
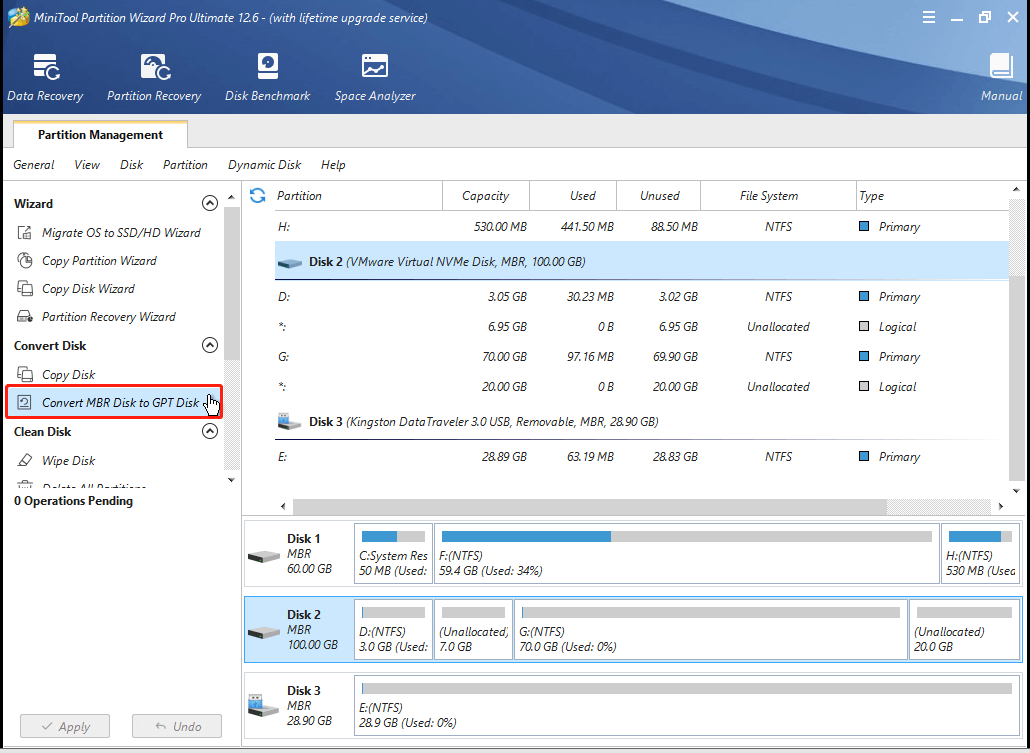
Step 5: Make sure which MBR disk showing in the Disk Map needs to be converted to GPT disk, right-click the disk, and Choose Convert MBR Disk to GPT Disk among the options. Or you can also activate the Convert MBR to GPT Disk feature from the left panel after choosing the disk. (Here take Disk 1 for an example)
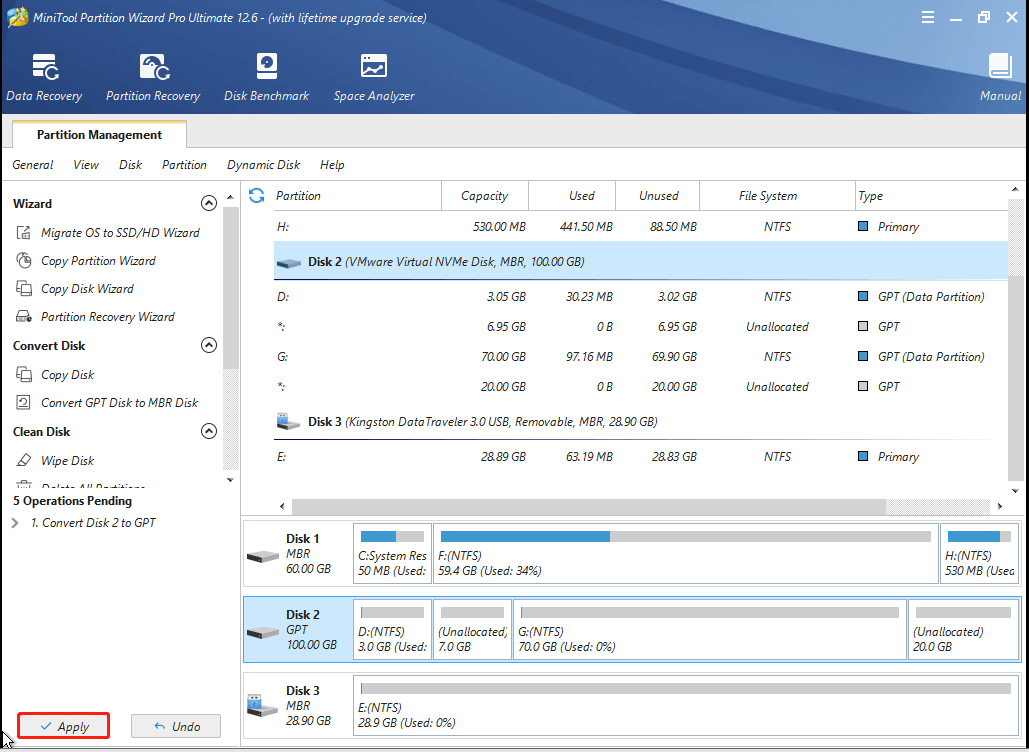
Step 6: Click the Apply button in order to carry out pending operations.
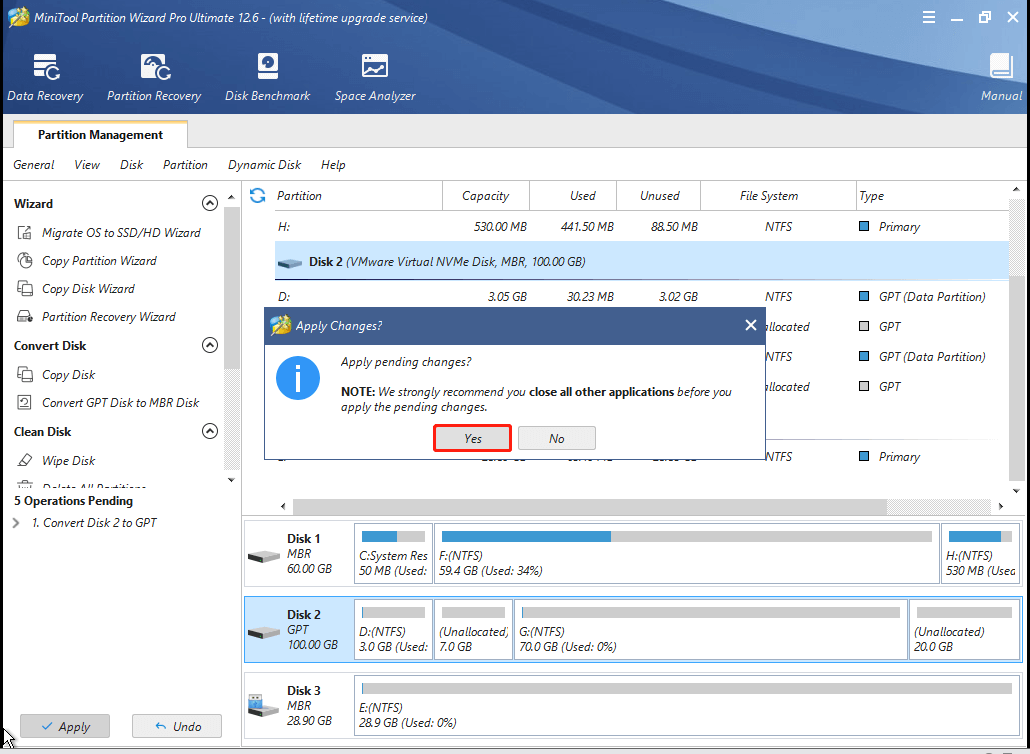
Step 7: Click Yes in the pop-up prompt windows to start converting MBR disk to GPT disk.
Step 8: Click the OK button when the converting process comes to an end.
After the conversion is complete, remove the boot USB, restart the PC from your Windows installation media in UEFI mode, and continue the installation on the new GPT disk.
Bottom Line
Now you know how to convert MBR to GPT during Windows installation. DiskPart is built-in and fast, but it erases the disk. MiniTool Partition Wizard converts the disk without data loss. Choose the one that fits whether your disk holds important files.
If you run into any problems, contact us via [email protected].
Convert MBR to GPT During Windows Installation FAQ
To convert MBR to GPT after installing Windows, you can try the following 3 tools.
- Use MiniTool Partition Wizard. You can complete this conversion by following the tutorial in the part ‘Convert MBR to GPT via MiniTool Partition Wizard’ in this post. This will not cause data loss.
- Use Disk Management or Diskpart. Both two tools require you delete all the partitions on the hard drive and then convert it from MBR to GPT. Therefore, it is highly recommended that you try MiniTool Partition Wizard.
Certainly, you can install Windows 10 on MBR partition. Windows 10 supports two installation methods:
- The system can be installed on the hard disk of MBR partition table when the boot record method is set to Legacy in BIOS.
- The system can be installed on the hard disk of GPT partition table when the boot record method is set to UEFI in BIOS.
To know the layout of the MBR and GPT partition tables, you can read What Are the Two Different Methods for Partitioning Hard Drives.
To convert partition style from GPT to MBR, you can also try the following three tools.
- Use MiniTool Partition Wizard to do the GPT to MBR conversion without data loss.
- Use Disk Management or Diskpart with data loss during the conversion.
To ensure which partition style you should use, please take the following principles into consideration.
- hard disk capacity: use GPT if the disk space is more than 2TB.
- boot recode method: use MBR if your computer only supports the Legacy mode.
- partition numbers: use GPT if you create more primary partitions (more than 4).
About The Author

Position: Columnist
Charlotte is a technology columnist with a strong focus on the Windows operating system, specializing in disk management, backup, and data recovery. She is passionate about analyzing computer errors, identifying root causes, and delivering practical solutions. In her free time, she stays updated on the latest developments in computer systems and hardware while continuously learning new technologies to broaden her expertise. Her writing style is clear and easy to understand, making complex technical topics accessible even to users with limited computer knowledge.
User Comments :