SYSTEM THREAD EXCEPTION NOT HANDLED is a Windows BSOD error often caused by a driver or corrupted system files. This guide from MiniTool Partition Wizard explains 11 fixes to resolve crashes and restore normal boot, even if your PC cannot start properly.
SYSTEM_THREAD_EXCEPTION_NOT_HANDLED is a Blue Screen of Death (BSOD) error in Windows that occurs when a system thread generates an exception that the operating system cannot handle.
It may appear during system startup, gaming, or regular computer use on Windows 10 or Windows

This error is usually caused by issues such as outdated or corrupted device drivers, damaged system files, incorrect virtual memory (paging file) settings, overclocking, or hardware problems like a failing CPU or GPU.
When this BSOD occurs, try restarting the PC to see if you can boot into Windows. If it doesn’t work, enter WinRE, go to Troubleshoot > Advanced options, and then use the Startup Repair option to solve the issue.
![Preparing Automatic Repair Black Screen [Fix Guide]](https://images.minitool.com/partitionwizard.com/images/uploads/2023/11/preparing-automatic-repair-thumbnail.jpg)
If the issue is temporary or occurs only once, no further action may be required.
However, if the SYSTEM_THREAD_EXCEPTION_NOT_HANDLED error happens frequently or Startup Repair does not work, you should continue with the advanced troubleshooting methods below.
Identify the Cause of SYSTEM_THREAD_EXCEPTION_NOT_HANDLED
Before attempting a solution, it is advisable to identify the specific cause of the Blue Screen error.
In some cases, the blue screen displays the name of the driver file that caused the crash, providing information that helps you quickly pinpoint the source of the problem.
The following are some common driver file names.
| Driver File | Related Component | Possible Cause |
| WinFsf.sys | File system filter driver | Third-party storage or security software issue |
| nvlddmkm.sys | NVIDIA graphics driver | Outdated, corrupted, or incompatible GPU driver |
| Ntfs.sys | Windows file system | Disk errors or corrupted system files |
| vgk.sys | Riot Vanguard anti-cheat | Software conflict or driver incompatibility |
| atikmdag.sys | AMD graphics driver | Graphics driver conflict or installation issue |
| igdkmd64.sys | Intel graphics driver | Intel GPU driver malfunction |
However, the system often does not display the specific file responsible for the error.
In such instances, you can determine the cause by analyzing the dump files (system crash dumps) located in the C:\Windows\Minidump folder.
These files record the system’s state at the time of the crash, helping to determine whether a driver, hardware device, or system component triggered the Blue Screen.
#1. Enter Safe Mode
When your PC won’t boot into Windows, you need to enter Safe Mode to perform the following solutions or access the dump file.
Here is how to enter Safe Mode.
- Enter WinRE by interrupting boot three times.
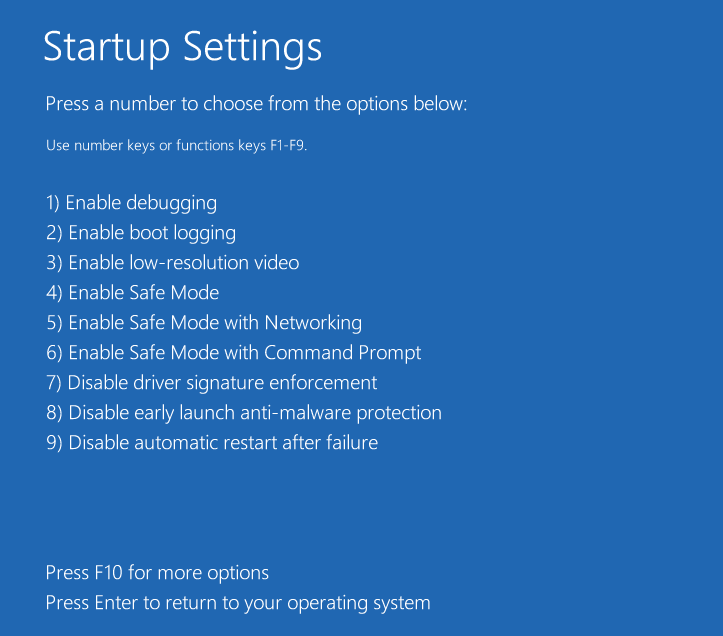
- Go to Troubleshoot > Advanced options > Startup Settings.
- Click Restart.
- Press F5 to enable Safe Mode with Networking.
#2. Analyze the Dump File
Here is a brief guide on how to analyze the dump file.
Step 1: Open the dump file with a debugger tool.
- Go to C:\Windows\Minidump and then copy the DMP file to the desktop.
- Download and install the WinDbg tool from the Microsoft Store.
- Open this tool and click File > Start debugging > Open dump file.
- On the right panel, click Browse and select the DMP file.
- Click Open.

Step 2: Identify the culprit file.
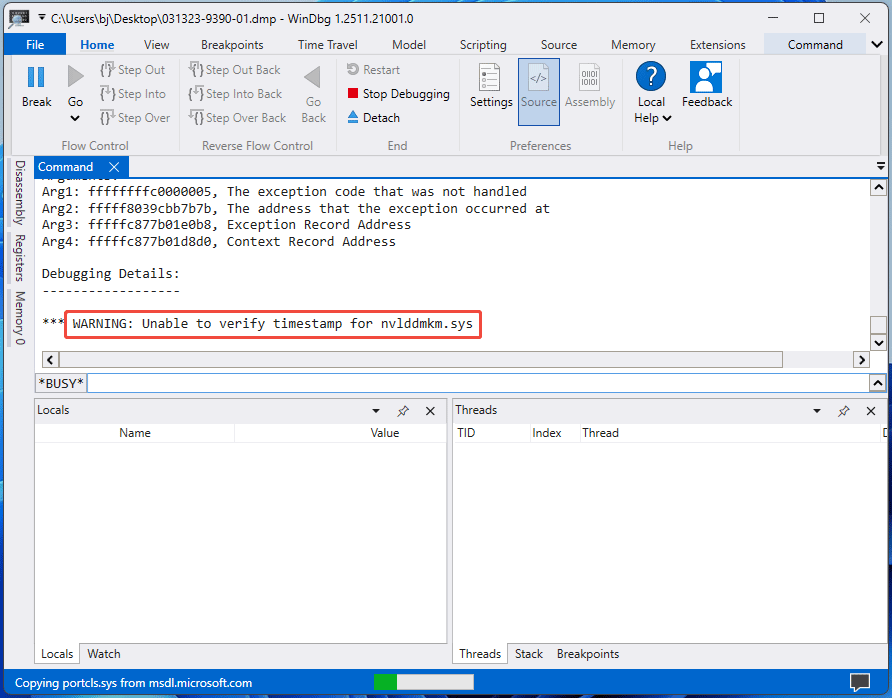
- After the dump file loading is complete, in the text bar, type “!analyze -v” and press Enter.
- Wait for it to give you the Bugcheck Analysis.
- Under Debugging Details, see the WARNING information. It will tell you the culprit file of the BSOD system thread exception not handled.
Solution 1. Disconnect Peripherals
Faulty or incompatible peripherals can sometimes trigger the SYSTEM_THREAD_EXCEPTION_NOT_HANDLED blue screen error by causing driver conflicts during startup.
Disconnect all external devices, including USB Wi-Fi adapters, headsets, external drives, keyboards, and mice, and then restart your PC.
If the error disappears, reconnect the devices one at a time to identify the problematic hardware.
Once found, update or reinstall its driver, or replace the device if necessary.
Solution 2. Rename the Driver File
If the stop code system thread exception not handled has been followed by the faulty driver file’s name, you can try this method when you can’t enter Safe Mode.
Step 1: Open Command Prompt in WinRE.
- Enter WinRE and go to Troubleshoot > Advanced options > Command Prompt.
- Choose your account to continue.
- Enter your password and click Continue.
Step 2: Once Command Prompt opens, use DiskPart commands to identify your OS drive as drive letters may differ in WinRE.
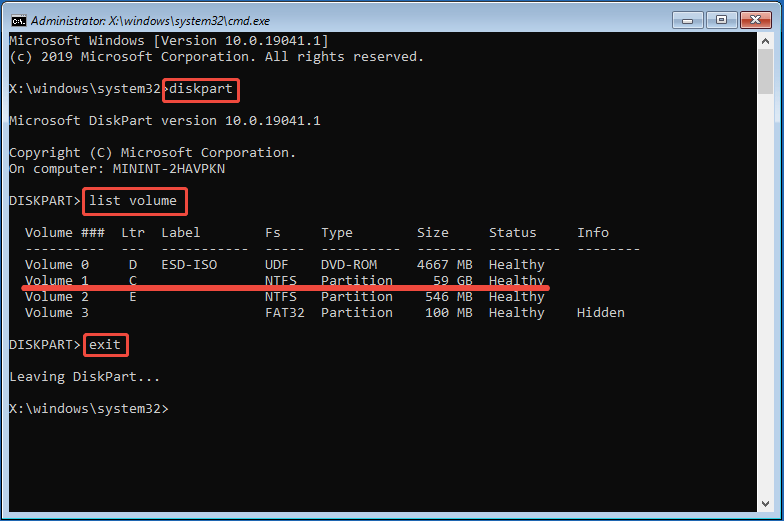
- Type “DiskPart” and press Enter. You should now get DISKPART> appear.
- Type “List volume” and press Enter. A list of your drives should now appear. Identify the drive letter that is your OS drive.
- Type “Exit” and press Enter. It will take you out of DiskPart.
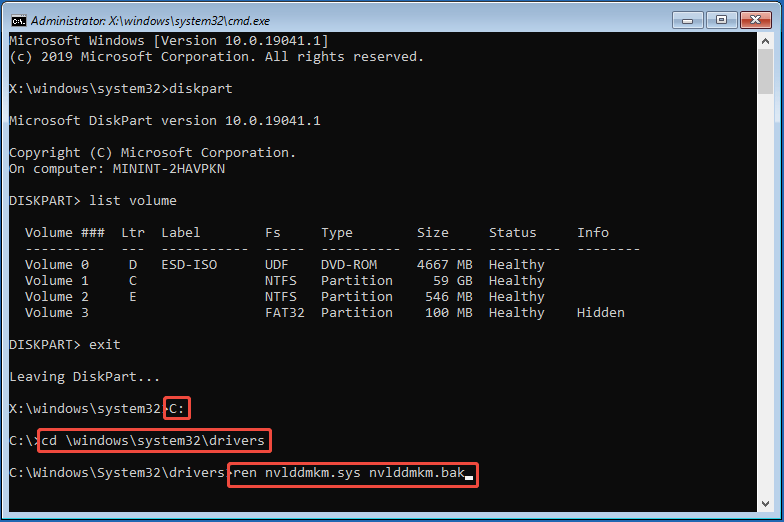
Step 3: Rename the failed driver file so Windows can’t call it on boot, but it won’t delete it.
- Type your OS drive letter (D: for example) and press Enter.
- Type “cd \windows\system32\drivers” and press Enter. This will navigate into the driver folder.
- Type “ren driver_file another-name” and press Enter. Taking nvlddmkm.sys as an example, the command could be “ren nvlddmkm.sys nvlddmkm.bak”.
Step 4: Close the Command Prompt and shut down your PC. Then, reboot your PC and check if the issue has been solved. Once in Windows, you need to update the failed driver or uninstall the conflicting software.
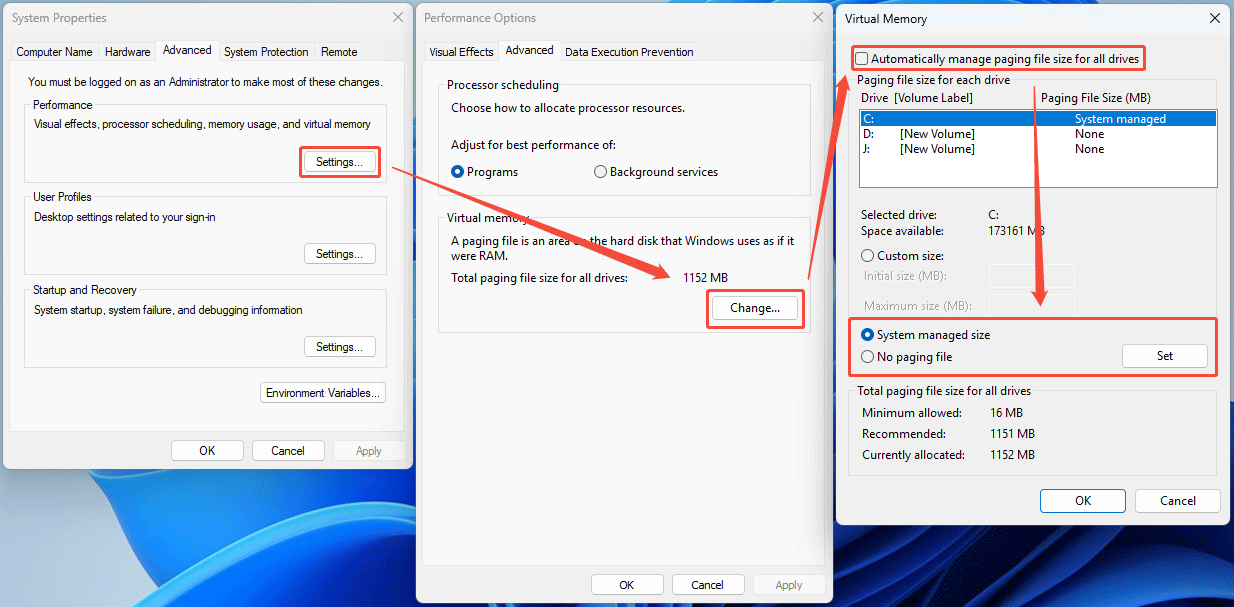
Solution 3. Place the Page File in a Single Partition
If the stop code SYSTEM_THREAD_EXCEPTION_NOT_HANDLED is related to memory management, the issue does not necessarily lie with the physical RAM modules. It could also be related to the page file (pagefile.sys) configuration.
Improper page file configuration can trigger memory management issues, potentially leading to this error.
You can follow the steps below to check this.
- Type “view advanced system settings” in the Windows Search bar and select it from the results.
- In the pop-up System Properties window, on the Advanced tab, under Performance, click Settings.
- In the Performance Options window, go to the Advanced tab.
- Under Virtual memory, click Change.
- Uncheck the box for Automatically manage paging file size for all drives.
- Select partitions except for C: and make sure No paging file is set for them (click the Set button for each of the partitions).
- Make sure the C: drive has selected the System managed size option.
- Then, click OK to save the changes.
Solution 4. Disable Overclocking
Overclocking may result in an unstable computer, which may be the reason for the BSOD system thread exception not handled.
Then, try disabling overclocking to see if the issue can be solved. To do that, reset the BIOS. Here is the guide:
- Power on the computer and then press the BIOS key (F2, Del, Esc, etc.) once the PC logo appears. This will lead you to the firmware.
- Navigate to the Exit or System Configuration tab, and find Load Setup Defaults, Restore Defaults, or Load Optimized Defaults.
- Select this option and confirm.
- Press F10 to save changes and exit the firmware.

2. If you are a seasoned OC user, you can also try just lowering the OC dials.
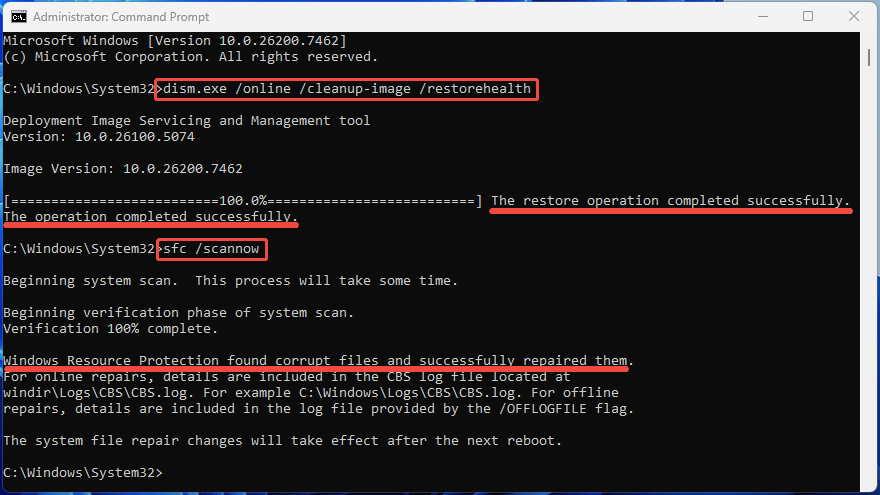
Solution 5. Repair System Files
If the failed file is a Windows system file, repairing the system files may solve the system thread exception not handled Windows 11/10 issue. Here is the guide:
- In the Windows Search bar, type “cmd”.
- From the result list, right-click Command Prompt and choose Run as administrator.
- Type “dism.exe /online /cleanup-image /restorehealth” and press Enter.
- Once the DISM repair is complete successfully, type “sfc /scannow” and press Enter.
Solution 6. Update Drivers
In most cases, the system thread exception not handled Windows 10/11 is caused by a device driver (especially the keyboard, mouse, and the dedicated GPU device drivers). The driver may be corrupt or outdated, so it can’t go through the computer booting process.
In this case, you can solve the issue by updating the device driver. Here is the guide:
- Press the Windows logo key + X and then select Device Manager to open it.
- Expand the device directory corresponding to the problematic driver (Display adapters, Keyboards, Mice and other pointing devices, and so on).
- Right-click the device and choose Update driver.
- Select Search automatically for drivers.

Solution 7. Uninstall Programs
If the SYSTEM_THREAD_EXCEPTION_NOT_HANDLED Blue Screen error appeared after installing new software, it may be related to a driver conflict.
Try uninstalling recently installed programs and check if the issue is resolved.
#1. Windows updates broke the driver.
A user reports that the system thread exception not handled issue occurs after a Windows update. The dump file indicates that it’s caused by a virtual driver associated with the Vanguard anti-cheat software. It’s speculated that the update broke the driver.
#2. Another program broke the driver.
A user reports that he has a Logitech m650 with the Logitech Options+ application running. But he also has X mouse button control. Since he installed the Logitech app, the X mouse hasn’t worked. The Logitech app likely corrupted the driver required by the X mouse.
Finally, he solved the BSOD system thread exception not handled issue by uninstalling the X mouse.
2. If you need the uninstalled software, install its latest version after the PC boots up.
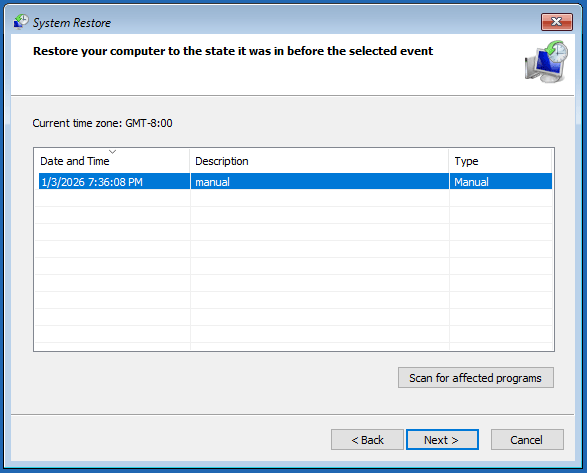
Solution 8. Perform System Restore
If the SYSTEM_THREAD_EXCEPTION_NOT_HANDLED Blue Screen error occurred after a recent driver update, software installation, or system change, you can use System Restore to revert Windows to a previous state.
This can help fix the issue without affecting your personal files. Here is how to perform a system restore.
- In WinRE, go to Troubleshoot > Advanced options > System Restore.
- Select your account, type the password, and click Continue.
- Click Next, select a restore point, and then click Next again.
- Confirm your restore point. It will tell you which drives are affected. Then, click Finish.
Solution 9. Reinstall Windows
If all the above methods don’t work, you can try reinstalling Windows. Before that, you need to move your important files out of the unbootable computer.
#1. Recover Data
If your computer can boot into Safe Mode, you can move the files to an external drive via the copy command. However, if you can’t boot into Safe Mode, MiniTool Partition Wizard can help you recover data from the unbootable PC to an external drive.
Here is the guide.
MiniTool Partition Wizard DemoClick to Download100%Clean & Safe
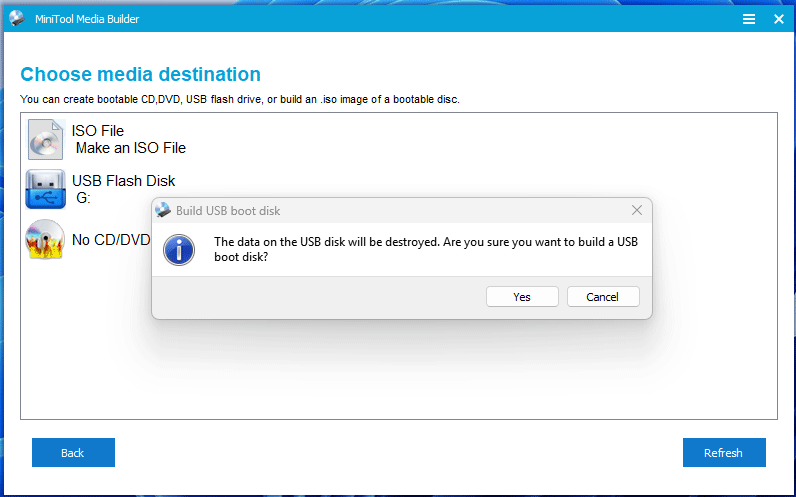
Step 1: Launch MiniTool Partition Wizard on a well-running PC. Insert a USB drive into this PC. Click Bootable Media.
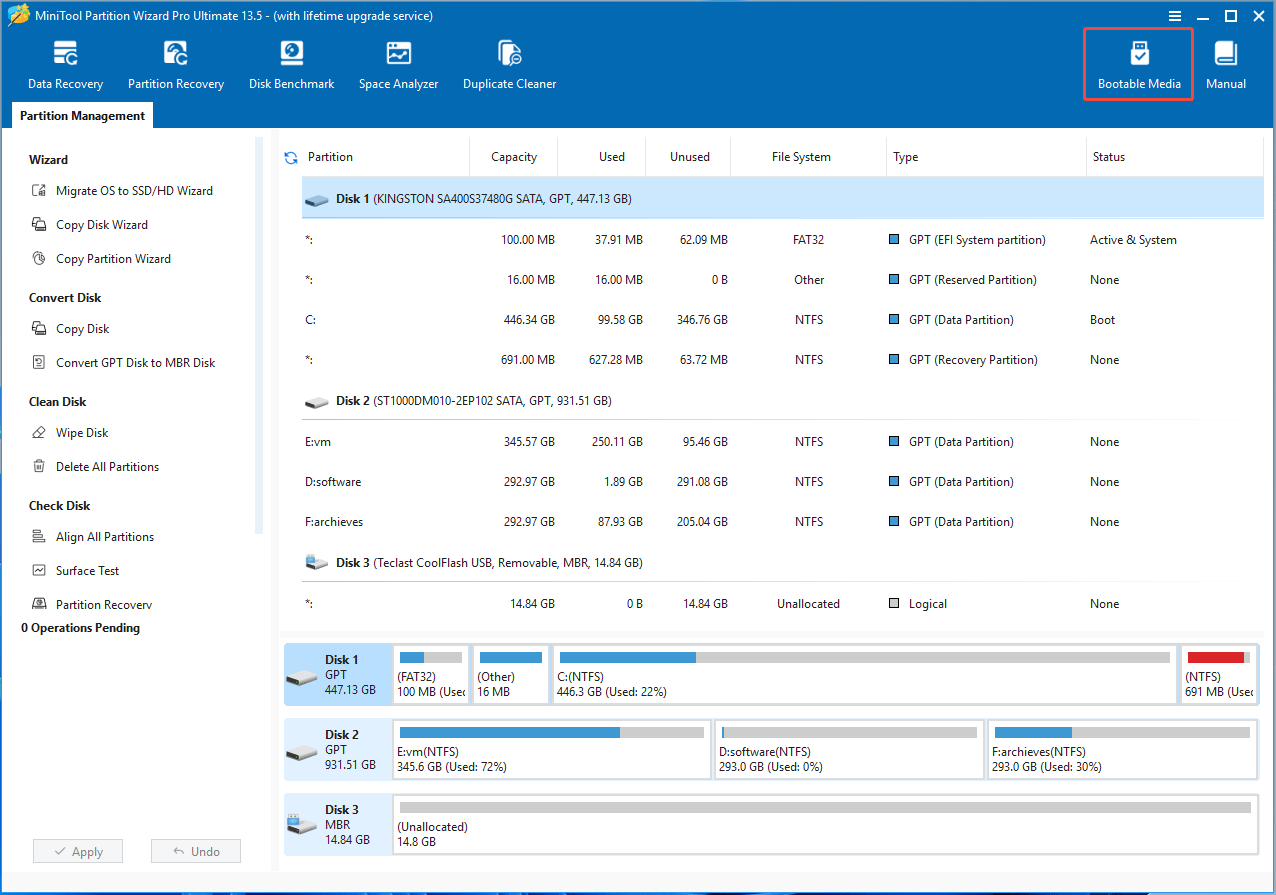
Step 2: Click WinPE-based media with MiniTool plug-in. When it asks you to choose the media destination, click USB Flash Disk. Read the Note message and click Yes to start the creation process.
Step 3: After the process is complete, click Finish. Then, insert the bootable USB drive into the unbootable PC and make the PC boot from the USB drive. At the same time, connect an external drive to the computer.
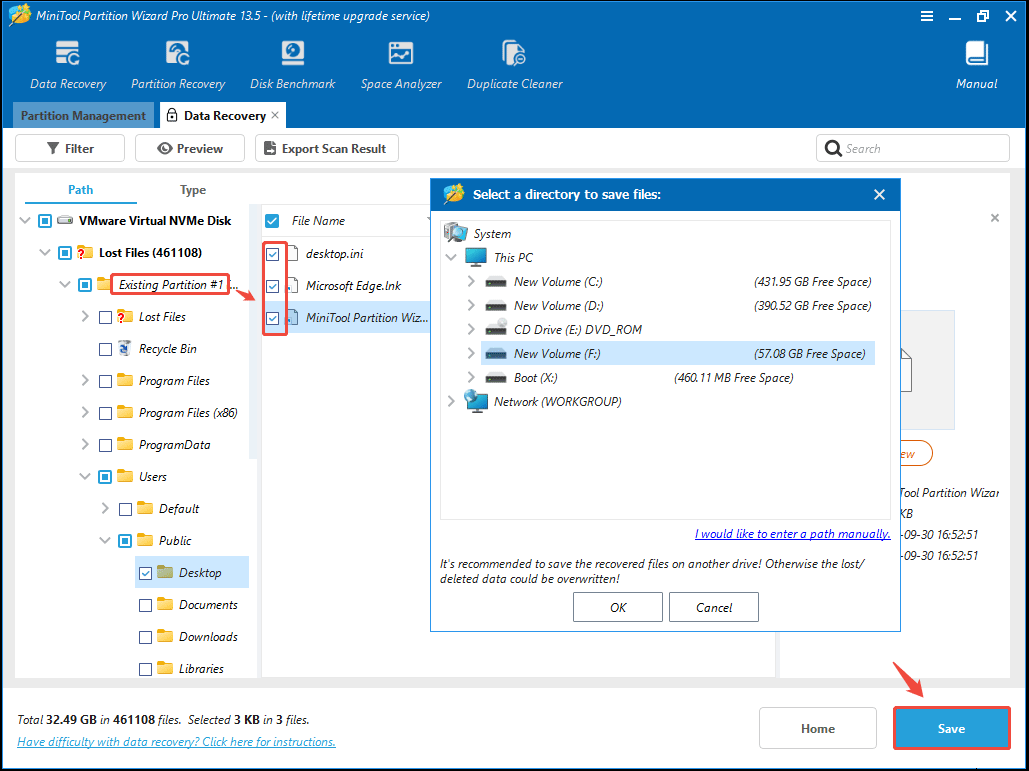
Step 4: Once MiniTool Partition Wizard opens, click Data Recovery > Devices. Then, hover over the system disk and click Scan.

Step 5: Wait for a few minutes and then stop the scanning process. Expand Lost Files > Existing Partition. Navigate to the files that you want to recover, just like in Windows. Check the boxes before them and then click Save. In the pop-up window, select the external drive to save recovered files.
#2. Reinstall the OS
After recovering important files, it’s time to reinstall the OS. Here is a guide.
Step 1: Create a Windows installation USB drive.
- On a normal PC, download the Windows Media Creation Tool (MediaCreationTool.exe) from Microsoft’s website.
- Insert a USB drive into the PC and run this tool.
- Accept the license terms.
- Uncheck the box for Use the recommended options for this PC.
- Change the Language and Edition to make sure they are suitable for the unbootable PC. Then, click Next.
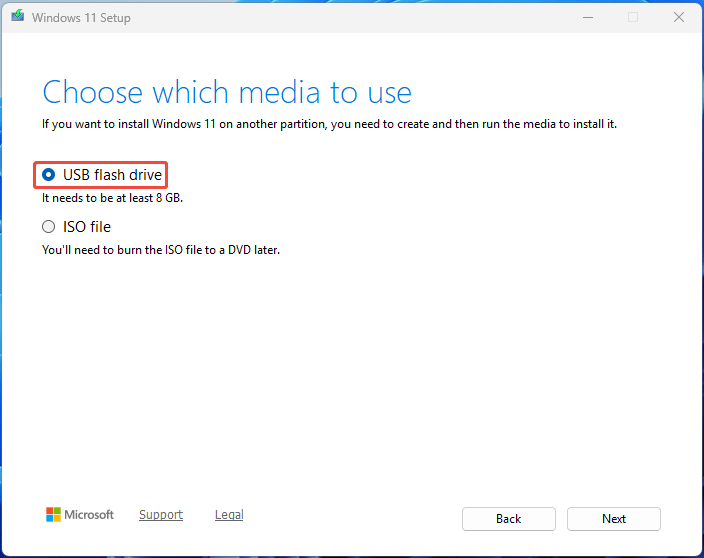
- Select the USB flash drive option and click Next.
- Select the drive letter of the connected USB drive and click Next.
- Wait until the Windows installation USB drive creation process is complete.
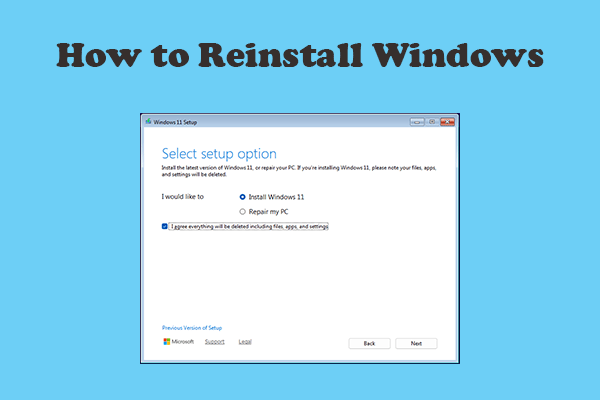
Step 2: Reinstall Windows.
- Install the Windows installation USB drive into the unbootable PC and then boot the PC from it.
- Once the Windows Setup interface appears, select language settings, and then click Next.
- Select keyboard settings and click Next.
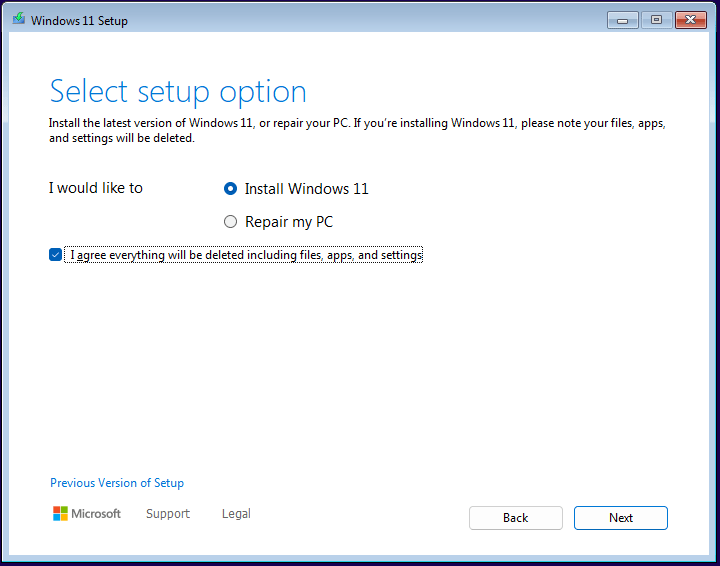
- Select setup option (choose the Install Windows option), check the box before I agree everything will be deleted including files, apps, and settings, and then click Next.
- Click I don’t have a product key.
- Select the Windows image version and click Next. Then, it will install Windows on the PC. Wait until the process is completed.
Solution 10. Run RAM Test
The system thread exception not handled blue screen can also be caused by memory issues. If your computer has two or more memory sticks installed, remove them one by one to check if the issue is caused by one of them.
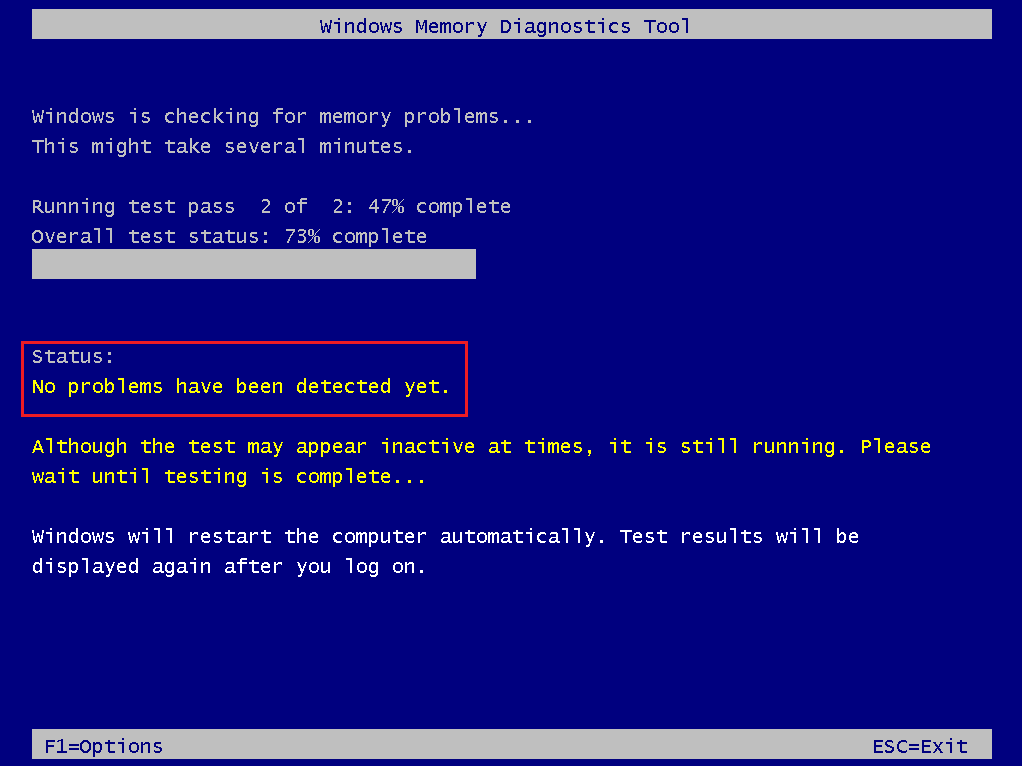
If your computer has only one memory stick, run a RAM test to check if the memory stick malfunctions. Here is the guide:
- Press the Windows logo key + R to open Run.
- Type “mdsched.exe” and press Enter.
- Click Restart now and check for problems (recommended).
- Wait for the computer to restart and run the test.
- Pay attention to the Status information. It will tell you if there are memory problems.
- Depending on the error message, repair or replace the RAM.
2. If you can’t enter Windows or Safe Mode, you need to use MemTest86 to make a bootable USB drive, and then use this drive to run comprehensive tests.
Solution 11. Replace the CPU
In the worst-case scenario, the system thread exception not handled problem is caused by a faulty CPU. In this case, you need to replace the CPU or the computer.
Bottom Line
This post tells you why the system thread exception not handled BSOD occurs and offers 11 solutions to it. Each solution is explained in detail with listed steps and visual pictures.
When dealing with this issue, if you need to reinstall Windows, recover data before that. MiniTool Partition Wizard can help you do that. If you encounter issues when using it, send an email to our support team at [email protected].
About The Author

Position: Columnist
Cecilia has been an editor at MiniTool for two years. She primarily focuses on disk and partition-related content, with particular expertise in disk cloning, partition recovery, and PDF document conversion. She is dedicated to providing users with clear and accurate solutions to help them efficiently resolve common computer problems.
User Comments :