Recuva is a program developed by Piriform, which allows users to recover deleted or lost files from any internal or external storage space. However, some Recuva users reported that Recuva got stuck when they run a deep scan on a hard drive, USB flash drive, or a memory card. How to solve this problem? Here, MiniTool Partition Wizard will tell you that.
I downloaded Recuva, and I’m now trying to scan the card. The problem is that the scan gets stuck. It will start, the number of files found will slowly creep up, then when the progress bar is at around 1%, it will just stop. No more progress, no more files found. I let it run for an hour and nothing changed. The software isn’t frozen, it’s just the scan that’s stuck.https://www.reddit.com
How Does Recuva Work?
When a file is deleted, it will only be marked as Deleted in the Master File Table (MFT) of Windows. The data itself will continue to exist on the drive until it is overwritten by new data. So, how does Recuva work? Scroll down to know the detail.
Recuva has two scan methods:
- A normal scan: It is the simplest way to search for files on the selected drive because it only looks for deleted files by searching for items marked as Deleted.
- A deep scan: It includes a normal scan phase, but it can search for lost files in the unallocated clusters by their headers and footers. Obviously, a deep scan can find more files, including existing files, RAW files, and more.
Usually, if users fail to find the file they want after a normal scan, they will switch to a deep scan instead.
Why Is Recuva Deep Scan Stuck?
If you are scanning a large disk containing a large number of files, it is normal to scan for a few hours. Please wait patiently. If you are worried that Recuva is stuck, you can go to Task Manager to check if Recuva is running normally. If the values of CPU, Memory, and Disk are changing, Recuva is not stuck.
However, if you are sure that the Recuva deep scan is stuck, there are the possible reasons below:
- Use encryption software such as BitLocker
- Hard drive errors or bad sectors on the disk
How to Fix “Recuva Deep Scan Stuck”?
When users can’t find the target file in the normal scan, Recuva will provide them with a deep scan option to search for deleted, damaged, or even overwritten files on the drive. However, many people are complaining that the Recuva software gets stuck during the deep scan process.
Based on the possible reasons above, there are several methods for you to fix the “Recuva deep scan stuck” issue. You can choose one of them to solve your problem according to your own needs.
Method 1: Force Quit Recuva
If you encounter the “Recuva Deep Scan Stuck” issue, the simplest and easiest way to fix it is to force quit the software. How to do that? Here is the guide:
Step 1: Right-click the Windows Start button and choose Task Manager.
Step 2: Under the Processes tab, click Recuva and click the End task button. (You can also right-click Recuva and choose the End task option.)
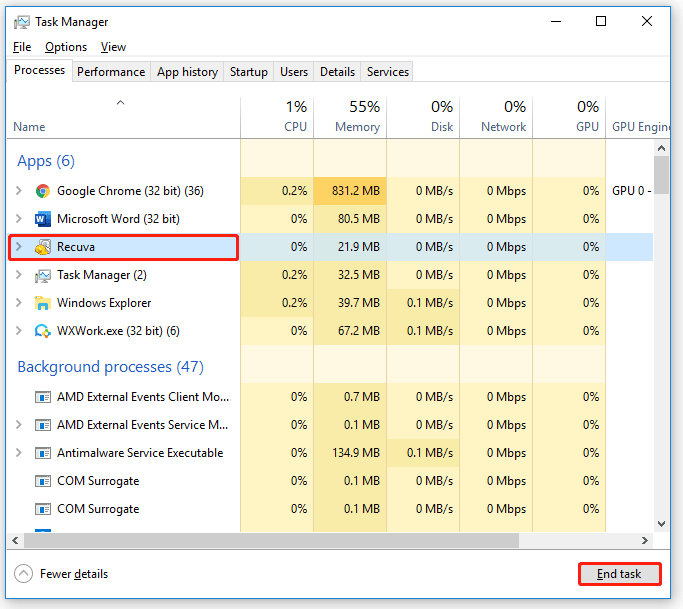
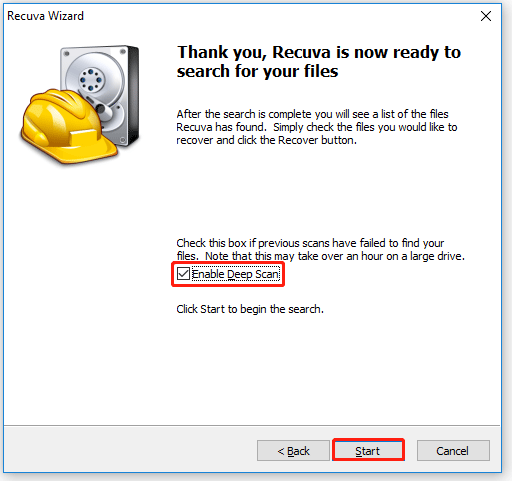
Step 3: Relaunch Recuva, tick the Enable Deep Scan option and then click the Start button.
Method 2: Disable Encryption Software
Encryption software (such as BitLocker) uses cryptography to protect the digital information on the computer, However, encryption software may prevent Recuva from running a deep scan. In this case, you need to disable encryption software, and then restart Recuva to run a deep scan.
This post “7 Reliable Ways to Disable BitLocker Windows 10” will tell you how to disable BitLocker. Also, if you use other encryption software, you can search for a reliable way in your browser to disable it.
Method 3: Check and Fix the Hard Disk
If there are file system errors or bad sectors on the hard disk, the Recuva deep scan may get stuck. In this case, you can use Windows inbuilt CHKDSK utility to check and fix the hard disk. Follow the steps below to do that:
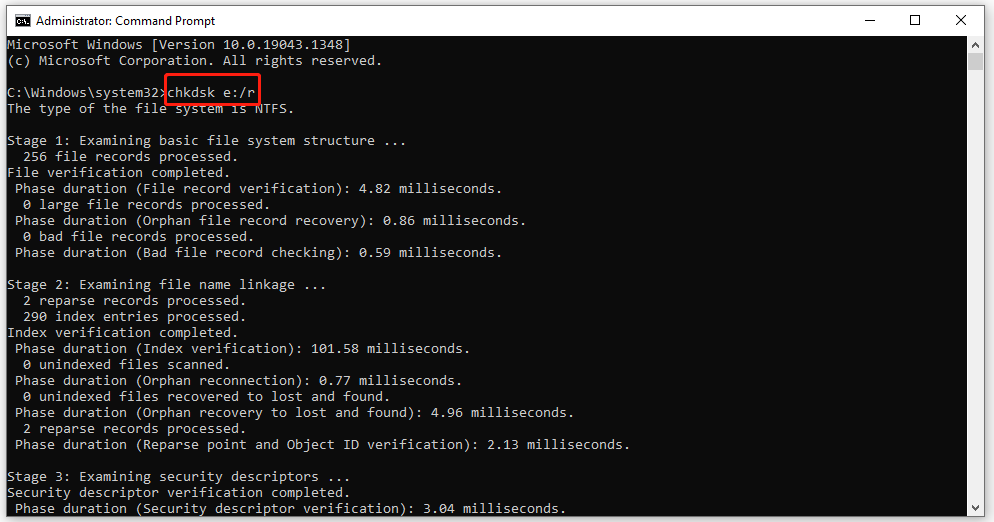
Usually, you can use the chkdsk /f and chkdsk /r command to fix disk errors, but chkdsk /r can detect and locate bad sectors on the drive, and try to recover readable information from them.
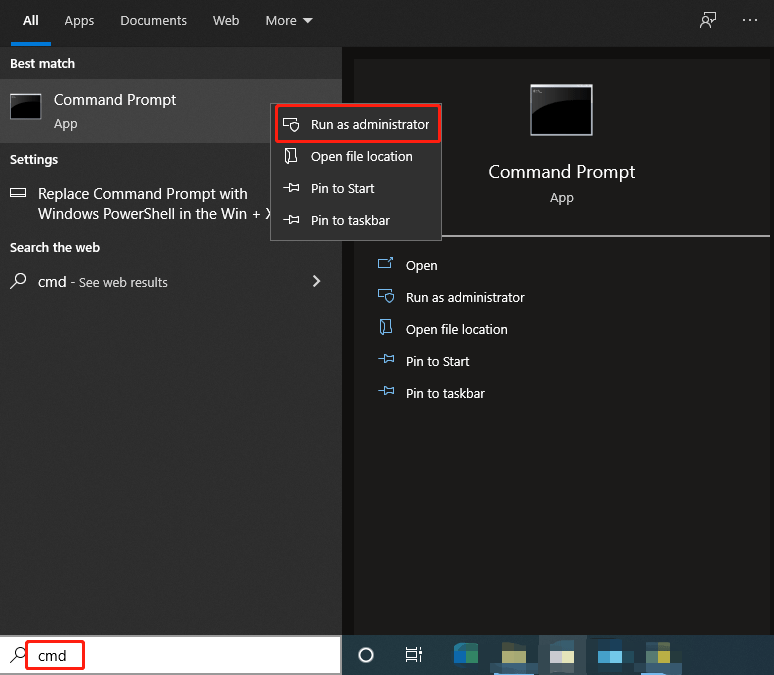
Step 1: Press the Win + S key on the keyboard. Enter cmd in the search box, right-click Command Prompt, and then choose Run as administrator.
Step 2: In the elevated Command Prompt, type chkdsk e:/r (e: is the drive letter of the specific drive that you want to fix) and press Enter.
CHKDSK vs ScanDisk vs SFC vs DISM Windows 10
After checking and fixing hard drive errors, you can restart Recuva and run a deep scan to see if the problem is resolved. If Recuva is still stuck during the deep scan process, you can search for other software in your browser and try to recover your data.
However, if you still can’t recover your data with other software, you may consider whether there are physical bad sectors on your disk.
How to confirm whether there are physical bad sectors? Here I recommend using MiniTool Partition Wizard to help you check bad sectors on the hard disk. This software provides the Disk Surface Test function to scan each sector status by reading data from the sector. Here is the guide on how to use this software:
Step 1: Download MiniTool Partition Wizard by clicking the following button. Follow the on-screen instructions to install it on your computer.
MiniTool Partition Wizard FreeClick to Download100%Clean & Safe
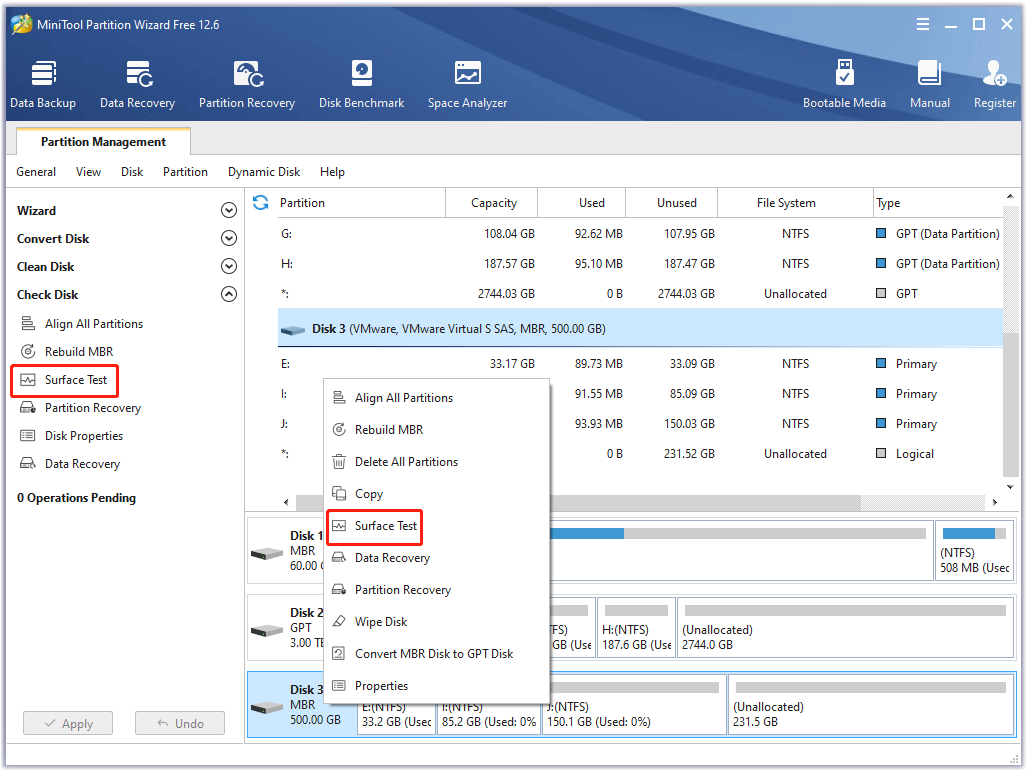
Step 2: Launch MiniTool Partition Wizard to its main interface. Choose one of the following ways to activate the Disk Surface Test function:
- Click the Surface Test option from the left action pane after selecting the target disk.
- Right-click on the target disk, and then select Surface Test in the pop-up menu.
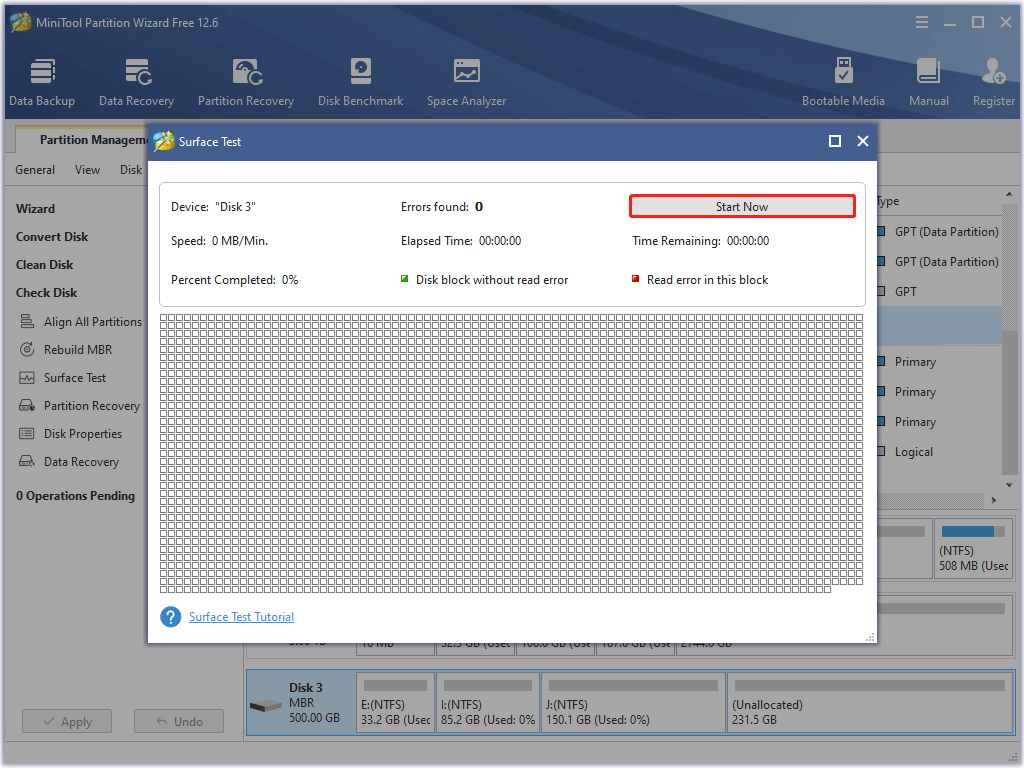
Step 3: In this interface, click the Start Now button. Then, MiniTool Partition Wizard will automatically test the disk surface.
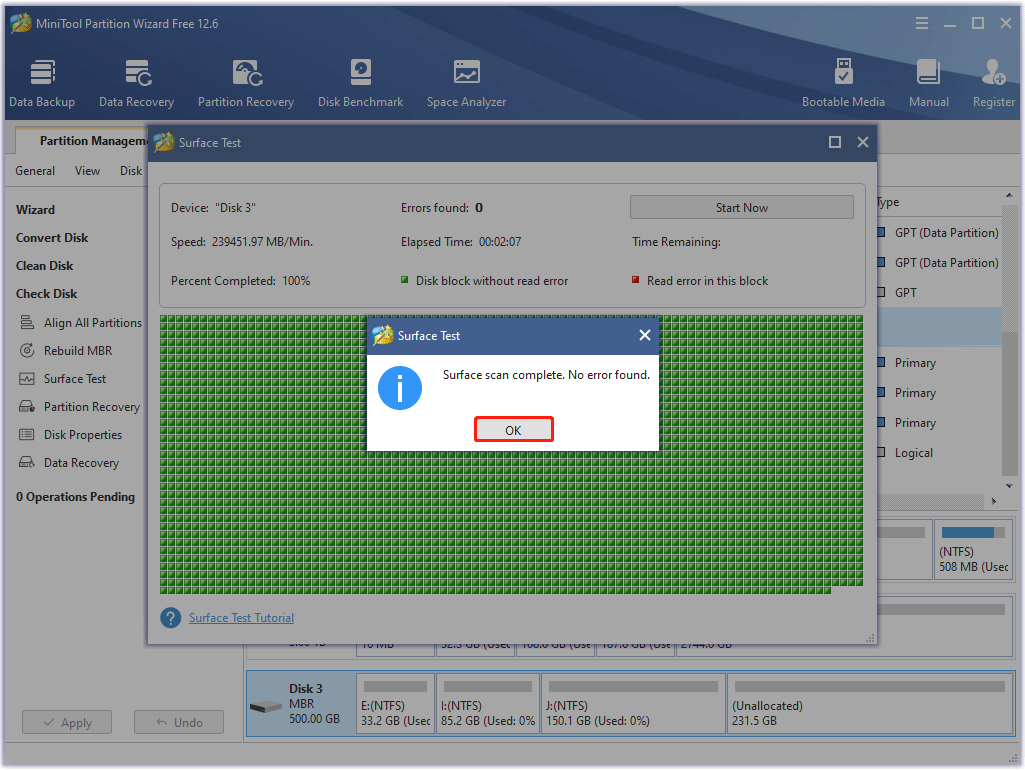
After the software finishes scanning the disk, the results will be displayed. Disk block without reading error will be marked with green color, while Read error in this disk will be marked with red color.
After scanning the hard disk, if there are many bad sectors on it, data recovery software is likely to be unable to recover data. If the data is very important, you can send the drive to laboratories for data recovery, but the charge is very high. Otherwise, you may need to give up recovering your data.
Method 4: Choose Recuva Alternative
If the above methods don’t work, in this case, you can choose a Recuva alternative. MiniTool Partition Wizard is a safe and reliable application whose Data Recovery function is used to recover lost or deleted files from the logically damaged partition, formatted partition, and so on.
With the help of MiniTool Partition Wizard, you can easily recover your data in simple steps. How to do that? Please get MiniTool Partition Wizard, launch it to access its interface, and follow the on-screen instructions to install it on your computer.
MiniTool Partition Wizard DemoClick to Download100%Clean & Safe
Step 1: Launch MiniTool Partition Wizard to its main interface, and click Data Recovery on the top toolbar.
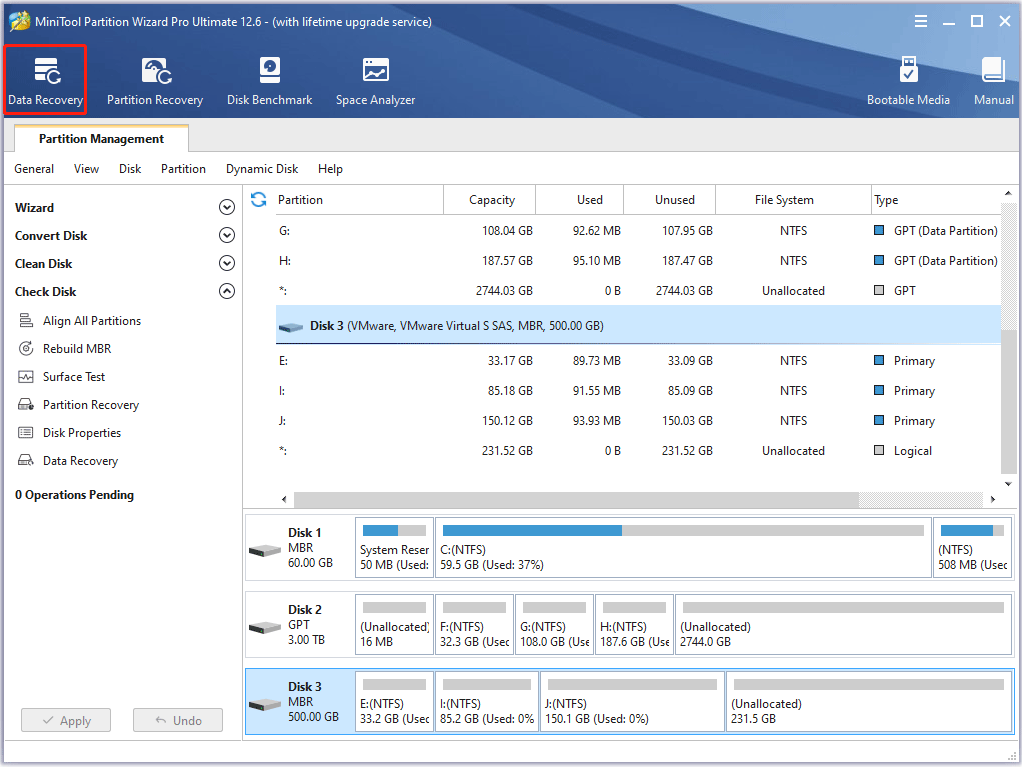
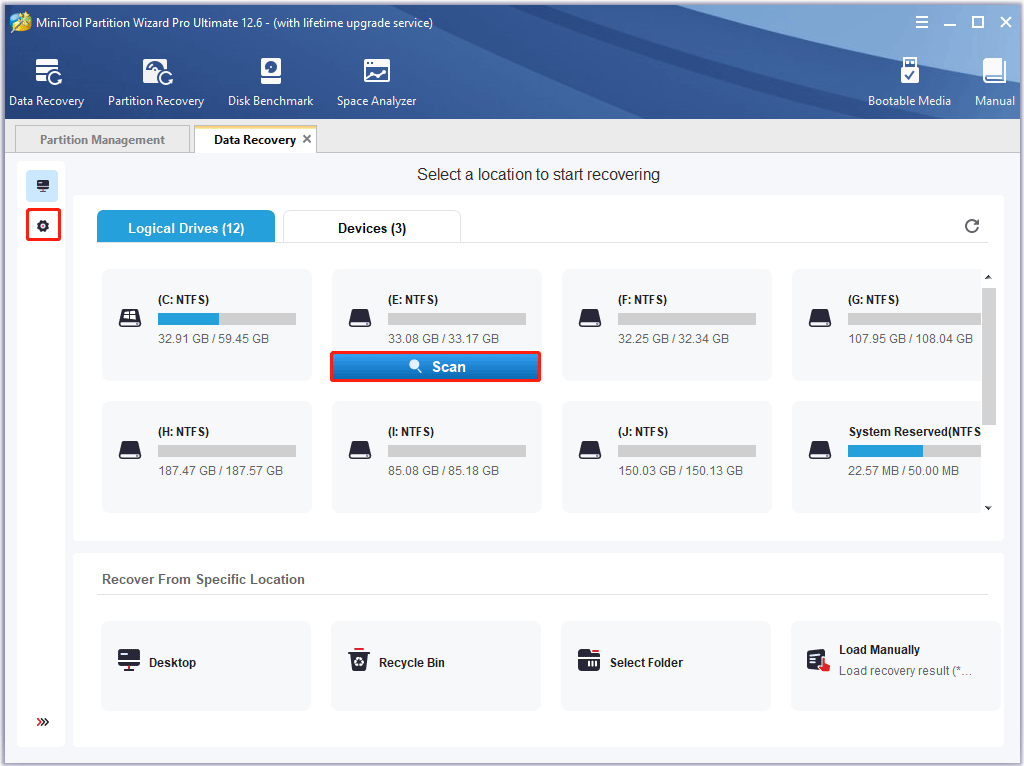
Step 2: In this interface, you can see all detected storages devices on the computer. Choose the drive where your data is lost or deleted. Then, click Scan and give it a few minutes to scan. (Here I take drive E: as an example)
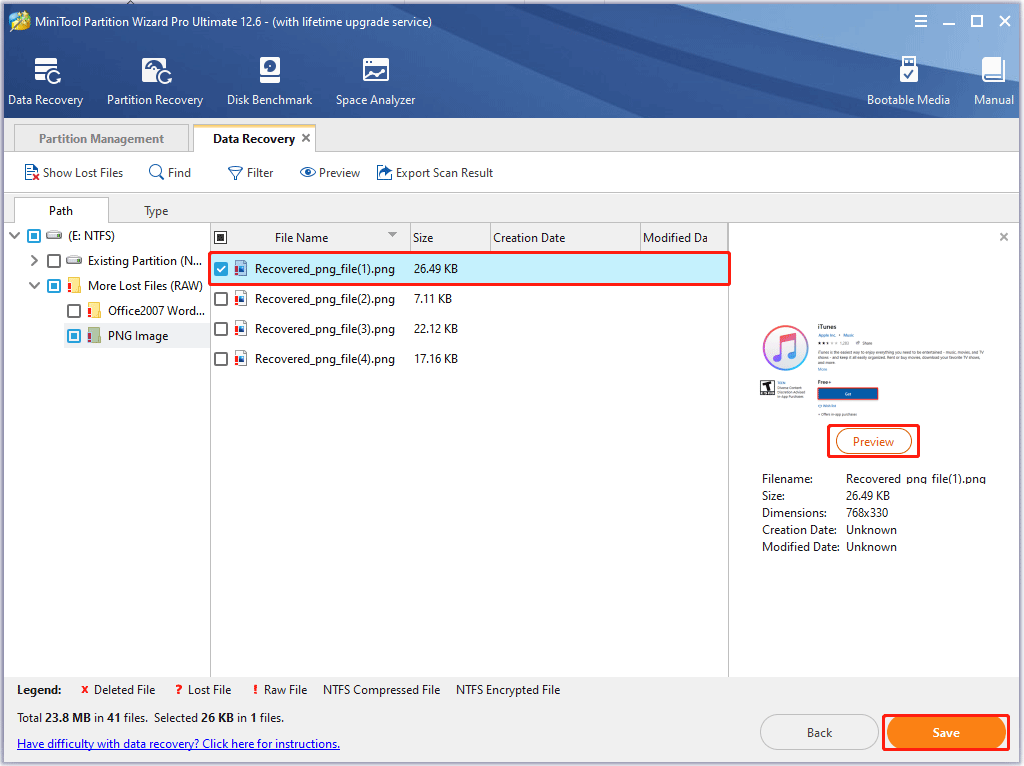
Step 3: After scanning, you can preview the files. Then, tick the file that you want to recover, and click the Save button.
In addition, Data Recovery provides you the following options so that you can quickly find the data they need.
- Type: All the found files will be displayed by file type. Just unfold the file type and select some items of this type to recover.
- Show Lost Files: Users just need to click the Show Lost Files button to make the software display only the lost files.
- Find: This option allows users to enter a specific file name to quickly find the desired file. Match Case requires users to pay attention to the capital and small letter of the file name. Match Word requires the user to enter the complete file name, including the file extension.
- Filter: This option allows users to search for files by Filename/Extension, Size, Creation or Modification Date. Besides, users can choose to show deleted, lost, or normal files as needed.
Bottom Line
After reading this post, if the Recuva deep scan is stuck, you can try the first three methods to solve the problem. In addition, you can also use the Data Recovery function of MiniTool Partition Wizard to recover the lost or deleted data.
If you have any questions about how to fix the “Recuva Deep Scan Stuck” issue, please leave them in the comment zone and we will try our best to answer them. If you need any help when using MiniTool Partition Wizard software, you can contact us via [email protected].
User Comments :