A lot of users are confused about the PowerShell unzip/zip command. If you are also trying to figure it out, this post on MiniTool is worth reading. It walks you through detailed steps to unzip a file using PowerShell on Windows 10/11.
As it’s well known to us all, PowerShell is a powerful Windows built-in command-line shell and scripting environment tool. It can be used to deal with various works on Windows, such as installing Windows updates, PowerShell copy files, PowerShell gets folder size, installing SSH PowerShell, etc.
However, a great many people and even professionals are not familiar with how to do these works using PowerShell. Here’s a true example from the StackOverflow forum. In this post, we mainly focus on PowerShell unzip/zip files.
I have a .zip file and need to unpack its entire content using PowerShell. I'm doing this but it doesn't seem to work. What's wrong? The directory C:a is still empty.
https://stackoverflow.com/questions/27768303/how-to-unzip-a-file-in-powershell
What’s the PowerShell Unzip/Zip Command
First of all, it’s necessary what’s cmdlet can be used to unzip/zip in PowerShell. To unzip file PowerShell on Windows 10/11, you can make full use of the PowerShell Expand-Archive command that can unzip or extract all contents of zipped or archived files to the target folder.
If you want to create a compressed archive or zipped file from specified folders/directories, you can use the PowerShell Compress-Archive command. But you need to make sure the file size is no more than 2GB. In addition, both two commands require that the archive file extension is .zip.
Now, you should have an overall understanding of the zip/unzip PowerShell commands. Let’s see how to zip/unzip in PowerShell Windows 10/11.
Make sure your computer has PowerShell v5+ installed. If not, you can refer to this post “How to Update PowerShell Version to v7.2.5 for Windows 10/11” to install the latest version.
How to Unzip File PowerShell on Windows 10/11
It is very simple to unzip a file using the Expand-Archive PowerShell command on Windows 10/11. Here we will 2 examples to make PowerShell extract zipped files.
Assume that you have a compressed folder named Office2016.zip and you want to unzip it in C:UsersAdministratorDesktop path to D:PowerShell, you can refer to the following guide.
# Example 1: PowerShell Unzip an Existing Archive File into a Specified Folder
1. Press the Win + R keys to open the Run box, and then type powershell in it and press Ctrl + Shift + Enter keys to open the elevated PowerShell window.
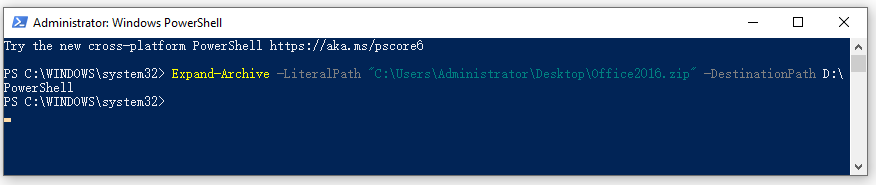
2. In the pop-up window, type the following command and hit Enter to unzip the Office2016.zip file into the D:PowerShell. Then wait for the PowerShell unzip file process to complete.
Make sure you replace the file path/name and target path according to your actual situation.
Expand-Archive -LiteralPath "C:UsersAdministratorDesktopOffice2016.zip" -DestinationPath D:PowerShell

3. If you want to overwrite an existing extracted file, you can add the -Force parameter at the end of the same PowerShell Expand-Archive command.
Expand-Archive -LiteralPath “C:UsersAdministratorDesktopOffice2016.zip” -DestinationPath D:PowerShell -Force
# Example 2. PowerShell Unzip an Existing Archive File in the Current Folder
If you want to make PowerShell unzip files in the current folder, you can run the following PowerShell unzip command.
Expand-Archive -Path "C:UsersAdministratorDesktopOffice2016.zip" -DestinationPath C:

Similarly, you can add the -Force parameter at the end of the command to overwrite an existing extracted folder.
How to Zip File PowerShell on Windows 10/11
Of course, you can use the PowerShell compress archive command to create a zipped file/folder on Windows 10/11. Here we summarize some common examples of the PowerShell zip files.
# Example 1. PowerShell Zip Files to a New Zipped Archive
If you want to compress different files and create a new achieve file, you can run the following command in the elevated PowerShell window. Here you can remove the -Force parameter if you don’t have to overwrite an existing extracted file.
Compress-Archive -LiteralPath D:PowerShell -DestinationPath C:Archives -Force

# Example 2. PowerShell Zip Files That Include the Root Directory
If you want to zip a directory and create an archive folder that contains the root directory and all its files/subdirectories, you can use the Path parameter instead.
Compress-Archive -Path D:PowerShell -DestinationPath C:ArchivesOffice2016.zip
# Example 3. PowerShell Zip Files That Exclude the Root Directory
Well, you can run the following command if you want to zip a directory and create a new archive that excludes the root directory.
Compress-Archive -Path D:PowerShell* -DestinationPath C:ArchivesOffice2016.zip
# Example 4. PowerShell Zip Only the Files in the Root Directory
If you just want to compress the files only in the root directory and create a new archive, you can run the following command.
Compress-Archive -Path D:PowerShell*.* -DestinationPath C:ArchivesOffice2016.zip
# Example 5. Add Files to a Created Archive Folder
If you want to add some files to the created archive folder, you can use the -Update parameter. For that:
Compress-Archive -Path D:PowerShell* -Update -DestinationPath C:Archives
How to zip/unzip in PowerShell Windows 10/11? Now, I believe that you already have known the answers. If you have other opinions about the zip/unzip PowerShell topic, please share them in the following comment zone.
Further reading: How to do if you delete a zipped file accidentally? Don’t worry. MiniTool Partition Wizard can help you restore the deleted file on various storage devices quickly. In addition, it can help you to back up partitions, rebuild MBR, migrate OS, convert NTFS to FAT without data loss, etc.
User Comments :