Overview of PowerShell SSH
Before you set up the SSH from PowerShell, let’s have an overall understanding of the following questions.
What Is SSH
SSH (Secure Shell) is a remote administration protocol that allows you to control and modify your servers over the internet. It is also a cryptographic network protocol that allows you to use network services safely even through an unsecured network. This is because it can create a secure connection to the shell on another computer.
With the SSH client, you can build communications from the remote server in an encrypted manner. For example, you can build a remote connection between Windows and Linux via SSH and transfer files between them. In addition, you can take full use of SSH clients like PuTTY on Windows.
What Does PowerShell SSH Mean
When it comes to managing a remote server or network service, the most common way is to use SSH in Windows PowerShell as an SSH client. This is because PowerShell comes with a built-in SSH client that allows you to connect securely to a remote server even through an unsecured network.
On Windows 10 v1809 and higher, the PowerShell SSH client is enabled by default. That’s to say, you can connect to a remote device via the PowerShell SSH command tool. But there are some prerequisites to using Windows SSH PowerShell.
Can I Use Windows PowerShell SSH
Can I use Windows PowerShell SSH? The answer depends on whether your computer has met the prerequisites. To use SSH in Windows PowerShell, make sure that you have:
- Windows 10 v1809 and higher version (If you don’t know how to update Windows, you can refer to this post “How to Install Windows Updates with PowerShell”.)
- PowerShell v6 and higher (To update PowerShell, read this post “How to Update PowerShell Version to v7.2.5 for Windows 10/11”.)
- Open port 22 in your Firewall
If you don’t know how to use SSH Windows PowerShell, you can refer to the tutorial below:
Step 1. Type PowerShell in the search box, and then right-click the Windows PowerShell and select Run as administrator. Then click on Yes to confirm it.
Step 2. In the elevated PowerShell window, type ssh and press Enter to access Windows SSH PowerShell.
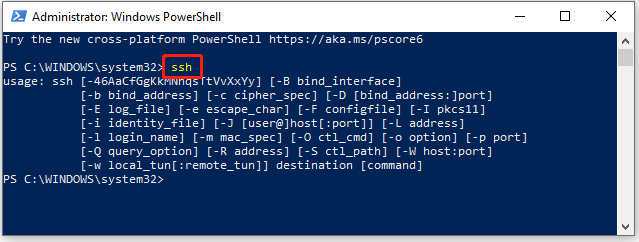
Step 3. With the SSH client opened, you can connect to a remote server or network device with the following PowerShell SSH command.
ssh <username>@<host_ip_address>
For example, the command should be ssh [email protected] in my case.
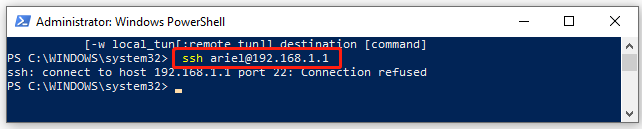
If you don’t know the IP address of your host, you can refer to this post. Alternatively, you can use the hostname instead of the IP address. If you don’t supply the username, then it will use your local user account.
Step 4. If the SSH client is running on a different port rather than the default port 22, you can run the following command to change the port number.
ssh <username>@<host_ip_address> -P <port_number>
How to Install SSH PowerShell on Windows 10/11
As mentioned above, the SSH client has been installed and enabled by default on Windows 10 v1809 and higher, but the SSH server isn’t. So, you need to install the OpenSSH server first and then configure the SSH server. Here’s how:
For remote connection, make sure you have installed PowerShell v6 or higher on the computer. Here we take PowerShell v7.3.0 for example.
Step 1. Install OpenSSH Server with PowerShell.
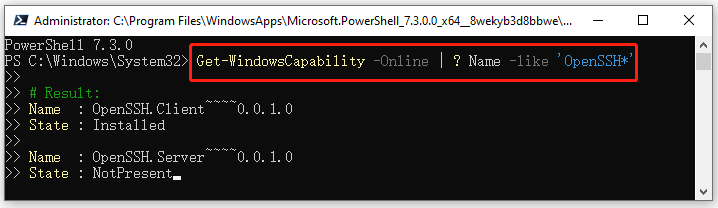
1. Open the elevated PowerShell command as we explained above, type the following command, and hit Enter to check if the OpenSSH server is installed.
Get-WindowsCapability -Online | ? Name -like ‘OpenSSH*’
2. If not installed, run the following command to enable the OpenSSH server in PowerShell.
Add-WindowsCapability -Online -Name OpenSSH.Server~~~~0.0.1.0
3. Run the following command to start the OpenSSH server.
Start-Service sshd
Step 2. Configure the SSH server on Windows.
In addition, you need to configure the SSH server so that you can use more PowerShell SSH commands on remote computers.
- Navigate to the sshd_config file located at $env:ProgramDatassh and open it with Notepad.
- In the configuration file, remove the “#” before the line PasswordAuthentication yes to make sure the password authentication is enabled.
- Add “Subsystem powershell c:/progra~1/powershell/7/pwsh.exe -sshs -NoLogo -NoProfile” in the configuration file to create the SSH subsystem on the remote computer. Then press Ctrl + S keys to save the changes.
- Run the Restart-service sshd command in PowerShell to load the new configuration file.
After finishing all the above steps, you should get the PowerShell SSH server installed on Windows 10/11 and you can connect to it using PowerShell.
Further reading: If you enter some issues like file system corruption and low disk space on Windows 10/11, don’t worry. MiniTool Partition Wizard can help you fix them easily by checking file system errors, extending/resizing partitions, analyzing disk space, upgrading to a larger hard disk, etc.
User Comments :