Recently, some people have reported encountering the page fault in nonpaged area error on their PC. This error bothers them a lot. For example, here is a user report from Reddit:
...my computer just randomly started a blue screen after a minute of signing into Windows...I rebooted, and it blue-screened again after about a minute. This time, it was clear enough for me to see the stop code. Which is (PAGE FAULT IN NONPAGED AREA) ...https://www.reddit.com/r/pchelp/comments/1gbyhbj/bsod_stop_code_page_fault_in_nonpaged_area/
Have you also encountered the same error? If so, no worries. This post from Partition Magic analyzes the possible causes of the error and offers several effective methods to fix the error.
What Is “Page Fault in Nonpaged Area” Error
The “page fault in nonpaged area” error is a type of blue screen error with the code 0x00000050. When this issue occurs, the screen displays a blue background, a sad smiley face, and the stop code page fault in nonpaged area.
The Nonpaged Area is a specific section of your computer‘s RAM that stores vital operating system files and data that cannot be moved to the hard drive. This region is essential for system stability because it contains data that the CPU needs to access rapidly and frequently.
When the operating system reports a “Page Fault in Nonpaged Area” error, it means the system attempted to access data in this area but was unsuccessful.
What Causes “Page Fault in Nonpaged Area” Error
Various reasons can cause the page fault in nonpaged area error. In this section, I list some most possible reasons:
- Driver errors: Outdated, corrupted, or incompatible drivers can cause conflicts with the system’s memory management.
- Incorrectly installed programs or updates: Incorrectly installed programs or updates can cause a variety of issues, from performance problems to application malfunctions.
- RAM issues: If your RAM modules are faulty or not seated properly, you can receive the stop code page fault in nonpaged area.
- Antivirus interference: Antivirus software may trigger the page fault in nonpaged area error at times.
- Software conflicts: Some software (such as poorly coded or incompatible third-party apps) can cause conflicts in memory management.
- Hardware problems: If there are bad sectors or errors on your disk, you can encounter the page_fault_in_nonpaged_area error.
- Corrupted system files: If there are corrupted system files on your PC, you can come across the page_fault_in_nonpaged_area error easily.
- Malware problems: A Virus or malware can cause problems for the RAM or CPU directly, and then result in the page fault in nonpaged area error.
How to Fix “Page Fault in Nonpaged Area” Error
So, what should you do to fix the page fault in nonpaged area error? To fix the error, you can try updating Windows/drivers/BIOS, closing antivirus, checking RAM, unchecking the Automatically manage paging file size for all drivers option, uninstalling HP Omen Gaming Hub, etc.
Boot in Safe Mode
To try the following methods to fix the page fault in nonpaged area error, you need to boot in safe mode first. To do that, you just need to repeatedly force a shutdown during startup to enter the Automatic Repair window and then boot your PC in safe mode.
Here are the detailed steps:
Step 1. Enter the Automatic Repair window.
- Turn off your computer.
- Then, turn on your PC.
- Press the Power button to force shut down your PC when you see the Windows logo or any sign of startup.
- Repeat the above steps several times until you enter the Automatic Repair window.
Step 2. Boot your PC in Safe Mode.
- Select Troubleshoot > Advanced options.
- Then, select Startup Settings.
- Next, click the Restart button.
- After the restart, you will see a list of Startup Settings.
- Press 5 or F5 for Safe Mode with Networking.
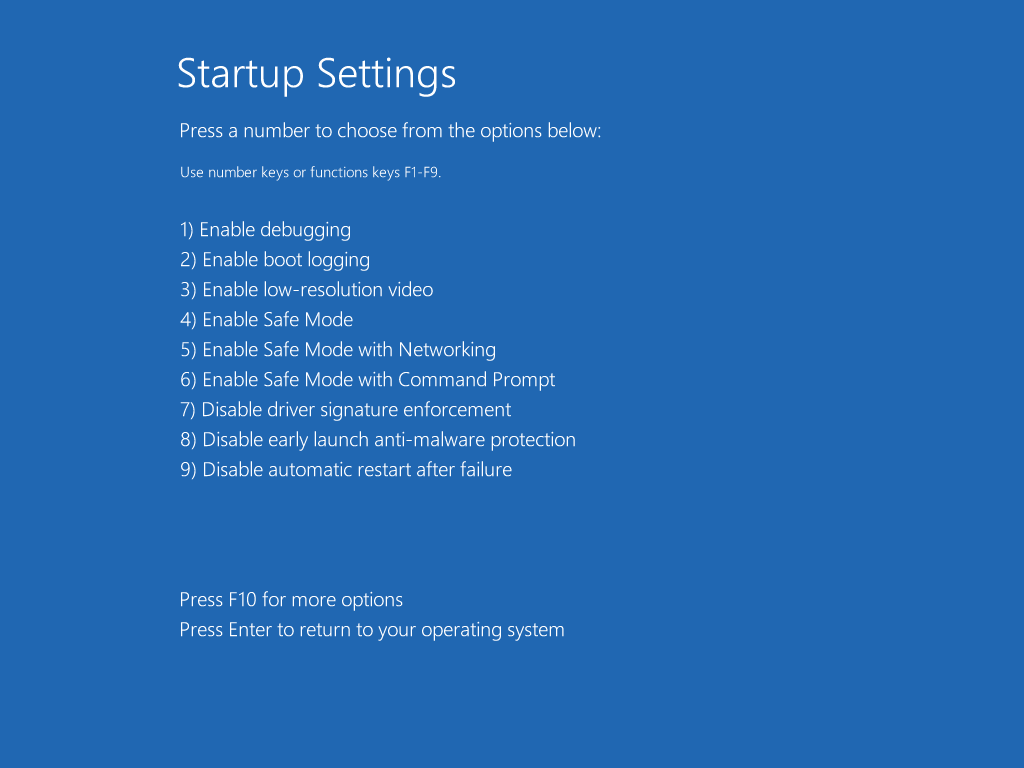
Step 3. Once done, you can boot in Safe Mode with networking successfully.
Method 1. Update Windows & Driver
Outdated Windows and drivers may cause the page fault in nonpaged area error. In this case, you can try updating Windows and drivers to fix the error. Here’s how to do that:
Update Windows:
- Press the Win + I keys simultaneously to open the Settings window.
- Navigate to Update & Security > Windows Update.
- Then, click Check for updates.
- If there are available updates, update them.
Update drivers:
Step 1. Press the Win + X keys simultaneously to open the Quick Link menu.
Step 2. Select Device Manager from the menu.
Step 3. Expand the categories one by one to spot the faulty driver.
Step 4. Then, right-click the faulty driver and select Update driver.
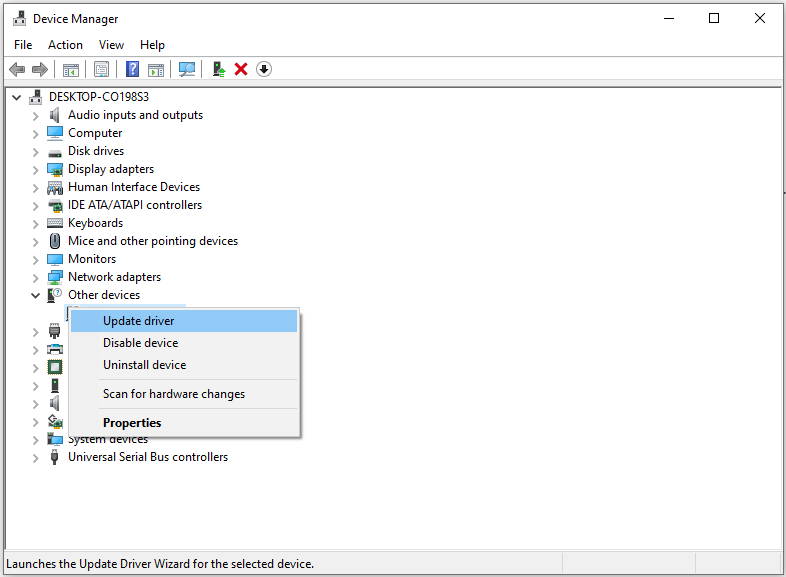
Step 5. In the pop-up window, select “Search automatically for updated driver software”.
Step 6. After that, follow the on-screen instructions to complete the process.
Method 2. Close Antivirus Program
Sometimes, the antivirus that you use on your PC may cause BSOD errors on your PC, including the BSOD page fault in nonpaged area error. If you are using an antivirus app on your PC, you can try closing it to fix the error. Here’s the way:
Step 1. Press the Win + S keys at the same time to open the Search window.
Step 2. Type “windows security” in the search box and press Enter.
Step 3. In the Windows Security window, click Virus & threat protection.
Step 4. Under the Virus & threat protection settings section, click Manage settings.
Step 5. Next, toggle off these switches:
- Real-time protection
- Cloud-delivered protection
- Automatic sample submission
- Tamper Protection
Step 6. After that, check if the error has been resolved.
Method 3. Check the RAM
If the RAM stick isn’t adequately linked to your motherboard, you can encounter the page fault in nonpaged area error easily. Also, the grimy RAM slot or a corrupted RAM stick can also cause this error. So, you can try checking the RAM to fix the error. Here’s how to do that:
Part 1. Check whether dust or physical damage to your RAM
Step 1. Turn off your computer completely.
Step 2. Then, switch off the battery and remove all power cords.
Step 3. Take out the RAM sticks and check if there is any dust or damage on them. If there is dust, clean it with a microfiber cloth.
Step 4. After that, reconnect the RAM sticks and restart your PC to check if the PC still pops up the error.
Part 2. Run Windows Memory Diagnostic
Step 1. Press the Win + R keys simultaneously to open the Run window.
Step 2. Type “mdsched” or “mdsched.exe” in the box, and press Enter.
Step 3. In the Windows Memory Diagnostic window, select the Restart now and check for problems option.
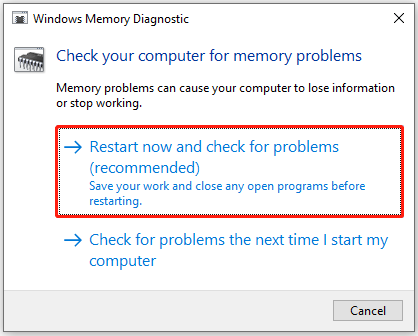
Step 4. Then, your computer will restart and start the Windows Memory Diagnostic test.
Step 5. Once the scanning is over, your computer will restart.
Step 6. Launch the Event Viewer and check the memory scanning results here. If RAM indeed has a problem, replace the RAM stick as per the motherboard specifications.
Method 4. Untick Automatically Manage Paging File Size for All Drives
Some people report that they fix the page fault in nonpaged area Windows 10 error successfully by unticking the Automatically manage paging file size for all drivers option. You can also have a try. Here’s how to do that:
Step 1. Press the Win + I keys at the same time to open the Settings window.
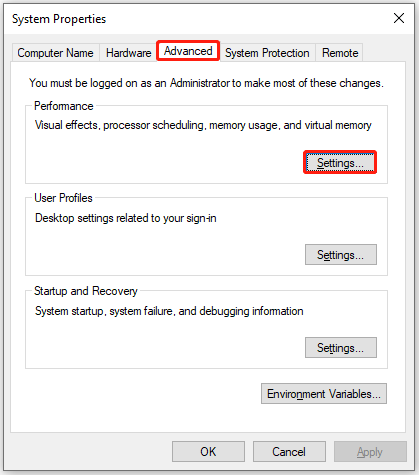
Step 2. Go to System > About, and then click Advanced system settings in the Right panel.
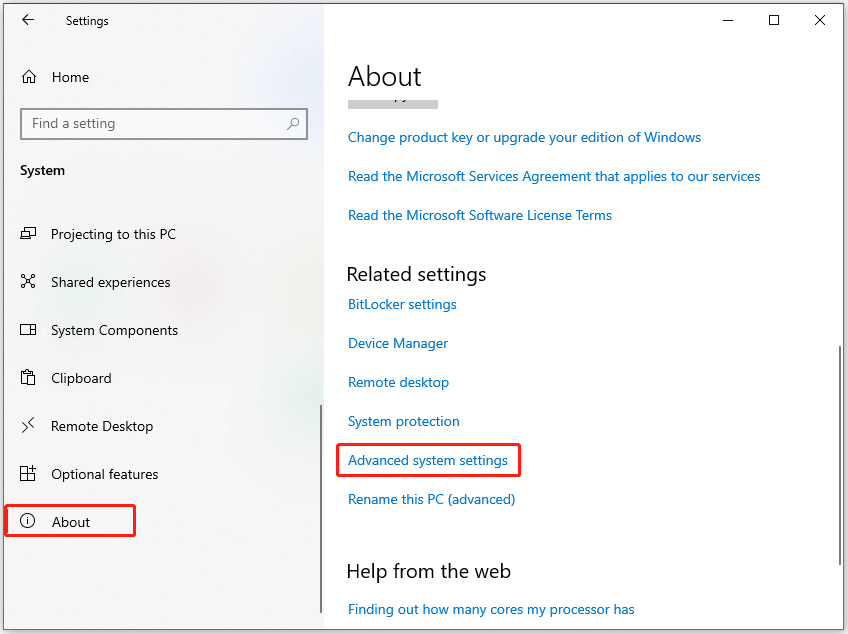
Step 3. In the pop-up System Properties window, under the Advanced tab, click the Settings button in the Performance section.
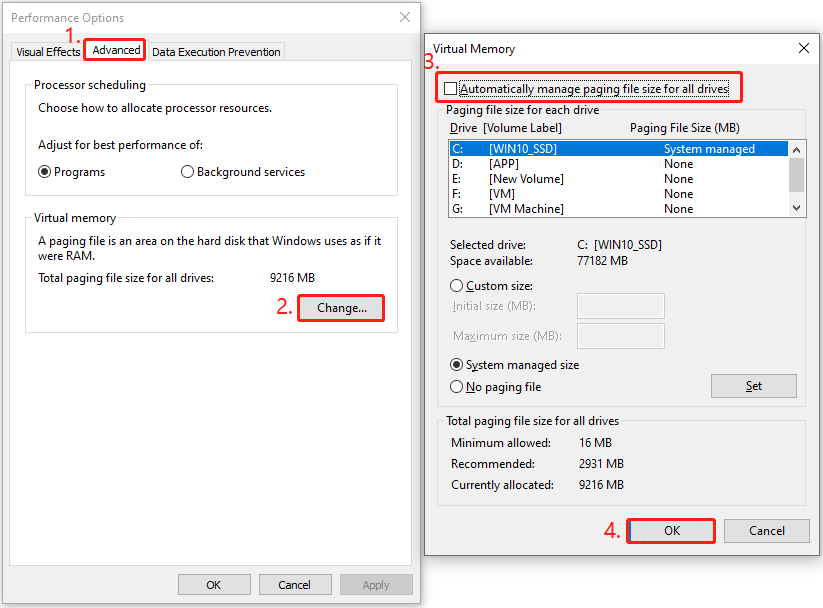
Step 4. In the Performance Options window, go to the Advanced tab, click Change in the Virtual Memory section. Then, untick the box of “Automatically manage paging file size for all drives” and click OK to save the changes.
After that, restart your computer and check if the error has been resolved. If not, you can also try increasing the Virtual Memory to fix the error. Here’s how to do that:
Step 1. Repeat the above steps to enter the Virtual Memory window.
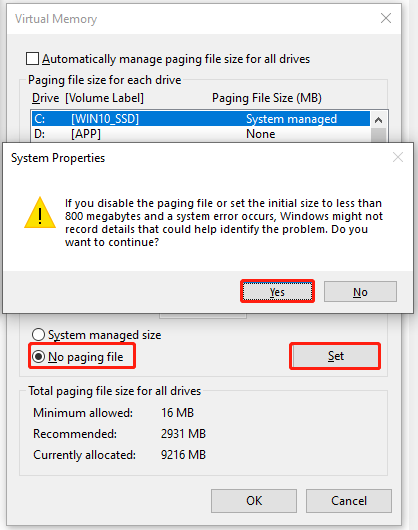
Step 2. Then, uncheck Automatic manage paging file size for all drives.
Step 3. Select partition C, check No paging file, and click Set. Then, click Yes in the pop-up warning window.
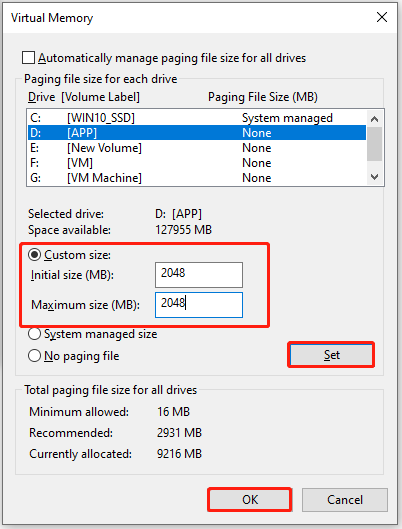
Step 4. Then, set a suitable virtual memory on a non-system partition.
- Select a non-system partition and then check Custom size.
- Set the same value in Initial size and Maximum size to avoid the system frequently requesting page files of different sizes, which can reduce the consumption of system resources and improve operating efficiency.
- Then click Set and OK to save.
Method 5. Run Hardware Troubleshooter
Hardware issues can also cause the page fault in nonpaged area Windows 10 error. In this case, you can run the Hardware troubleshooter to fix the error. Here’s how to do that:
Step 1. Press the Win + R keys simultaneously to open the Run window.
Step 2. Type “msdt.exe -id DeviceDiagnostic” in the box and press Enter.
Step 3. In the Hardware and Devices window, click Next. Then, the troubleshooter will start to scan and detect errors.
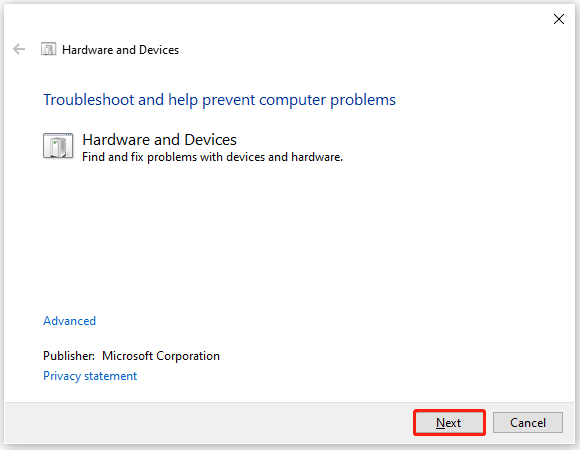
Step 4. Next, the error will be displayed if there is after the scanning process is complete. Then, follow the on-screen guide to fix it.
If there is no problem displayed, it means that there is no hardware issue on your PC. You can continue to try other methods.
Method 6. Check Disk Errors
Errors or bad sectors in the disk may also lead to the page fault in nonpaged area csagent.sys error. In this case, you can use MiniTool Partition Wizard’s Check File System and Surface Test to check and fix disk errors.
Besides, this powerful partition disk manager tool can also help you partition hard drive, change cluster size, convert MBR to GPT, rebuild MBR, format partitions to different file system, recover data from hard drive, and more.
Here’s how to use the Check File System and Surface Test features:
Step 1. Download and install MiniTool Partition Wizard by clicking the following Download button. Otherwise, you can navigate to MiniTool Partition Wizard’s official website. Then, launch this app to enter the main interface.
MiniTool Partition Wizard FreeClick to Download100%Clean & Safe
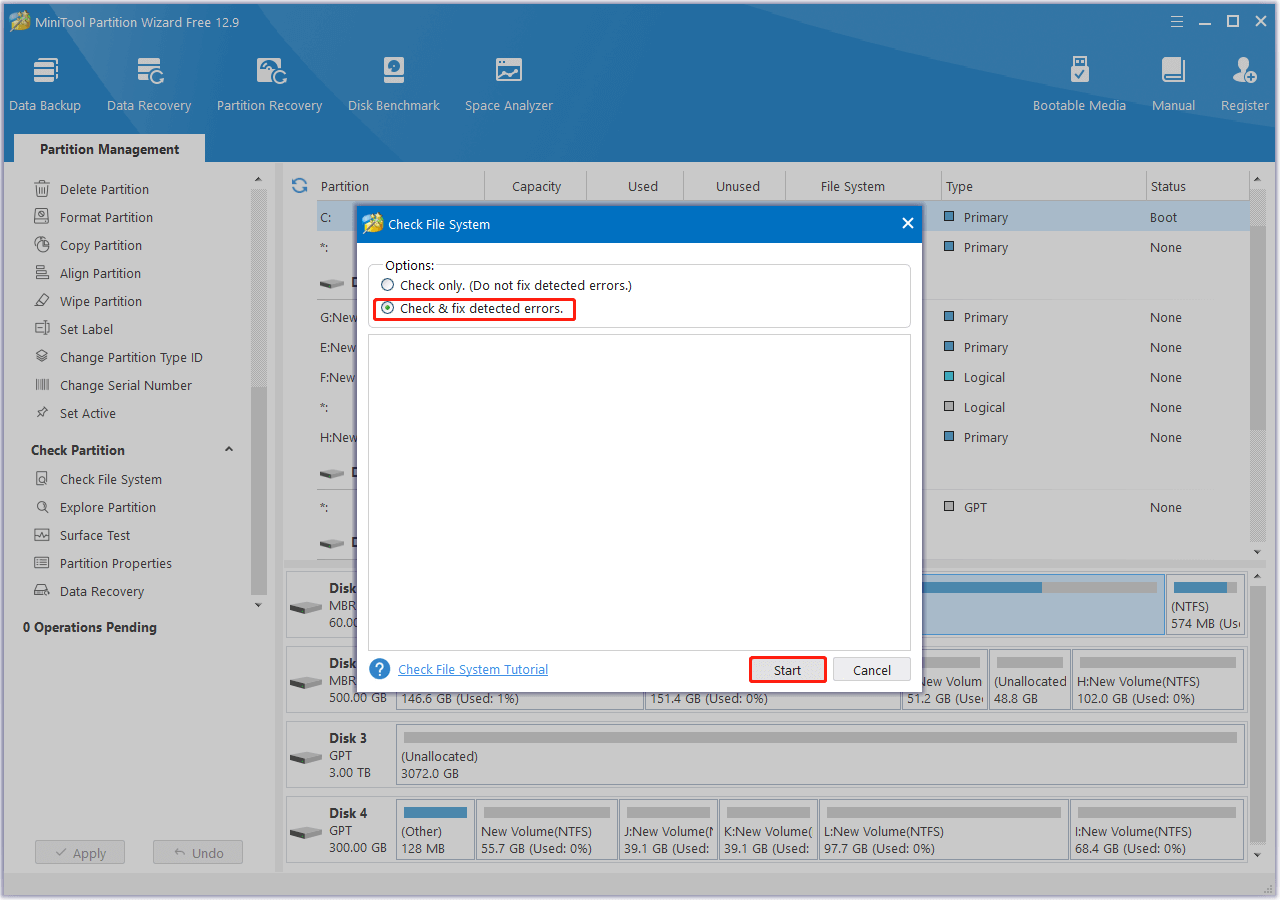
Step 2. Run the Check File System feature.
- Choose the partition that you want to check from the disk map.
- Right-click it and select Check File System.
- Choose Check & fix detected errors.
- Then, click Start.
- After that, this software will check and fix the error.
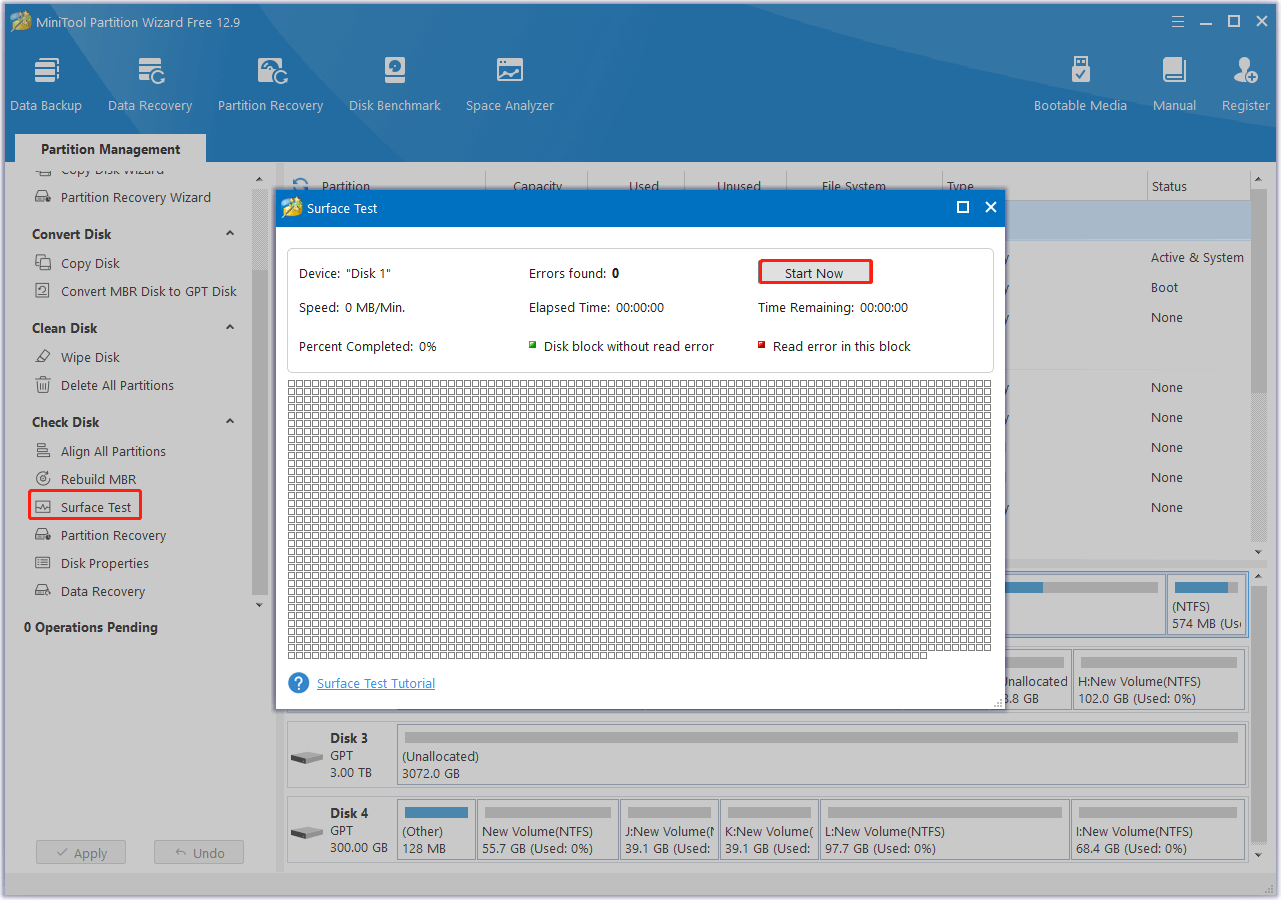
Step 3. Run the Surface Test feature.
- Choose the partition or disk you want to scan from the disk map.
- Then, select Surface Test from the left panel.
- Click Start now.
- Once the scanning is done, bad sectors will show in red.
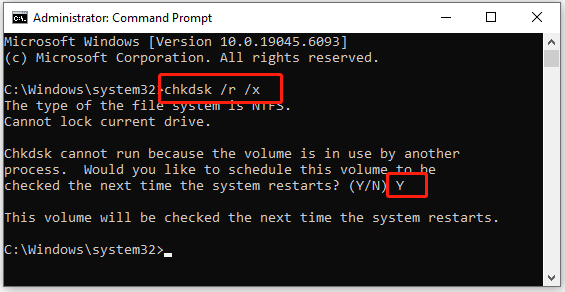
CHKDSK with parameters /r and /xcan mark bad sectors and then make the operating system avoid writing data to them. After running the Surface Test feature, if you find some bad sectors on your disk, you can do the following steps:
- Press the Win + S keys simultaneously to open the Search window.
- Type “cmd” in the search box.
- Find Command Prompt from the results.
- Right-click it and select Run as administrator.
- Type “chkdsk /r /x” and press Enter.
- If the disk is in use, you can press Y to check to partition next time the system restarts
- Then restart your computer, and the check will start.
- Once done, all bad sectors will be marked.
Method 7. Run SFC and DISM
Corrupted system file can result in the page fault in nonpaged area csagent.sys error as well. In this situation, you can try running SFC and DISM commands in Administrator: Command Prompt. Here’s the guide:
Step 1. Run Command Prompt as administrator.
Step 2. Type “sfc /scannow” and press Enter.
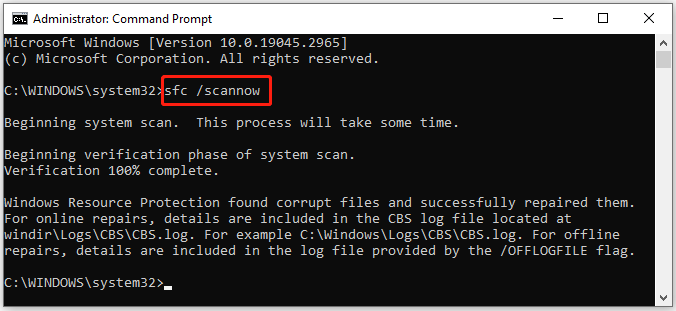
Step 3. Once the SFC scanning is complete, run the following commands for DISM scanning:
- DISM.exe /Online /Cleanup-image /Scanhealth
- DISM.exe /Online /Cleanup-image /Checkhealth
- DISM.exe /Online /Cleanup-image /Restorehealth
Method 8. Uninstall HP Omen Gaming Hub
From a Reddit post, I find that some people are fixing the page fault in nonpaged area error successfully by uninstalling HP Omen Gaming Hub. If your PC has also installed this app, you can try this way to fix the error. Here’s the way:
Step 1. Open the Control Panel window.
- Open the Search window.
- Type “control panel” and press Enter.
Step 2. Go to the installed programs list.
- Set View by as Category.
- Click Programs > Programs and Features.
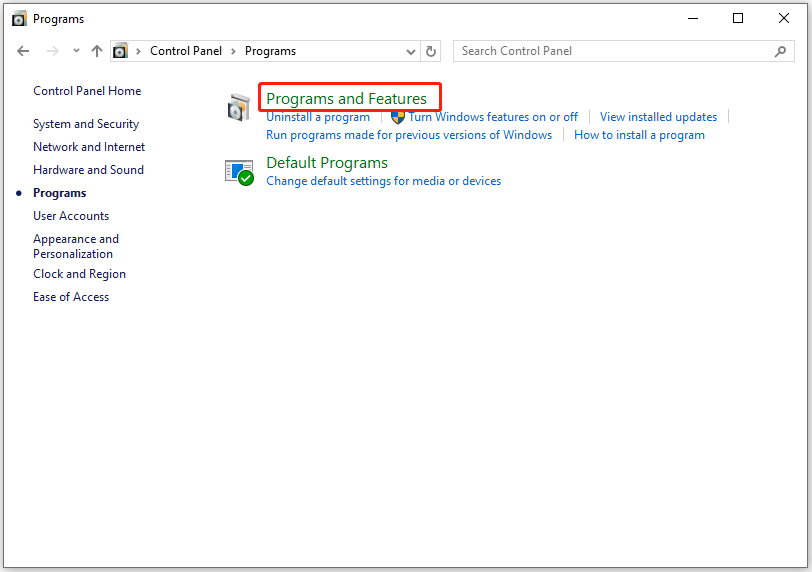
Step 3. Uninstall HP Omen Gaming Hub.
- Find HP Omen Gaming Hub from the program list.
- Choose and right-click it.
- Select Uninstall from the pop-up window.
- Follow the on-screen guide to uninstall the program.
Step 4. Once done, restart your computer and check if the error has been resolved.
Method 9. Update BIOS
An outdated BIOS may also trigger the page fault in nonpaged area error. In this case, you can try updating the BIOS to fix the error. To do that, you can do the following steps:
Step 1. Download the latest BIOS.
- Go to your motherboard manufacturer’s website.
- Navigate to the support or downloads section.
- Search for your specific motherboard model.
- Find the BIOS update section.
- Download the latest BIOS update file.
Step 2. Prepare a USB drive.
- Format the USB drive with the FAT32 file system.
- Extract the downloaded BIOS update file to the USB drive.
Step 3. Update BIOS.
- Connect the prepared USB drive to your PC.
- Restart your computer.
- Press the BIOS key to enter the BIOS menu.
- Locate the BIOS update utility within the BIOS setup (it might be called EZ Flash, Instant Flash, M-Flash, or similar).
- Select the BIOS file from the USB drive.
- Then, follow the on-screen instructions to start the update.
- Once done, the system will restart automatically.
Step 4. Check the BIOS update.
- After the restart, enter the BIOS menu again.
- Check whether the BIOS version is up-to-date.
Step 5. Now, restart your computer and check if the error is fixed.
Method 10. Perform a System Restore
If you have created a restore point for your Windows, you can also try performing a system restore to fix the page fault in nonpaged area error. Here’s how to perform that:
- Open the Run window.
- Type “rstrui.exe” in the box and press Enter.
- Click Next, and you can find all the restore points you have created.
- Select one restore point, and then click Next.
- Follow the on-screen instructions to complete the restore process.
- Once done, check if the error has been fixed.
Method 11. Reset Your PC
If none of the above methods can help you troubleshoot the BSOD page fault in nonpaged area error, you can try resetting your PC to fix the error. Here is the guide:
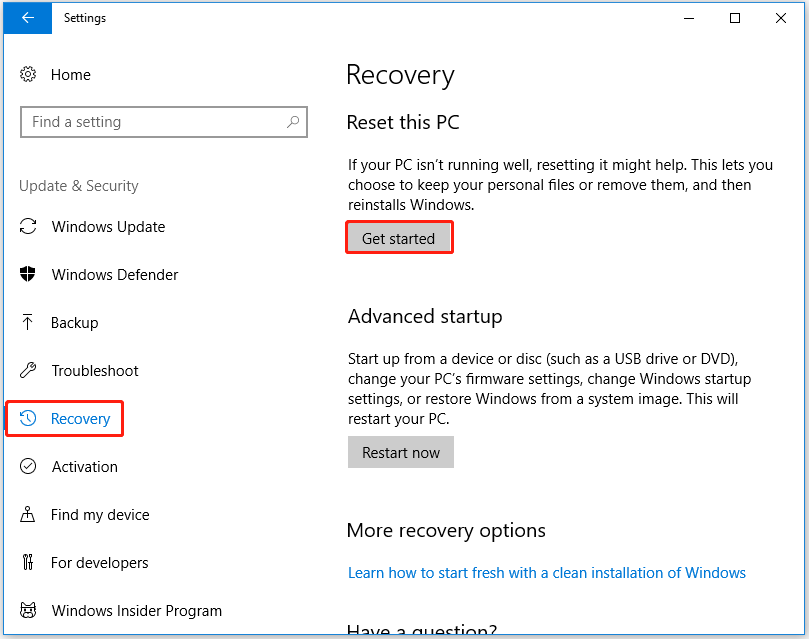
Step 1. Press the Win + I keys at the same time to open the Settings window.
Step 2. Go to Update & Security > Recovery, and then click Get started under the Reset this PC section.
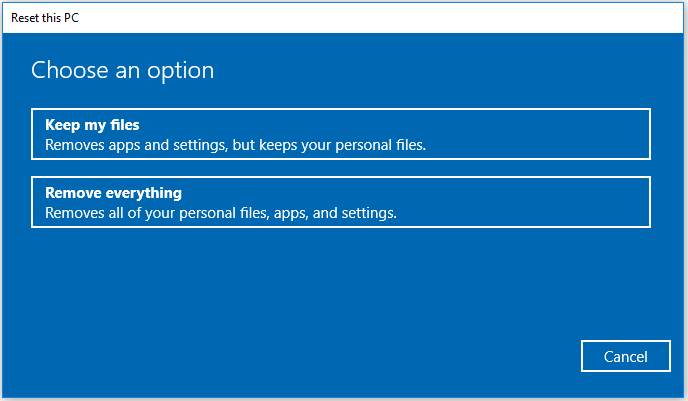
Step 3. Choose an option.
- Keep my files. If you choose this option, it will remove apps and settings but keep your personal files on your PC.
- Remove everything. If you choose this option, it will remove all of your files, apps, and settings.
Step 4. Then, follow the on-screen instructions to complete the whole process. Once done, check whether the error has been resolved on your computer.
How to Recover Lost Data After Fixing the Error or Reinstalling Windows?
If you find some of your data has been lost after fixing the page fault in nonpaged area error, you don’t need to worry. MiniTool Partition Wizard offers the Data Recovery feature to help you recover lost files with ease. Here’s how to use MiniTool Partition Wizard to recover lost files:
Step 1. Download the MiniTool Partition Wizard Pro Platinum or higher edition on your PC.
MiniTool Partition Wizard DemoClick to Download100%Clean & Safe
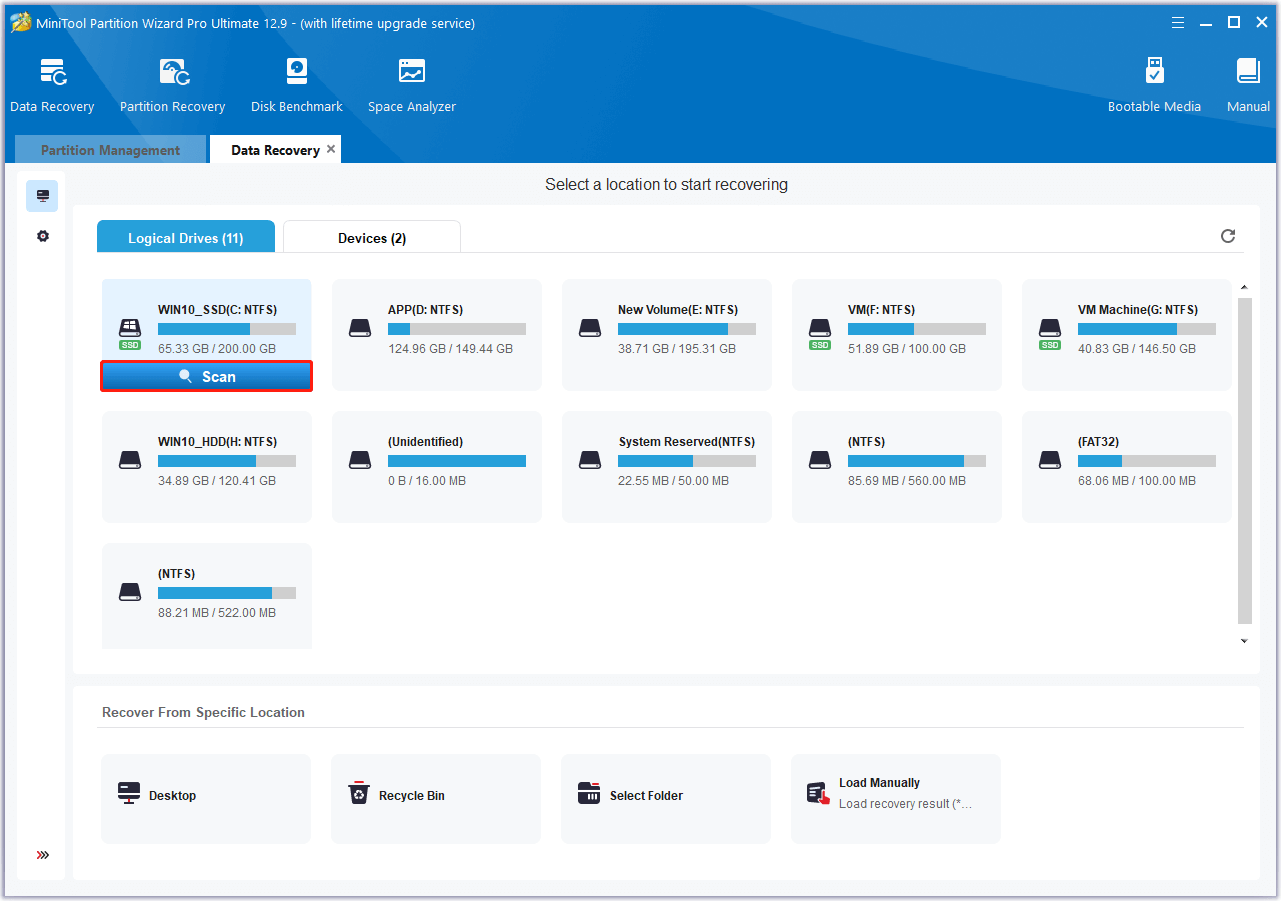
Step 2. Launch it into its main interface, click the Data Recovery option, and then select the partition where your lost files were stored previously, and then click Scan.
Step 3. Wait for the recovery process to complete.
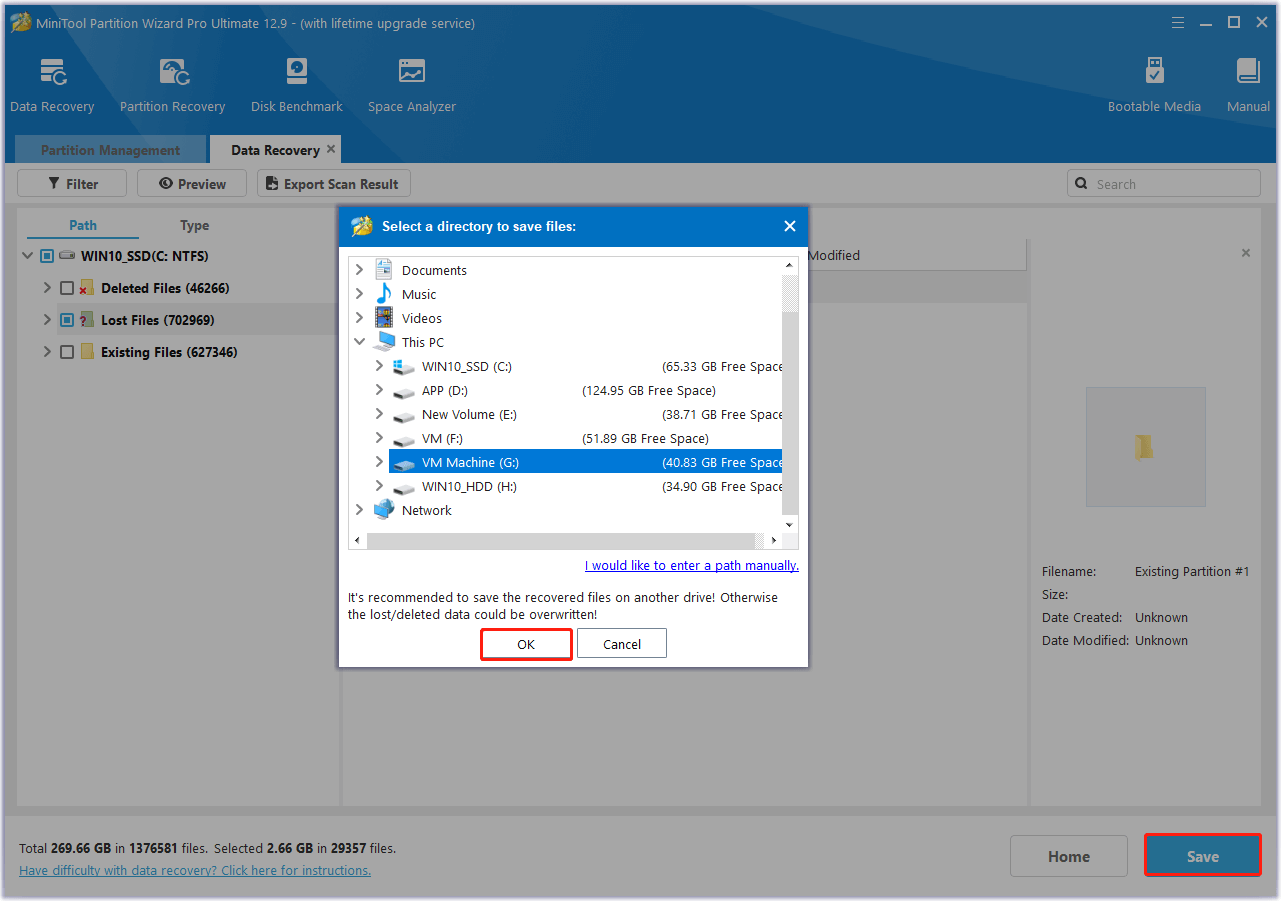
Step 4. Once done, tick the files you want to recover and click Save. Then, choose a safe location to save the recovered files and click OK.
In Conclusion
This is the end of the post. It offers several effective methods to troubleshoot the page fault in nonpaged area error, including updating Windows/drivers/BIOS, checking RAM, unticking the Automatically manage paging file size for all drivers option, etc.
What’s more, if you have any suggestions or encounter any issues while using MiniTool Partition Wizard, you can send emails to [email protected]. We will reply to you as soon as possible.
Page Fault in Nonpaged Area FAQ
About The Author

Position: Columnist
Charlotte is a technology columnist with a strong focus on the Windows operating system, specializing in disk management, backup, and data recovery. She is passionate about analyzing computer errors, identifying root causes, and delivering practical solutions. In her free time, she stays updated on the latest developments in computer systems and hardware while continuously learning new technologies to broaden her expertise. Her writing style is clear and easy to understand, making complex technical topics accessible even to users with limited computer knowledge.
User Comments :