The BSOD kernel mode heap corruption error indicates a problem with the kernel’s heap. To fix the error, you can try updating the driver, running memory diagnostics, performing SFC, reinstalling Windows, etc. Read this post from Partition Magic to get the full guide.
What Is the Kernel Mode Heap Corruption Error?
Kernel mode heap corruption causes a blue screen of death, indicating out-of-bounds operations in Windows’ kernel responsible for hardware and process management. It shuts down the system to prevent damage, leading to a BSOD.
This issue may happen unexpectedly or during activities such as gaming, video rendering, or multitasking. It often causes crashes and system reboots, which can be very frustrating for users. For instance, here is a user report from the Reddit forum:
…my pc just suddenly restarts by saying it ran into some problem, and the error code was kernel mode heap corruption. Now this doesn’t happen regularly, but occasionally, like after 2-3 days, I wonder what the cause of it could be? ... Can anyone suggest a fix?? Thanks in advance.https://www.reddit.com/r/techsupport/comments/1429xhl/what_is_kernal_mode_heap_corruption/
Have you also encountered the same error? If so, just continue reading to get a comprehensive guide.
What Causes the Kernel Mode Heap Corruption Error?
Why does the Kernel Mode Heap corruption error occur? This error often stems from these reasons:
- Faulty hardware (mostly RAM)
- Driver issues (especially graphics card drivers)
- Software conflicts
- Overclocking
- Windows Updates
- Insufficient page file size/virtual memory
- Corrupt or missing system files
Recover Lost Files Before Fixing Kernel Mode Heap Corruption
Before you fix the kernel mode heap corruption error, you’d better recover lost data first to avoid data becoming unrecoverable. To do that, you can choose MiniTool Partition Wizard. It offers the Data Recovery feature to help you retrieve lost data easily.
Case 1. Can Boot into Windows Normally
If you can boot your computer into Windows normally, you can do the following steps to recover the lost data:
Step 1. Download and install MiniTool Partition Wizard on your PC.
MiniTool Partition Wizard DemoClick to Download100%Clean & Safe
Step 2. Launch it and click the Data Recovery option from the top toolbar. Next, select the system partition, and then click Scan.
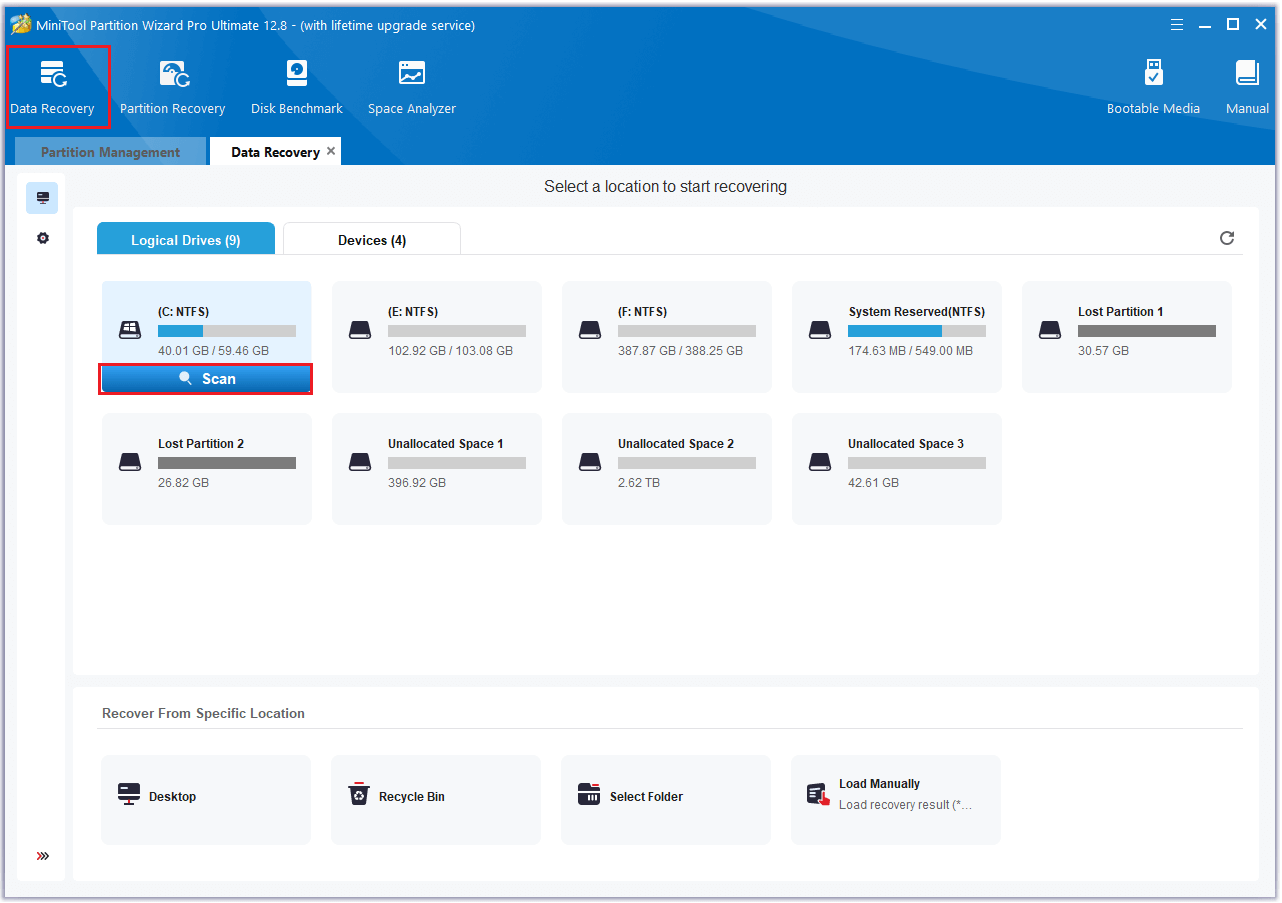
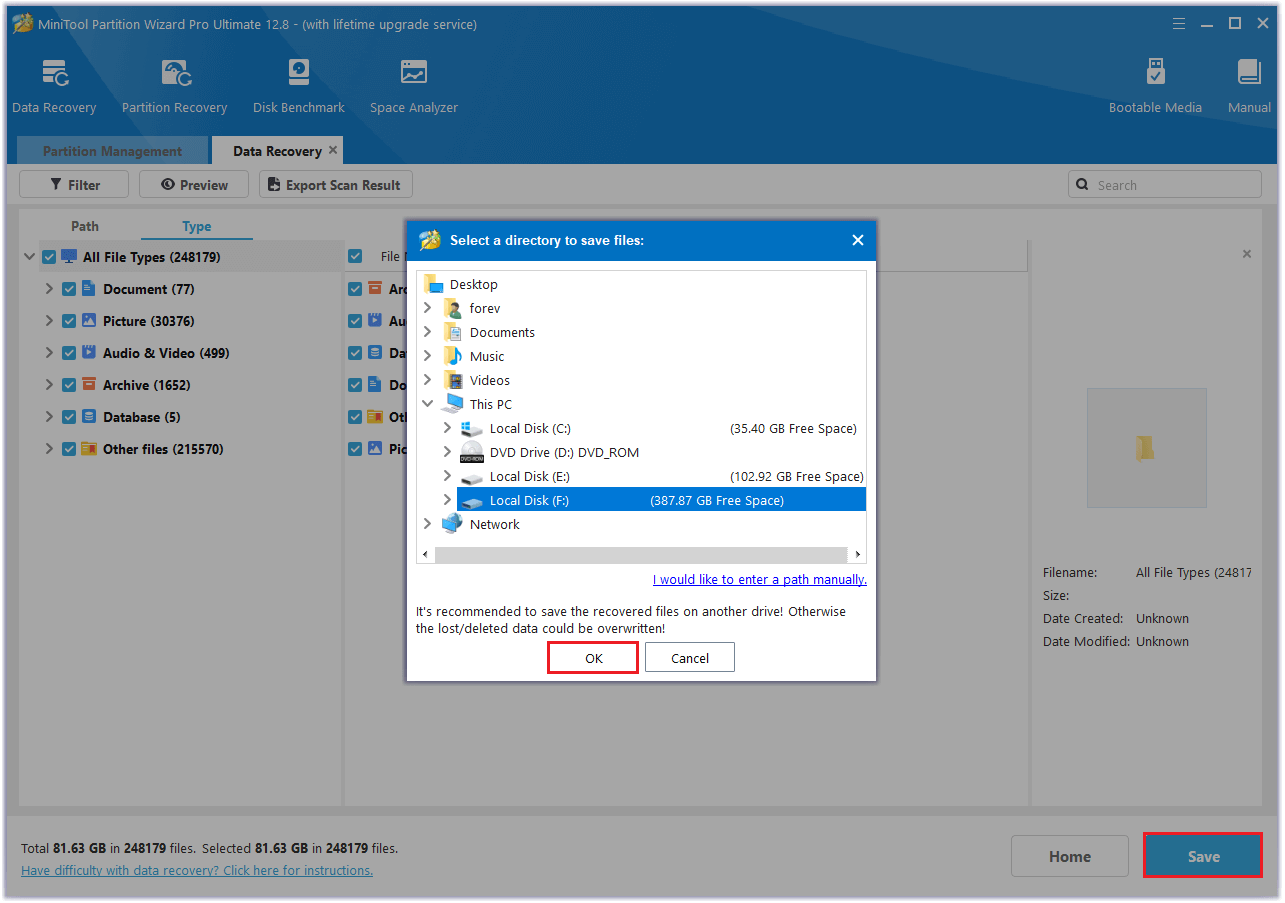
Step 3. Wait for the scanning process to complete. Once done, check the needed files and click Save. Next, choose a location to save the recovered files and click OK.
Case 2. Unable to Boot into Windows Normally
If your computer keeps in BSOD error and unable to boot into Windows normally, you need to recover the data in WinRE. Here’s the way:
Step 1. Download and install MiniTool Partition Wizard on a working computer. Then, launch it to enter its main interface.
Step 2. Click Bootable Media and click WinPE-based media with MiniTool plug-in.

Step 3. Choose USB Flash Drive. Then, this software will start to create the MiniTool bootable media.
Step 4. Once done, click Finish to close the window.
Step 5. Boot your computer with the MiniTool bootable media.
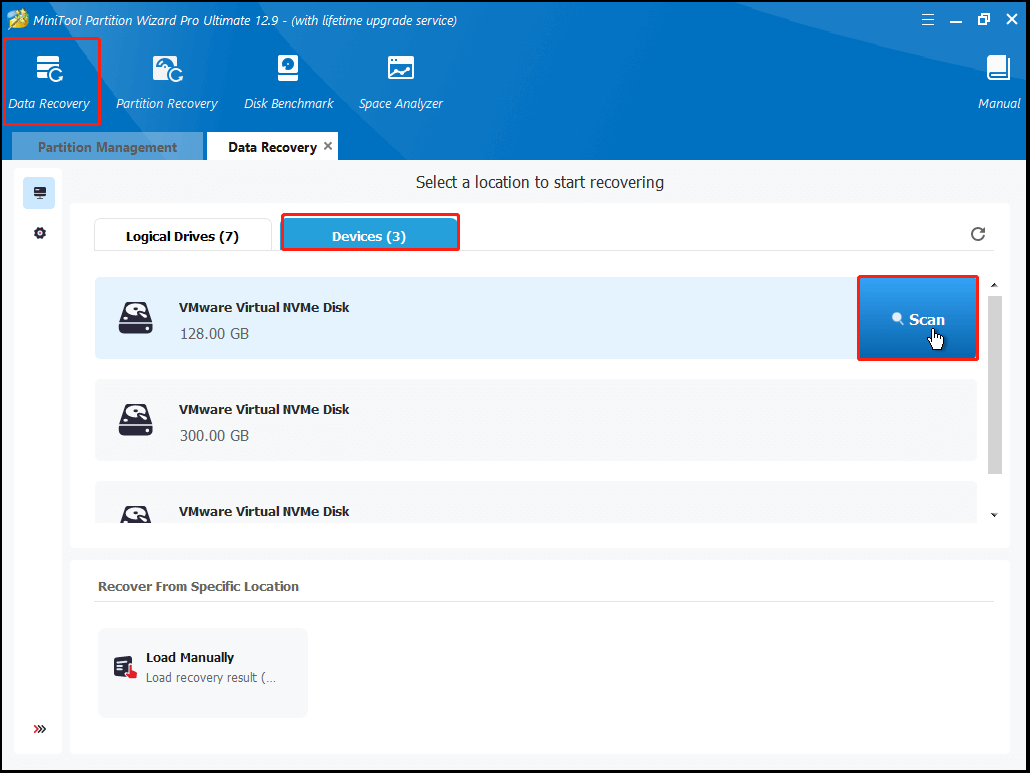
Step 6. Click Data Recovery, go to the Device tab, choose the disk you need and click Scan.
Step 7. Once the scanning is done, check the needed files and click Save. Then, save them into a safe location and click OK. Note that you don’t save the recovered files to the previous location, or the files will be overwritten.
What’s more, this multifunctional tool can also help you convert MBR to GPT, check disk for errors, partition hard drive, change the cluster size, set partitions as logical/primary, rebuild MBR, and more.
How to Fix the Kernel Mode Heap Corruption Error?
What should you do to fix the kernel mode heap corruption error? You can check for malware, manage device drivers, perform SFC & DISM, test RAM modules, increase virtual memory limits/page file size, run the driver verifier manager, reinstall Windows, etc.
Method 1. Check for Malware
Malware infection is one of the reasons for kernel mode heap corruption error occurring. So, you can try using Windows Security to help you scan and remove malware infection, and then fixing the kernel mode heap corruption error. Here are the detailed steps:
Step 1. Press Win + S to open the Search window.
Step 2. Type “windows security” in the box, and press Enter.
Step 3. Select Virus & threat protection in the pop-up window.
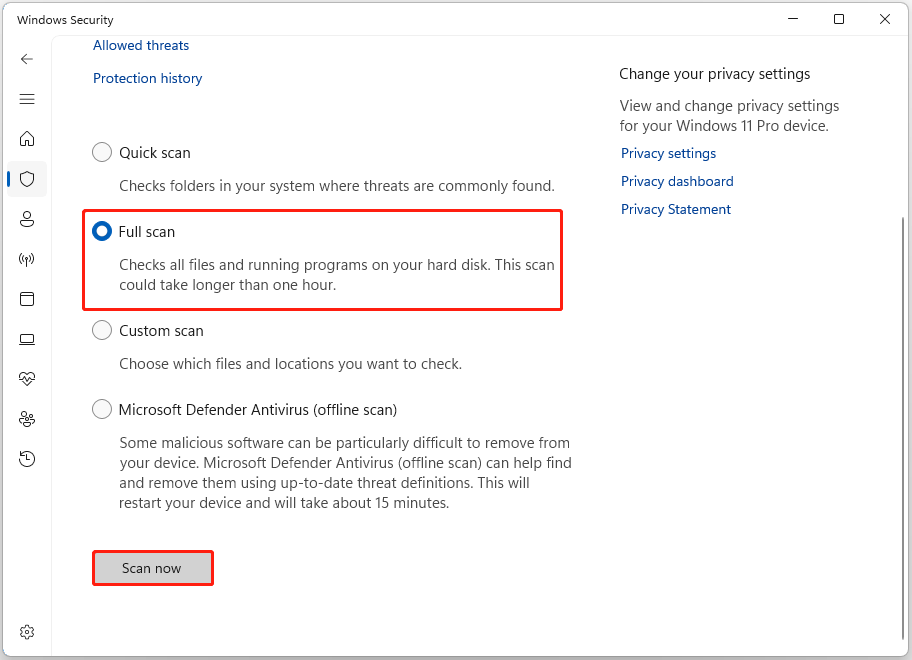
Step 4. Click Scan options.
Step 5. Choose the Full scan option and click Scan now.
Step 6. When the scan completes, the tool will tell you if it found anything. If any virus or malware found, remove it.
Method 2. Update the Display Drivers
An outdated or corrupted display driver can also cause the kernel mode heap corruption error. Therefore, you can go to Device Manager and then update the outdated display driver to fix the error. Here’s how to do that:
Step 1. Press the Win + X to open the Quick Link menu.
Step 2. Select Device Manager from the menu.
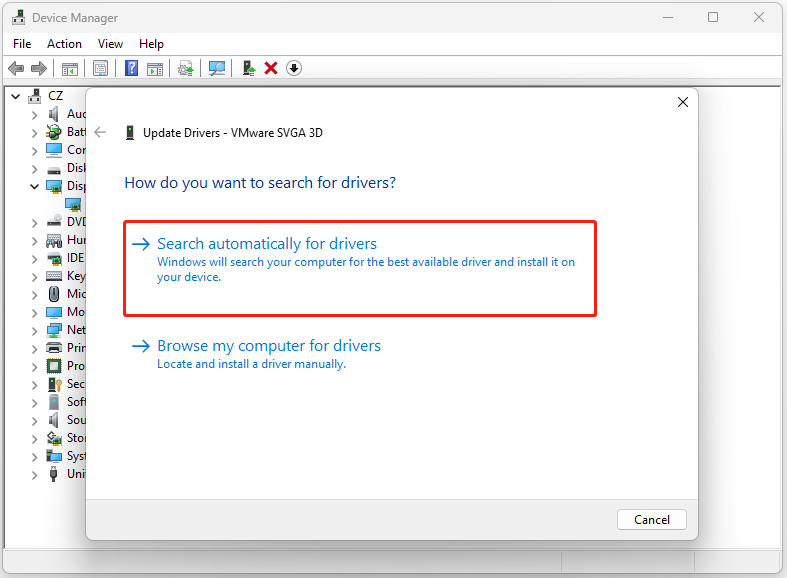
Step 3. Expand the Display category, right-click the outdated driver, and select Update driver.
Step 4. Select Search automatically for drivers, and then follow the on-screen instructions to complete the process.
Once you update the outdated display driver, restart your PC and check if the error is fixed. If not, you can try reinstalling the driver to fix the error. Here’s the way:
Step 1. Right-click the driver that you want to uninstall in Device Manager.
Step 2. Select Uninstall device.
Step 3. Tick the box for Attempt to remove the driver for this device and click Uninstall.

Step 4. Repeat the same steps to remove the driver for your other display card if you have one.
Step 5. Restart your computer. Then, your PC will install the latest driver(s) automatically.
If you encounter the BSOD kernel mode heap corruption error after updating your device driver, you can try rolling back the driver to fix the error. Here’s the guide:
Step 1. Right-click the target driver and select Properties.
Step 2. Go to the Driver tab.
Step 3. Click Roll Back Driver.
Step 4. Select a reason for rollback, then click Yes.
Step 5. Restart your computer to take effect the changes.
Method 3. Use SFC & DISM Commands
Corrupted system files may also trigger the BSOD kernel mode heap corruption error. In this situation, you can do the following things to fix the error:
Run SFC command:
Step 1. Open the Search window.
Step 2. Type “cmd” in the search box. Then, right-click Command Prompt and select Run as administrator.
Step 3. In the elevated Command Prompt window, type “sfc /scannow” and press Enter.
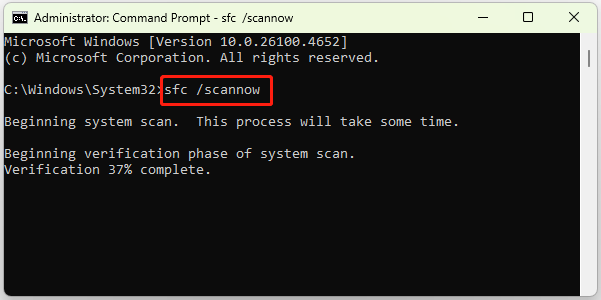
Step 4. The SFC tool scans for corrupted or missing system files and repairs or replaces them. Afterward, restart your computer to implement the changes.
Run DISM command:
Step 1. Do the same steps as above to run Command Prompt as administrator.
Step 2. Execute the following commands to run DISM commands:
- DISM.exe /Online /Cleanup-image /Scanhealth
- DISM.exe /Online /Cleanup-image /Checkhealth
- DISM.exe /Online /Cleanup-image /Restorehealth
Step 3. Once done, restart the computer to check if the error has been resolved.
Method 4. Check RAM Modules
If the RAM modules on your PC are faulty or are seated improperly, you can run into kernel mode heap corruption as well.
In this case, you can test memory via the built-in Windows Memory Diagnostic tool and replace the RAM modules in the motherboard to fix the error.
Here are the detailed steps:
Step 1. Press Win + R to open the Run window.
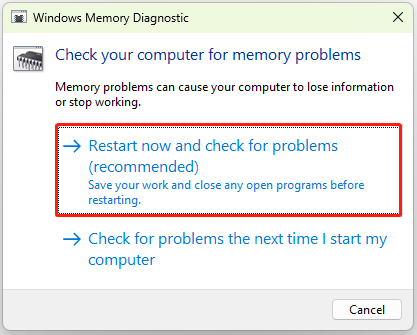
Step 2. Type “mdsched.exe” in the box and press Enter.
Step 3. Select Restart now and check for problems (recommended). Then, your computer will restart and diagnose the memory.
Step 4. Once done, check the diagnosis report in Event Viewer.
- Open the Run window again.
- Type “eventvwr.msc” in the box and press Enter.
- Go to Windows Logs > System.
- Then, find the diagnosis report from the list.
- Take measures according to the result description.
Common memory test situations/results:
- No memory errors were detected: If the test shows this in result, it means RAM seems fine. You do not need to take any actions on your RAM modules.
- Hardware problems were detected: If you receive this error message in the test result, it indicates that there is likely faulty RAM. To fix it, you can test sticks one by one and then replace the faulty one.
- Test hangs or reboots PC: If the test won’t complete or your PC reboots during the test, it indicates that there is severe memory corruption, overheating, a faulty motherboard, or PSU. To fix it, you can test sticks one by one and then replace the faulty one.
- Slow PC but no test errors: If nothing wrong shows in the test result, but your PC is slow, it indicates no errors in RAM. To fix it, you just need to upgrade your PC.
If the scan detects problems, you will need to replace some or all of your RAM modules.
Method 5. Increase Virtual Memory
Increasing virtual memory (by increasing the paging file size) allows your computer to run more applications, handle memory-intensive tasks, and improve multitasking.
Some people fix the kernel mode heap corruption error successfully by increasing virtual memory. You can also have a try. Here are the steps:
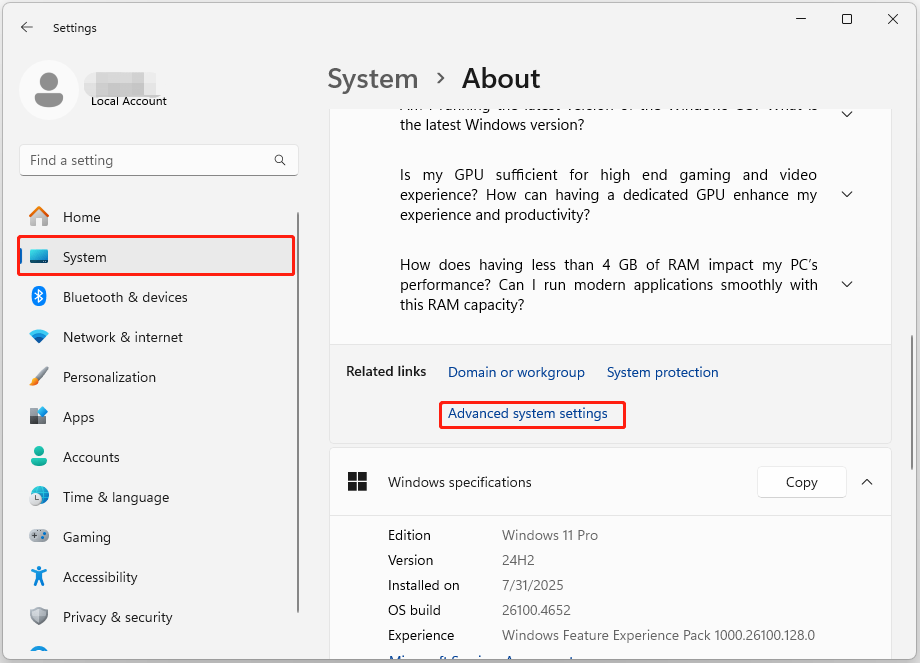
Step 1. Press the Win + I to open the Settings window.
Step 2. Go to System > About, and then click Advanced system settings.
Step 3. Go to the Advanced tab, click Settings in the Performance section.
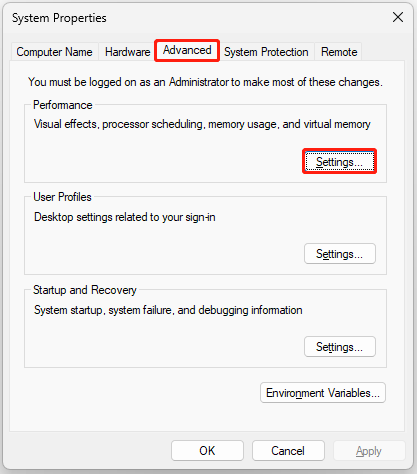
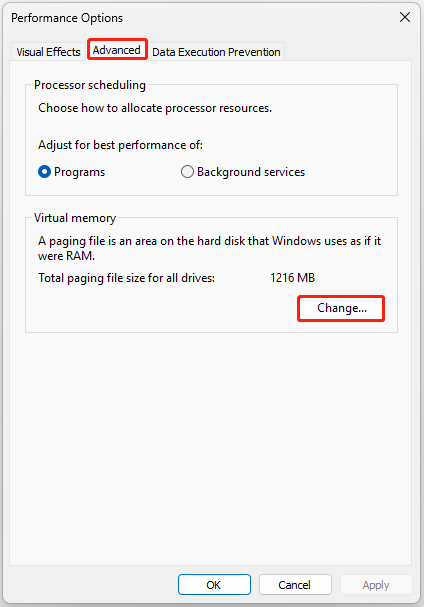
Step 4. Navigate to the Advanced tab, and click Change in the Virtual Memory section.
Step 5. Uncheck Automatically manage paging file size for all drives. Then, select Custom size, specify the Initial Size and the Maximum size. After that, click Set and OK to confirm the changes.
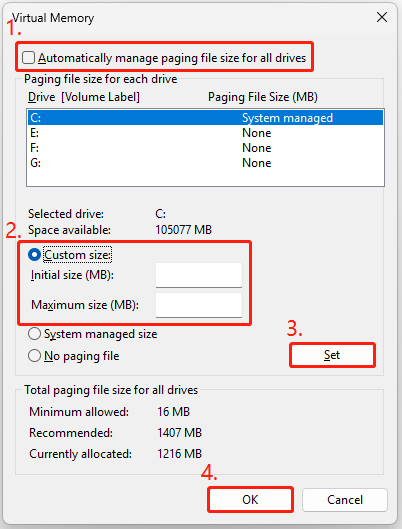
Step 6. Click OK and restart your computer.
Also, you can try using Command Prompt to modify the paging file size. Here is the detailed breakdown:
Step 1. Run Command Prompt as administrator.
Step 2. Type the command “wmic pagefile list /format:list” and press Enter.
Step 3. Type wmic computersystem where name=”%computername%” set AutomaticManagedPagefile=false and press Enter.
Step 4. Type wmic pagefileset where name=”C:\\pagefile.sys” set InitialSize=YOUR-INIT-SIZE,MaximumSize=YOUR-MAX-SIZE and press Enter to set the initial and the maximum size of the virtual memory.
Step 5. Once the command is executed, restart your computer for the changes to take effect.
Method 6. Run Driver Verifier Manager
You can also try running Verifier Manager to fix the stop code kernel mode heap corruption error. Here’s how to do that:
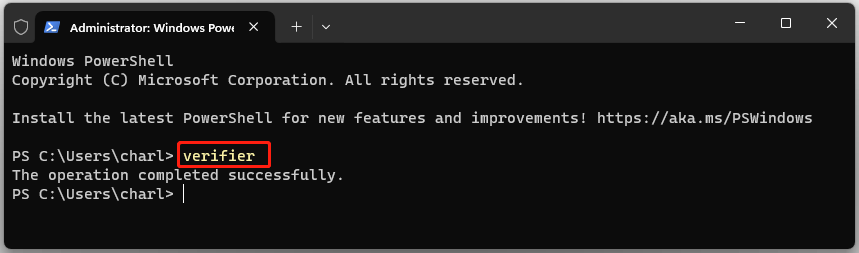
Step 1. Run Windows PowerShell as administrator.
- Windows 10: Right-click Start icon, select Windows PowerShell (Admin).
- Windows 11: Right-click Start icon, select Terminal (Admin).
Step 2. Type “verifier” and press Enter.
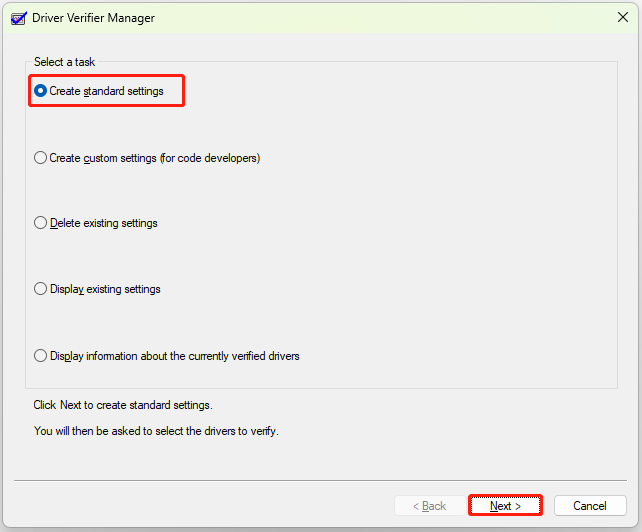
Step 3. In the Driver Verifier Manager window, select Create Standard Settings and click Next.
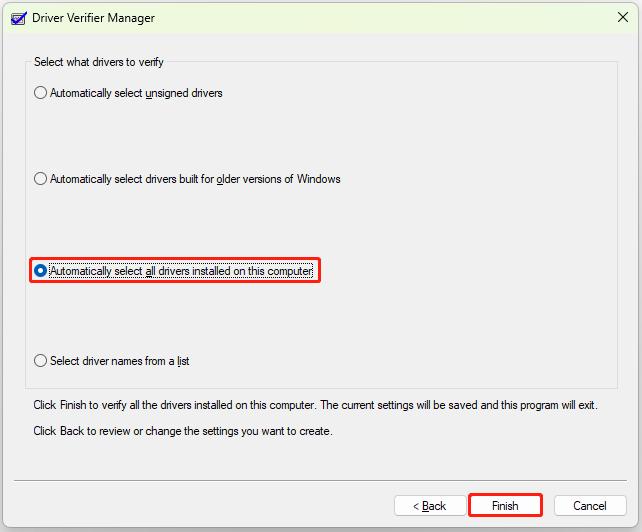
Step 4. Choose Automatically select all drivers installed on this computer and click Finish.
Step 5. Click OK in the prompted window, and restart your PC to allow the tool to scan for corrupted or outdated drivers.
Step 6. After the reboot, Windows will list any drivers with errors. Update, roll back, or reinstall these drivers to resolve the issue.
Method 7. Uninstall Incompatible Software
If you encounter a kernel mode heap corruption error on your PC after you install a new app on your PC. You can suspect that this software is not is incompatible with your system.
In this case, you can go to Programs and Features to uninstall the incompatible software to fix the error. Here’s the guide:
- Open the Search window.
- Type “control panel” and press Enter.
- Set View by as Category.
- Click Uninstall a program under the Programs section.
- Select the incompatible software from the list.
- Right-click it and click Uninstall.
- Then, follow the on-screen guide to complete the process.
Method 8. Reinstall Windows
Reinstalling Windows can resolve various system issues, including the stop code kernel mode heap corruption. Therefore, if none of the above methods can help you troubleshoot the kernel mode heap corruption Windows 11/10 error, you can try this method.
Here, I take Windows 11 as an example:
Step 1. Create a Windows 11 USB bootable media.
Step 2. Boot your PC from the USB bootable media.
Step 3. In the Windows 11 Setup window, select the language settings and click Next.
Step 4. Select keyboard settings and click Next.
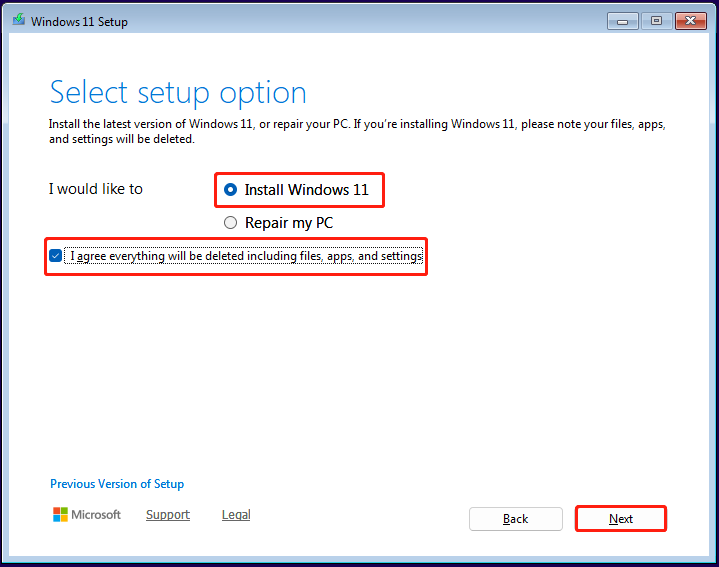
Step 5. Choose the Install Windows 11 option, check the box of “I agree everything will be deleted including files, apps, and settings” and click Next.
Step 6. Click I don’t have a product key. Then, select a proper Windows 11 version and click Next.
Step 7. Read Applicable notices and license terms, and click Accept.
Step 8. Select the location to install Windows and click Next. After that, click Install to continue.
Step 9. Next, wait for the process to finish. Once done, follow the on-screen instructions to complete the initial setup.
To Sum Up
Now, you probably know how to fix the BSOD kernel mode heap corruption error. This article examines causes and suggests simple solutions. It also introduces MiniTool Partition Wizard to help you restore lost data.
If you experience problems or have feedback about MiniTool Partition Wizard, please contact us by emailing [email protected]. We will respond promptly.
Kernel Mode Heap Corruption FAQ
1. Match alloc and free calls
2. Avoid use-after-free
3. Prevent buffer overflows/underflows
4. Avoid freeing interior pointers
5. Set input validation
6. Use safe string functions
7. Error handling
8. Enable runtime protections
Use memory debugging tools
Pay attention to and address compiler warnings
Thorough code reviews
Extensive testing
Regular updates and patches
1. Using memory debugging tools
2. Updating all outdated drivers
3. Running system file checks
4. Check hardware issues
5. Identify and uninstall the conflict software
6. Reinstalling the operating system
About The Author

Position: Columnist
Charlotte is a technology columnist with a strong focus on the Windows operating system, specializing in disk management, backup, and data recovery. She is passionate about analyzing computer errors, identifying root causes, and delivering practical solutions. In her free time, she stays updated on the latest developments in computer systems and hardware while continuously learning new technologies to broaden her expertise. Her writing style is clear and easy to understand, making complex technical topics accessible even to users with limited computer knowledge.
User Comments :