TestDisk is a free partition and data recovery program that has no GUI. Using it may be a little difficult. This post from MiniTool Partition Wizard shows you how to use TestDisk and offers a TestDisk alternative.
About TestDisk
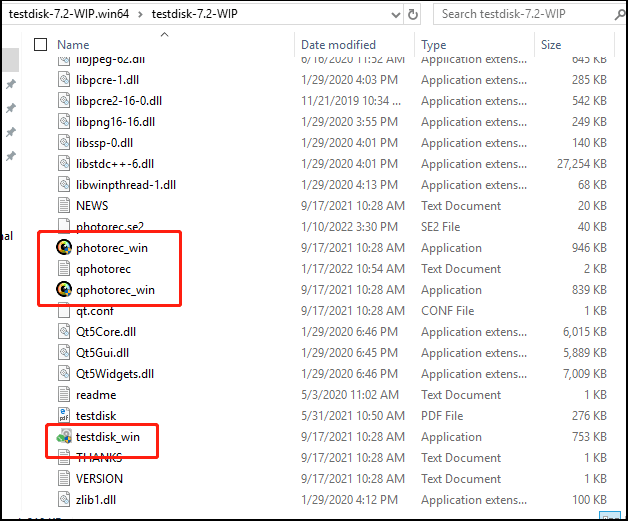
TestDisk is powerful free data recovery software available on Windows, Linux, and macOS. This software is packaged as a zip file. After you extracted the zip file, you will see a folder that contains all things needed to run this software. It means that you can launch this software directly without installation.
In the folder, you will see two main apps: photorec and testdisk. Apparently, the two tools are composed into one program — TestDisk & PhotoRec.
TestDisk is primarily designed to help recover lost partitions and make non-booting disks bootable again when these symptoms are caused by faulty software: certain types of viruses or human errors (such as accidentally deleting a Partition Table). In addition, it can also undelete files from FAT, NTFS, exFAT, and ext2 file systems.
PhotoRec is a signature-based file data recovery utility designed to recover lost files including video, documents, and archives from hard disks and CD-ROMs, and lost pictures from digital camera memory. It may be able to recover your data where other methods fail.
TestDisk can detect numerous file systems including NTFS, FAT12, FAT16, FAT32, exFAT, ext2, ext3, ext4, btrfs, BeFS, CramFS, HFS, JFS, Linux Raid, Linux Swap, LVM, LVM2, NSS, ReiserFS, UFS, and XFS. However, PhotoRec can only support FAT, exFAT, NTFS, EXT2/3/4, and HFS+ file systems.
How to Use TestDisk to Recover Data on Windows 10
Before Get Started
- TestDisk must be executed with Administrator privileges. Please right-click the TestDisk or PhotoRec app and choose Run as administrator.
- TestDisk doesn’t offer a GUI while PhoteRec offers one. Therefore, in TestDisk, use the Arrow and PageUp/PageDown keys to navigate, use the Enter key to confirm your choice, and use the q (Quit) key to return to a previous display or quit TestDisk.
After launching TestDisk, you can follow the guides below to use this software.
TestDisk Data Recovery
In this part, taking the NTFS file system as an example, I will show you how to use TestDisk to recover data.
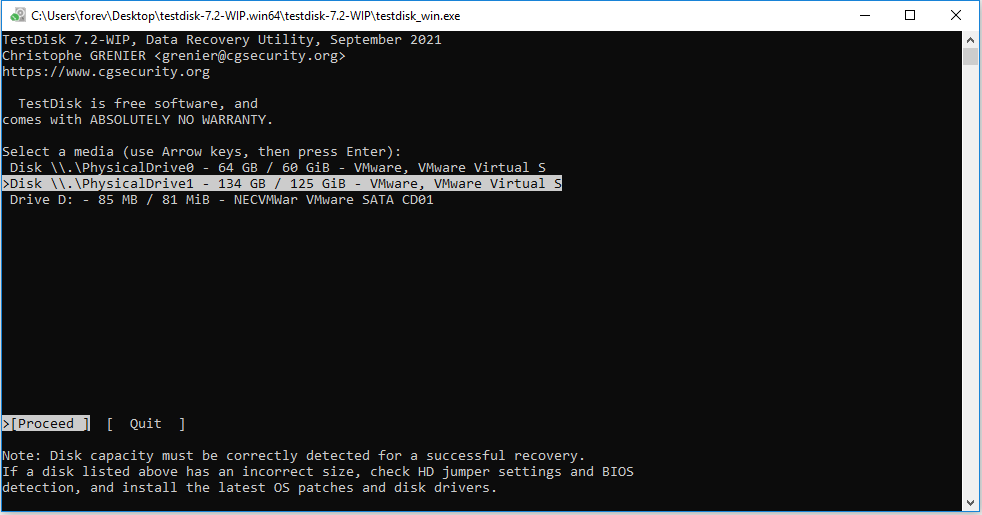
Step 1: Run TestDisk as administrator. Choose the [Create] option. Then, you need to select the disk where data is lost. The disk size and name can help you choose the correct disk.
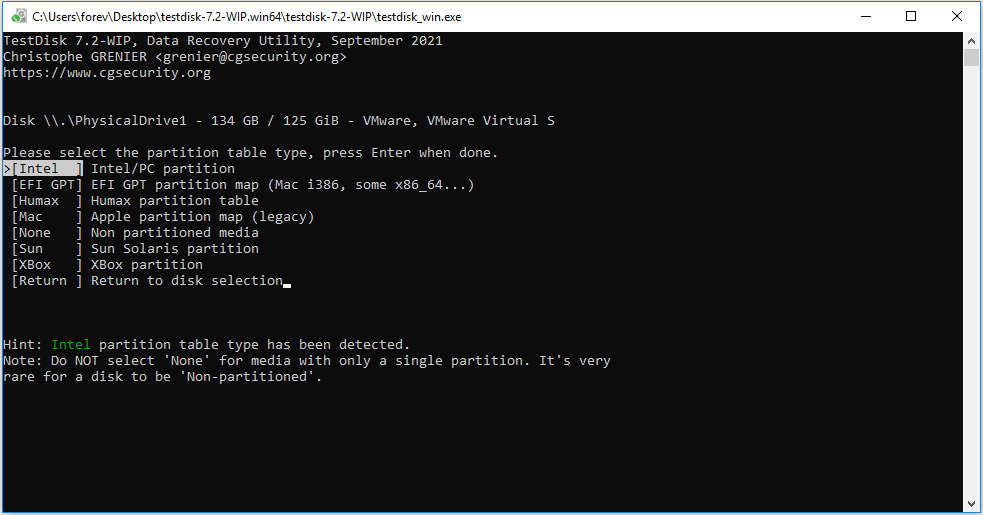
Step 2: Choose the partition table type. Because my disk is MBR and the OS is Windows, I choose the [Intel] partition type. You should choose one according to your conditions.
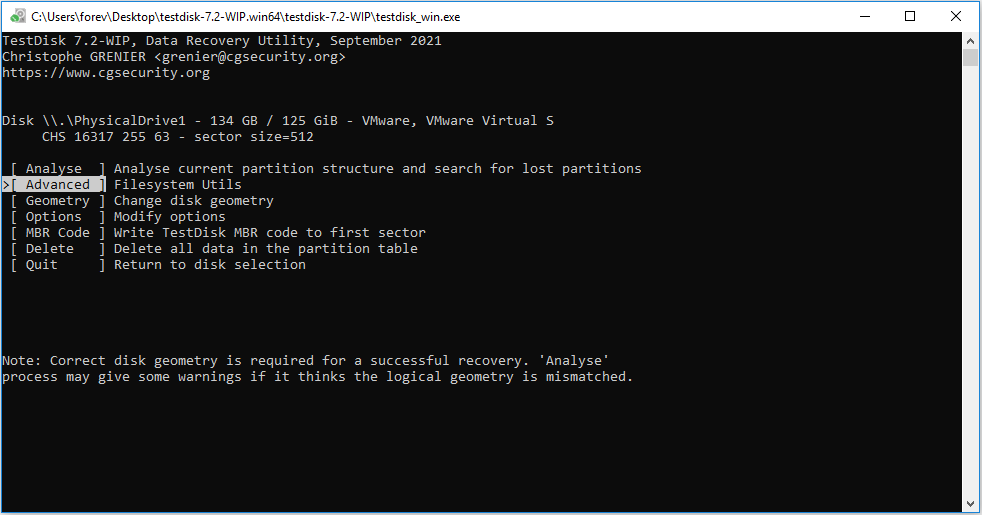
Step 3: Choose the [Advanced] option.
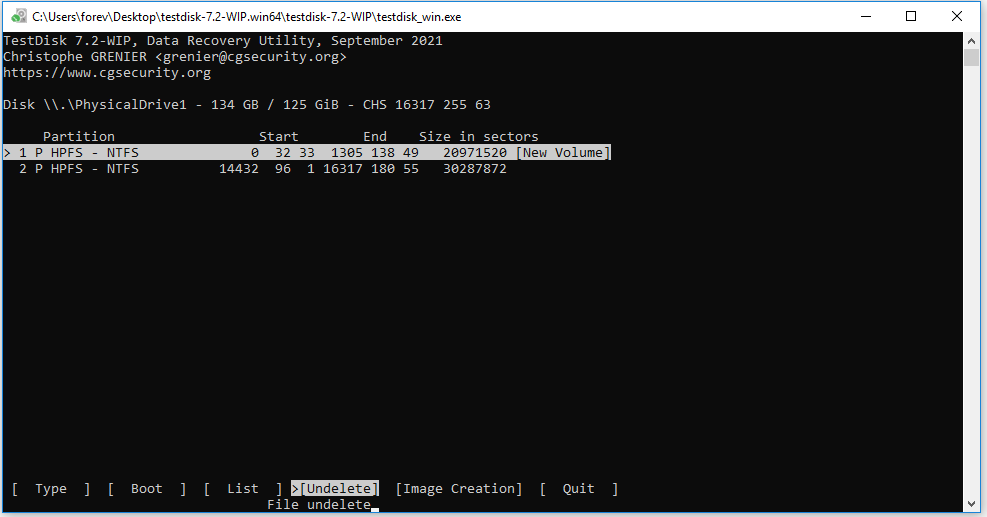
Step 4: Highlight the partition where data is lost and then choose the [Undelete] option.
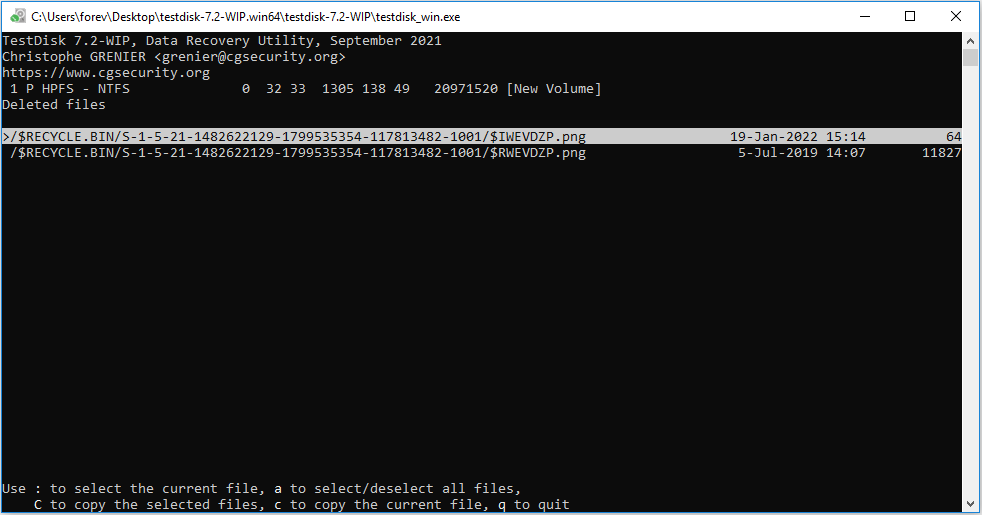
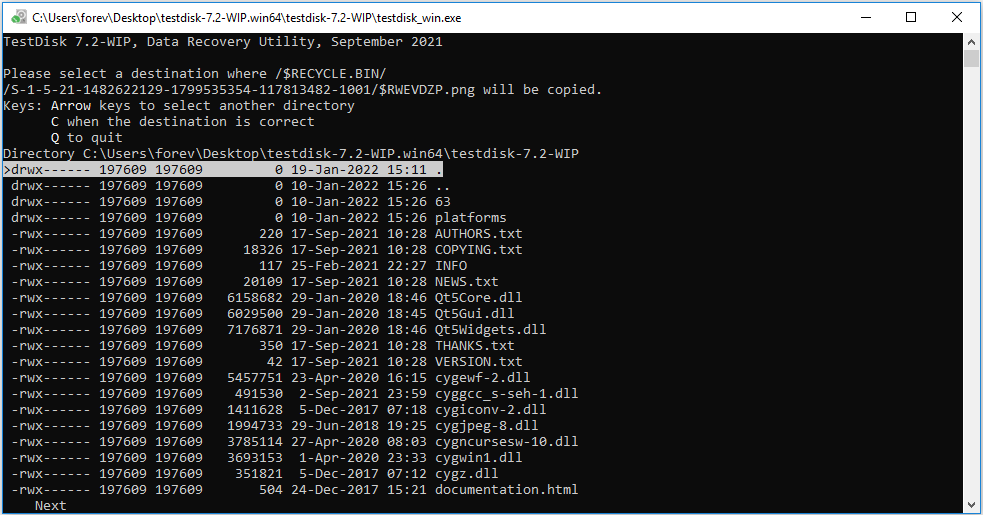
Step 5: Deleted files will be detected and listed. Now, you need to select the file you want to recover. As described in the interface, you should use “:” to select the current file, use “a” to select/deselect all files, use “C” to copy the selected files, and use “c” to copy the current file.
Step 6: Now, you need to choose where to store the recovered files. You can select any directory under the TestDisk program folder. And then click “C” to confirm the location.
Step 7: Find and open the folder that stores the recovered files to check whether the file is recovered successfully.
Data Recovery Online: Is It Possible to Recover Data Online Free?
TestDisk Partition Recovery
In addition to the TestDisk data recovery feature, TestDisk also offers the partition recovery feature. Here is the guide on how TestDisk recovers a partition.
Step 1: Launch TestDisk, click [Create], select the disk where partitions are lost, choose the partition table type, and then select [Analyse]. In the new window, directly choose [Quick Search] to continue.
Step 2: Wait until the analyzing process is completed. Some warnings may be displayed. You just need to click [Continue]. Then, you will get a scanning result as shown in the following picture. Both existing partitions and lost partitions will be listed.
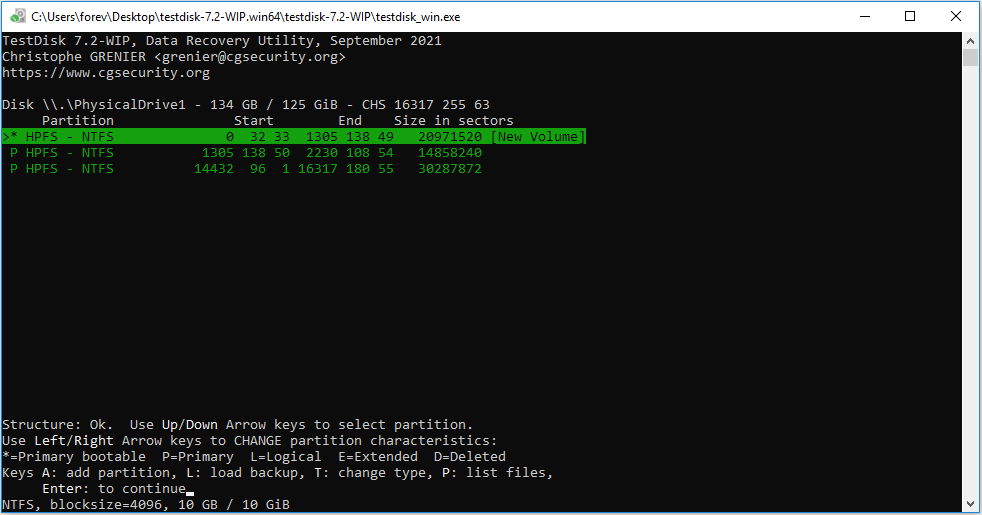
Step 3: You can check whether the lost partition is listed through the start and end location of the partition. Also, you can highlight the partition and press “p” to check files in this partition. Through this way, you can determine whether this partition is the one you want to recover.
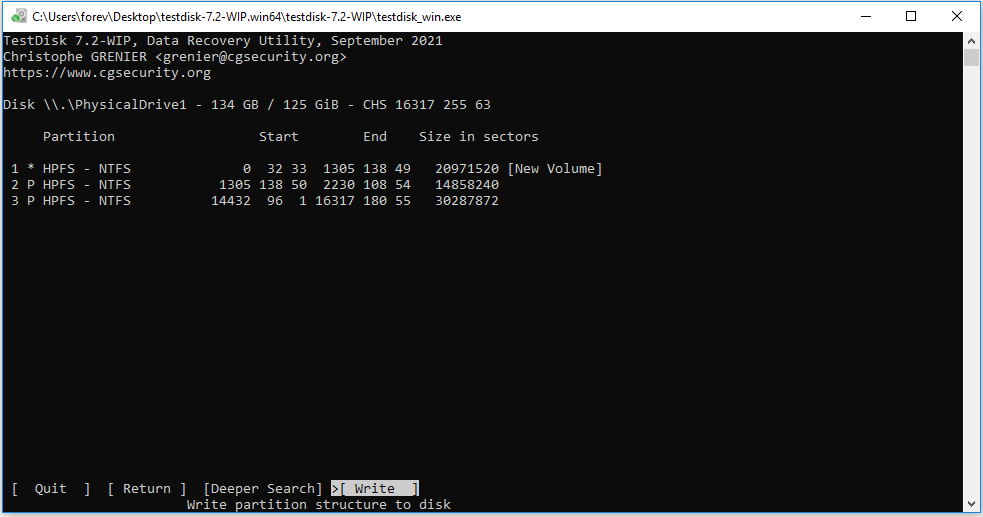
Step 4: If all partitions are available and the data is correctly listed, please press the Enter key to continue. Then, choose [Write] to save the partition structure. After that, the lost partition will be recovered soon. And you need to open Disk Management tool to add a driver letter to this partition. Now, you can use this partition as usual.

PhotoRec Data Recovery
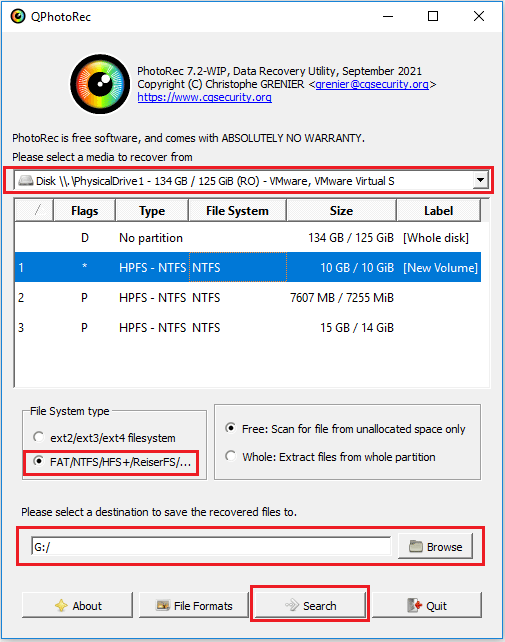
TestDisk may fail to recover some files. In this case, you can try PhotoRec. Please launch the qphotorec app that has a GUI. Then, you should:
- Choose a media to recover from. Please note that this app only allows you to select the whole disk. If you just want to recover data from a specific partition, you can launch the photorec app that doesn’t have a GUI.
- Check file system type and data recovery method (Free or Whole).
- Choose a directory to save the recovered files to. Please don’t save the recovered files to the partition where data is lost.
- Click the Search button.
Use MiniTool Partition Wizard as the TestDisk Alternative
Using TestDisk Windows 10 may be a little difficult because it has no GUI. In addition, sometimes, it may fail to recover data and partitions. For example, I have deleted a picture and a video before using TestDisk & PhotoRec. But both TestDisk and Photorec only recover the picture. They fail to recover an MP4 video I deleted before.
Therefore, I recommend you use MiniTool Partition Wizard, a simple and powerful data and partition recovery program. Please follow the guides below to recover data and partitions.
MiniTool Partition Wizard DemoClick to Download100%Clean & Safe
MiniTool Partition Wizard—Data Recovery
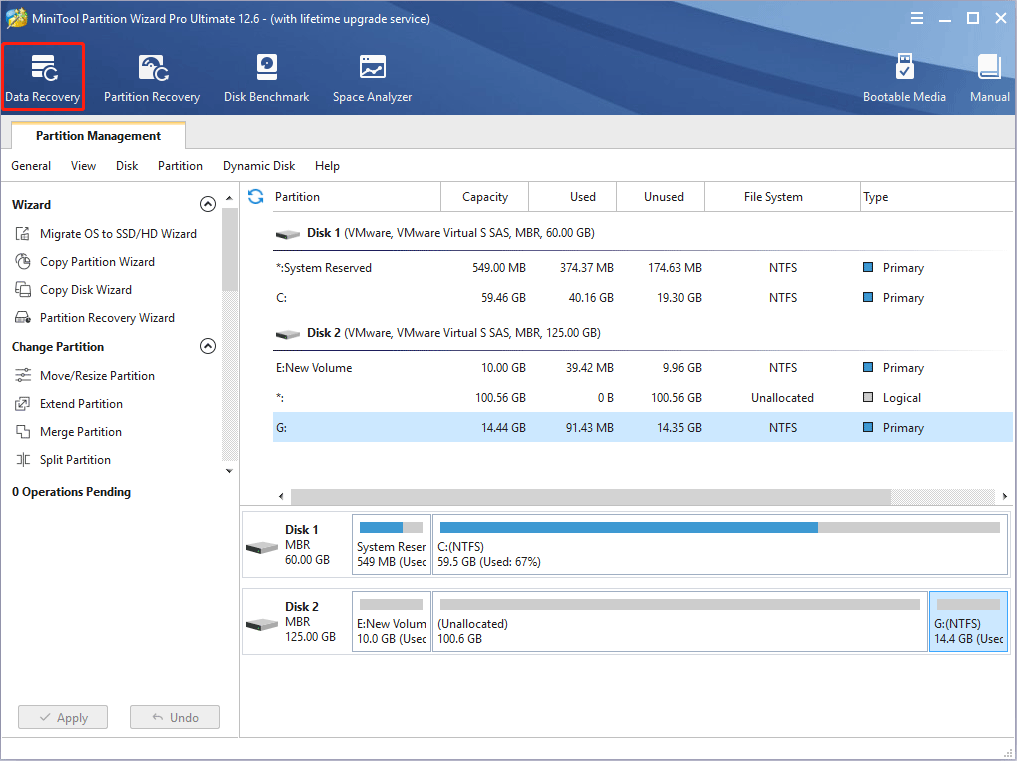
Step 1: Launch MiniTool Partition Wizard and get to its main interface. Then, click the Data Recovery feature at the top section.
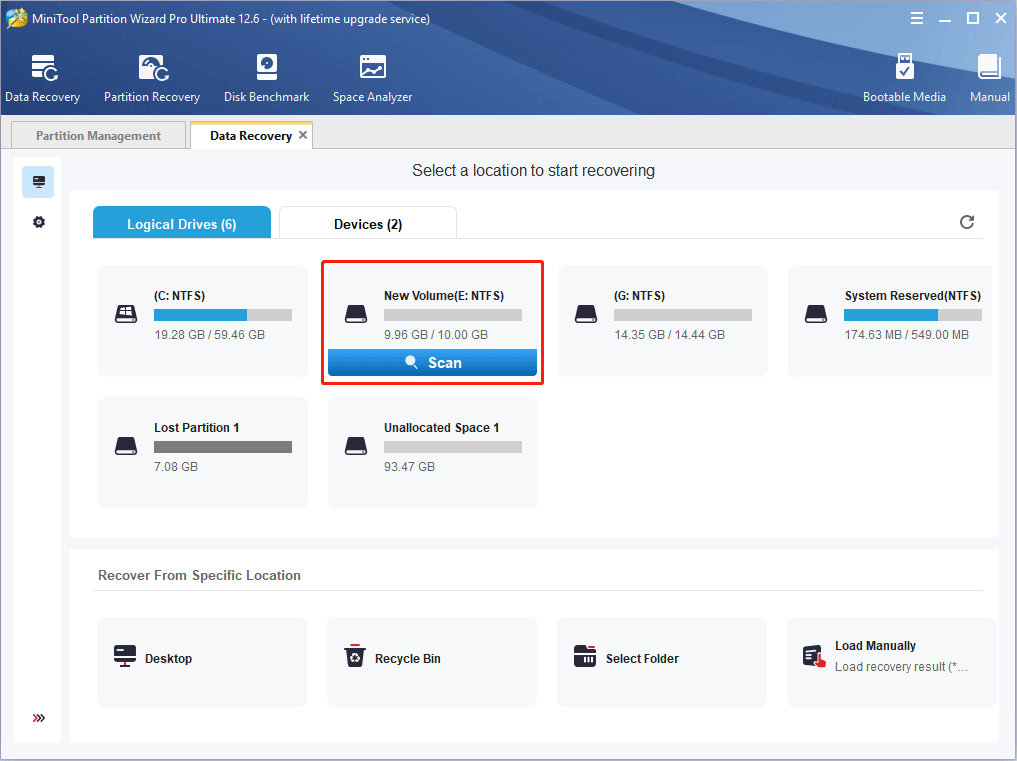
Step 2: In the newly-opened Data Recovery tab, select the partition where data is lost and then start scanning. You just need to hover the cursor on the partition and click the Scan button.
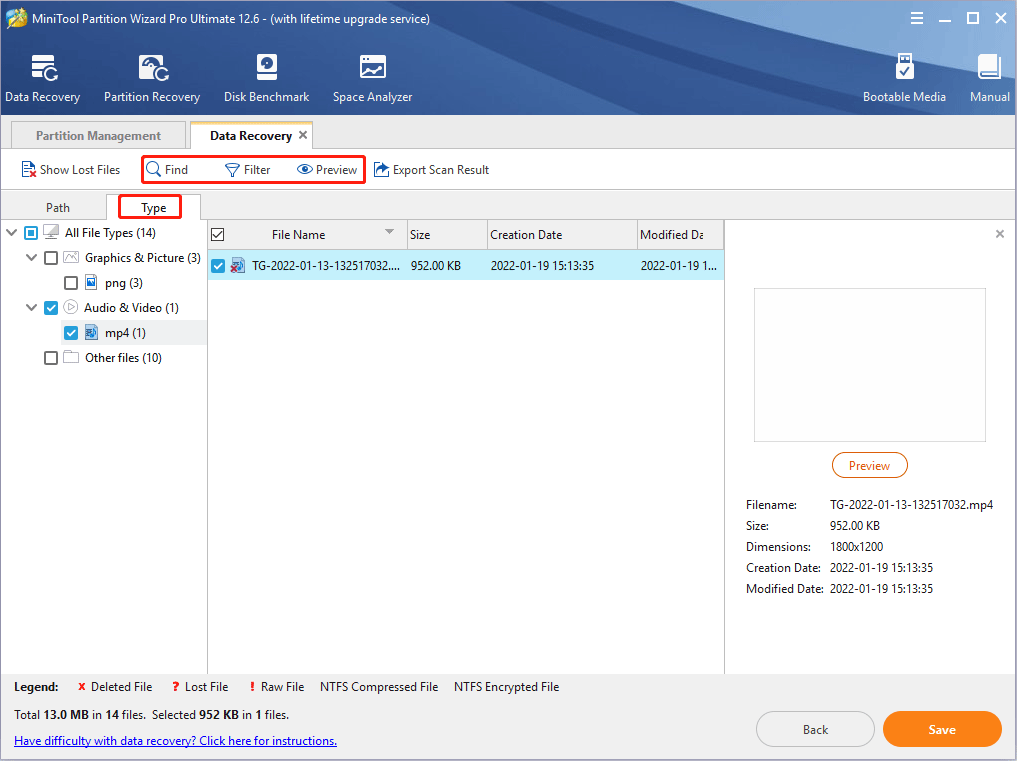
Step 3: Wait until the scanning process is completed. Now, you need to find the lost files. To find the lost files fast, I recommend you skip to the Type tab. Expand each file type folder to find the lost files. When lost files are found, check the box before them and click the Save button. Then, select a safe place to store the recovered files.
MiniTool Partition Wizard also offers the following tools to help you find data quickly and correctly:
- Find: It allows you to find data according to the name. But please note that sometimes MiniTool Partition Wizard may fail to recover the file name. In this case, it will rename the recovered files.
- Filter: It allows you to find files according to the file extension, file size, and file creation or modification date.
- Preview: It allows you to preview up to 70 types of files so that you can determine whether the found files are what you want to recover.
MiniTool Partition Wizard—Partition Recovery
Step 1: Launch MiniTool Partition Wizard and click Partition Recovery. Then, follow the on-screen instructions to select the disk where partitions are lost.

Step 2: Choose the scanning range. You can choose to scan the entire disk if you have created a partition on the space where the partition is deleted. If not, you can choose to scan free space only. Of course, you can also specify a range as your will.

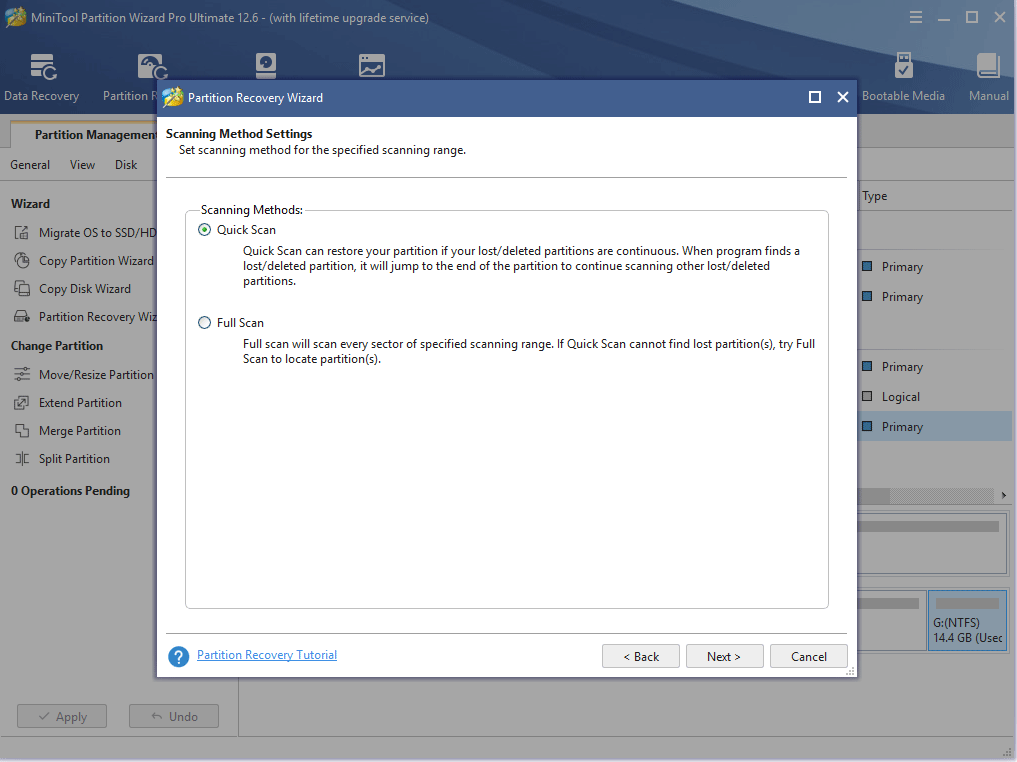
Step 3: Choose a scanning method. Please choose Quick Scan because this method is faster. If this method fails to recover the partition, you can then try the Full Scan, which will scan the disk sector by sector.
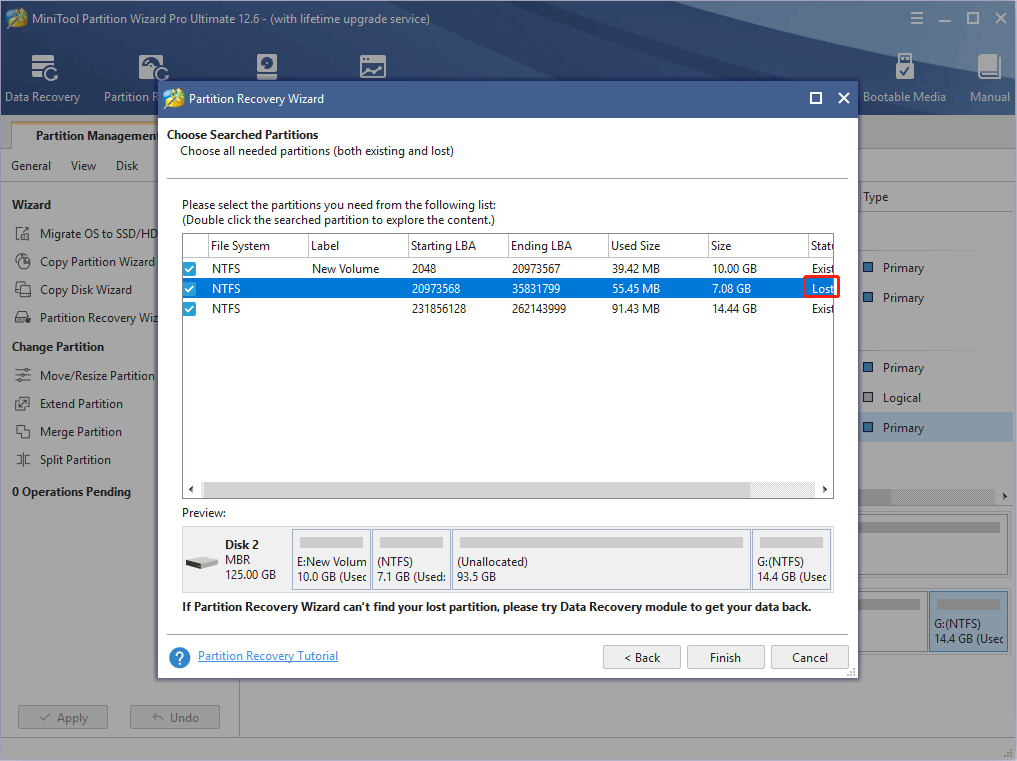
Step 4: After the scanning process is completed, you should check the box before the existing partitions and lost partitions so that the existing partitions will not be deleted when lost partitions are recovered.
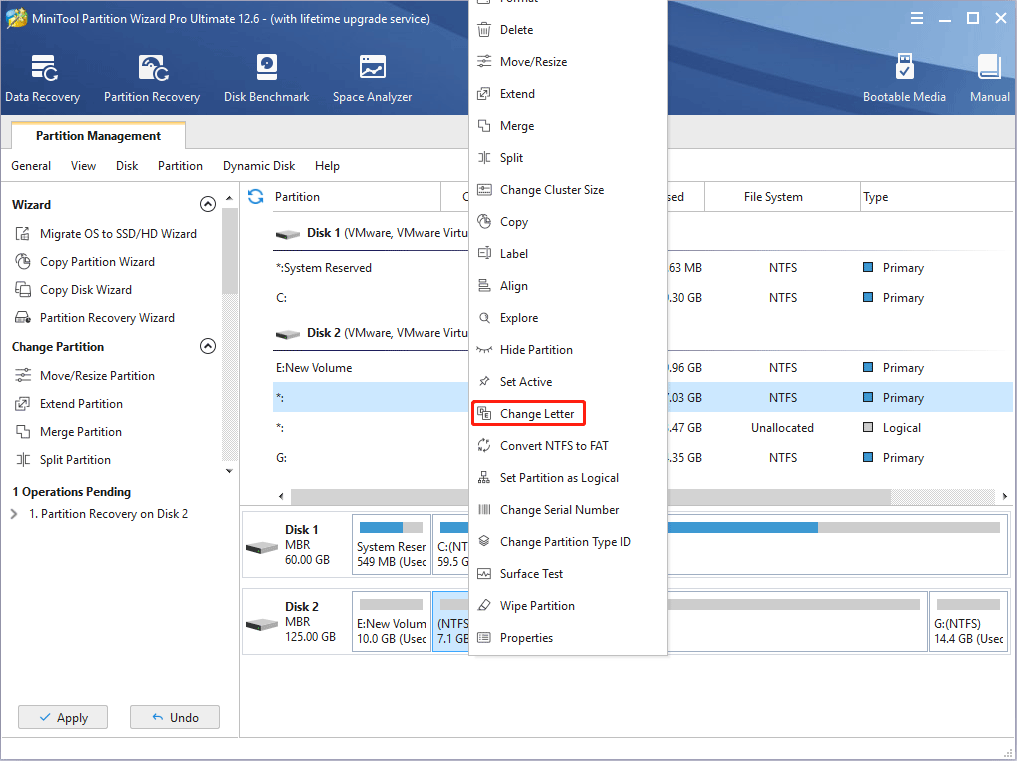
Step 5: As the recovered partition has no drive letter, you should right-click it and choose Change Letter to add a proper letter to it.
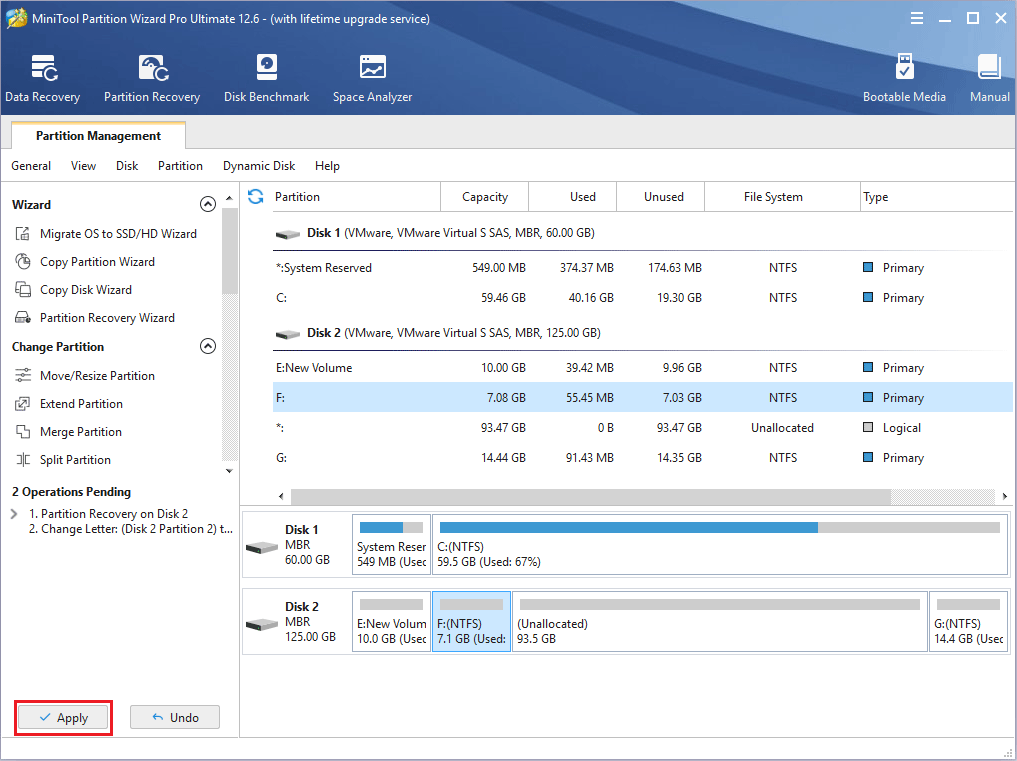
Step 6: Click the Apply button to execute pending operations.
Bottom Line
TestDisk is an open-source data recovery program. It can recover some files but it has its disadvantages. For example, it has no GUI and it may fail to recover some types of files. I have tried TestDisk & PhotoRec and therefore gives you a complete guide on how to use it. I hope this post is helpful to you.
If you have other ideas about the TestDisk software and TestDisk alternatives, please leave your comments in the following zone. In addition, if you encounter problems when using MiniTool Partition Wizard to recover data and partition, please feel free to contact us via [email protected]. We will get back to you as soon as possible.
About The Author

Position: Columnist
Linda has been an editor at MiniTool for seven years. She continuously learns about computers and puts her knowledge into practice. Moreover, she is particularly knowledgeable in disk management, data recovery, system installation, and PDF editing. Her articles typically reference multiple examples or are based on her own experience, providing users with the most suitable solutions.
User Comments :