You can fix the Dell laptop won’t turn on issue by checking the power source/connection/power button, performing a hard reset, repairing corrupted system files, etc. Read the post from Partition Magic to get a step-by-step guide.
Dell is one of the major popular laptop brands. It is a United States company, with these current product lines: Inspiron, Latitude, Precision, and XPS.
However, just like other brands’ laptops, users of Dell laptops can encounter various issues, including the Dell laptop won’t turn on issue.
Have you also been bothered by the Dell laptop turn on issue? If so, continue reading to know the reasons and solutions.
What Causes Dell Laptop Won’t Turn on?
Why won’t my Dell laptop turn on? Knowing the possible causes of the issue can help you get to the best solution and recover the lost files. Here are the main causes of the issue:
- AC power adapter: If your AC power adapter is damaged, you may fail to charge your Dell laptop and then encounter issues, like the Dell laptop won’t turn on issue.
- Battery problems: If your battery is dead or damaged, you can encounter boot issue easily.
- Faulty RAM: If your RAM modules aren’t connected properly, you can encounter issues when starting your PC.
- Motherboard issue: The motherboard is responsible for connecting all components. If there is some damage to it, your PC won’t turn on easily.
- Faulty Screen Issues: If the display is damaged, you can see nothing when you boot your Dell laptop.
- Overheating: The overheated laptop may also fail to boot.
- Operating system errors: A corrupted OS can cause a boot issue.
- BIOS issues: Incorrect boot settings in the BIOS or UEFI of the computer can cause boot-related issues.
- Hardware issues: Conflicting hardware can cause startup issues.
Recover Lost Data Before You Fix the Error
Before you try different ways to troubleshoot the “Dell laptop won’t turn on” issue, you’d better recover your data first to avoid data loss. To do that, I highly recommend MiniTool Partition Wizard.
It offers the Data Recovery feature to help you easily perform hard drive data recovery, USB/SD card data recovery, or SSD data recovery. Here’s how to use MiniTool Partition Wizard to recover files:
# 1. Create a MiniTool bootable media
Step 1. Connect the USB disk to your working computer. Next, download and install MiniTool Partition Wizard on this PC, and then launch it to enter its main interface.
MiniTool Partition Wizard DemoClick to Download100%Clean & Safe
Step 2. Select Bootable Media, and click Win PE-based media with MiniTool plug-in in the pop-up window.

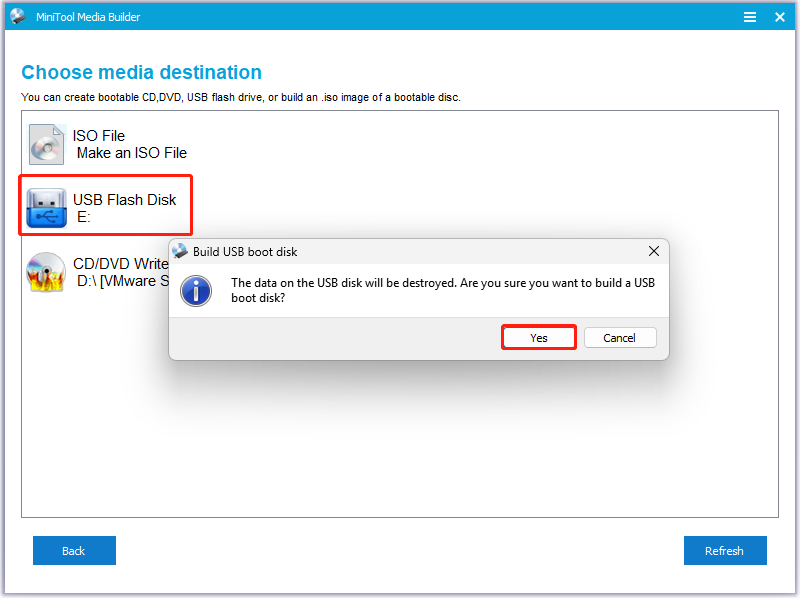
Step 3. In the Choose media destination window, choose USB Flash Disk. If you see a window pop up with the message “The data on the USB disk will be destroyed. Are you sure you want to build a USB boot disk?”, click Yes to continue.
Step 4. After that, this software will erase all data on your USB disk and then start to create MiniTool USB bootable media.
Step 5. Once done, click Finish.
# 2. Boot your laptop with the MiniTool bootable media
Step 1. Connect the MiniTool bootable media to your Dell laptop.
Step 2. Power on the laptop and then boot it to enter the BIOS menu.
Step 3. Go to the Boot tab.
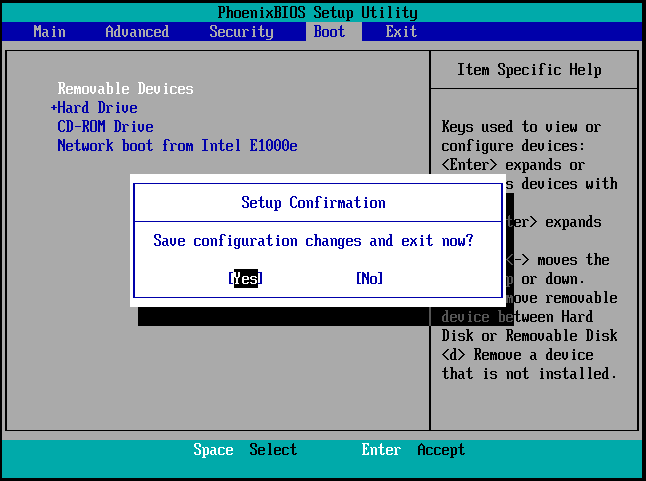
Step 4. Highlight Removable Devices and set it to the top.
Step 5. Press F10 and the Enter keys to save the changes.
Step 6. After that, your PC will boot with MiniTool bootable media.
# 3. Perform the Data Recovery feature
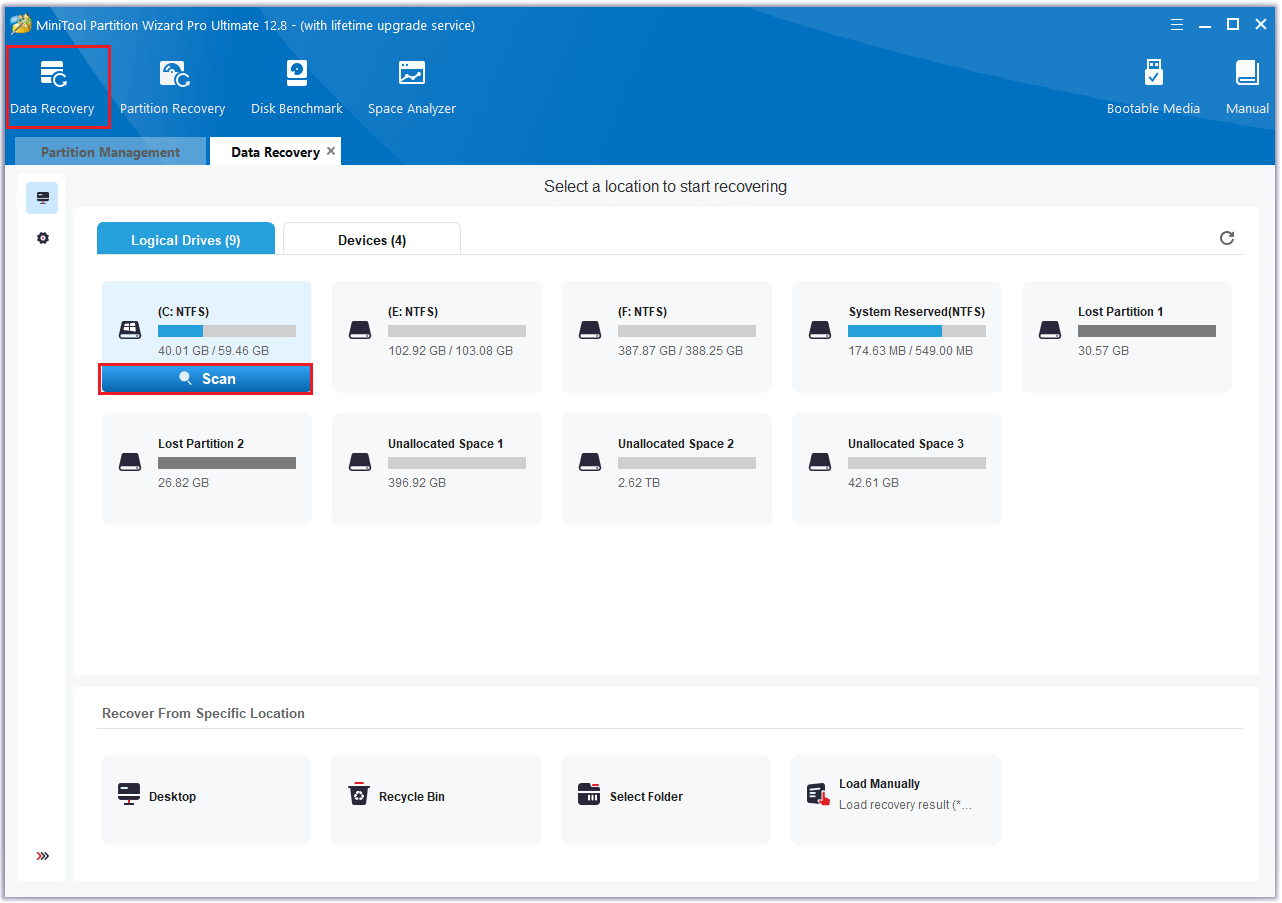
Step 1. In the main interface of MiniTool Partition Wizard, click the Data Recovery option from the top toolbar. Next, select the system partition (normally the C partition), and then click Scan to start the scanning.
Step 2. Wait for the scanning process to complete.
Step 3. Once done, tick the files you want to recover and click Save. Then, choose a safe location to save the recovered files and click OK.

Also, this powerful and multifunctional partition disk manager can help you partition hard drive, check disk for errors, convert MBR to GPT, etc.
What Should You Do When Dell Laptop Won’t Turn on?
How to fix the Dell laptop not turning on issue? To fix the issue, you can try checking the power source/peripherals/physical damage, performing a hard reset, resetting the Real-Time Clock/ BIOS/UEFI, etc.
Method 1. Check the Power Source
If your laptop’s battery is dead, you may experience the Dell laptop not turning on issue easily. In this case, try charging the laptop for a while to see if that resolves the problem.
If the laptop still doesn’t turn on, you can troubleshoot the power source by following these tips.
- Power adapter and cable: You need to check the power adapter and cable for any signs of damage. If damaged, replace them with Dell-approved replacements.
- Power outlet: If there is something wrong with the power outlet on your wall, you can encounter issues easily. To check that, you can try a different power outlet.
- Battery: If your laptop’s battery is removable, you need to check if there are any signs of damage or bloating.
Method 2. Remove Peripherals
Sometimes, peripherals that you connect to your laptop may cause your Dell laptop not to turn on. In this case, you can try removing all the peripherals to fix the issue.
If it doesn’t work, you can continue and try other methods.
Method 3. Troubleshoot the Display
Display issues can also cause a Dell laptop not to turn on. Therefore, you can look for any signs of physical damage on your laptop carefully, or you can connect an external monitor to your laptop to check if the issue is related to the screen.
If you find that the screen is the culprit of the issue, you can contact Dell support for repair.
Method 4. Perform a Hard Reset
A hard reset can remove residual electrical charges, clear the laptop’s memory of temporary data, and resolve issues like freezing or unresponsiveness.
So, you can try performing a hard reset to fix the Dell laptop boot issue. Here are the detailed steps:
- Turn off your computer.
- Unplug the AC adapter or power cable and remove the battery.
- Detach all peripherals like USB drives, printers, webcams, and media cards.
- Press and hold the Power button for 15 to 20 seconds to clear residual power.
- Reconnect the AC adapter or power cable and insert the battery (for Dell laptops).
- Turn on your Dell computer to check if it powers up now.
Method 5. Reset the BIOS or UEFI
Incorrect settings in BIOS/UEFI can cause the Dell laptop not to turn on issue as well. In this situation, you can try loading the BIOS/UEFI defaults to fix the issue. Here’s the way:
- Press the Power button.
- When power indicators appear, press the F2 key repeatedly until the BIOS environment is displayed.
- In the bottom-right corner of the screen, click on Restore Defaults.
If your computer doesn’t get past the POST (Power-On Self-Test) stage and you can’t access the BIOS, try opening your laptop and reseating the CMOS battery on the motherboard. This battery stores BIOS settings, and reseating it will restore default settings.
Method 6. Reset the Real-Time Clock (RTC)
Also, you can try resetting your Dell laptop’s Real-Time Clock (RTC) to fix the Dell laptop won’t start issue. Here’s the guide:
- Turn off your laptop and connect the power adapter.
- Press and hold the power button for 30 to 35 seconds until the LED blinks three times.
- Release the power button.
- Return to BIOS to adjust the time, boot sequence, and other settings.
Method 7. Boot into Windows Safe Mode
Still wondering, “why my Dell laptop won’t turn on but the power light is on?” Try starting your laptop in Safe Mode. Here’s the guide:
# 1. Create Windows bootable media
Step 1. Connect your USB drive to a working PC.
Step 2. Open a browser on a working PC, and go to the Download Windows 10/Windows 11 website.
Step 3. Click the Download Now button in the Create Windows 10/11 Installation Media section.
Step 4. Once the file is downloaded to your PC, double-click to run the downloaded file.
Step 5. Read the Applicable notices and license terms, and click Accept.
Step 6. Select language and edition, and click Next. Then, choose USB flash drive and click Next.
Step 7. Choose your USB flash drive and click Next. Once done, click Finish.
# 2. Boot in Safe Mode
Step 1. Press the specific key to enter the BIOS menu.
Step 2. Go to the Boot tab and set the created Windows bootable installation media to the top. Press F10 to save the changes.
Step 3. Click Next in the Windows Setup screen, and then click Repair your computer.
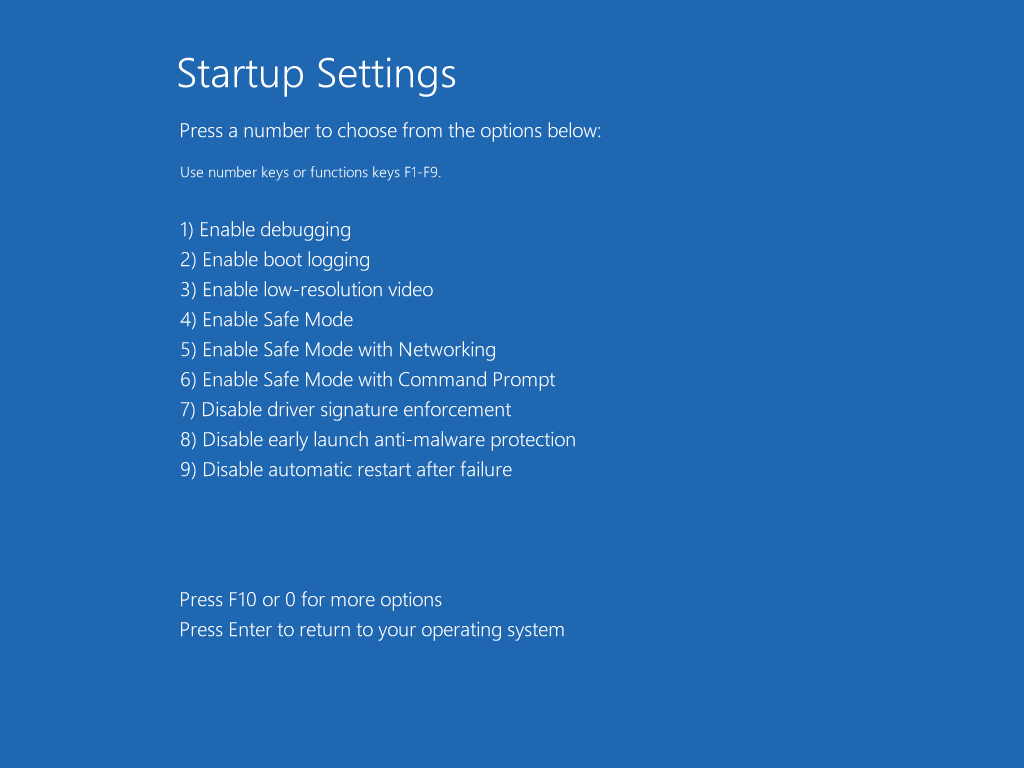
Step 4. Next, choose Troubleshoot > Advanced options > Startup Settings.
Step 5. Press 5 or F5 for Safe Mode with Networking.
Method 8. Repair Corrupted System Files
Corrupted system files can result in the Dell laptop being unable to boot normally as well. In this situation, you can try running SFC and DISM commands through the Command Prompt interface in the Windows Recovery Environment. Here’s the guide:
# 1. Boot into Windows Recovery Environment
Step 1. Power off your Dell laptop. Then, connect the Windows recovery or installation media and turn on the computer.
Step 2. Power on the device and quickly press the F12 key until the “One Time Boot Menu” or “Boot Device Options” appears.
Step 3. Select your recovery or installation media (USB or DVD) from the list and press Enter.
Step 4. Now, you can enter the Choose an option screen.
# 2. Find Command Prompt and Run SFC and DISM
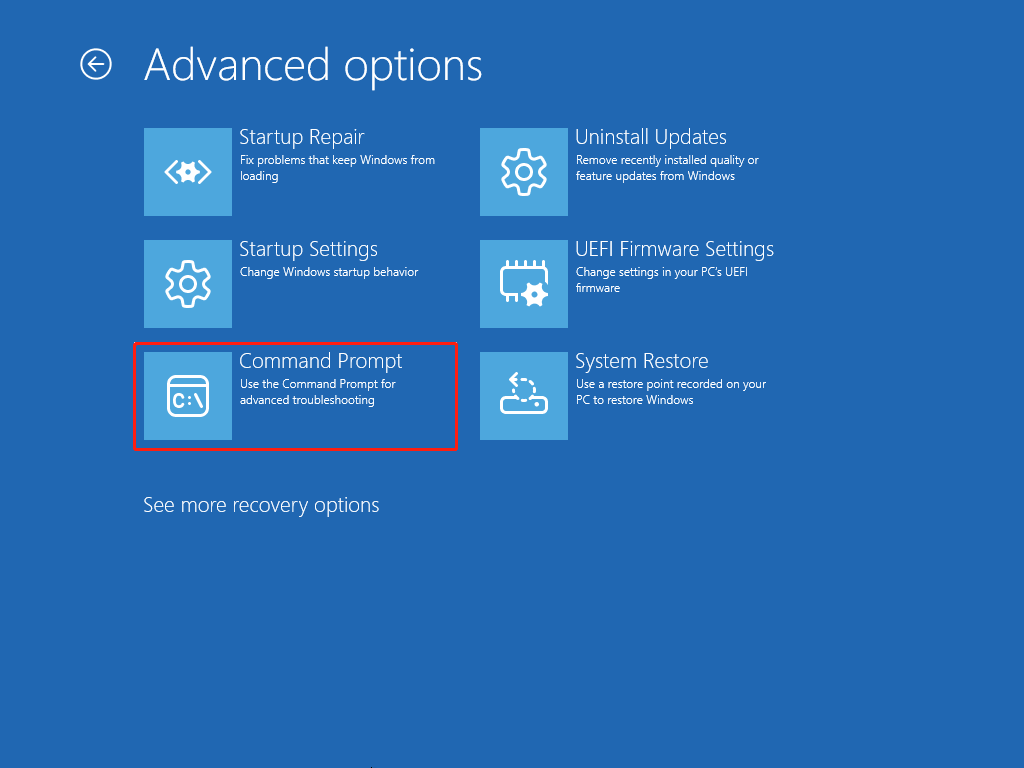
Step 1. Choose Troubleshoot > Advanced options.
Step 2. In the Advanced options window, select Command Prompt.
Step 3. In the elevated Command Prompt window, type “sfc /scannow” and press Enter.
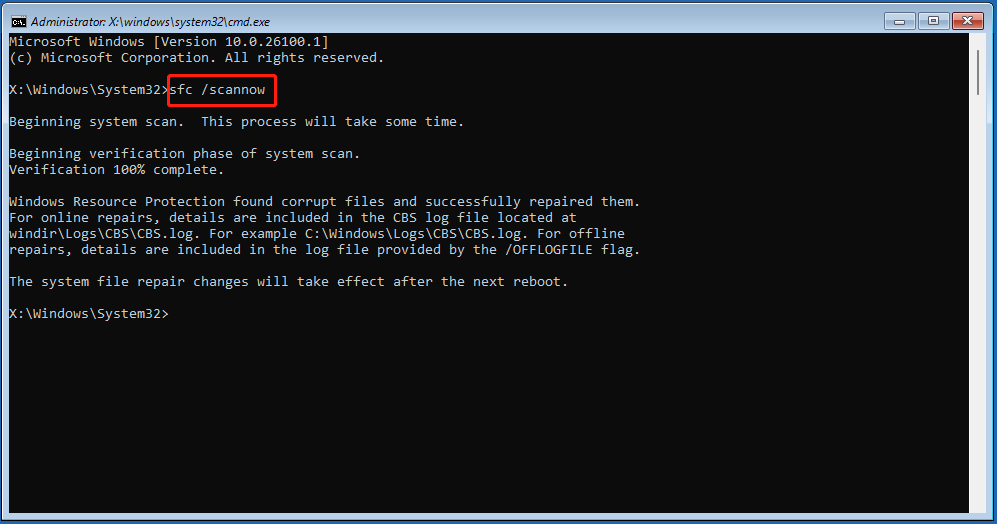
Step 4. Once the SFC scanning is complete, execute the following commands one by one for DISM scanning:
- DISM.exe /Online /Cleanup-image /Scanhealth
- DISM.exe /Online /Cleanup-image /Checkhealth
- DISM.exe /Online /Cleanup-image /Restorehealth
Method 9. Run Startup Repair
Some people report that they fixed the Dell laptop boot issue successfully by running Startup Repair. You can also have a try. To do that, you just need to do the following steps:
- Boot into the Advanced Options window.
- Select Startup Repair.
- Then, this tool will scan your system and fix the found issues.
- Once done, check if the issue has been resolved.
Method 10. Run a Preboot Diagnostic Test
The Dell diagnostic tool, called the ePSA (Enhanced Pre-Boot System Assessment), can check your system memory, hard drive, screen, and other components for errors. It also helps identify hardware issues that might prevent your laptop from turning on.
So, you can use it to fix the Dell laptop not turning on issue. Here’s how to execute it:
- Press the Power button.
- When the Dell logo appears, press F12 repeatedly.
- After a few seconds, you should see the BIOS boot screen.
- Go to Other Options.
- Select Diagnostics and run the test.
- Then, your PC will start various tests and give the results.
Method 11. Reinstall Windows
Corrupted Windows operating system can also result in the Dell laptop not turning on issue. In this case, you can try reinstalling Windows to fix the issue. Here, I use Windows 11 as an example. You just need to do the following steps:
Note: Reinstalling Windows will erase all your data on the system disk. So, you’d better back up your important data first before you do that.
# 1. Create a Windows installation media
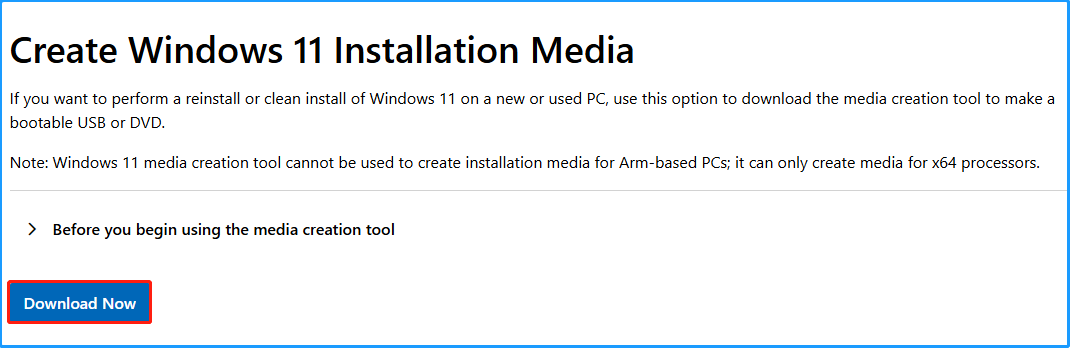
Step 1. Connect your USB flash drive to the working PC, and navigate to the Download Windows 11 website.
Step 2. Click Download Now under the Create Windows 10/11 Installation Media section.
Step 3. Find and run the MediaCreationTool.exe file on your PC.
Step 4. Read the Applicable notices and license terms, and click Accept.
Step 5. Select language and edition, and click Next. Then,choose the USB flash drive option and click Next.
Step 6. Choose your USB flash drive and click Next. Once done, click Finish to confirm.
# 2. Install Windows OS
Step 1. Boot your PC from the USB bootable media, then follow the on-screen guide to enter the Windows 11 Setup window.
Step 2. Select the language settings and click Next. Then, set keyboard settings and click Next.
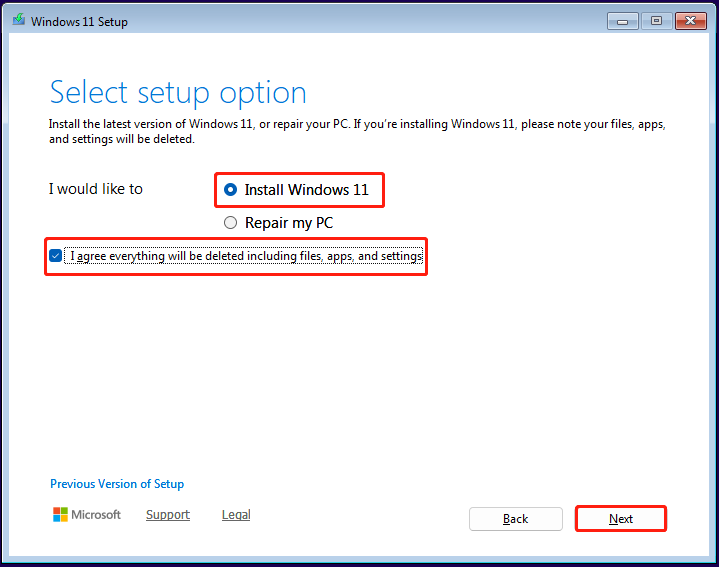
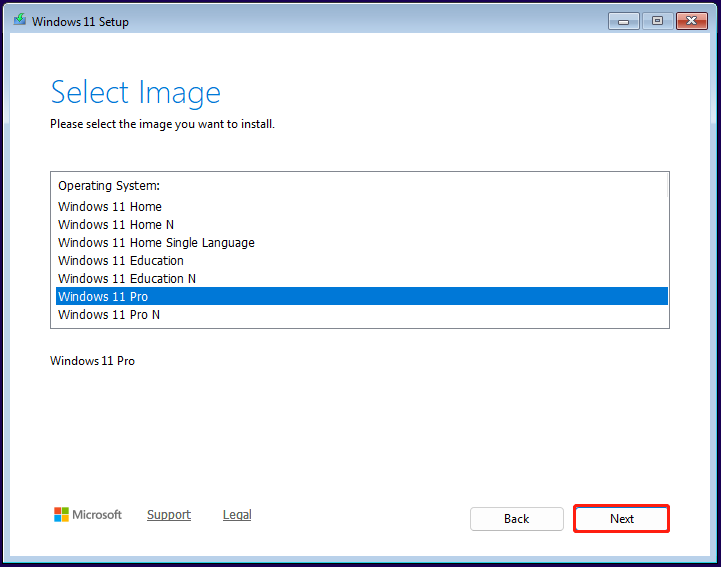
Step 3. Choose the Install Windows 11 option, check the box of “I agree everything will be deleted including files, apps, and settings”, and then click Next.
Step 4. Click I don’t have a product key to activate Windows 11 later. Then, select the Windows 11 version that you want to install and click Next.
Step 5. Read Applicable notices and license terms, and click Accept.
Step 6. Select a location to install Windows and click Next. After that, click Install to confirm.
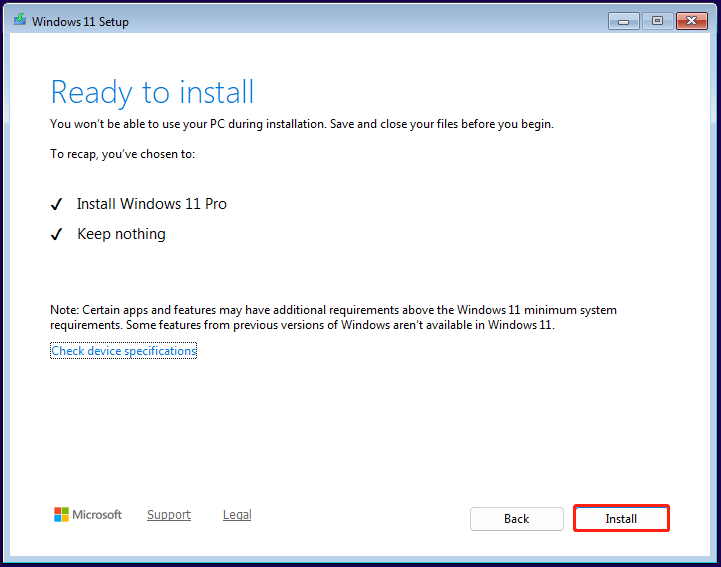
Step 7. Wait for the process to finish. After that, follow the on-screen instructions to complete the initial setup.
Now, your Dell laptop works normally again.
Method 12. Check for Physical Damage
Physical damage can also cause your Dell laptop not to turn on. It’s important to carefully inspect your laptop for any signs of damage, such as cracks, dents, or loose parts around the hinges or ports.
Additionally, liquid spills can damage the internal components. If you have accidentally spilled water or any other liquids on your Dell laptop, the internal components have likely sustained damage.
Moreover, you can open the back lid of the Dell laptop and check if there is any damage to its motherboard and RAM. To do that, you just need to do the following steps:
Step 1. Turn off your Dell laptop completely.
Step 2. Open the laptop’s back lid.
- Flip over the laptop.
- Unscrew all the screws on the back lid.
- Lift up the back lid.
- Then, you can see the internal components of your laptop.
Step 3. Check if there are any damages on the motherboard.
Step 4. Check whether the RAMs are damaged.
If you have one RAM: Find the RAM module on the motherboard, remove it. Then, reinsert it again.
If you have two RAMs: Remove one and try turning on your computer. You can then remove the other one if the problem persists.
Method 13. Ask for Dell Professional Help
If none of the previous methods resolve the issue of your Dell laptop not turning on, you can visit Dell’s support page. There, you can search for your specific laptop model to find tailored guidance.
If your laptop is still under warranty, you may be eligible for free repair or replacement.
Tips for Preventing Future PC Startup Issues
Encountering the Dell laptop not starting up issue is very bothersome. When this issue occurs on your PC, it may put your data in danger of loss.
Therefore, focusing on proactive measures to prevent future PC startup issues is necessary. Here are some useful tips:
- Keep Windows & device drivers updated: Updates often include fixes for known issues and improve system stability. So, you need to ensure your operating system, like Windows, and device drivers are up-to-date.
- Update BIOS/UEFI: An Outdated BIOS/UEFI can lead to booting issues easily. So, you’d better keep your BIOS/UEFI up-to-date as well.
- Reduce Startup programs: Too many startup programs can increase the boot time and result in issues. So, you need to reduce the number of startup programs.
- Optimize disk: Regularly defragment your hard drive (if you’re not using an SSD) and clean up old, unnecessary files.
- Disable Fast Startup: Although Fast Startup can reduce boot times, it can cause startup issues as well.
- Keep the PC’s interior clean: Clean the dust in the computer’s interior regularly to prevent dust buildup, which can cause overheating and other issues.
- Check all internal hardware connections: Loose connections can also cause various issues.
In Conclusion
This is the end of the post. Now, you may already know what should you do when Dell laptop won’t turn on. This post offers several easy methods to help you troubleshoot the issue. Also, it offers a powerful tool – MiniTool Partition Wizard to recover lost files and manage your disk.
Additionally, if you have any suggestions or experience issues while using MiniTool Partition Wizard, please contact us by emailing [email protected]. We will respond as soon as possible.
Dell Laptop Won’t Turn on FAQ
Besides, you can use built-in diagnostic tools or software to assess the battery’s health.
About The Author

Position: Columnist
Charlotte is a technology columnist with a strong focus on the Windows operating system, specializing in disk management, backup, and data recovery. She is passionate about analyzing computer errors, identifying root causes, and delivering practical solutions. In her free time, she stays updated on the latest developments in computer systems and hardware while continuously learning new technologies to broaden her expertise. Her writing style is clear and easy to understand, making complex technical topics accessible even to users with limited computer knowledge.
User Comments :