To resolve the issue of the “D drive is missing after Windows 11 update”, try recovering partition with MiniTool Partition Wizard, rescanning the disks in Disk Management, assigning a drive letter, updating drivers, repairing corrupted system files, etc.
Some users have reported that their D drive disappeared after upgrading to Windows 11. This problem is usually frustrating because you can’t access the data stored on the D drive.
So, what causes this problem? And how can you fix it? Continue reading to find out the detailed answers.
Why Is My D Drive Missing after Windows 11 Update?
After upgrading to Windows 11, many users have encountered the problem of the D drive disappearing, preventing them from accessing the data stored on it.
Here are some common reasons why the D drive might be missing after a Windows 11 update:
- Missing drive letter: The partition may still exist, but Windows has forgotten to assign a drive letter to it (e.g., D:).
- Hidden D drive: Sometimes, the Windows system might hide your D drive due to certain configuration settings, meaning the drive no longer appears in File Explorer.
- Driver issues: Windows updates may install incompatible storage drivers, preventing the hard drive from being recognized.
- Partition/file system corruption: The update may have corrupted the partition table, causing the partition to appear as “unallocated” space.
- Windows update problems: Some system updates may mess up the drive letter or system configuration, causing the D drive to disappear.
Now that you know the reasons why your D drive disappeared, you can take corresponding measures to help you quickly recover your missing D drive.
How to Fix the D Drive Is Missing after Windows 11 Update?
If you find that your “D drive not showing up after Windows 11 update”, you can try the following methods to solve the problem:
Method 1: Check the Hard Drive’s SATA Data Cable
For internal hard drives, you need to first check if the hard drive’s SATA data cable and power cable are securely connected.
If these connections are loose or have poor contact, the hard drive may not be able to supply power or transfer data properly, and the system will not be able to recognize the hard drive, causing the D drive to disappear in Windows.
It is recommended to first shut down the computer and disconnect the power, then reconnect the relevant cables firmly to restore the hard drive’s normal connection.
If this still doesn’t work, please try the following methods.
Method 2: Rescan Disks in Disk Management
You can perform a “Rescan Disks” operation to scan the target disk and resolve the issue of the missing D drive.
Step 1: Right-click the Start icon and choose Disk Management to open.
Step 2: Select the target volume (D). After that, click the Action option on the navigation bar.
Step 3: Choose the Rescan Disks option from the context menu. Then the disk scanning is in progress.
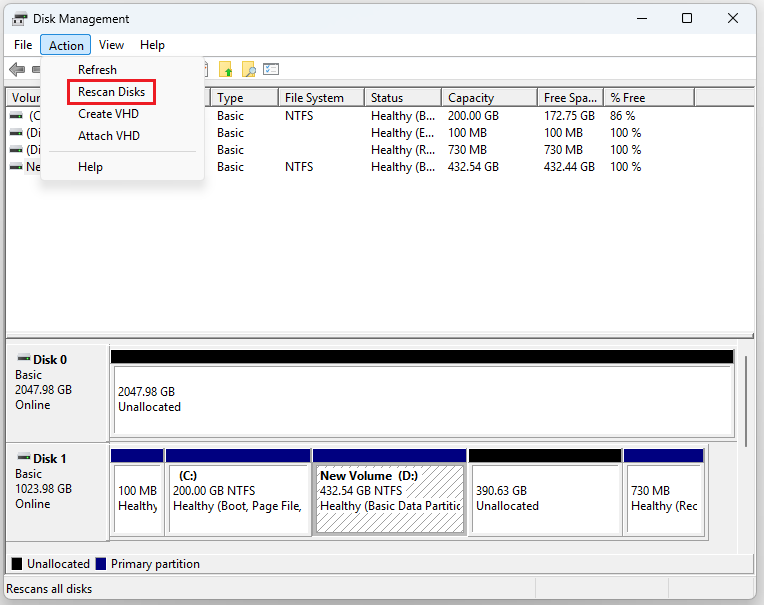
After completion, you can confirm whether the D drive shows up.
Method 3: Make the Hidden Drives Show
If your D drive has disappeared because it was mistakenly set to hidden, you can rediscover it by following these steps.
Step 1: Click the File Explorer icon and select three dots at the top. Next, choose Options from the drop-down menu.

Step 2: On the Folder Options window, click on the View tab and then check the option Show hidden files, folders, and drives.
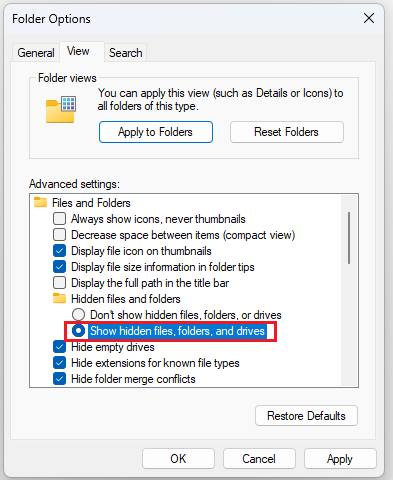
Step 3: Click on Apply and then the OK button.
Method 4: Assign a Drive Letter
After a Windows 11 update, the system may encounter minor issues during hard drive reorganization, resulting in the original partition still existing, but its drive letter (such as D:) being automatically removed.
In this case, you need to reassign a drive letter to that drive.
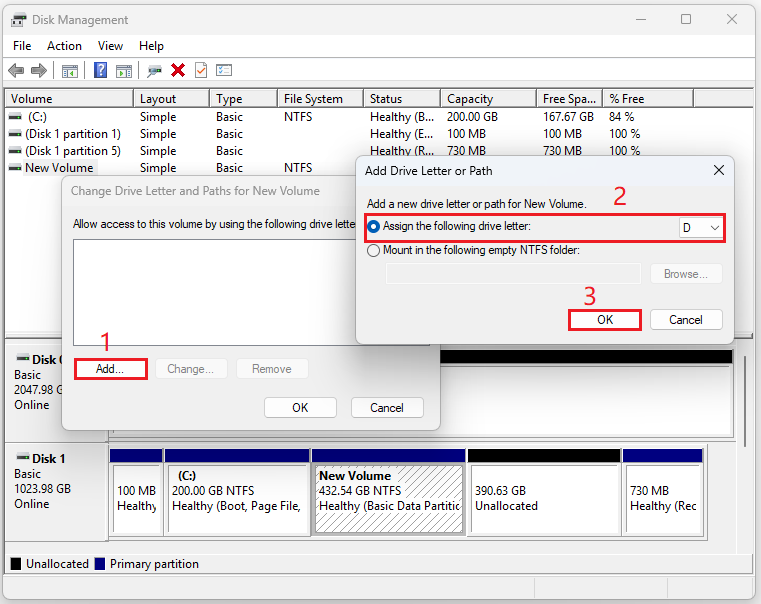
Step 1: Press Win + R to open the Run window and type diskmgmt.msc, then press Enter.
Step 2: Right-click the D drive (it may not have a drive letter), and select Change Drive Letter and Paths.
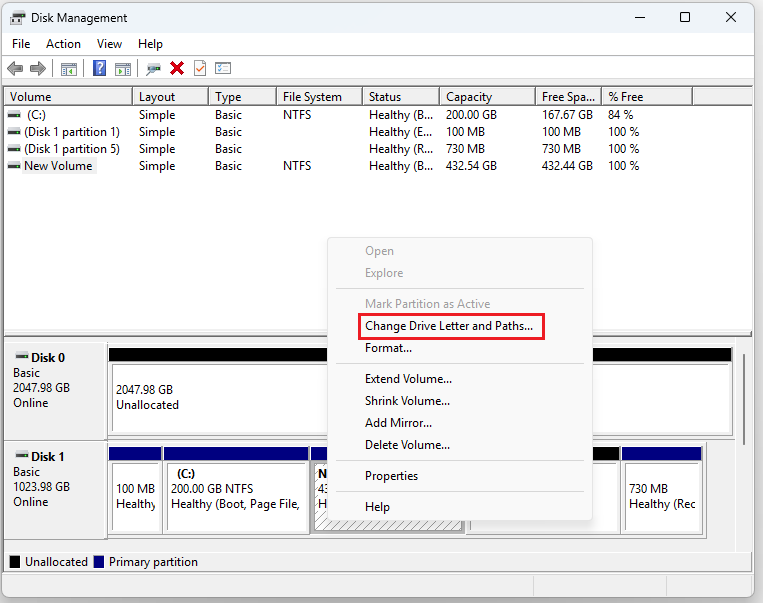
Step 3: In the new pop-up window, click Add and choose the letter D. Then click OK.
Method 5: Update BIOS and Drives
Check your BIOS to confirm that the drive is still recognized, and then proceed to update your BIOS.
After that, if the D drive letter still doesn’t appear, update the SATA controller driver through the Device Manager. Here are the steps:
Step 1: Press Win + X and select Device Manager.
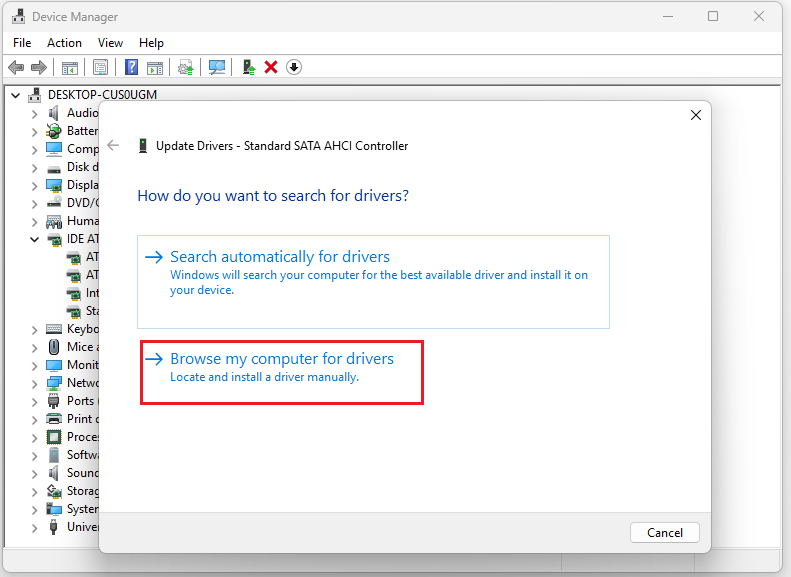
Step 2: Expand the IDE ATA/ATAPI controllers and right-click the drive to choose Update driver. Then choose Browse my computer for drivers.
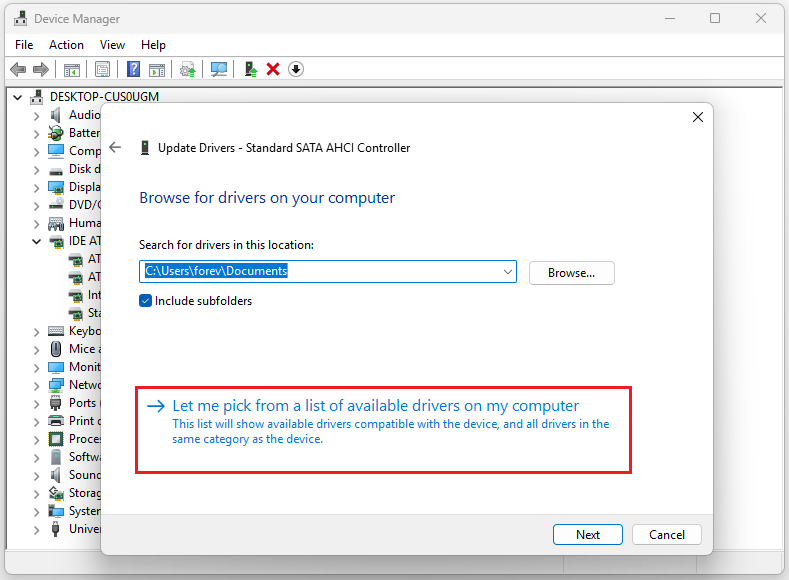
Step 3: Select Let me pick from a list of available drivers on my computer.
Step 4: Then a list will show up, scroll down until you reach IDE ATA/ATAPI controllers. Click Standard SATA AHCI Controller > Next.
Method 6: Repair Corrupted System Files
If system files are corrupted, it may cause problems with disk recognition, mounting, and driver loading. Running SFC can automatically repair these corrupted system components, thereby restoring the normal display of drive D.
Step 1: Type cmd in the Windows search box, find Command Prompt, and choose Run as administrator.
Step 2: Type DISM.exe /Online /Cleanup-image /Restorehealth and press Enter.
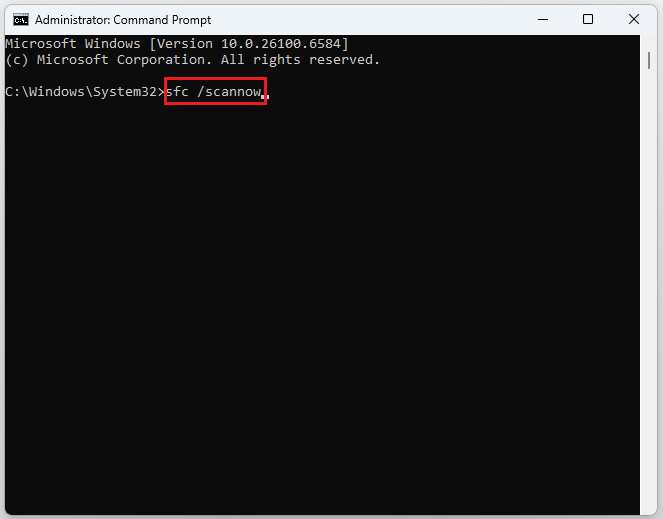
Step 3: When the process is over, type sfc /scannow in the window and press Enter.
Method 7: Run CHKDSK
System updates may cause file system corruption on drive D, preventing Windows from properly recognizing the partition and causing it to not appear in File Explorer.
To resolve this issue, you can use the CHKDSK tool to check the hard drive and repair any potential disk errors.
Step 1: Press the Win + R keys to open the Run dialog.
Step 2: Type cmd in the text box and then press Ctrl + Shift + Enter to run Command Prompt with administrative privileges.
Step 3: In the prompted Command Prompt window, type chkdsk D: /f /r and press Enter.
- /f: Fix file system errors.
- /r: Locate bad sectors and attempt to recover readable data.
Method 8: Recover Partition via MiniTool Partition Wizard
If your D drive appears as unallocated space in Disk Management instead of a normal D drive partition, it means the partition has been lost. In this case, you need to recover the disk.
The Partition Recovery feature in MiniTool Partition Wizard can help you with that.
It can not only help you recover partitions, but also recover hard drive data, delete/extend/resize partitions, convert MBR to GPT, and recover data from external hard drive.
MiniTool Partition Wizard DemoClick to Download100%Clean & Safe
Step 1: Launch MiniTool Partition Wizard to its main interface. Then click Partition Recovery from the top. Then click Continue.
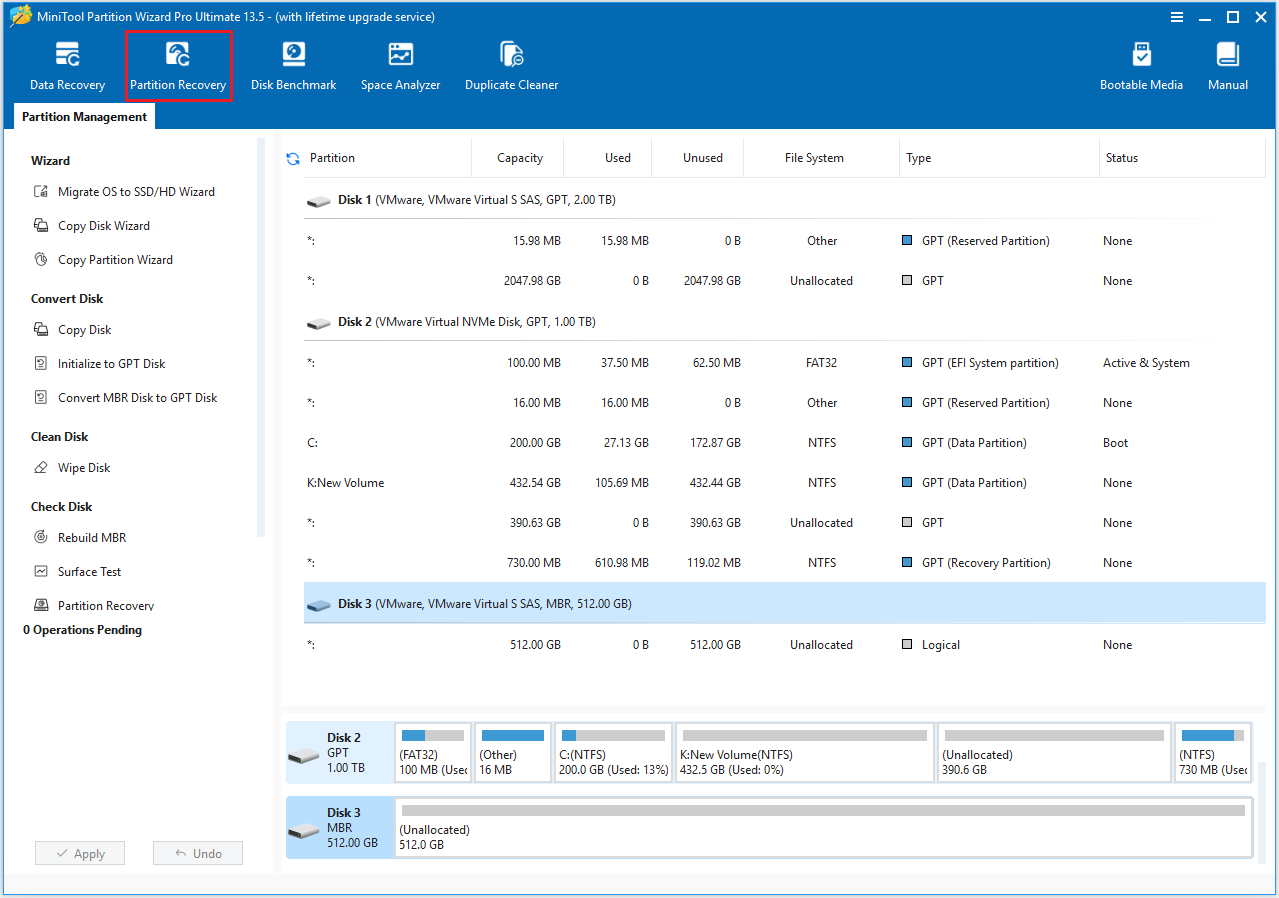
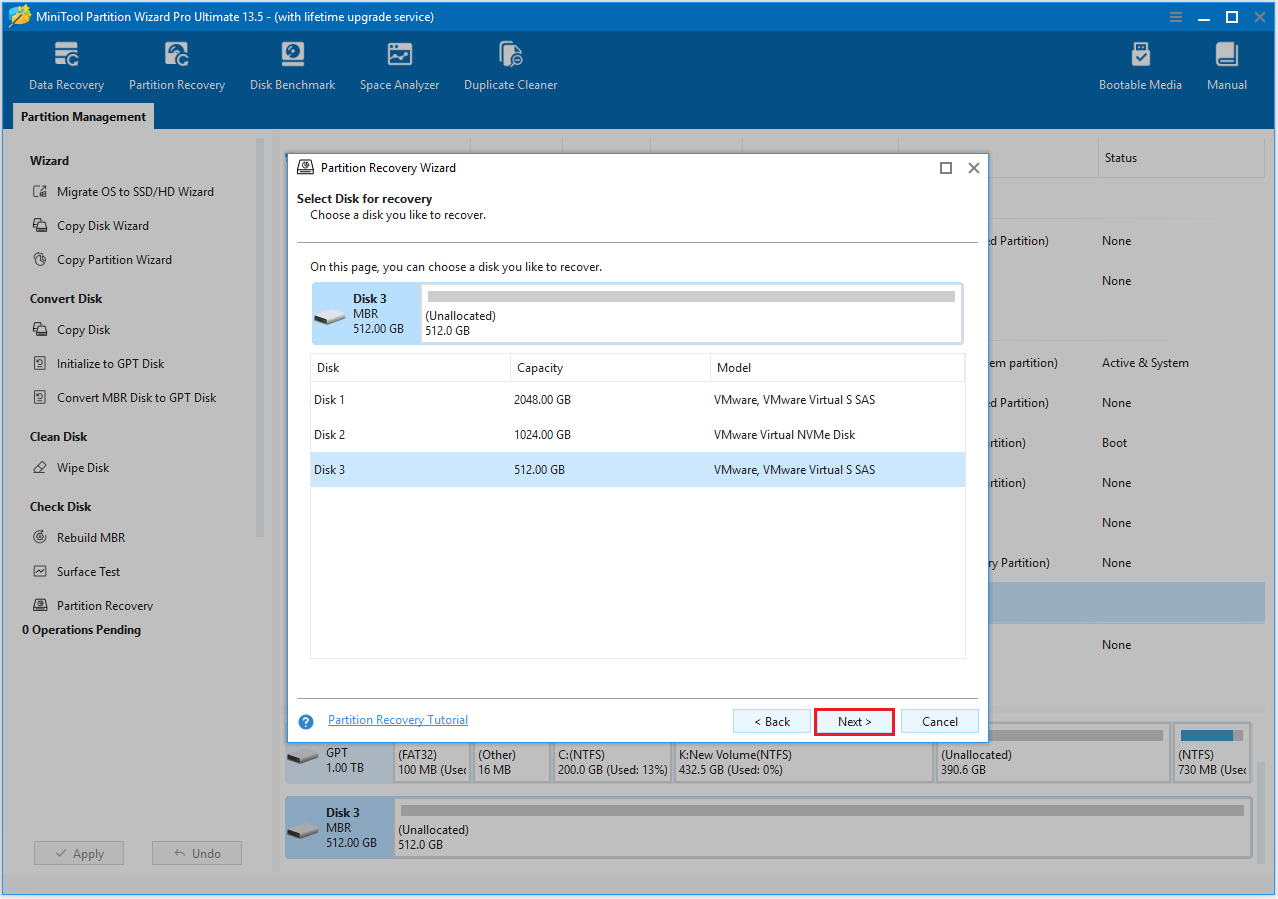
Step 2: Choose Disk 3 and click Next.
Step 3: In the window that appears, choose a scanning range and click Next to continue.
- To scan the entire disk, please select the Full Disk option.
- If you only want to scan the free space on your disk, select Unallocated Space.
- To scan particular sectors only, please choose the Specified Range option.

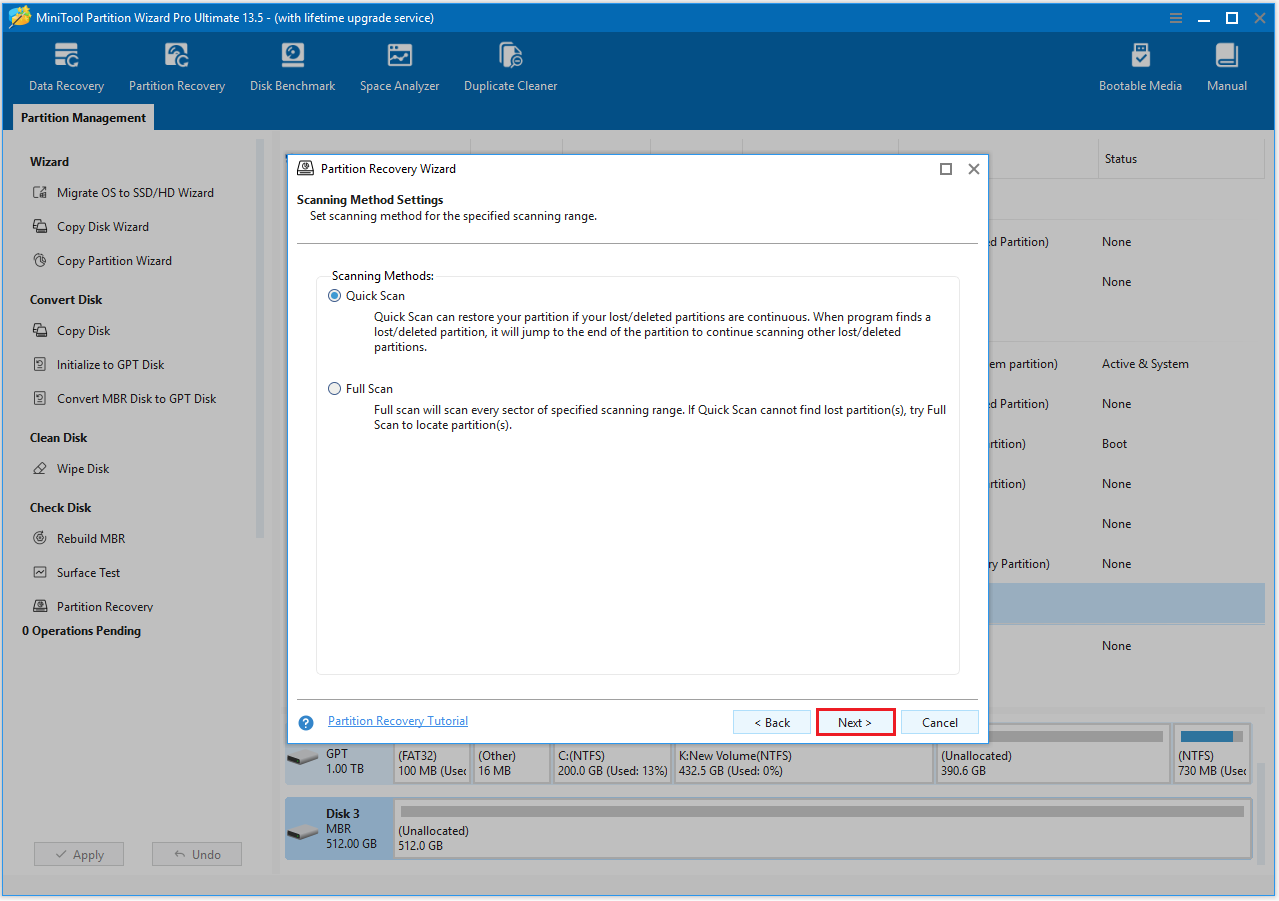
Step 4: Here are two scanning methods for you to choose from. Then click Next.
- Quick Scan: It works best for recovering continuous lost or deleted partitions. When this tool detects such a partition, it will skip to the end of it and continue scanning for any other missing or deleted partitions.
- Full Scan: If Quick Scan doesn’t locate the lost partitions, try using Full Scan, which examines every sector within the scan range you selected.
Step 5: This will list all partitions found after the scan is complete. To determine if these partitions contain the files you need, double-click on the partition to see the directory structure. Then click Close.
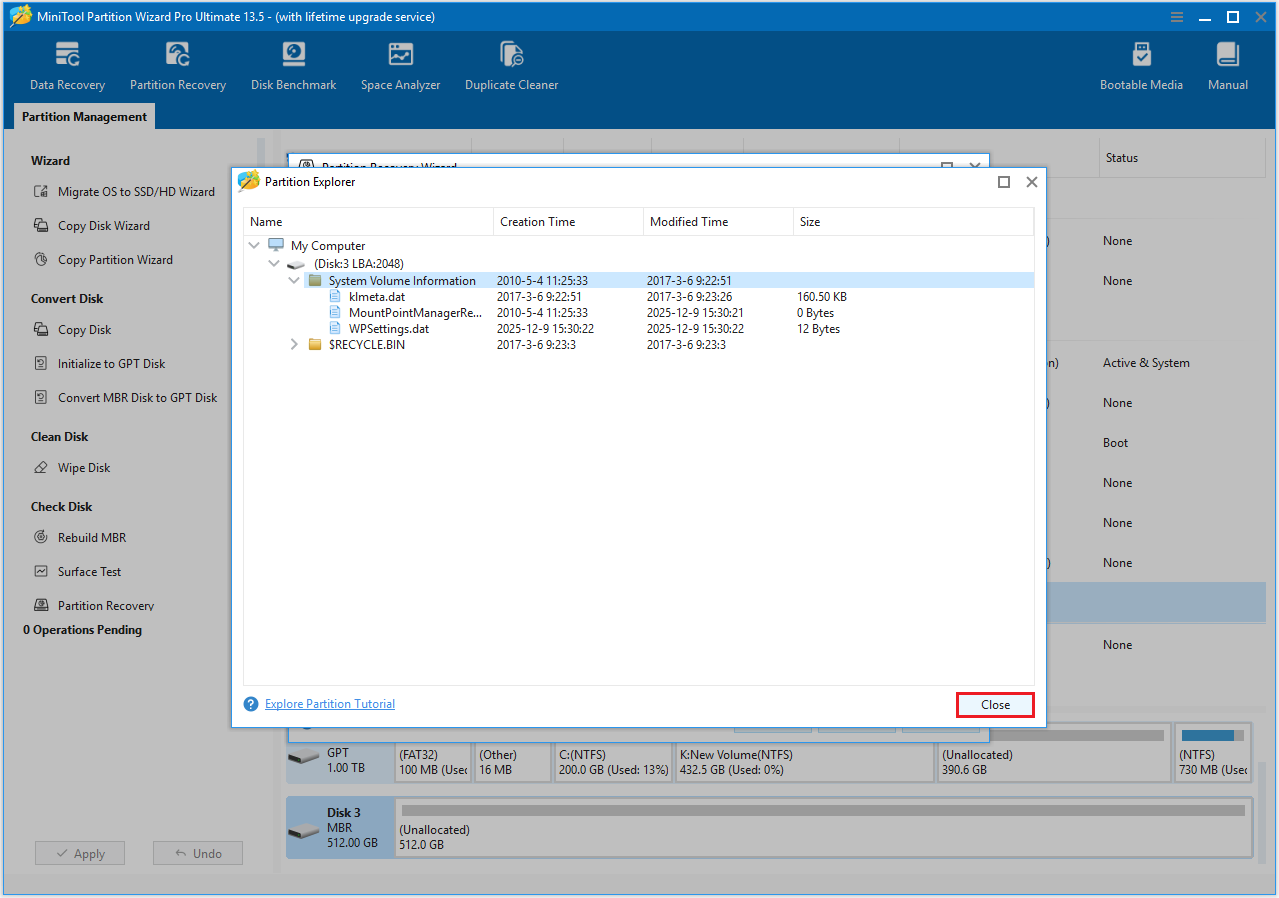
Step 6: Once you’ve verified that the displayed partitions are the ones you need, close the Partition Explorer window and select all the necessary partitions (both the current and the recovered ones). Any partitions left unchecked will be removed. After that, click Finish.

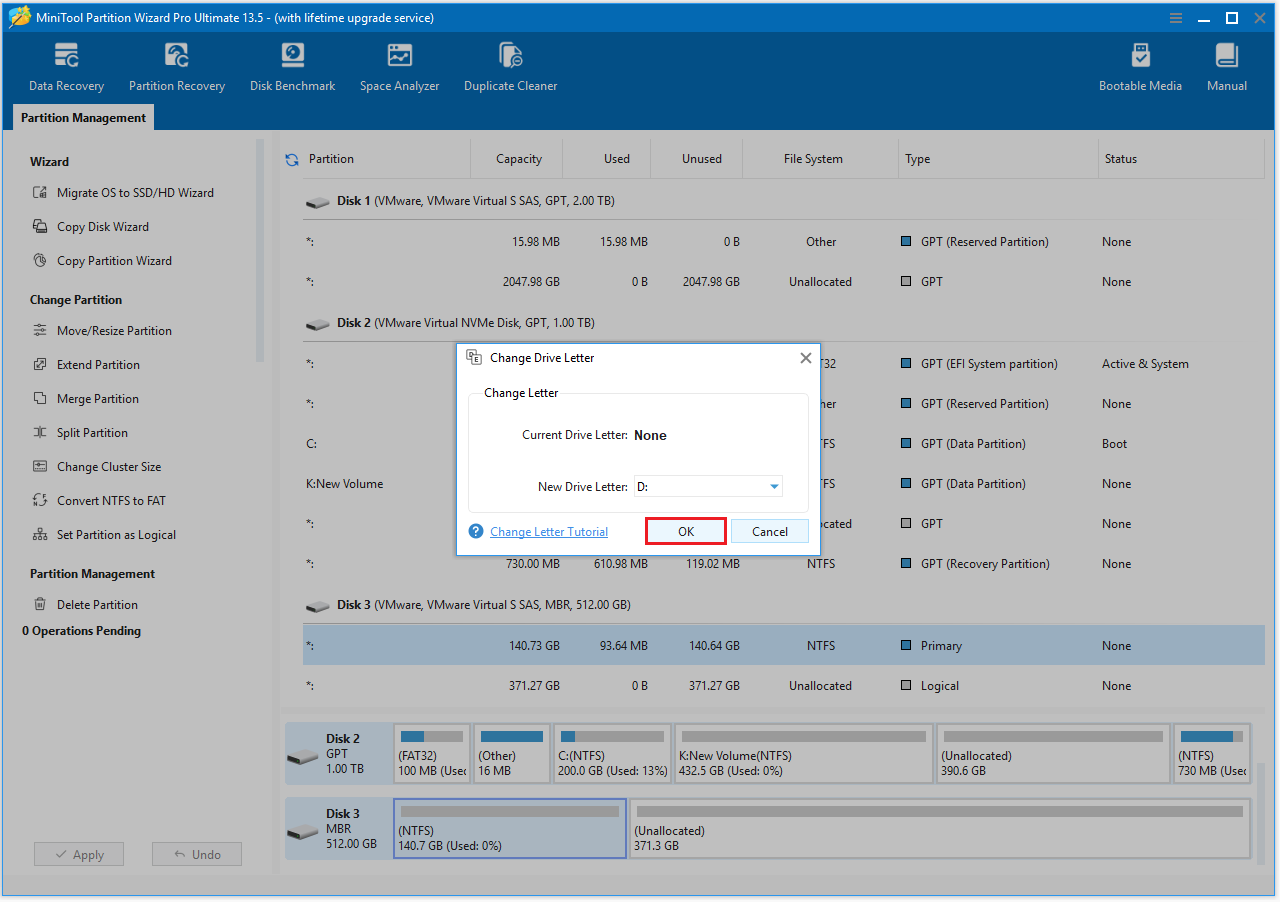
Step 7: Now you can preview that the selected disk contains the partitions you just checked. Click the Apply > Yes button to finish the recovery process.
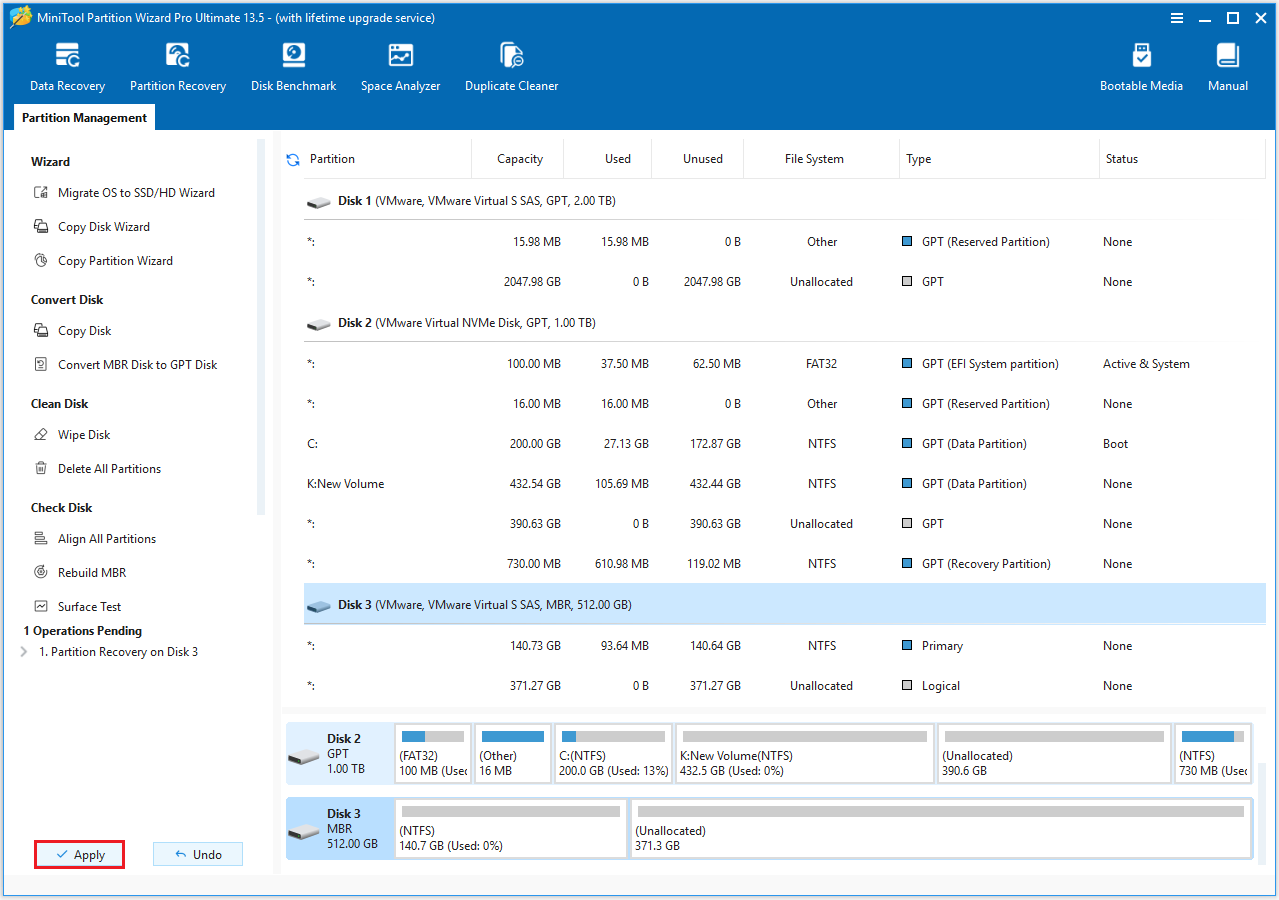
Once the partition is restored, it will not have a drive letter. To use it as usual, you need to assign it the drive letter D.
Method 9: Uninstall Recent Windows Update
If you encounter a problem where your D drive disappears after installing or updating Windows 11, you can try uninstalling the update to see if that resolves the issue.
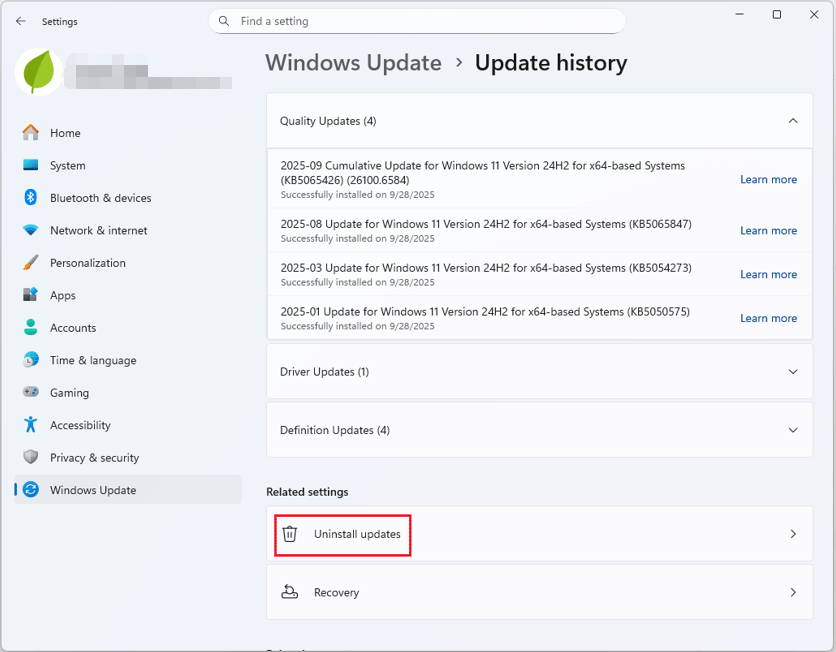
Step 1: Click the Start icon and choose the Settings app.
Step 2: Click Windows Update > Update history > Uninstall updates.
Step 3: In the pop-up window, right-click on the recently installed update and choose Uninstall. Confirm the operation.
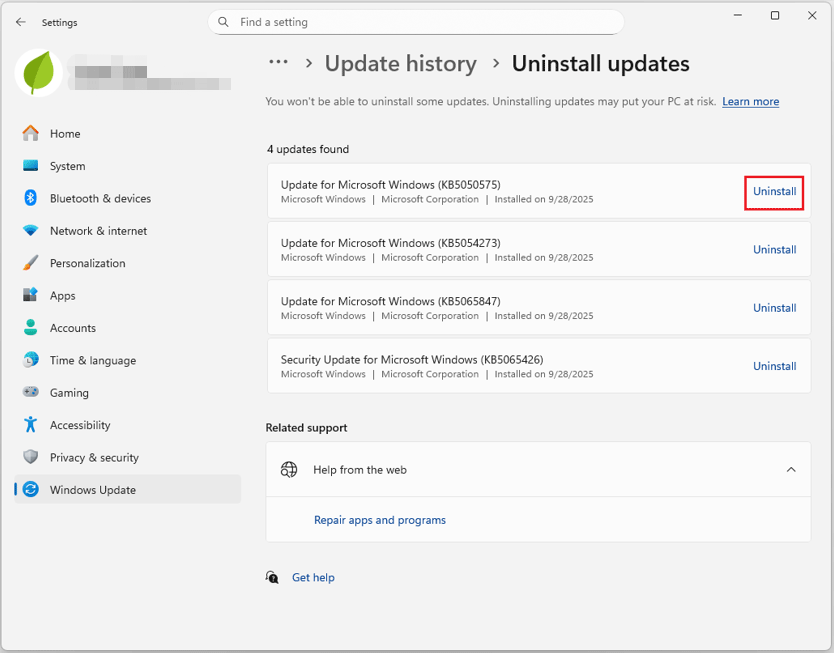
After the uninstallation, see if the hard drive goes back on the PC.
Method 10: Restore Your Computer to the Previous Point
To resolve the issue of the D drive disappearing after a Windows 11 update, you can use “System Restore.” System Restore will restore your computer to its state before the update.
If the D drive became unrecognizable due to the update, restoring it to its previous normal state will allow the system to correctly recognize and display the D drive again.
Step 1: Type Create a restore point in the search box and click Open from the right side.
Step 2: Choose System Restore and click Next.

Step 3: Choose a restore point and click Next, then follow the instructions to revert the computer to a previous restore point.

D Drive Is Missing after Windows 11 Update FAQ
Step 1: Press Windows + I to open Settings.
Step 2: Go to Update & Security > Windows Security > Virus & threat protection.
Step 4: Click Scan options.
Step 5: Choose Full scan and click the Scan now button.
Bottom Line
If you also encounter the situation where the D drive disappears after a Windows 11 update, you can refer to the methods provided in this article, including assigning a drive letter, making the hidden drives show, repairing corrupted system files, etc.
If you have any questions or suggestions while using MiniTool Partition Wizard, you can contact us via [email protected] for further assistance.
About The Author

Position: Columnist
Cecilia has been an editor at MiniTool for two years. She primarily focuses on disk and partition-related content, with particular expertise in disk cloning, partition recovery, and PDF document conversion. She is dedicated to providing users with clear and accurate solutions to help them efficiently resolve common computer problems.
User Comments :