The Windows operating system is one of the most popular systems. Over the years, it has become a multifunctional platform from a pure operating system. However, just like with other systems, you can encounter errors while using the Windows OS.
Blue screen is one of the most critical errors that will prevent you from accessing the normal Windows interface. For example, here is a user report from the learn.microsoft.com forum:
Around an hour ago, my laptop froze and I got a blue screen with the stop code "clock watchdog timeout"...I'd like to know what caused this to happen, how to fix it, and how I can stop this from re-occurring...:https://learn.microsoft.com/en-us/answers/questions/1650923/got-a-clock-watchdog-timeout-blue-screen-how-do-i
Have you also encountered the Clock Watchdog Timeout error? If so, continue reading to get the possible reasons and solutions for the error.
What Is the Clock Watchdog Timeout Error
The Clock Watchdog Timeout error is a blue screen issue in Windows that indicates communication problems between the processor and other components, often due to CPU cores and threads not handling interruptions properly.
To understand this error more clearly, it’s important to know what a watchdog is. A watchdog is a hardware or software component that monitors the system and initiates a reset or an error if it detects a malfunction.
When the CPU, which is responsible for processing instructions, does not complete its tasks within the time limit set by the watchdog, the Clock Watchdog Timeout error can occur.
Possible Causes of Clock Watchdog Timeout Error
What causes the Clock Watchdog Timeout error? The Clock_Watchdog_Timeout error typically arises from processor issues that hinder its proper function. Other potential causes may exist as well:
- RAM issues
- BIOS problems
- Hardware Issue
- Outdated/damaged/incompatible drivers
- Overclocking
- Software conflicts
- Corrupted system files
- Outdated BIOS or firmware
- Malfunctioned operating system
- Virus or malware
- Problematic antivirus
- Thread communication failure
- System overload
After analyzing what could cause the Clock_Watchdog_Timeout error, you can choose the appropriate methods below to fix the error.
How to Fix the Clock Watchdog Timeout Error
What should you do to fix the BSOD Clock Watchdog Timeout error? To fix the error, you can try performing a clean boot, running a memory test, repairing corrupted system files, checking disk errors, disabling overclocking/C1-E in BIOS, updating/resetting BIOS, etc.
Here’s the detailed guide:
#1. Try Some Basic Tips
Before you try other advanced methods to fix the Clock Watchdog Timeout Windows 11 error, you can try some basic tricks first.
- Check hardware connections
- Restart your system
- Clean your computer
- Update Windows
- Check power supply
- Monitor CPU and GPU temperature
- Test CPU Stability
If none of them can help you fix the error, you can continue and try the following methods.
# 2. Check for Malware
A virus or malware can cause the Clock Watchdog Timeout Windows 11 error as well. Therefore, you can try performing a full virus scan on your PC to find and remove a virus or malware, and then resolve the Clock_Watchdog_Timeout error.
Here’s how to use Windows Security to run a full scan in Windows 10 and 11:
Step 1. Open the Windows Security window.
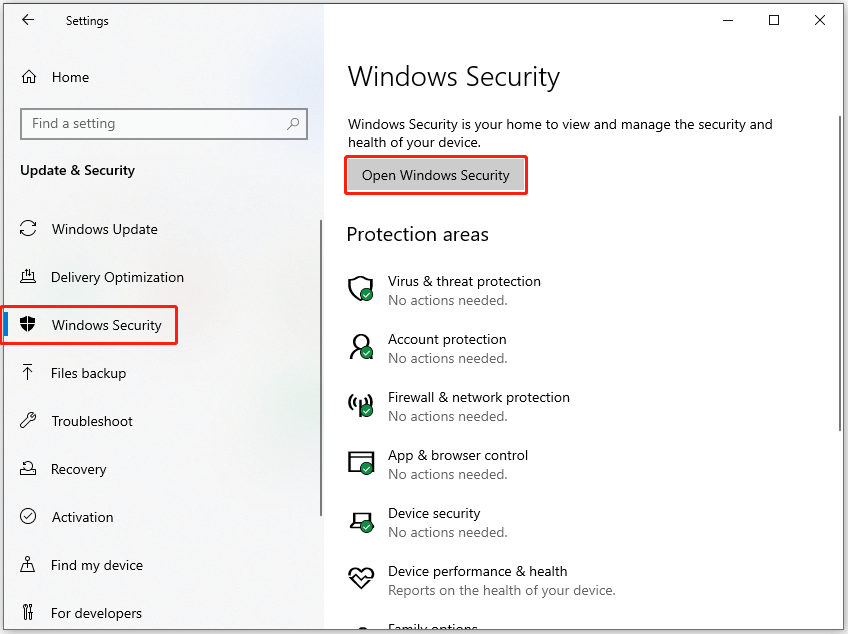
For Windows 10:
- Open the Settings window.
- Navigate to Update & Security > Windows Security.
- Then, click Open Windows Security.
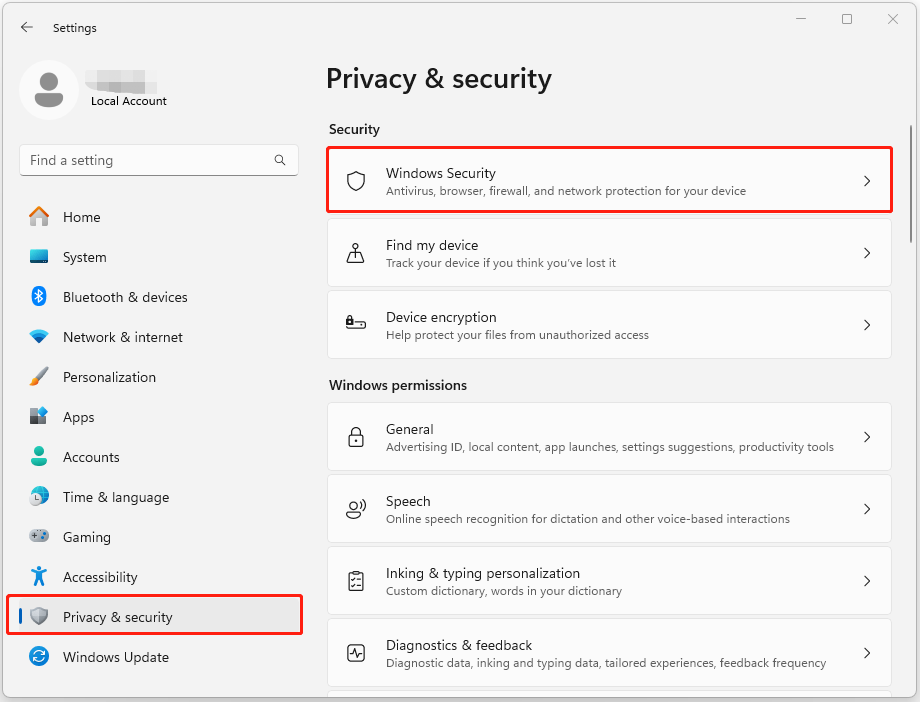
For Windows 11:
- Open the Settings window.
- Select Privacy & Security from the left panel
- Next, click Windows Security.
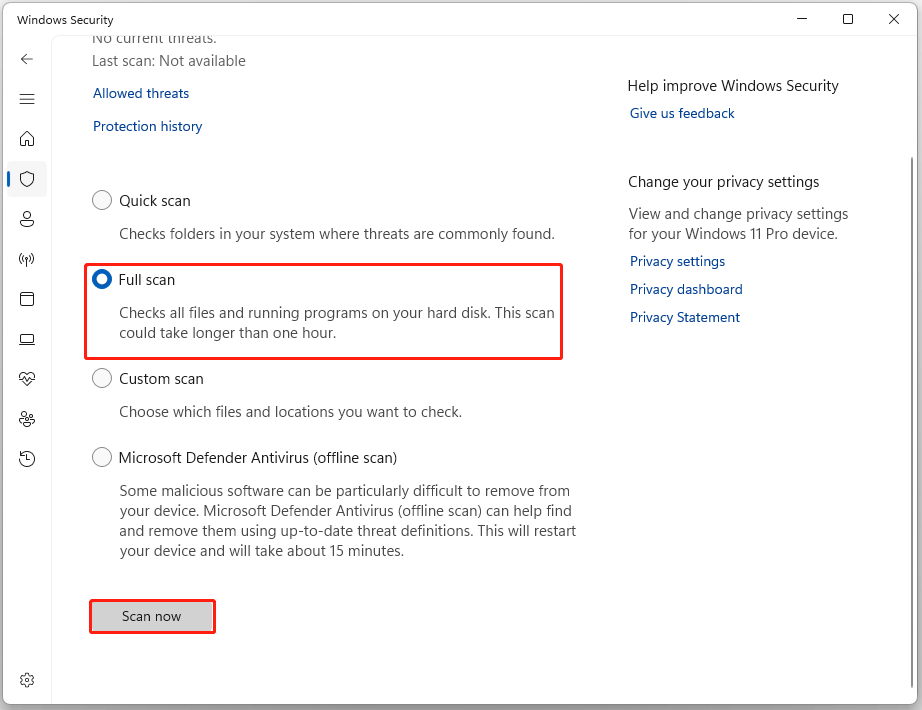
Step 2. Perform a full virus scan.
- Select Virus & threat protection.
- Then, click Scan options.
- Choose Full scan and click Scan now.
Step 3. Once done, follow the on-screen guide to remove the found virus or malware.
Step 4. Now, restart your computer and check if the error has been resolved.
# 3. Roll Back/Update Drivers
Outdated, damaged, or incompatible drivers may also cause the Clock Watchdog Timeout Windows 10 error. In this situation, you can try updating the outdated driver to fix the issue. Here’s how to do that:
Step 1. Open the Device Manager window.
- Press the Win + X keys simultaneously to open the Quick Link menu
- Select Device Manager from the menu.
Step 2. Update the outdated device drivers.
- Expand a category.
- Right-click the outdated driver.
- Select Update driver from the menu.
- Choose the Search automatically for drivers option.
- Then, follow the on-screen guide to complete the process.

Step 3. Repeat the above steps to update all the outdated drivers. Once done, check if the Clock Watchdog Timeout Windows 10 error is fixed.
If you encounter the Windows 10 Clock Watchdog Timeout error after you update your device drivers, you can try rolling back the updated drivers to fix the error. Here’s how to do that:
Step 1. Open the Device Manager window.
Step 2. Roll back the updated device driver.
- Expand the category that contains the driver that you’ve updated recently.
- Then, right-click the updated driver and select Properties.
- Go to the Driver tab.
- Now, click the Roll Back Driver button.
- Click Yes to confirm.
Step 3. Next, restart your computer and check if the error has been resolved.
# 4. Repair Corrupted System Files
Corrupted system files is also one of the reasons for the Clock Watchdog Timeout error. In this case, you can try running SFC and DISM commands to fix the error. Here’s the guide:
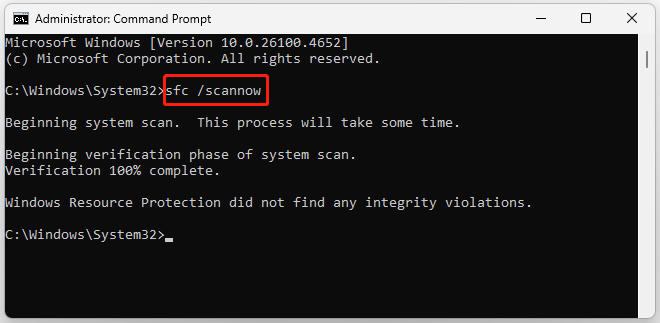
Step 1. Run Command Prompt as administrator.
- Type “cmd” in the search box.
- Right-click Command Prompt.
- Then, select Run as administrator.
Step 2. Run SFC command.
- Type “sfc /scannow” in the elevated Command Prompt window.
- Then, press Enter.
- After that, the SFC scanning will start.
Step 3. Run DISM commands.
- Type “DISM.exe /Online /Cleanup-image /Scanhealth” and press Enter.
- Then, type “DISM.exe /Online /Cleanup-image /Checkhealth” and press Enter.
- Next, type “DISM.exe /Online /Cleanup-image /Restorehealth” and press Enter.
Step 4. Once done, restart your computer and check if the error is fixed.
# 5. Run Memory Tests
RAM issues may also trigger the Clock Watchdog Timeout error easily. So, you can run a memory test to check whether there is anything wrong with the RAM. Here’s how to use Windows Memory Diagnostic to check the memory:
Step 1. Open the Windows Memory Diagnostic window.
- Press the Win + R keys simultaneously to open the Run window.
- Type “mdsched” or “mdsched.exe” in the box, and press Enter.
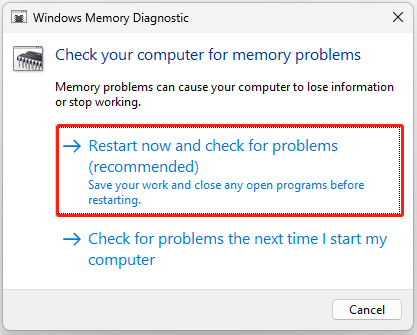
Step 3. Run the memory test.
- Select the Restart now and check for problems option.
- Then, your computer will restart and start the Windows Memory Diagnostic test.
- Follow the on-screen instructions to complete the process.
- Once the scanning is over, your computer will restart.
Step 4. Open the Event Viewer to check memory scanning results.
- Open the Run window.
- Type “eventvwr” and press Enter.
- Find and check the memory scanning results here.
- If there’s a RAM issue, replace the RAM stick according to the motherboard specifications.
Also, some people report that they fixed the error successfully by increasing the RAM. You can also try. Here’s how to do that:
- Buy the same RAM as the one in your PC.
- Power off your PC.
- Unplug the power cable.
- Open the case.
- Install the new RAM in your PC.
- After that, close the case, plug in the power cable, and power on to check if the error is fixed.
# 6. Check Disk Errors
Errors or bad sectors in the disk may also lead to the Clock Watchdog Timeout error. In this case, you need to fix disk errors and mark the bad sectors to remove the error.
To do that, I highly recommend MiniTool Partition Wizard. It offers the Check File System feature to check and fix errors, and the Surface Test feature to scan and show bad sectors.
Besides, this feature-rich tool can also help you partition hard drive, change cluster size, format partitions into other file systems, convert MBR to GPT, rebuild MBR, recover data from hard drive, and more.
Here’s how to use the Check File System and Surface Test features:
Step 1. Download and install MiniTool Partition. Then, launch this app to enter the main interface.
MiniTool Partition Wizard FreeClick to Download100%Clean & Safe
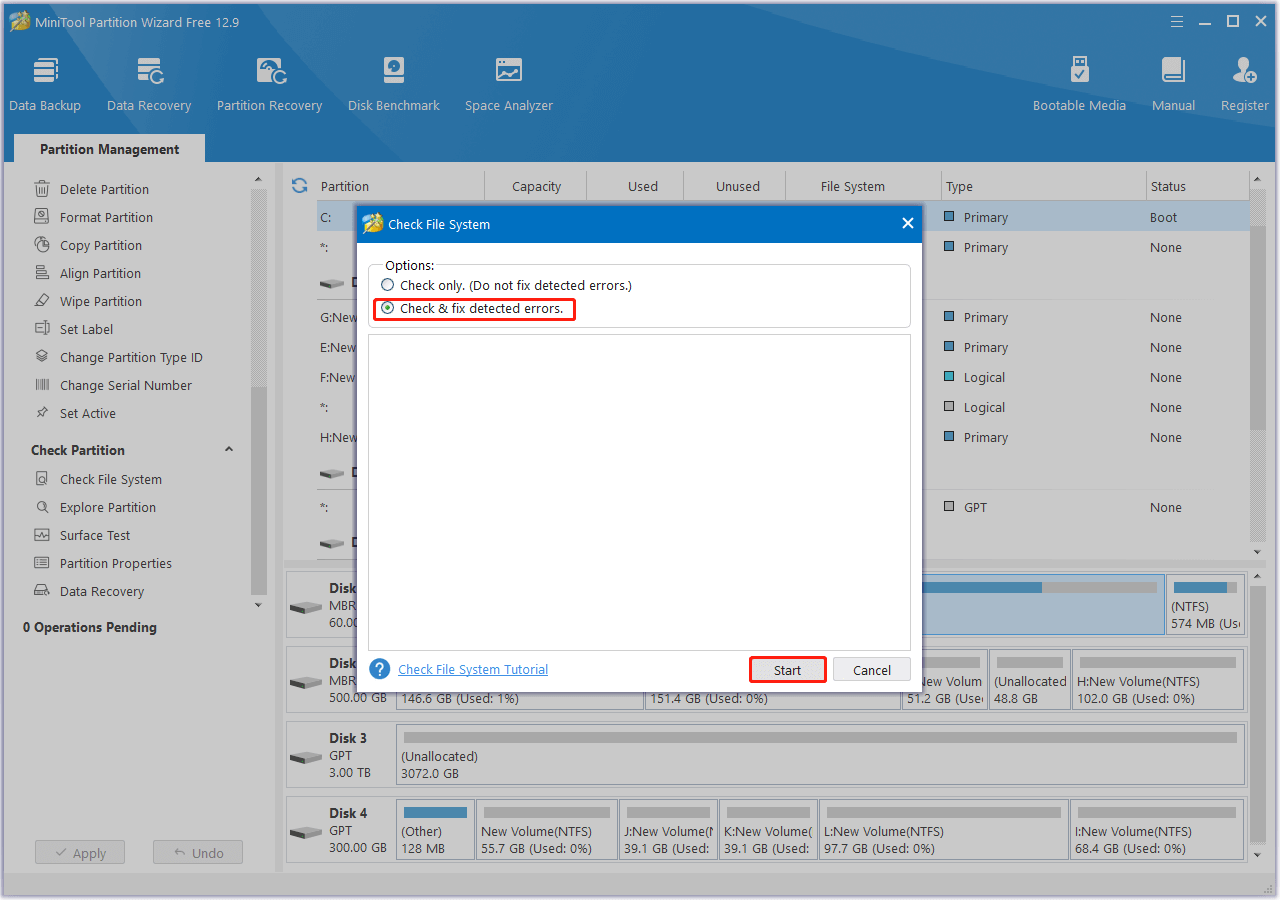
Step 2. Run the Check File System feature.
- Choose the partition that you want to check in the right panel.
- Then, select Check File System from the left panel.
- Choose Check & fix detected errors.
- Then, click Start.
- If the partition that you choose is in use, you can receive a Question window.
- Click Yes to confirm.
- After that, restart your PC, and then the scanning will start.
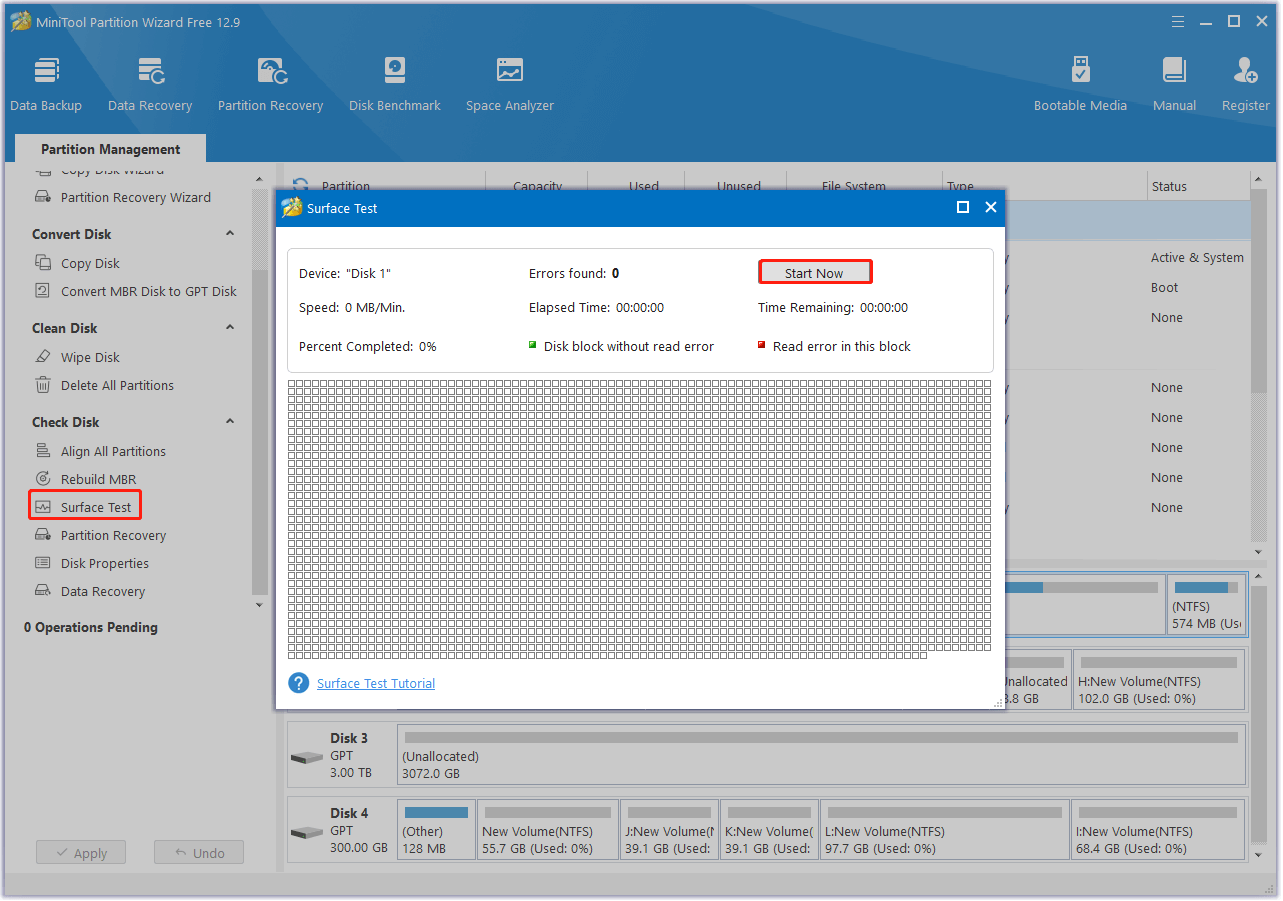
Step 3. Run the Surface Test feature.
- Choose the partition or disk you want to scan.
- Then, select Surface Test from the left panel.
- Click the Start now button.
- Once done, bad sectors will show in red.
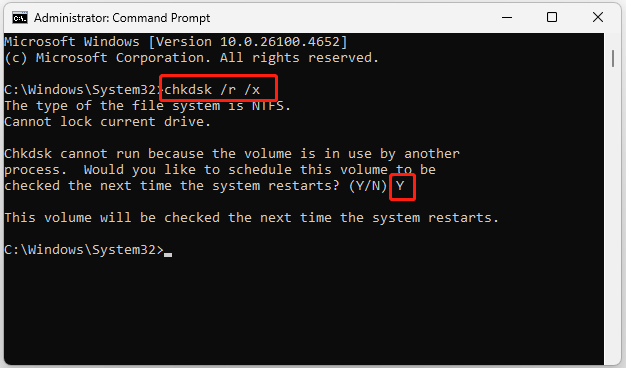
CHKDSK with parameters /r /x can mark bad sectors and instruct the operating system to avoid writing data to them. If the Surface Test finds some bad sectors on your disk, you can do the following steps to mark them:
- Run Command Prompt as administrator.
- Type “chkdsk /r /x” and press Enter.
- Press Y to check to partition next time the system restarts.
- Restart your computer, and the check will start.
- Once the process is done, all bad sectors will be marked.
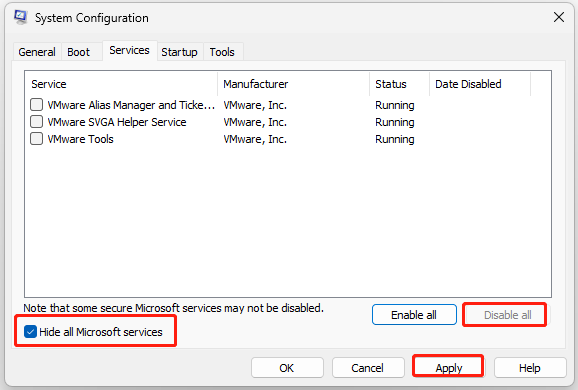
# 7. Perform a Clean Boot
A clean boot can run the system with a minimal set of drivers and startup programs. So, you can use it to help you find out the culprit of the Windows 10 Clock Watchdog Timeout error. Here’s the guide:
Step 1. Open the System Configuration window.
- Open the Run window.
- Type “msconfig” in the box.
- Then, click OK.
Step 2. Disable all services.
- Got to the Services tab.
- Check the Hide all Microsoft services option.
- Click on the Disable all button
- Then, click on the Apply button.
Step 3. Next, go to the Startup tab and click on Open Task Manager.
Step 4. Find out the culprit of the Clock Watchdog Timeout error.
- Right-click the apps you suspect and select the Disable option from the menu.
- Exit Task Manager.
- Click OK under the Startup tab.
- Then, when you restart the computer, you are in a clean boot environment.
- Next, check if the problem still occurs. If not, enable each program one by one until the problem reappears. The last program enabled might be the source of the error, and you should consider removing it.
# 8. Disable Overclocking
If you have overclocked your system and encounter the Clock Watchdog Timeout error, you can try disabling overclocking to solve the error. Here are the detailed steps:
- Press the Delete key or F2 key to enter the BIOS/UEFI during startup.
- Find the overclocking settings and set them to default.
- While at it, ensure XMP (on Intel platform-based motherboards) and DOCP (on AMD/Ryzen platform-based motherboards) are disabled.
- Once done, check if the error is fixed.
# 9. Disable C1-E in BIOS
In BIOS, C1E is a power management state that goes beyond the basic C1 state (halt state). It allows the processor to lower its memory controller clock speed and halt HyperTransport links to further reduce power consumption.
Sometimes, the enabled C1E may result in the Clock Watchdog Timeout error. So, you can also try disabling C1-E in BIOS to fix the error. Here’s the way:
- Boot into the BIOS menu.
- Find C1-E settings in the BIOS.
- Then, disable it.
- Once done, restart your PC and check if the error is fixed.
# 10. Update/Reset BIOS
An outdated BIOS may also trigger the Clock Watchdog Timeout error. So, you can try updating the BIOS to fix the error. Here’s the guide for updating BIOS:
Step 1. Go to your motherboard manufacturer’s website.
Step 2. Go to the support or downloads section and search for the specific model of your motherboard.
Step 3. Locate the section for BIOS updates and download the most recent BIOS update file.
Step 4. Prepare a USB drive, format it with the FAT32 file system, and extract the downloaded BIOS update file to the drive.
Step 5. Connect the USB drive that contains the downloaded BIOS update file to your PC. Then, restart your computer.
Step 6. Press the Delete key or F2 key to enter the BIOS menu.
Step 7. Locate the BIOS update utility, select the BIOS file from the USB drive.
Step 8. Follow the on-screen instructions to start the update.
Step 9. Once done, the system will restart automatically. Now, check if the error is fixed.
If updating your BIOS does not work for fixing the Clock Watchdog Timeout error, you can try resetting the BIOS to fix the error. Here’s the way:
- Press the Delete key or F2 key to enter the BIOS menu.
- Look for options like “Load Setup Defaults” or “Load Default Options”.
- Select it and press Enter.
- Confirm the reset and exit.
# 11. Run the System Restore
Performing a system restore can revert the operating system to a state where there aren’t any errors. So, if you have created restore points for your Windows operating system, you can try running System Restore to fix the Clock Watchdog Timeout error. Here’s the way:
- Open the Settings window.
- Go to System > About, and then select the System protection link.
- Click the System Restore button.
- Select Next, and then select the restore point you want to use.
- Next, click the Next button.
- After that, click Finish.
- Then, choose Yes to the “Once started, System Restore cannot be interrupted. Do you want to continue?” question.
- Wait for this process to be completed.
- Once done, your Windows will revert to the previous state as you select.
# 12. Clean Install Windows
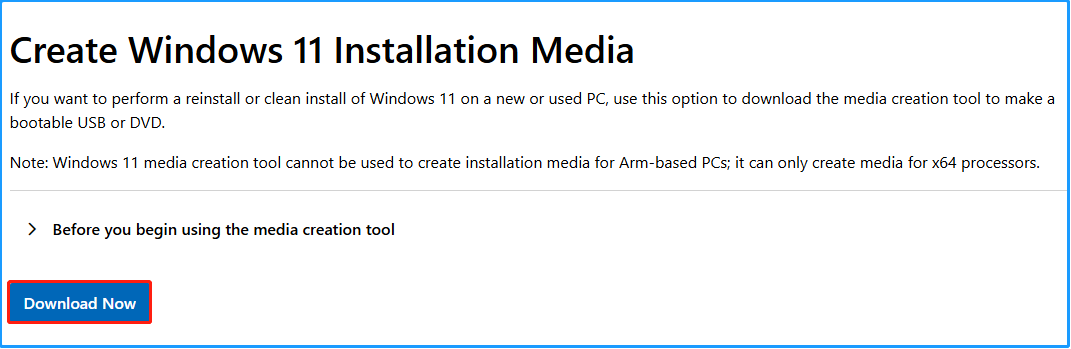
If all the above methods don’t work for you to fix the Clock Watchdog Timeout error, you can try performing a clean install of Windows. Here is the step-by-step guide for a clean install via Media Creation Tool:
1. Download the Media Creation Tool
Step 1. Launch a browser on a working PC and navigate to the Download Windows 10/Windows 11 website.
Step 2. Find the Create Windows 10/11 Installation Media section.
Step 3. Then, click the Download Now button.
2. Create a Windows installation media
Step 1. Connect your USB flash drive to the working PC.
Step 2. Run the MediaCreationTool.exe file.
Step 3. Read the Applicable notices and license terms, and click Accept.
Step 4. Select language and edition, and click Next to continue.
Step 5. Then,choose USB flash drive and click Next.
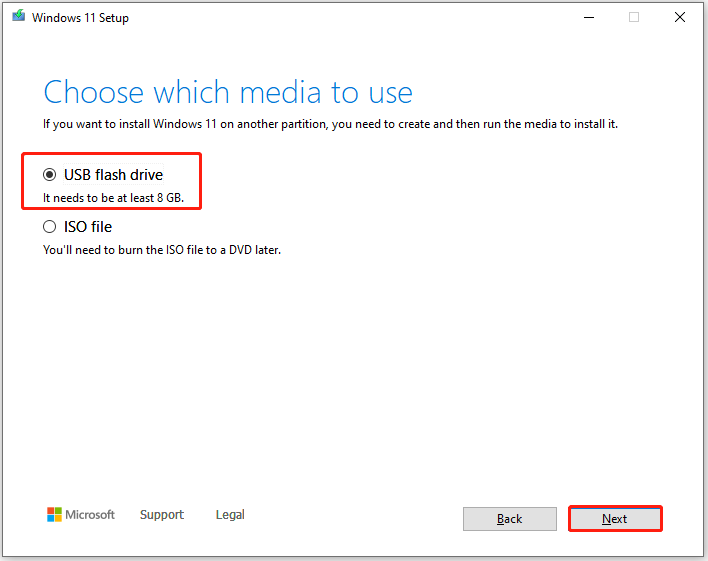
Step 6. Choose your USB flash drive and click Next.
Step 7. Wait for the process to complete. Once done, click Finish to confirm.
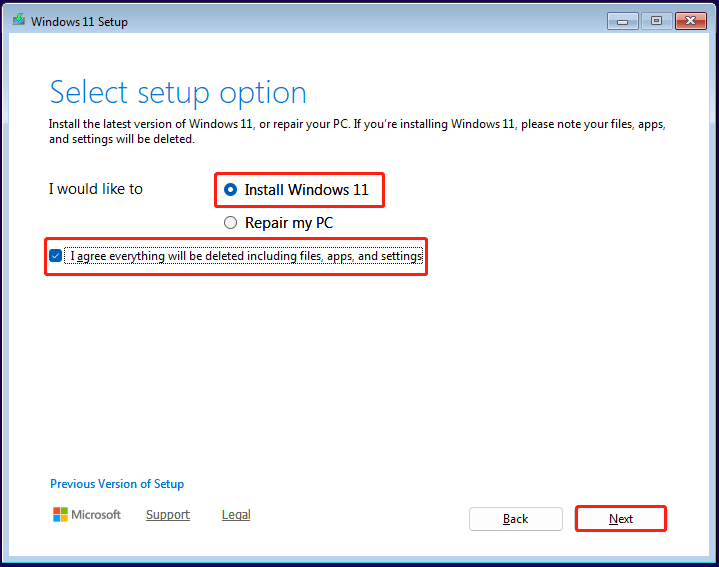
3. Install Windows OS
Step 1. Start your PC using the USB bootable media, then follow the on-screen instructions to reach the Windows 11 Setup window.
Step 2. Select the language settings and click Next to continue.
Step 3. Select keyboard settings and click Next.
Step 4. Then, choose the Install Windows 11 option, check the box of “I agree everything will be deleted including files, apps, and settings”, and then click Next.
Step 5. Click I don’t have a product key to activate Windows 11 later.
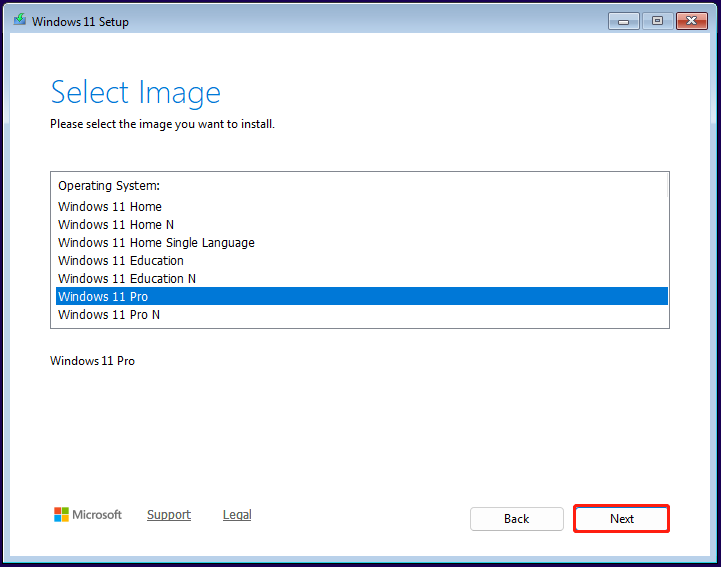
Step 6. Then, select the Windows 11 version that you want to install and click Next.
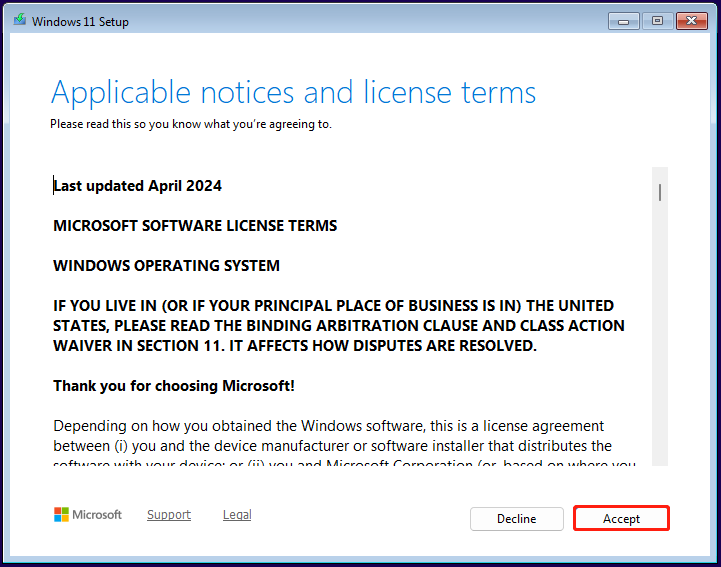
Step 7. Read Applicable notices and license terms, and click Accept.
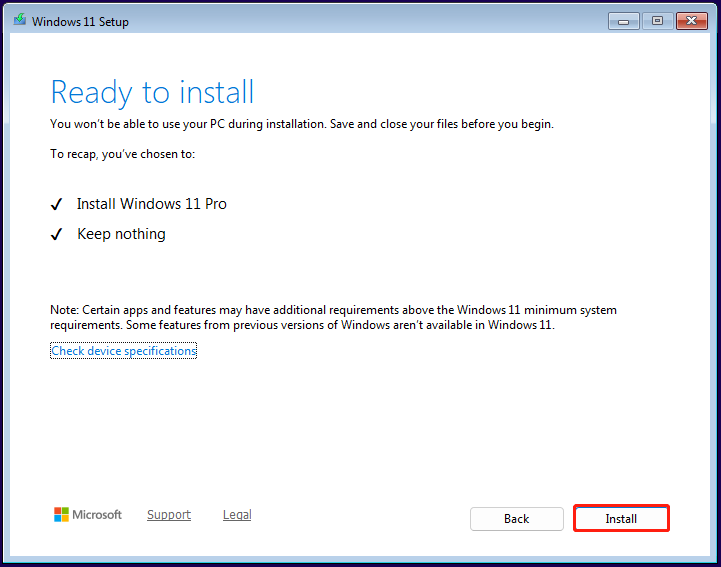
Step 8. Select the location to install Windows and click Next to move on.
Step 9. After that, click Install to continue.
Step 10. Next, wait for the process to complete. Once done, follow the on-screen guide to complete the initial setup.
What Should You Do If You Lost Data After Fixing the Error?
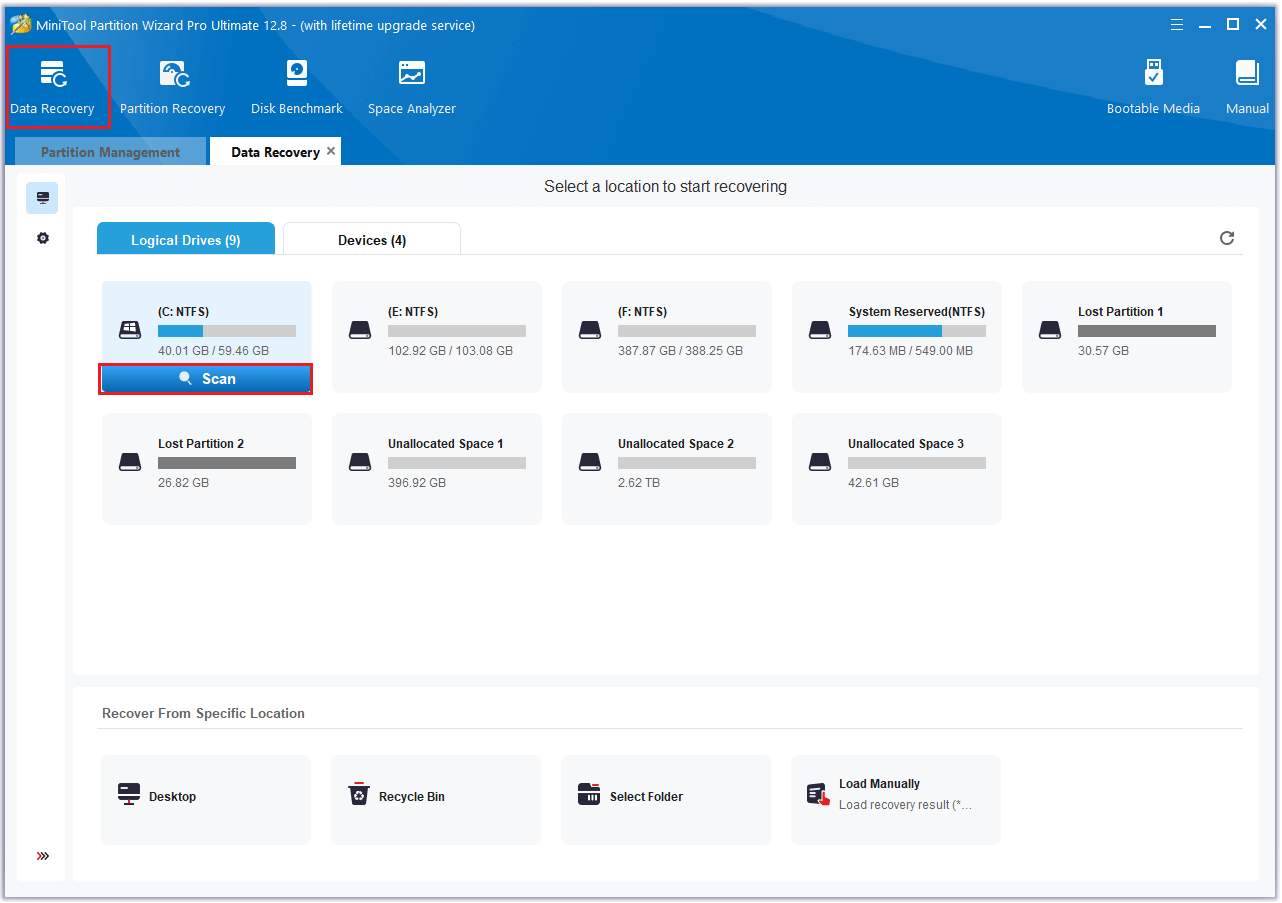
If you lose your data after fixing the Clock Watchdog Timeout error, you can use MiniTool Partition Wizard’s Data Recovery feature to retrieve it. Here’s how to do that:
Step 1. Download and install MiniTool Partition Wizard Platinum or higher. Then follow the on-screen instructions to install it on your PC.
MiniTool Partition Wizard DemoClick to Download100%Clean & Safe
Step 2. Launch it into its main interface and click Data Recovery.
Step 3. Select the partition where your lost files were previously stored, then click Scan.
Step 3. Wait for the recovery process to complete. Once done, check the boxes of files that you want to recover.
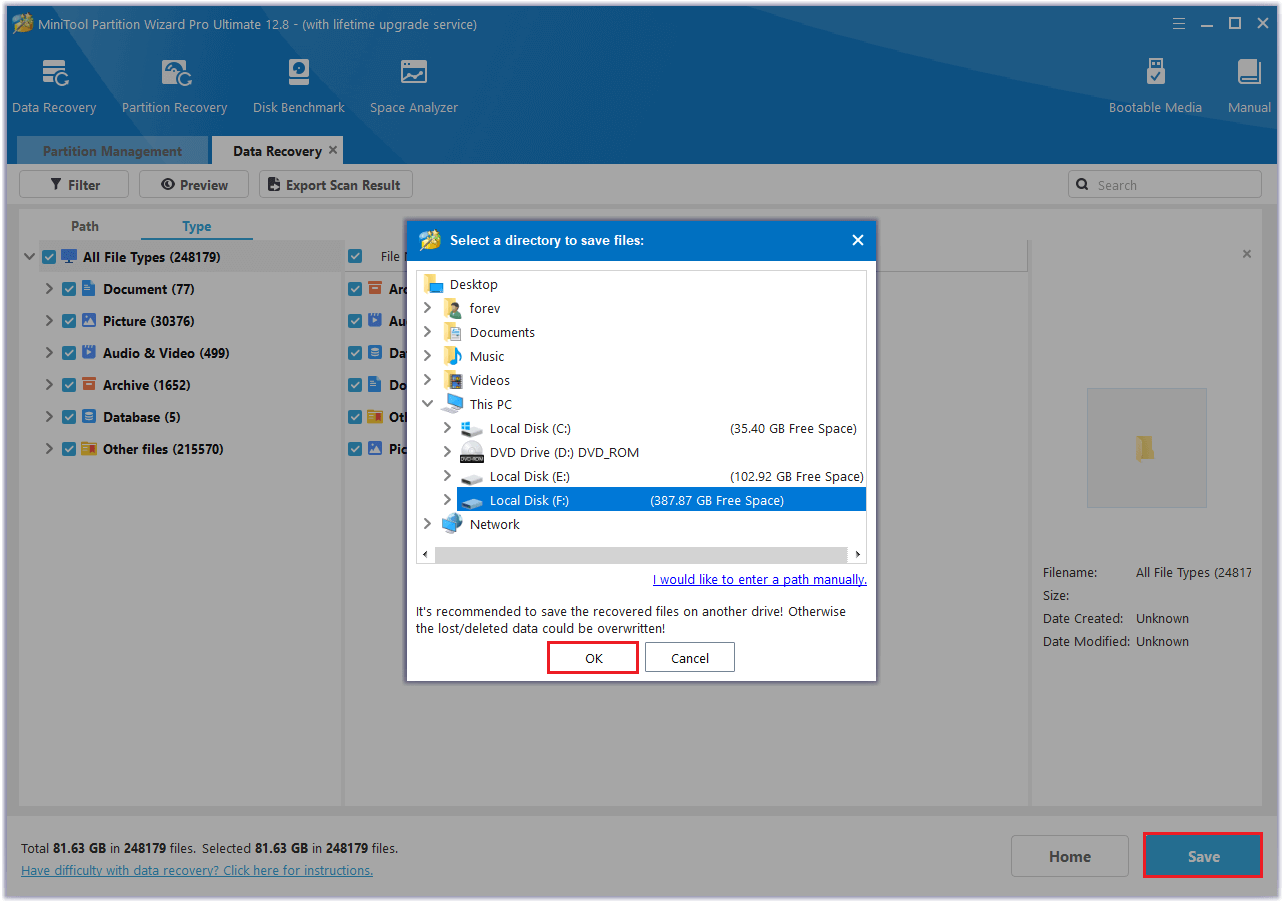
Step 4. Then, click Save, choose a safe location to save the recovered files, and click OK.
Tips for Preventing Error Occurrence & Data Loss
The Clock Watchdog Timeout error can cause a Blue Screen of Death (BSOD), preventing you from accessing the normal Windows interface. Encountering this error can be quite frustrating. Are there any tips to help prevent this error from occurring?
Yes, of course. You just need to keep drivers/BIOS up to date, disable overclocking, check RAM and other components, monitor temperatures, check all connections, and perform a full virus scan regularly.
In addition to doing some tips to prevent the BSOD Clock Watchdog Timeout error from occurring, you can also do the following tips to avoid data loss:
- Implement a 3-2-1 backup strategy: This approach involves keeping three copies of your data (the original and two backups) on two different media types, with one backup stored offsite.
- Utilize cloud storage: You can also choose to store your files in cloud storage, such as Google Drive or Dropbox.
- Schedule regular and automated backups: Automating backups at scheduled intervals minimizes the risk of human error and ensures your data is up-to-date.
To Sum Up
It’s frustrating to encounter the Clock Watchdog Timeout error on the Windows computer. By finding out what could cause the error, whether it is processor/RAM issues, BIOS problems, software/hardware conflicts, etc., you can try the appropriate methods to fix the error.
Furthermore, if you have any suggestions or encounter any issues while using MiniTool Partition Wizard, you can contact us by sending an email to [email protected]. We will get it back to you as soon as possible.
Clock Watchdog Timeout FAQ
1. Boot into BIOS/UEFI settings menu.
2. Look for options related to "Server Management," "Watchdog," or "Boot Watchdog Timer".
3. Then, set it to Disabled.
It detects abnormalities and outputs a reset signal only when the periodic signal from the monitored MCU falls behind a certain time cycle or stops coming.
About The Author

Position: Columnist
Charlotte is a technology columnist with a strong focus on the Windows operating system, specializing in disk management, backup, and data recovery. She is passionate about analyzing computer errors, identifying root causes, and delivering practical solutions. In her free time, she stays updated on the latest developments in computer systems and hardware while continuously learning new technologies to broaden her expertise. Her writing style is clear and easy to understand, making complex technical topics accessible even to users with limited computer knowledge.
User Comments :