Sometimes you may need a recovery disk to reboot or repair your computer. However, lots of people don’t know how to make a recovery disk for Windows 8/8.1. Don’t worry. This post of MiniTool provides detailed steps to make a Windows 8 recovery USB drive.
What a Recovery Drive Can Be Used for
A recovery disk is a very useful and important tool especially when your operating system can’t boot normally or is running with errors. When you create Windows 8.1 recovery disk, it will copy all necessary system reinstallation files based on your current PC. That’s to say, it can help you reinstall OS when needed.
Additionally, a recovery disk can help troubleshoot and fix some errors caused by corrupt downloads, hardware installation faults, or a faulty hard disk drive. For example, you can access the Advanced Startup Options, a repair and troubleshooting tools, for using Command Prompt, System Restore Points, Reset this PC, Automatic Repair, etc.
Considering its so many values, it’s necessary to create a recovery disk. Then how to create a recovery disk for Windows 8.1? Let’s keep reading.
![How to Upgrade Windows 8.1 to 10 Without Data Loss? [2 Ways]](https://images.minitool.com/partitionwizard.com/images/uploads/2022/04/upgrade-windows-8-1-to-10-thumbnail.jpg)
How to Create a Recovery Disk for Windows 8.1/8
There are 2 main parts to create a Windows 8 recovery drive. First of all, you need to do some necessary preparations such as backup. Then you can follow the guide below to create the recovery drive.
Before You Do
As you might know, many computers come with a recovery image that is stored on a dedicated recovery partition on your PC, which could occupy 3 to 6GB in size. To free up your disk space, you can delete the recovery image and create a recovery USB instead.
Of course, if your computer doesn’t have a recovery partition, it’s important to make a recovery drive. Here you can follow the steps below to check if your PC already has a recovery image.
Step 1. Type cmd in the Search bar, and then right-click Command Prompt and SELECT Run as administrator. Then click on Yes when you’re prompted with the UAC window.
Step 2. In the elevated Command Prompt window, type recimg /showcurrent and hit Enter. If it shows “There is no active custom recovery image”, then you need to create one before your make the Windows 8 recovery disk.
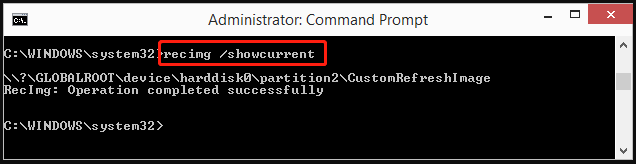
Step 3. To create a recovery image, type the following commands in the above Command Prompt window and hit Enter after each one.
- mkdir c:RefreshImage (it makes a folder for the recovery image)
- recimg –CreateImage c:RefreshImage (it creates the recovery image in that folder)
Another important thing is that the USB drive will be wiped in the process of creating a Windows 8 recovery USB. Thus, make sure you use an empty USB drive or back up all data from the USB to another drive.
How to Make a Recovery Disk for Windows 8.1/8
Windows 8.1 offers a built-in tool to create a USB recovery drive. Now, follow the steps below to create one.
Step 1. Connect a USB flash drive to your computer.
Step 2. Open the Charms menu and select Search, type recovery in it and select Create a recovery drive. Then click on Yes if you are prompted with a User Control Account window.
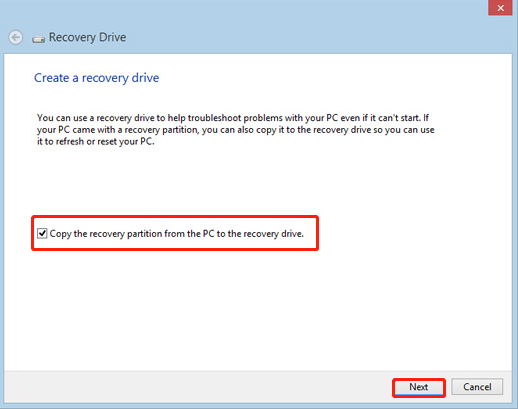
Step 3. In the Recovery Drive window, tick the checkbox next to Copy the recovery partition from the PC to the recovery drive and click on Next. Then it will tell you how much space is required to create the recovery drive.
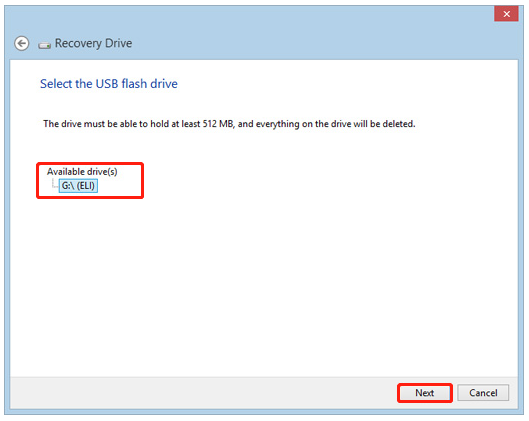
Step 4. Wait for the setup to find the available USB drive. Select the USB flash drive you just connected and click on Next.
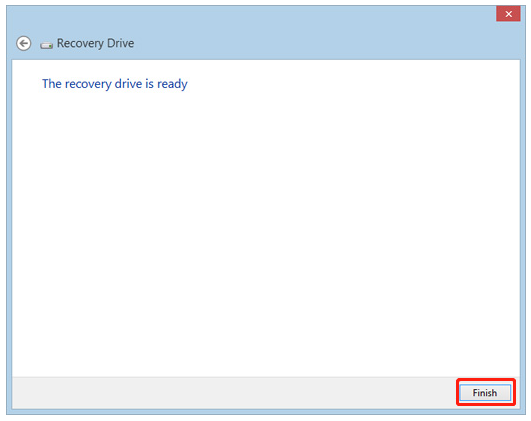
Step 5. Click on Create to start creating the Windows 8 recovery USB. When the recovery drive is ready, click on Finish to complete the process.
–images from the support.hp
That’s all. Here’s the end on how to create Windows 8.1 recovery disk process.
How to Use Windows 8 Recovery USB
After you create the Windows 8 recovery USB, you can start using it. If you don’t know how to do that, follow the simple guide below:
Step 1. Power off your computer.
Step 2. Insert the Windows 8 recovery drive into your computer and power on your computer.
Step 3. When the startup screen appears, use the Down arrow key to select the USB drive and press Enter to boot the computer with the recovery drive.
Step 4. Click the language for your keyboard and select Troubleshoot to open the Advanced Startup options. Then you can follow the on-screen prompts to troubleshoot or restore according to your demands.
User Comments :