Why is my SSD slower than HDD? Some users have noticed that the SSD is slower on their PC. Here’s a post from MiniTool Partition Wizard to explain the reasons and help you improve SSD performance.
As we all know, SSDs are generally faster than most traditional HDDs. This is because they use integrated circuit components as memory to store data persistently. However, many users will encounter the problem of SSD slower than HDD Windows 10. Why is my SSD slower than HDD? How to fix it? These issues are discussed in various forums. This is one:
SSD slower than HDD? I noticed that my SSD takes longer to load than a WD Blue 7200 HDD. So basically I brought my whole rig to my friend's house and told him to shut his PC off. Our systems at the same time and his almost full Terabyte HDD out-beat my barely half-full Samsung EVO 850 250GB SSD by about 1 second.https://forums.tomshardware.com/threads/ssd-slower-than-hdd.2625237/
![[Tutorial] How to Recover & Repair ADATA Memory Card](https://images.minitool.com/partitionwizard.com/images/uploads/2023/12/recover-data-from-adata-memory-card-thumbnail.png)
Why Is My SSD Slower Than HDD
You may be confused by the issue of SSD slower than HDD. What are the reasons behind it? Listed below:
- The TRIM command is disabled or does not exist.
- AHCI mode is disabled.
- BIOS/firmware is out of date.
- The system drive is out of space.
- The startup sequence is incorrectly specified.
- The computer or SSD is infected with a virus.
- Problem with SATA port or cable.
- Not enough storage.
After learning the possible reasons for the SSD slower than HDD Windows 10 issue, let’s get down to the methods for fixing it.
How to Fix SSD Slower Than HDD
What if your SSD is slower than HDD? In this section, this post collects several feasible methods to solve this issue. You can try them in order until the issue gets solved.
Method 1. Check TRIM Support
The TRIM command enables the SSD to erase blocks of data that are no longer in use. This operation can ensure the stable operation of the computer and avoid slowing down the computer’s writing speed in future use. Therefore, we need to check if TRIM is functioning properly. Here’s how:
Step 1: Type cmd in the Search box, and then right-click on Command Prompt and select Run as administrator. Click on Yes in the UAC window to access the program.
Step 2: In the elevated Command Prompt window, type fsutil behavior query DisableDeleteNotify and hit Enter.

Step 3: If it is 0, TRIM is enabled. If it is set to 1, TRIM is disabled so you need to type fsutil behavior set DisableDeleteNotify 0 and hit Enter to enable it.
Method 2. Enable AHCI Mode
AHCI (Advanced Host Controller Interface) is a newer interface technology in BIOS settings of the newer computers. AHCI mode is essential to maintain excellent performance of your SSD and prevent it from running slowly. If you disable this feature, your computer may crash or display the dreaded BSOD.
If SSD is slower than HDD, you should check if AHCI mode is enabled. Just press Win + X to choose Device Manager. Then expand the IDE ATA/ATAPI controller. If you see the AHCI controller in the list, you have enabled it. If you only see ATA and IDE, AHCI may be disabled on your computer.
To enable the AHCI mode. Here’s how:
Step 1: Open the elevated Command Prompt window again.
Step 2: In the elevated Command Prompt window, type the following command and press Enter.
bcdedit /set {current} safeboot minimal
Step 3: Restart your computer, and then press the F2 or Delete key during the startup to enter BIOS and enable AHCI.
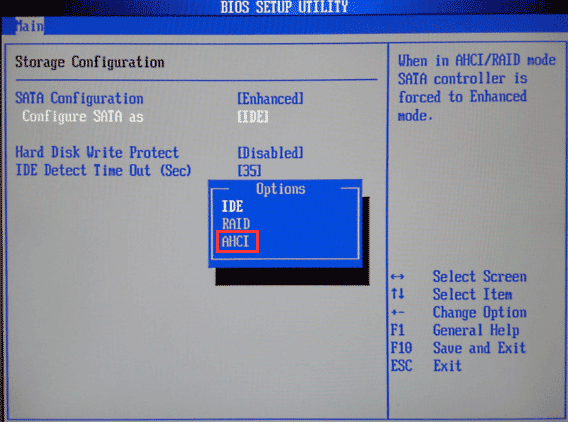
Step 4: Press the F10 and Enter keys to save changes, then exit BIOS.
Step 5: Restart your computer and open the Command Prompt window again. Type the following command and press Enter.
bcdedit /deletevalue {current} safeboot
Step 6: Reboot your computer and Windows should install the AHCI driver automatically.
Method 3. Disable Onboard VGA
Onboard VGA functionality is what causes SSD slower than HDD. How to disable it:
Step 1: Restart your computer and boot into BIOS settings.
Step 2: Find the Advanced BIOS Features/Advanced Chipset Features section.
Step 3: Find the Onboard VGA feature and disable it.
Step 4: Exit BIOS and click on Yes to save changes.
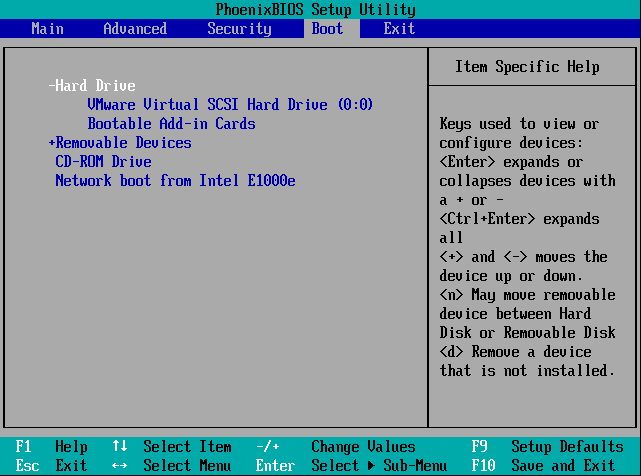
Method 4. Adjust the Boot Sequence
If the boot device order is not correct, the SSD will experience delays during the Windows 10 boot process. In this case, you must modify the boot order to prioritize the SSD.
Step 1: Restart your PC and enter BIOS by pressing the appropriate button. Navigate to Advanced BIOS.
Step 2: Access the Hard Drive Boot Priority. Use the up and down arrows to select the SSD as the First Boot Device.
Step 3: Exit BIOS and save changes.
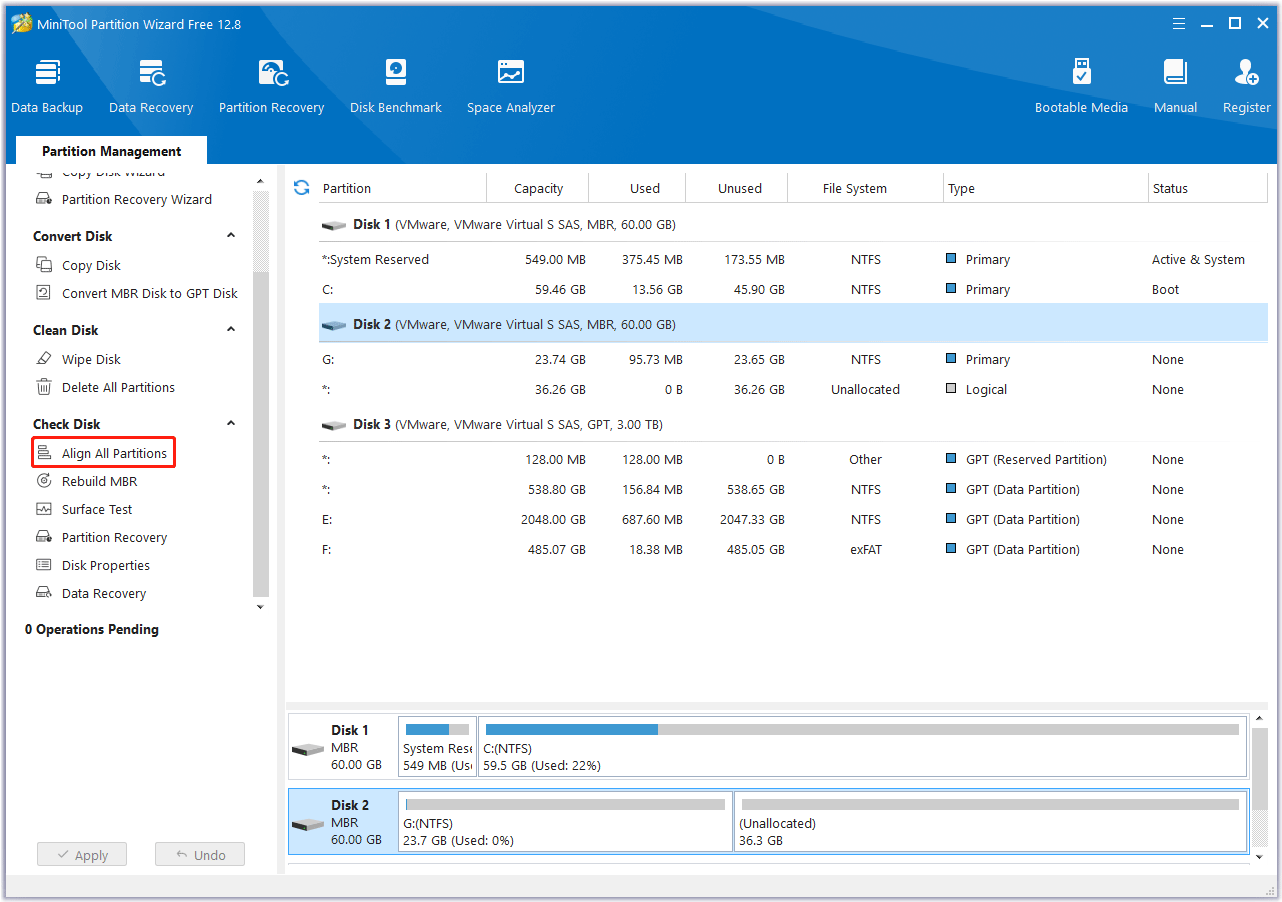
Method 5. Align the SSD Partitions
4K alignment can align the physical storage space of the SSD and help improve the performance of the SSD, including disk read and write speed, Windows running speed, and startup speed.
If you encounter the problem of SSD slower than HDD, you can try to use a free SSD partition alignment tool – MiniTool Partition Wizard to align partitions on the SSD easily.
Besides, this program offers many other features related to partition or disk management. You can use it to partition/resize/clone hard drive, convert MBR to GPT and vice versa, check disk health, test disk speed, recover data from hard drive, and more.
Here are the steps to align partitions with the help of MiniTool Partition Wizard.
MiniTool Partition Wizard FreeClick to Download100%Clean & Safe
Step 1: Download and install MiniTool Partition Wizard on your PC. Then launch it to enter its main interface.
Step 2: Choose your SSD and click on Align all Partitions from the left action panel.
Step 3: This software will tell you how many partitions need to be aligned. Then click on Yes to continue.
Step 4: Click on Apply to execute the pending operation.
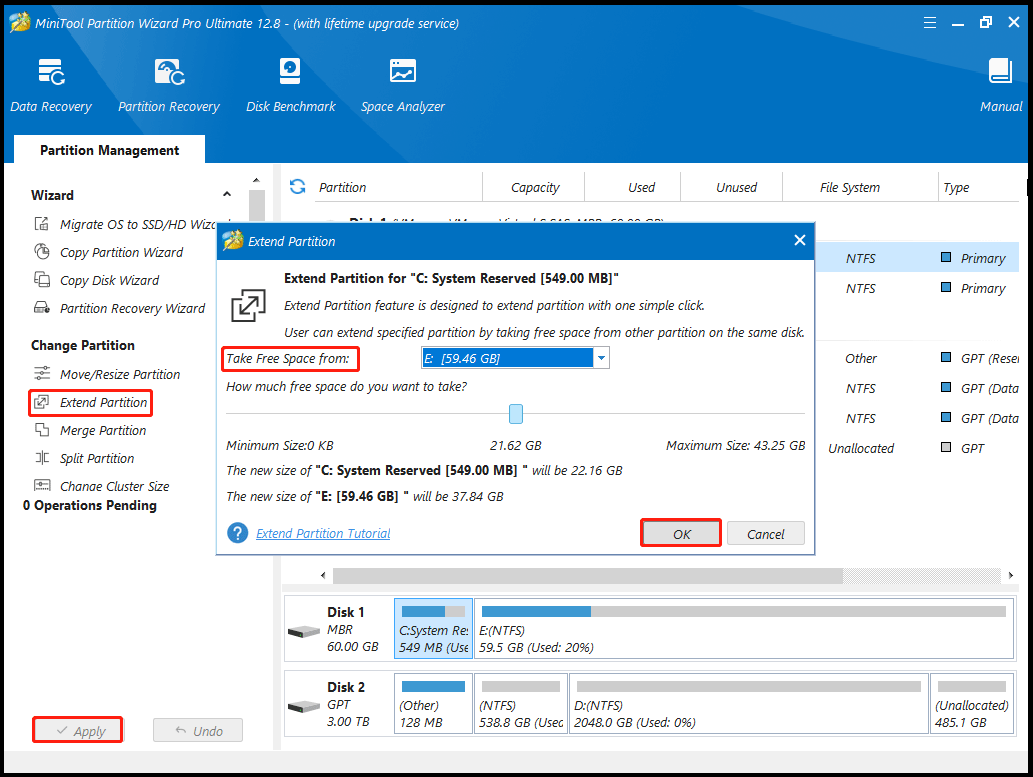
Method 6. Extend the Partitions on SSD
If there is insufficient system drive space on the SSD, your operating system will also boot very slowly. Expanding the C drive space can solve this problem.
Here we strongly recommend you use MiniTool Partition Wizard Bootable Edition to ensure that your computer can start normally after expanding the C partition. We recommend that you back up your important data as well as your system partition before starting this process.
First, you need to download and install MiniTool Partition Wizard on your PC. Then you need to prepare a USB flash drive.
MiniTool Partition Wizard DemoClick to Download100%Clean & Safe
Step 1: Create a USB bootable media using its Bootable Media feature。
Step 2: Use the USB bootable media to boot your computer.
Step 3: In the main interface of MiniTool Partition Wizard, select the C partition and choose Extend Partition from the left action panel.
Step 4: Choose to take free space from a partition or unallocated space and drag the sliding handle to decide how much free space to take. After that, click OK to go back to the main interface.
Step 5: Now you can view the partition as enlarged. Then you can click Apply to execute the change.
Method 7. Change Power Settings
You can try to change power settings to provide better performance for your computer.
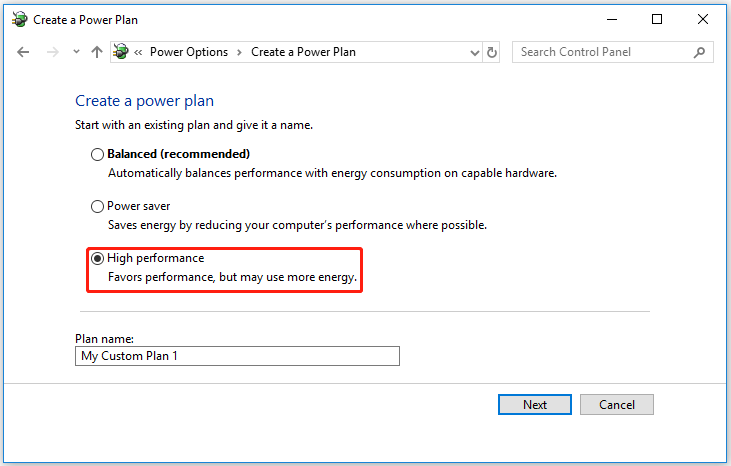
Step 1: Press the Win + I key to open the Settings window. Navigate to System > Power & sleep > Additional power settings.
Step 2: Select Create a power plan in the left pane. Then choose High Performance and follow the instructions to complete.
Method 8. Upgrade to a Larger SSD
If your SSD has been used for a long time, it may become very slow, then you can replace it with a new SSD with more storage space.
If you are annoyed by reinstalling the operating system and losing data during the disk upgrade process, then you can use the MiniTool Partition Wizard to clone the old SSD to the new SSD. Then all data will be transferred and you don’t need to reinstall the system and all programs.
MiniTool Partition Wizard DemoClick to Download100%Clean & Safe
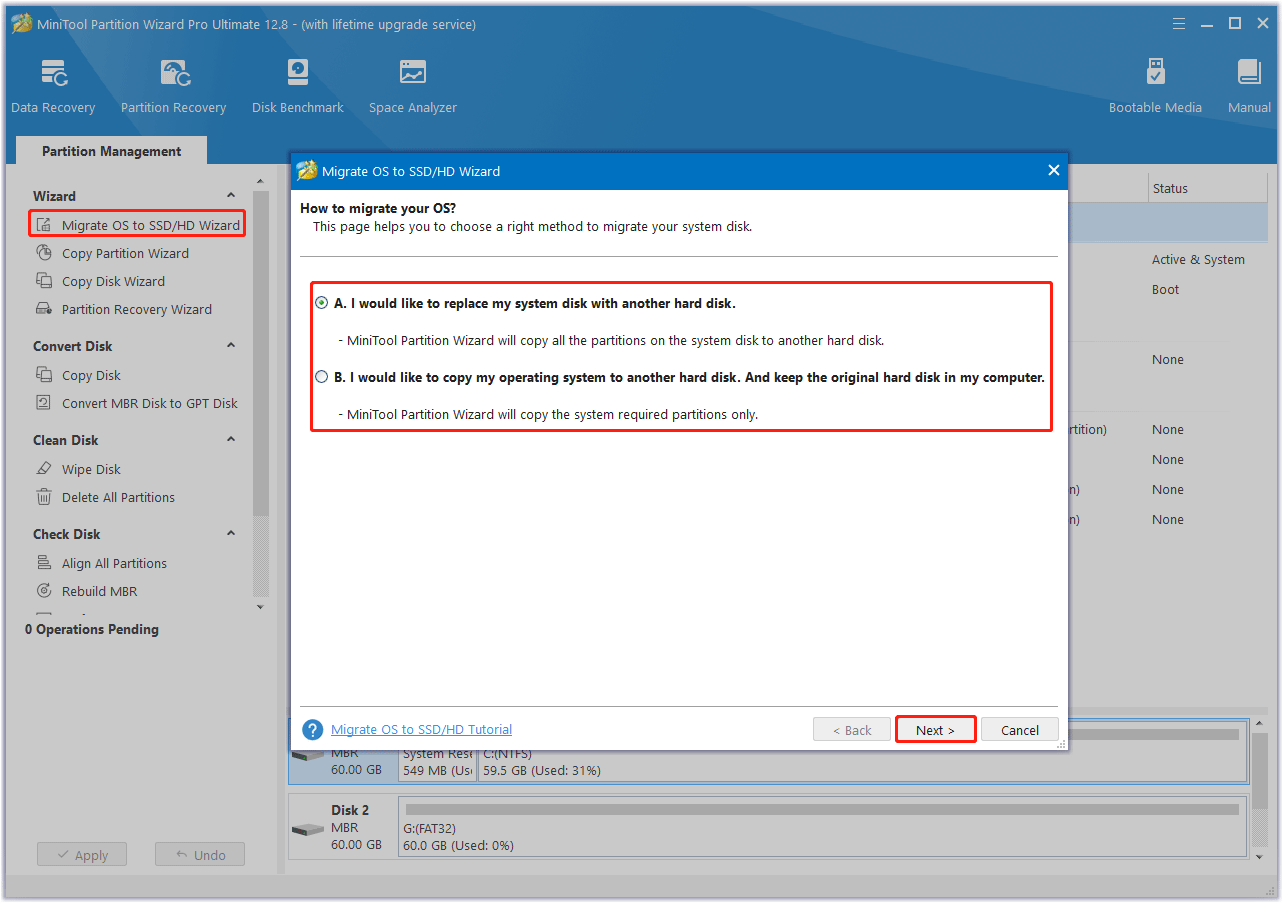
Step 1: Launch it to its main interface. Then choose Migrate OS to SSD/HD Wizard from the left action panel.
Step 2: Choose the right method to migrate the system disk and click on Next. Option A allows you to clone the whole system disk, while Option B only allows you to migrate the OS-related partitions.
Step 3: Select the new hard drive as the destination disk and click on Next.
Step 4: In the following window, configure the Copy Options, Target Disk Layout and Change Selected Partition according to your needs. Then click on Next.
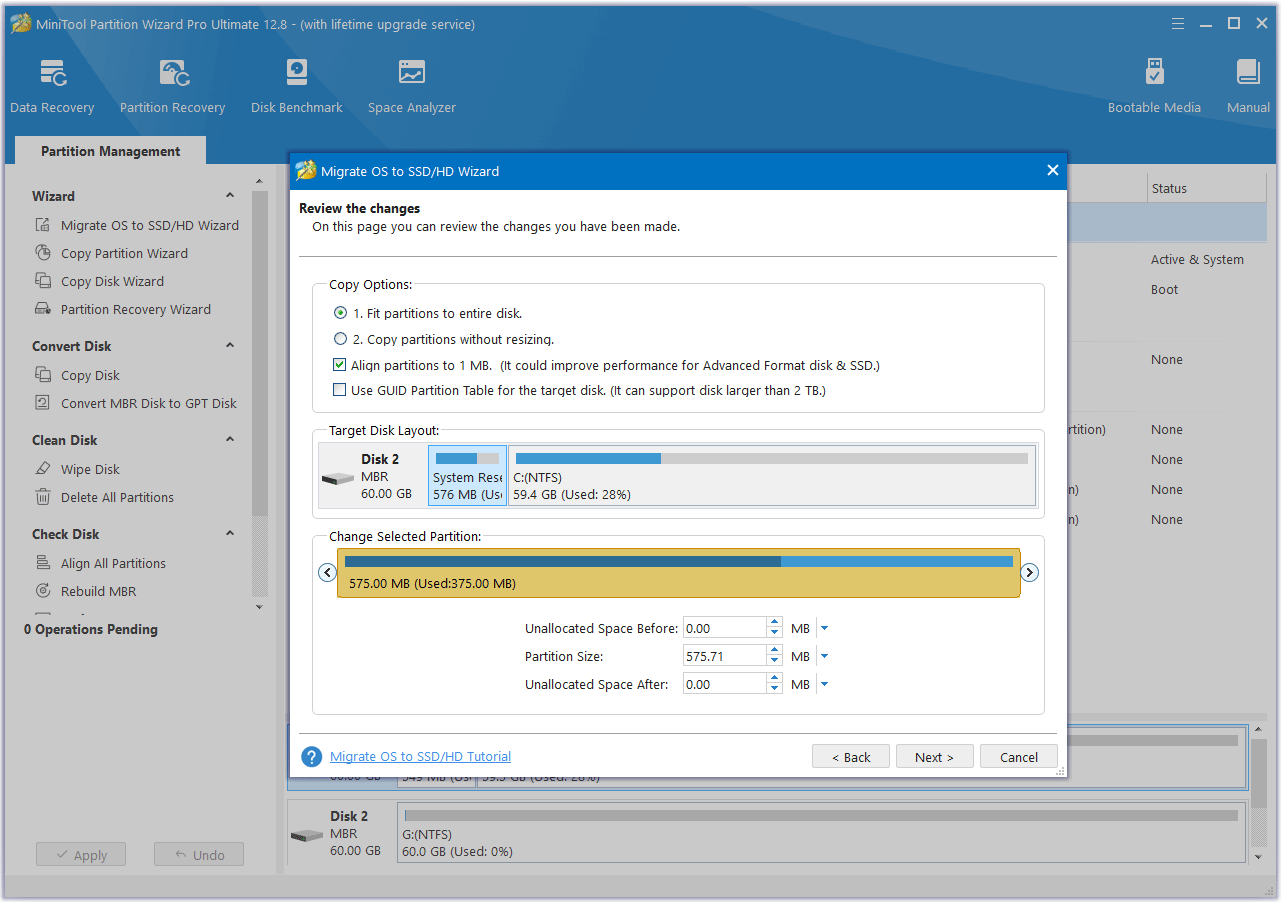
Step 5: Read the note about how to boot from the new disk and click on the Finish button. When you go back to the main interface, click on the Apply button to start the cloning process.
After the operating system migration is completed, you need to disassemble the machine and replace the SSD. After inserting the new drive into your computer, you can start your computer.
Bottom Line
In this article, we show you the possible reasons why SDD is slower than HDD, as well as some methods for fixing the SSD slower than HDD issue. Now, we believe you have learned the way to fix this issue. And you can extend the partition on SSD and improve SSD performance using MiniTool Partition Wizard.
For any other opinions about this error, you can leave a message in our comment area below. If you encounter certain issues while using MiniTool Partition Wizard, you can send us an email via [email protected] to get a quick reply.
About The Author

Position: Columnist
Vega enjoys helping people with computer problems, including disk management, data recovery, data backup, and more. She is constantly expanding her knowledge in related fields. And she will continue to bring more easy-to-understand professional articles to help people solve various problems on the PC.
User Comments :