A great many people are annoyed that Private Internet Access won’t connect. If you are also struggling to figure it out, you come to the right place. In this post, MiniTool summarizes several tried and tested solutions for PIA won’t connect.
PIA (Private Internet Access) is a widely popular VPN provider that has 3300 servers covering 46 counties. This VPN provider offers many features such as DNS leak protection and IPv6 leak protection. It is available for different operating systems including Windows, IOS, Linux, macOS, and Android.
Sometimes, however, a lot of users reported that Private Internet Access won’t connect to the computer. This problem is always related to the internet connection. In addition, other factors like IPv6 and TAP adapter drivers are responsible for PIA won’t connect.
![How to Fix CCleaner Not Opening Windows 10 [4 Solutions]](https://images.minitool.com/partitionwizard.com/images/uploads/2021/01/ccleaner-not-opening-windows-10-thumbnail.jpg)
Fix 1. Reinstall PIA in Safe Mode
Starting Windows in Safe Mode and reinstalling PIA has been tested by many people to be useful. To fix Private Internet Access won’t connect, follow the steps below to reinstall PIA in Safe Mode.
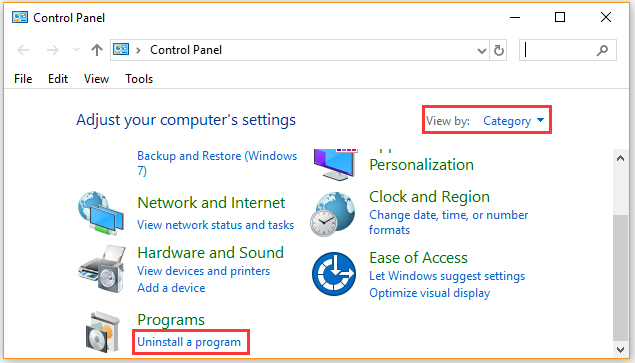
Step 1. Type control in the search box and select the Control Panel app from the context menu.
Step 2. Change the View by type to Category, and then click on Uninstall a program under the Programs section.
Step 3. Navigate to the PIA from the list of installed programs, and then right-click it and select Uninstall. Click on Yes to confirm this uninstallation and follow the on-screen prompts to complete this operation. Once this program is uninstalled completely, continue with the steps below.
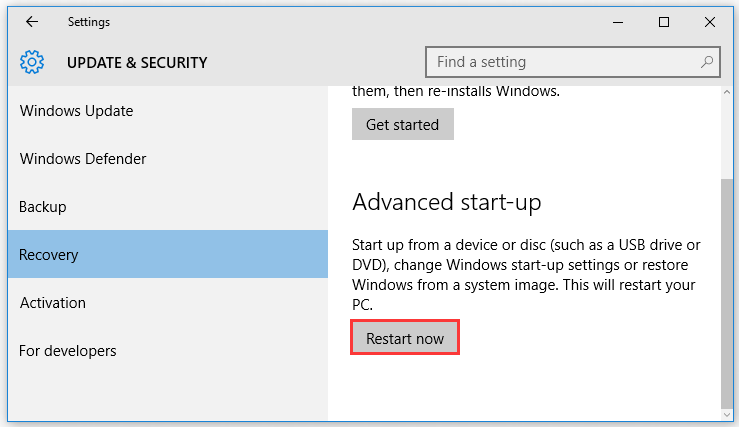
Step 4. Press Win + I keys to open the Settings app, and then navigate to Update & Security > Recovery > Restart now.
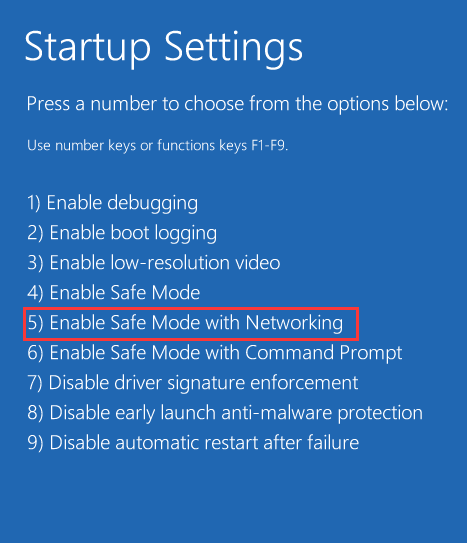
Step 5. Once you arrive at the Choose an option screen, select Troubleshoot, and go to Advanced Options > Startup Settings. After that, press the F5 key to select Enable Safe Mode with Networking. Click on the Restart button and your computer will reboot into Safe Mode.
Step 6. Once you enter the Safe Mode, you can download the latest version of PIA from its official website and install it on your computer.
After you have finished all the above steps, restart your computer to exit the Safe Mode and see if the Private Internet Access not connecting issue still persists.
Fix 2. Disable IPv6 Connection
Some users reported that they fixed PIA won’t connect easily by disabling the IPv6 internet connection. Here’s how to do that:
Step 1. Press the Win + R keys on the keyboard to call out the Run dialog box. Then type ncpa.cpl in the box and hit Enter.
Step 2. Right-click the internet connection that you are using on the computer and select Properties.
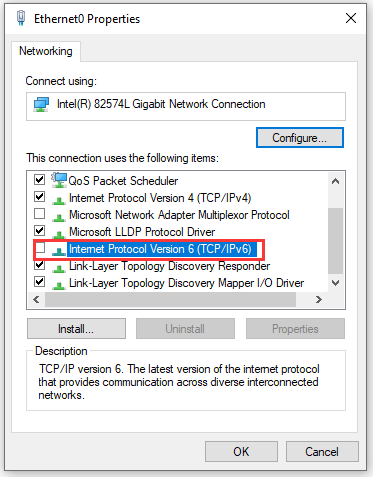
Step 3. Navigate to the option Internet Protocol Version 6 (TPC/IPv6) from the This connection uses the following items and Uncheck it.
Now, reboot your system to execute the changes and see if the Private Internet Access not working issue has been resolved.
Fix 3. Install an Older TAP Adapter Driver
It is reported that the new version of the TAP driver can trigger some connectivity issues like Private Internet Access won’t connect and slow down the download speed. To avoid these problems, we recommend you install an older TAP adapter driver.
Step 1. Right-click the PIA icon at the bottom right corner of the Windows clock and select Exit from the context menu.
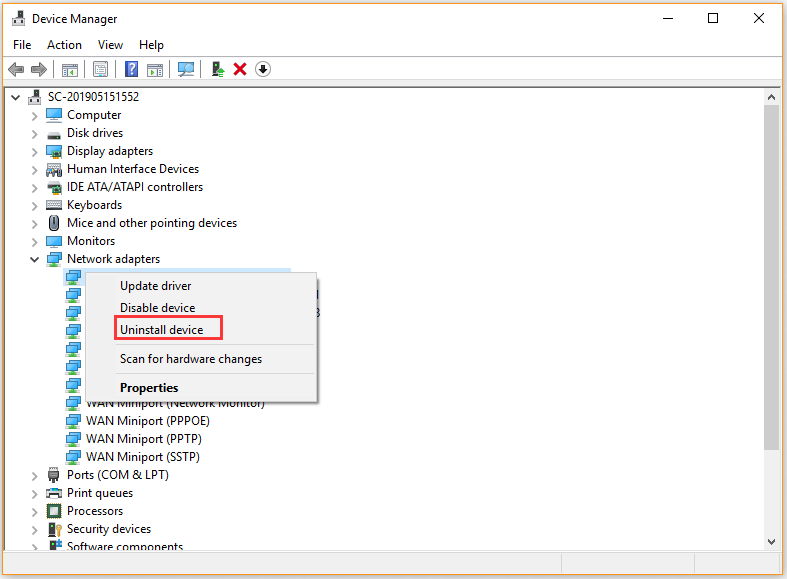
Step 2. Press Win + R keys to open the Run dialog box, and then type devmgmt.msc in the box and hit Enter.
Step 3. In the Device Manager window, expand the Network adapters category, then right-click the TAP adapter driver and select Uninstall device. After that, follow the on-screen prompt to complete this uninstallation.
Step 4. Click here to download the older TAP device driver and install it on your computer.
Restart your computer and see if the “Private Internet Access won’t connect” issue still exists.
Fix 4. Flush DNS Server
DNS is used by your browser to translate the IP address of a site. If the DNS cache gets corrupted, you may encounter some internet issues like Private Internet Access won’t connect. To avoid this issue, you can try flushing the DNS cache. For that:
Step 1. Press Win + R keys to open the Run dialog box, and then type cmd in it and press Ctrl + Shift + Enter keys to open an elevated command prompt.
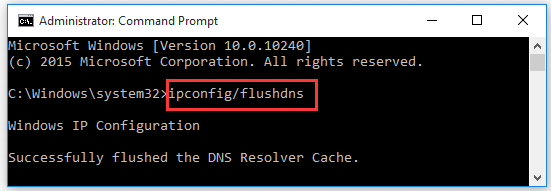
This operation will reinitialize the DNS cache completely. After that, you can reconnect PIA and see if the issue is fixed or not. If all the given methods fail to work, you may have to consider reinstalling Windows 10. This operation will delete all data on the system drive, please make a full backup of your system beforehand.
User Comments :