What causes MSI error 99? How to fix this error? If you also have these questions, you can read this post. Here, MiniTool Partition Wizard lists the possible reasons and some useful solutions to MSI error 99.
Causes of MSI Error 99
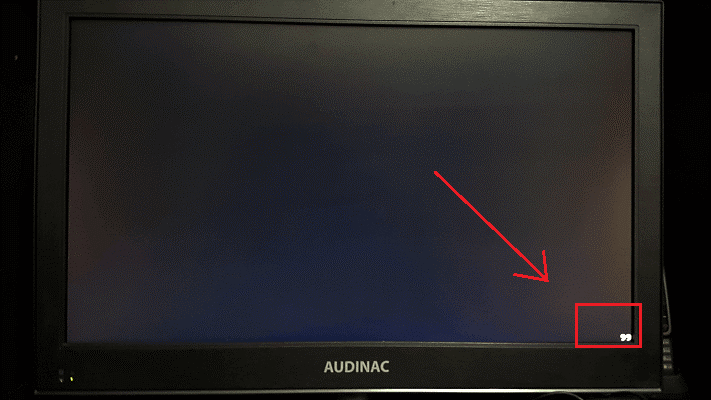
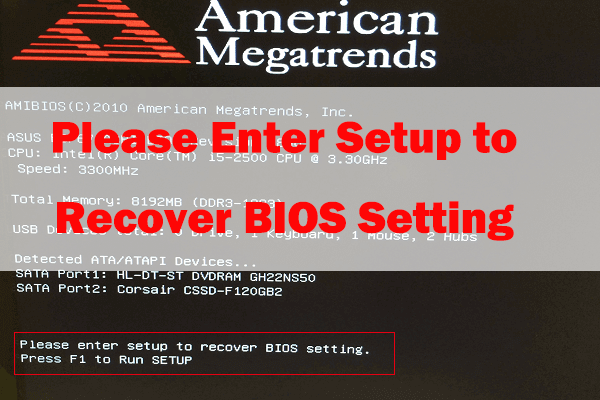
Some MSI motherboard users report that they receive an error code 99 on their screen when they boot or reboot their Windows devices, as shown in the picture below.
What causes MSI 99 error? After researching this error on the internet, we discovered the following potential culprits:
- The Kernel Temp data on your PC is corrupted.
- Your BIOS/UEFI settings are inconsistent with your actual information.
- The PSU of your PC is inefficient.
- There are I/O issues with your USB ports.
- There may be any type of hardware corruption on your PC, like a short circuit or other motherboard issues.
Below are some useful solutions that you can try to fix MSI error 99.
Also Read: MSI Monitor Not Turning On? There Are 11 Available Methods!
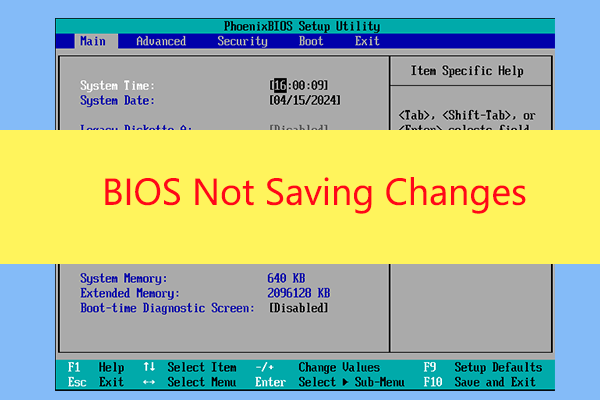
Solution 1. Verify Time and Date in BIOS
If the time or date setting in the BIOS is incorrect, the MSI motherboard error code 99 can appear. You can fix this error by changing the time and date settings in BIOS. Here’s the tutorial:
- Reboot your computer and press the BIOS keys (F10, F2, F12, F1, DEL) to enter the BIOS menu.
- In the main menu, use the arrow keys to navigate to the Time and Date section.
- Then check the time and date here carefully. If it’s wrong, go ahead and correct it.
- Once done, select Save and Exit to exit.
- Reboot your computer and check if the MSI 99 error is fixed.
Solution 2. Remove External Peripherals
If you’re using a low-end PSU and your system is unable to provide enough power to satisfy each connected component and peripheral, you can also see the MSI 99 error. In this case, you can try removing external peripherals, like an external HDD/SSD or USB-powered headset, to fix this error.
If you don’t want to remove these external peripherals, you can also choose to replace your PSU device with a new unit with a bigger capacity.

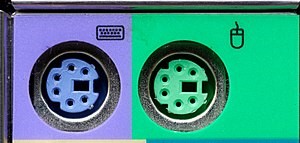
Solution 3. Connect Mouse and/or Keyboard Via PS/2 Ports
If you are using an old MSI motherboard with PS/2 ports, you may encounter MSI motherboard error code 99 because of peripherals connected via the USB ports. You can try disconnecting these peripherals from USB ports and then connecting them via the PS/2 slot to fix this motherboard error.
Solution 4. Set Disk Controller Mode to AHCI
If your HDD mode is set to IDE or RAID and your system does not have the right device drivers, you may also easily encounter the MSI motherboard error code 99. To fix that, you can try changing your Disk Controller mode to AHCI. Here are the steps:
- Boot your PC into Safe Mode.
- Press the Windows and S keys simultaneously to open the Search window.
- Type “cmd” in the search box.
- Then you can see Command Prompt under Best Match.
- Right-click it and select Run as administrator.
- Next, type the command “bcdedit /set {current} safeboot minimal (ALT: bcdedit /set safeboot minimal)” and then press Enter.
- After that, restart your PC and use the shortcut keys (F10, F2, F12, F1, DEL) to enter the BIOS menu.
- Change the SATA Operation mode to AHCI from either IDE or RAID.
- Save changes and exit, and then Windows will automatically boot to Safe Mode.
- Right-click the Windows Start Menu and choose Command Prompt (Admin).
- Type this command and press Enter key: bcdedit /deletevalue {current} safeboot (ALT: bcdedit /deletevalue safeboot)
- Reboot once more, and then Windows will automatically start with AHCI drivers enabled.

Solution 5. Clear CMOS Battery
If your BIOS/UEFI settings are inconsistent with your actual information, you may easily see the MSI motherboard error code 99. This is because the CMOS battery (Complementary Metal-Oxide Semiconductor) has preserved the temporary data between the two startups.
In this case, you should clear your CMOS battery to fix this error. For the desktop PC, follow these steps:
Step 1. Turn off your computer.
Step 2. Turn off all peripheral devices connected to the computer.
Step 3. Disconnect your computer from all the power sources.
Step 4. Remove the computer cover.
Step 5. Find the CMOS battery on the board. The battery may be in a horizontal or vertical battery holder or connected to an onboard header with a wire.
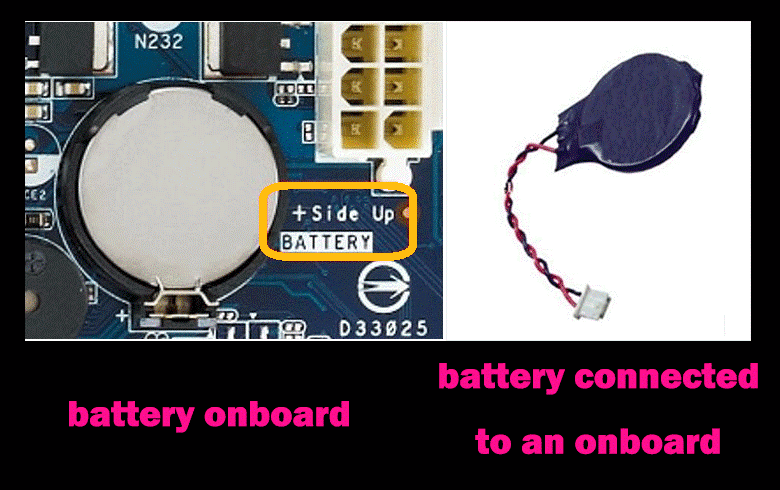
Step 6. Remove the battery:
- If the battery is in a battery holder, you need to determine the orientation of the + and – on the battery, and then gently take the battery out of its connector by using your fingernail or any conducive object.
- If the battery is connected to an onboard header with a wire, you need to disconnect the wire from the onboard header.
Step 7. Wait 1–5 minutes to ensure that the CMOS can forget its temporary cache data.
Step 8. Next, insert the CMOS battery into its specific slot and put back the case.
Step 9. Put the computer cover back on.
Step 10. Plug the computer and all devices back in.
Step 11. After booting, check if the MSI motherboard error code 99 is fixed.
![[Solved] Mfewfpk.sys Driver_IRQL_Not_Less_Or_Equal](https://images.minitool.com/partitionwizard.com/images/uploads/2022/10/mfewfpk-sys-driver-irql-not-less-or-equal-thumbnail.jpg)
Solution 6. Reset the BIOS or UEFI
If the MSI 99 error is caused by a BIOS or UEFI glitch or settings, you can try resetting the BIOS or UEFI menu to the default values to fix this error. Here are the detailed steps:
A. Reset the BIOS
- Boot your PC and enter the BIOS menu.
- Once you’re in the BIOS settings screen, find the menu named Setup Defaults (or Reset to Default, Setup Default, or Factory Default).
- Next, use the Load Setup Defaults option to back to the default values of your BIOS settings.
- Save the changes and wait for the next startup to complete.
- Check if the MSI 99 error has been resolved.
B. Reset UEFI
- If you cannot get past the initial screen, you should force three consecutive startups to force it to enter the Recovery menu.
- In the Recovery menu, navigate to Troubleshoot and select Advanced.
- Then click UEFI Firmware Settings.
- Next, click the Restart button to confirm your choice. Your computer will boot into the UEFI settings.
- Find the Restore menu, and then select Restore Default.
- After that, you can see a window pop up. You need to confirm the reset of your UEFI settings here.
- Once done, check if the MSI 99 error is fixed.
Solution 7. Replace Motherboard
If there is anything wrong with your MSI motherboard, you may also encounter the error code 99 on your screen. In this case, you need to change the motherboard to fix this error. If your system is still under warranty, you can ask the Dell technician to change the motherboard for you. If not, you can also try to change it by yourself. Here are the detailed steps:
Part 1. Back up your data
Before you change the motherboard, please back up your data, or you may lose your data easily. To do that, you can use MiniTool Partition Wizard’s Copy Disk Wizard feature. Here’s the tutorial:
Step 1. Download and install MiniTool Partition Wizard on a working PC. Connect your USB drive to this computer, and then launch MiniTool Partition Wizard.
MiniTool Partition Wizard DemoClick to Download100%Clean & Safe
Step 2. Click the Bootable Media feature on the top, and then click WinPE-based media with MiniTool plug-in.
Step 3. Select USB Flash Disk and click Yes in the pop-up window. Once done, you can create the USB bootable drive successfully.
Step 4. Connect the created bootable media to your computer and then boot the device from it.
Step 5. Then follow the on-screen instructions to launch MiniTool Partition Wizard.
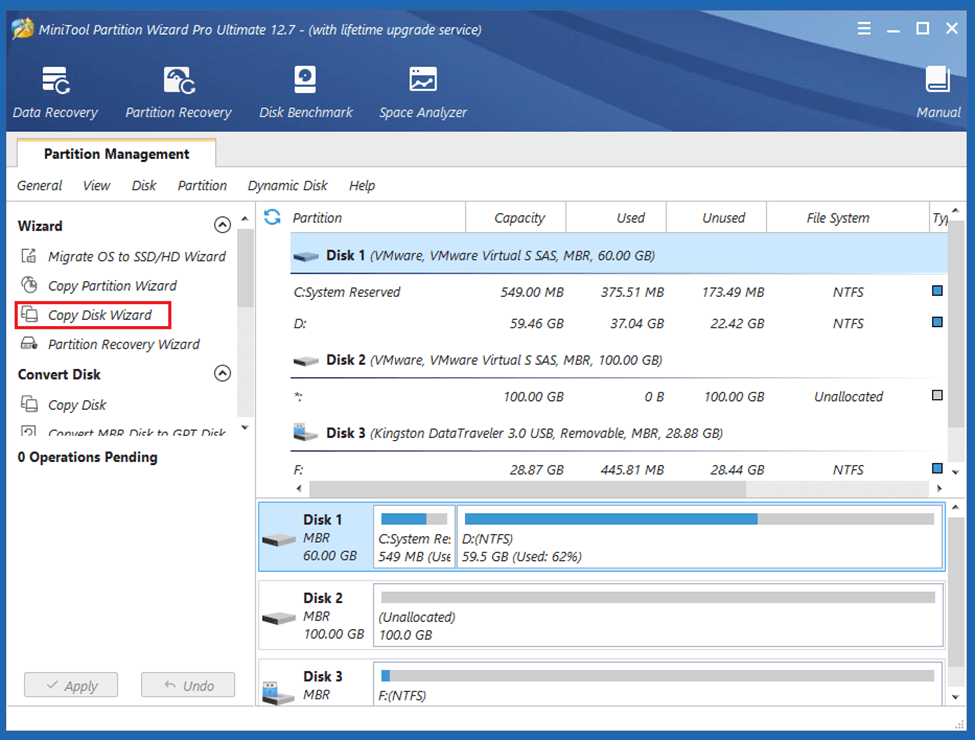
Step 6. Next, connect an external hard drive to your computer and select Copy Disk Wizard from the left panel.
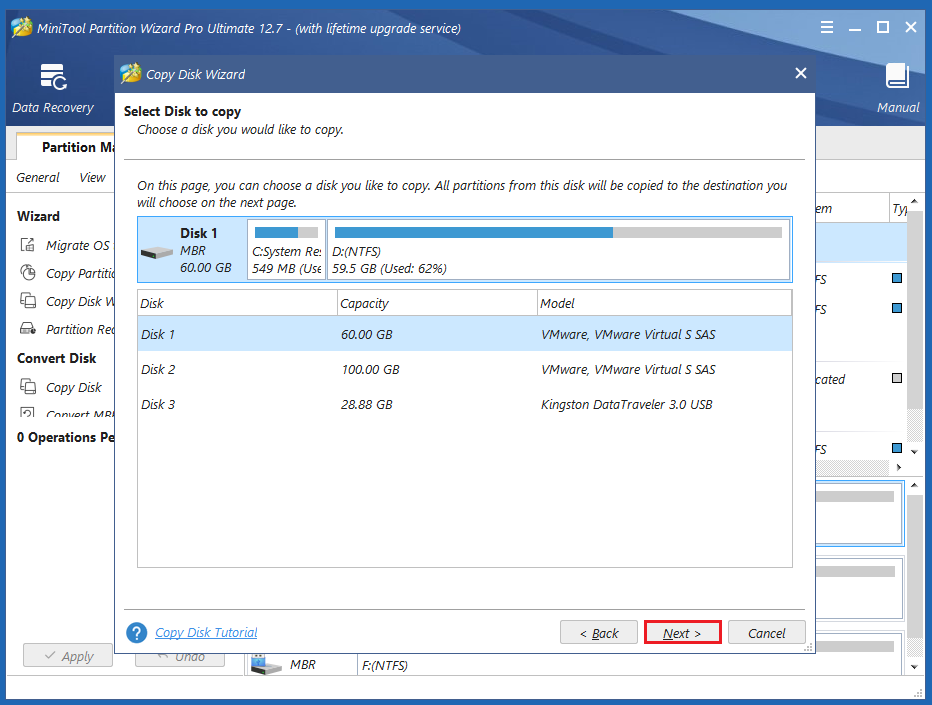
Step 7. Then you will go to the Select Disk to Copy window. Select system disk and then click Next.
Step 8. Next, select the destination disk (Disk 2) and click the Next button. In the prompted window, click Yes if there’s no important data on it.

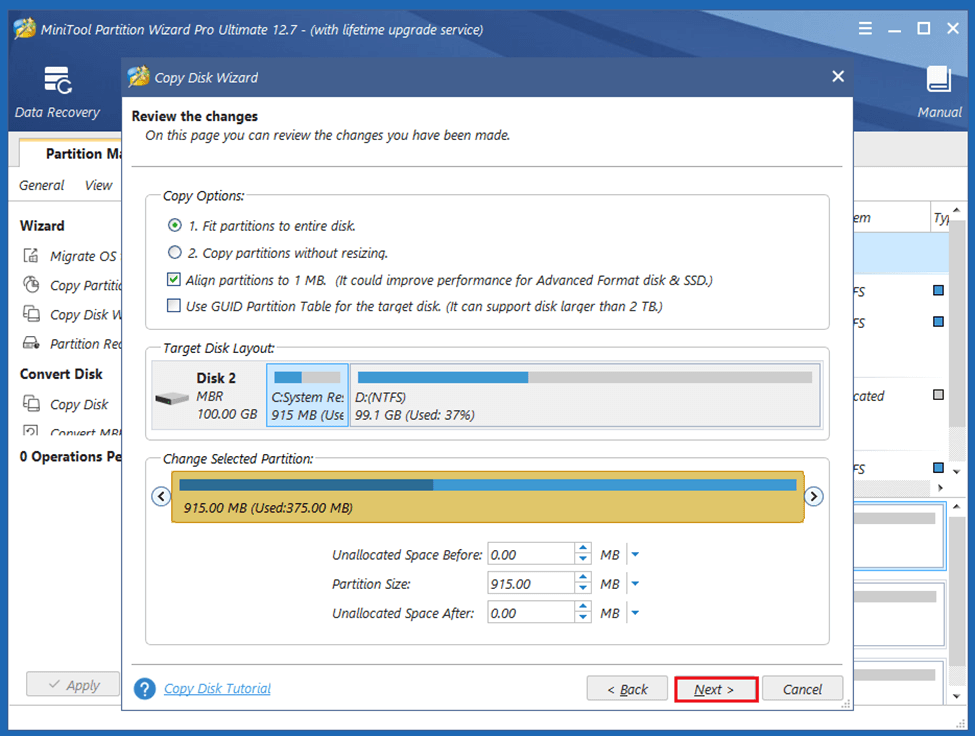
Step 9. Select copy options based on your needs and click Next. Click the Finish button on the next window.
Step 10. Click Apply and Yes to execute your changes.
Part 2. Change the Motherboard
- Turn off your computer and then unplug all peripherals and power cables (including the mouse, keyboard, Ethernet cable, external hard drives, printers, and others).
- Carefully place the case on its side, right side up.
- Loosen and remove the screws on the back of the case before sliding off and lifting the side panel.
- First, remove the Wi-Fi and graphics cards from the motherboard.
- Proceed to remove SATA and all interface cables connecting the hard drive, optical media drive, or SSD to the motherboard.
- Unplug all power cables from your motherboard.
- Remove all screws that keep the old motherboard at the computer’s mounting points.
- Carefully remove the old motherboard from the case.
- Remove the CPU, CPU cooler, and RAM from the old motherboard. (Be cautious with them and store them safely since you will be installing them on the new motherboard.)
- After that, you can install the new motherboard in the computer case.
- If all your connections are back in place, you’re ready to close up your computer’s case.
For more detailed steps, you can also read this post: How To Upgrade and Install a New CPU or Motherboard (or Both).
Part 3. Reactive Windows
If you’ve replaced your CPU or your motherboard with an identical model, you don’t need to make any changes to your system but reactivating Windows. If you’ve replaced your motherboard with a different model, you’ll probably need to reinstall your operating system at this point. If you’ve also changed the position of your SATA data cables, you may need to adjust the boot order in BIOS/UEFI.
Solution 8. Ask a Professional Technician for Help
If none of the above solutions can help you fix MSI error 99, you can ask professional technicians for help.
![[9 Methods] How to Fix the Blue Screen 0x0000007F Error?](https://images.minitool.com/partitionwizard.com/images/uploads/2022/12/0x0000007f-thumbnail.png)
Bottom Line
This post provides eight solutions to help you fix MSI error 99. You can try these methods to solve this error on your computer.
Do you know other methods to solve this error? Please share your ideas or experiences with us in the following comment zone. In addition, if you encounter problems while using MiniTool Partition Wizard, please contact us via [email protected]. We will get back to you as soon as possible.
About The Author

Position: Columnist
Charlotte is a technology columnist with a strong focus on the Windows operating system, specializing in disk management, backup, and data recovery. She is passionate about analyzing computer errors, identifying root causes, and delivering practical solutions. In her free time, she stays updated on the latest developments in computer systems and hardware while continuously learning new technologies to broaden her expertise. Her writing style is clear and easy to understand, making complex technical topics accessible even to users with limited computer knowledge.
User Comments :