Upgrading to a new computer is more than just replacing hardware. It means migrating your entire data. You’ll need to migrate personal documents from your old device to new one, which can be a daunting task.
Fortunately, Lenovo has developed software called Lenovo Migration Assistant (LMA). This intuitive software, designed specifically for Lenovo users, ensures a smooth, secure, and efficient transfer of data from your old computer to your new Lenovo device.
This article will provide a comprehensive overview of all aspects of Lenovo Migration Assistant, including its main features, compatibility, step-by-step tutorials for different transfer methods, troubleshooting for common problems, and Lenovo Migration Assistant alternatives.
What Is Lenovo Migration Assistant?
Lenovo Migration Assistant is dedicated data migration software developed by Lenovo to simplify the process of migrating data from older Lenovo PCs to newer Lenovo devices.
It is tailored specifically for the Lenovo ecosystem, ensuring compatibility with Lenovo laptops, desktops, and operating system settings.
It can transfer files via Wi-Fi or USB, offering intuitive and automated transfer options for easy operation.
This tool can transfer files in desktops, documents, pictures, music, videos, downloads, and other folders, as well as some system settings.
Key Features
Lenovo Migration Assistant stands out among numerous migration tools due to its features optimized for Lenovo systems and its user-centric design.
- Dual transfer modes: LMA supports two main migration methods: LAN/Wi-Fi transfer and USB Direct, to meet different user scenarios.
- Cloud integration: For users who prefer wireless, cross-device transfer, LMA integrates Dropbox, supporting cloud-based data synchronization between old and new computers. This feature is particularly useful for users who cannot carry two devices simultaneously.
- Lenovo ID sync: Signing in with your Lenovo ID ensures secure authentication between devices, preventing unauthorized access to sensitive data during transfer. It also syncs Lenovo-specific preferences, simplifying the setup process.
- Supports both new and older Windows versions: The LMA is compatible with the Windows systems from Windows 7 to Windows 11, making it ideal for users upgrading from older Lenovo computers to newer models.
Compatibility
Before using Lenovo Migration Assistant, ensure your devices meet the following compatibility requirements to avoid transfer issues:
- Device brand: While LMA is optimized for Lenovo PCs, the source device (older PC) can be a non-Lenovo-branded Windows device. However, the target device (newer PC) must be a Lenovo laptop or desktop.
- Compatible devices: It supports all IdeaCentre, IdeaPad, ThinkCentre, ThinkPad, and ThinkStation.
- Operating system: Both the source and target devices should be running Windows 7 or later. Earlier Windows versions are not supported.
- Network requirements: For LAN/Wi-Fi transfers, both devices should be connected to the same Wi-Fi or wired network. Cloud transfers via Dropbox require a stable internet connection.
- Storage space: The target Lenovo PC should have sufficient available storage space to accommodate all the data being transferred. Lenovo recommends reserving at least 20% more space than the total amount of data being transferred to avoid running out of storage.
- Software version: Always use the latest version of LMA, available for download from Lenovo’s official support website. Outdated versions may lack critical bug fixes and compatibility updates.
Preparation Before Using Lenovo Migration Assistant
A successful migration begins with thorough preparation. Skipping these steps can lead to longer transfer times. Here are some tips:
#1. Clean and organize the data on your source computer.
Before transferring data, clean up your old computer to reduce transfer time and optimize storage space usage on your new device:
- Delete unnecessary files: Delete duplicate files, temporary files, and expired downloads to minimize the amount of data to be transferred.
- Organize important data: Group related files into folders for easier access on your new computer.
- Compress large files: Use Windows’ built-in compression feature or third-party tools to compress large folders to speed up the transfer.
#2. Check the target computer’s storage space.
First, calculate the total size of the data you plan to transfer.
Then, check the available storage space on your target Lenovo computer (Settings > System > Storage). Ensure that the available space is at least 120% of the size of the data to be transferred.
How to Use Lenovo Migration Assistant?
Lenovo Migration Assistant offers two primary transfer methods:
- Wi-Fi Transfer
- USB Transfer
Below is a detailed tutorial for each method.
Method 1. Wi-Fi Transfer
This method transfers data directly between two computers on the same local Wi-Fi network. Here are the steps:
Step 1. Download and install Lenovo Migration Assistant on both devices.
- Go to the official Lenovo Support website and search for the Lenovo Migration Assistant download.
- Download the latest version of Lenovo Migration Assistant and install it on both the old (source) PC and the new (target) Lenovo PC.
- Launch this tool on both devices after installation.
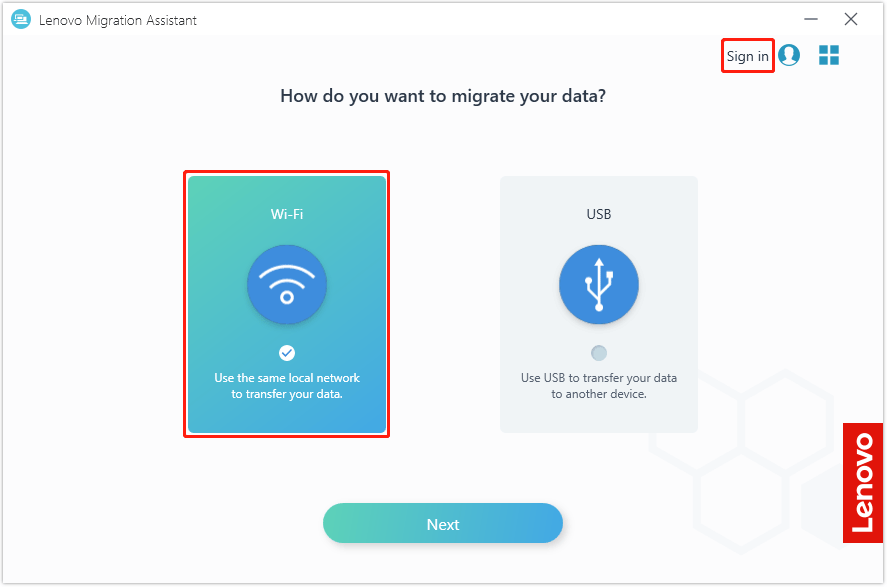
Step 2. Choose the transfer method.
- On both PCs, click Sign In and enter your Lenovo ID credentials.
- Select the Wi-Fi option on both devices.
- Click Next.
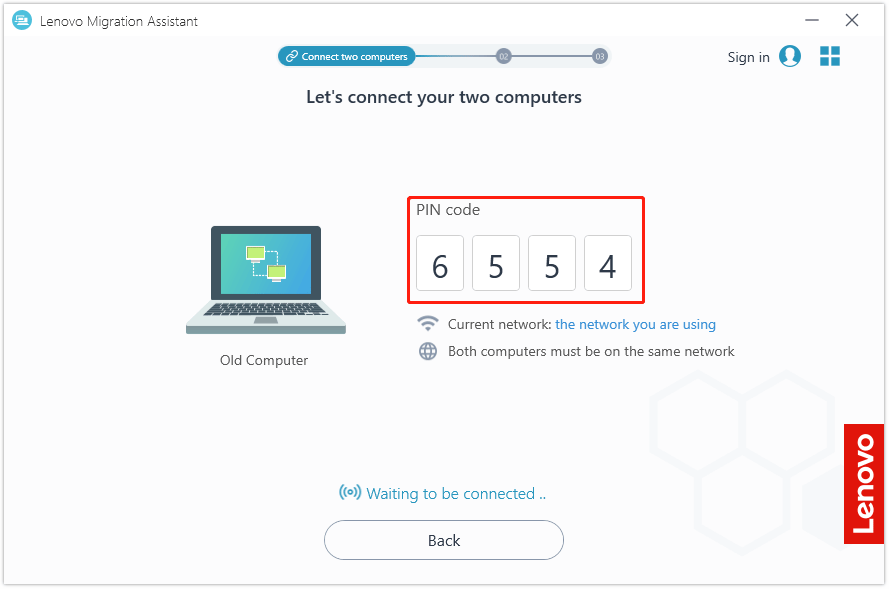
Step 3. Initiate a connection between devices.
- On the old PC, select Old Computer. Then the software will generate a 4-digit PIN code.
- On the new Lenovo PC, select New Computer. Enter the PIN code from the old PC when prompted and click Connect.
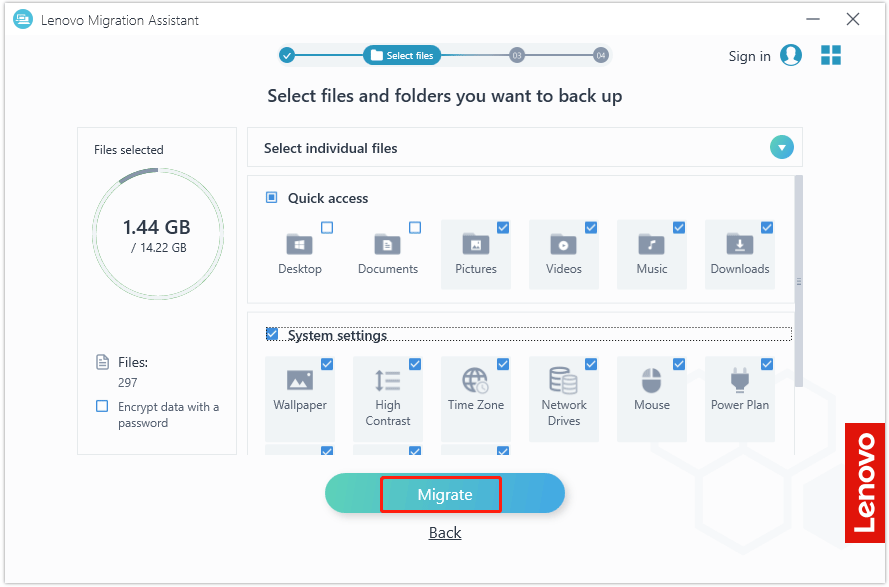
Step 4. Select data to migrate.
- Once connected, this tool will scan the source PC and display a list of transferable data categories: Desktop, Documents, Pictures, Music, Videos, Downloads, and some System settings.
- Check the items you want to transfer. You can click the arrow icon to select more saved data and even a whole drive.
- Click Migrate to begin the transfer.
Lenovo Migration Assistant will then immediately begin transferring the selected files. The time required depends on the file size. Once the transfer is complete, you can click Migrate More to transfer additional data.
Method 2. USB Transfer
If your two devices are not on the same network or have unstable network connections, the USB transfer method is a good option.
This tool is faster than simply copying and pasting files to a USB drive and allows you to select data from different paths at once, restoring backups to their original locations. Once the transfer is complete, you won’t need to manage these files again.
Step 1. Migrate data to the USB drive.
- Prepare a USB drive with sufficient free space and connect it to your source computer.
- Select USB, and then click Next.
- Select Create a backup and click Next.
- Once the tool detects the USB drive, click Connect.
- Wait for some time to scan your source PC data. Then select the files you want to migrate and click Migrate to back them up to the USB.
Step 2. Migrate the data from the USB to the new Lenovo PC.
- Exit the tool and disconnect the USB drive.
- Now, insert the USB drive into your target computer and launch Lenovo Migration Assistant. Then, select USB > Restore data.
- All backup files you created using this tool will be detected and displayed here. Simply select the desired backups and click Migrate to restore the data to your new computer.
Common Lenovo Migration Assistant Issues
While Lenovo Migration Assistant is easy to use, occasional issues may arise during transfer. Below are solutions to the most common problems reported by users:
Issue 1. Devices Fail to Connect
- Check network connection: For Wi-Fi transfers, ensure both devices are on the same network. Restart your router if the connection is unstable.
- Disable firewall/antivirus: Temporarily turn off third-party firewall or antivirus software, as they may block LMA’s communication ports.
- Run LMA as administrator: Right-click the LMA icon and select Run as Administrator to grant the software the necessary permissions to establish connections.
Issue 2. Transfer Process Freezes or Crashes
- Close background apps: On both devices, close resource-intensive apps (e.g., video editors, games) that may consume bandwidth or system resources.
- Check storage space: Ensure the target PC has enough free space. If the transfer freezes at a specific percentage, it may indicate insufficient storage.
- Restart LMA: Close the software on both devices, restart them, and restart the transfer from the beginning.
Issue 3. Incomplete File Transfer
- Check the log errors: Check the logs in C:\ProgramData\Lenovo\MigrationAssistant\Logs for errors.
- Verify file permissions: Ensure the user account on the source PC has read permissions for all files being migrated. Files with restricted permissions may not transfer.
Alternatives to Lenovo Migration Assistant
While Lenovo Migration Assistant excels at migrating between Lenovo devices, it also has some limitations, such as limited support for non-Lenovo devices, or the migration process potentially getting stuck or taking too long.
Below are some alternatives:
Option 1. MiniTool Partition Wizard
Lenovo Migration Assistant is great for migrating personal files and folders, but what if you want to migrate installed applications or even an entire disk?
That’s where professional disk cloning software comes in. MiniTool Partition Wizard is such a program. With this feature-rich software, you can complete the entire drive’s data transfer, including programs, games, and the Windows operating system.
In addition, it offers advanced features, such as converting MBR to GPT without data loss, migrating OS to SSD/HD, copying partitions to another drive, and more.
Now, follow the steps below to clone the hard drive from the old computer to the new computer. Note that you need to download and install MiniTool Partition Wizard on both computers.
MiniTool Partition Wizard DemoClick to Download100%Clean & Safe
Step 1. Clone the hard drive from the old computer to the external hard drive.
- Connect the external hard drive to the old PC via a SATA/NVMe to USB cable.
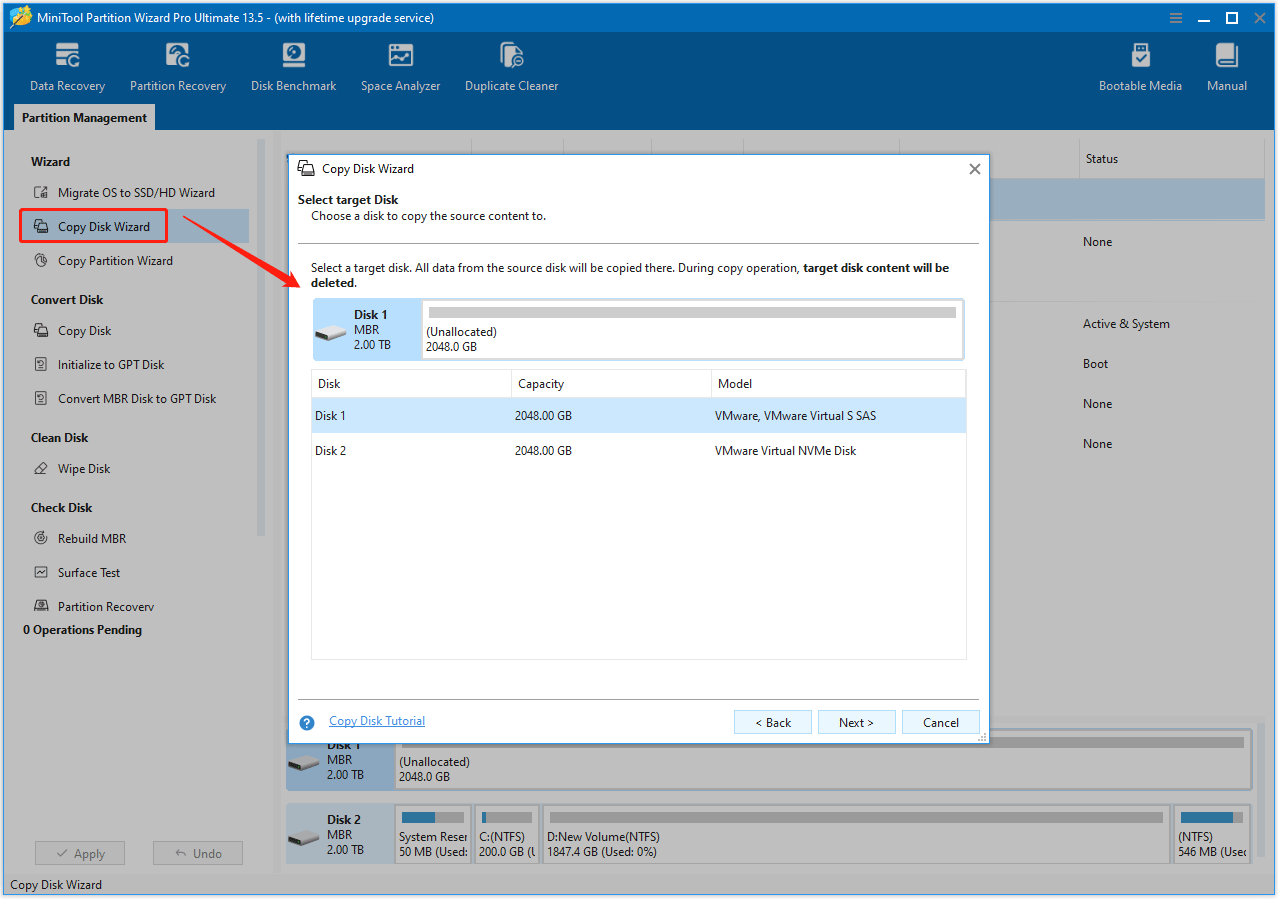
- Launch MiniTool Partition Wizard and click the Copy Disk Wizard feature from the left action panel. Then click Next.
- Select the drive on the old computer and click Next.
- Select the external hard drive and click Next.
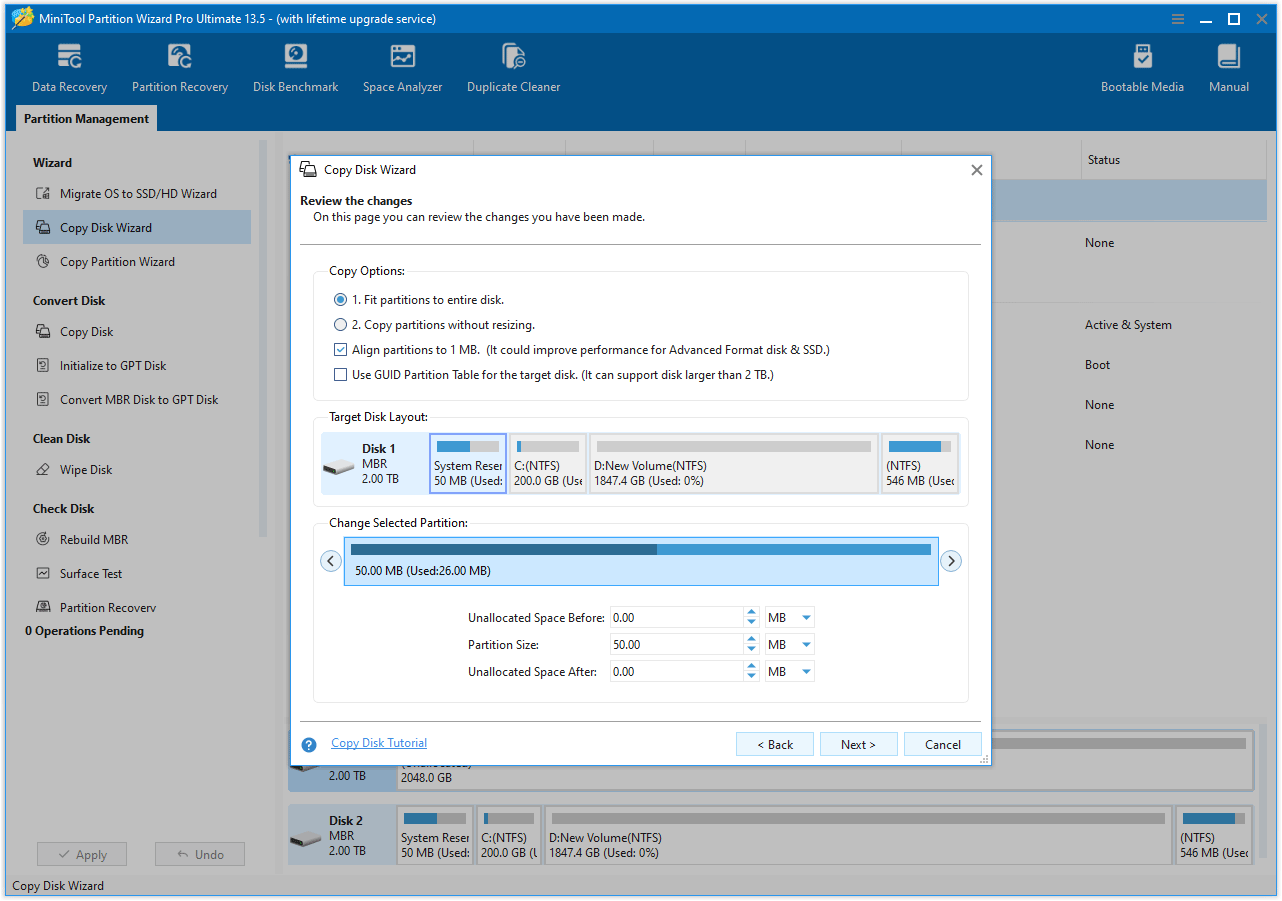
Step 2. Review the changes, and then click Next. It’s recommended that you keep the default option.
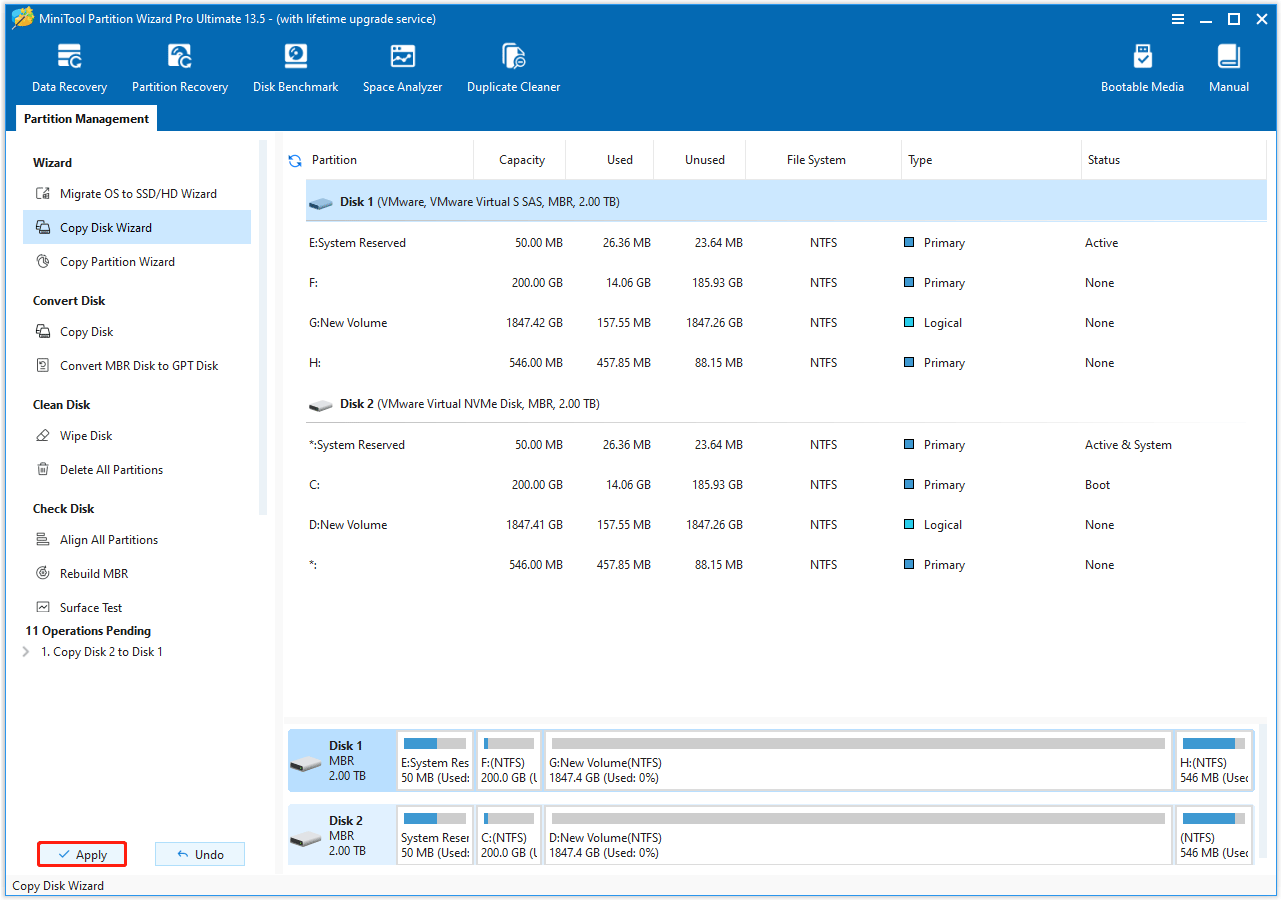
Step 3. Click Finish and then Apply to execute the operation.
Step 4. Once done, unplug the external hard drive and connect it to the new computer. Then refer to the steps above to transfer the data from the external drive to the new computer.
Option 2. Cloud Storage Services
Cloud storage services like OneDrive, Google Drive, and Dropbox provide an easy, secure way to transfer files between computers. To do that, just upload these files to the cloud on the old PC and download them on the new one.
This method is primarily for files and does not transfer programs or settings. Additionally, it is limited by cloud storage capacity and internet speed.
Option 3. Create a Shared Folder
If the two devices are on the same local area network, you can also choose to create a shared folder to transfer files. Here are the steps:
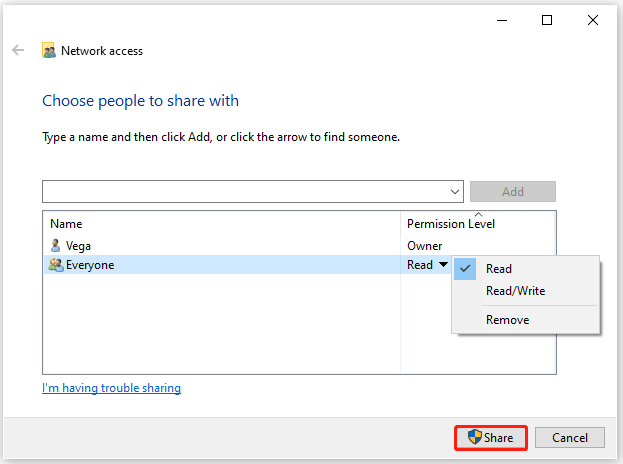
Step 1. Create and share a folder on the source PC.
- Open File Explorer and navigate to the folder you want to share.
- Right-click the folder and select Give access to > Specific people.
- In the dialog box, use the dropdown menu to select who you want to share with. Choose Everyone to allow all network users access. To share with a specific user, type the username and click Add.
- Then set the Permission Level (e.g., Read or Read/Write) and click Share.
Step 2: Access the shared folder on the destination PC.
- On the target PC, open File Explorer and click Network in the left navigation pane.
- You should see the source computer listed. Double-click it to view the shared folders.
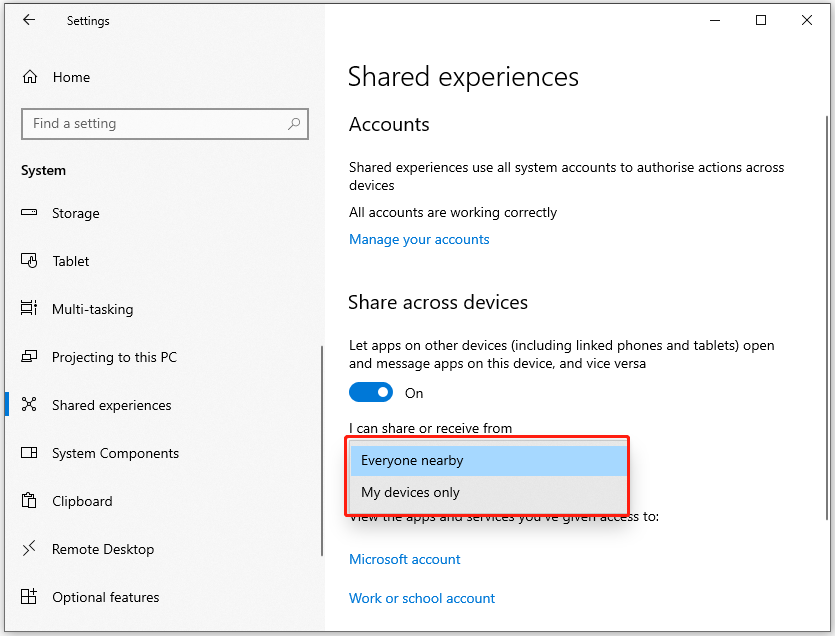
Option 4. Use Windows Nearby Sharing
If both computers are on the same local network, you can use the Windows built-in file sharing feature, Nearby Sharing, to share specific files and folders. But this is available on Windows 10 (1803 or later) and Windows 11, and has limitations in distance.
To use Windows Nearby Sharing to transfer files, follow these steps:
- Press Win + I to open Settings.
- Go to System > Shared experiences.
- In the right pane, ensure that the Share across devices feature is enabled and select to share or receive content only from Everyone nearby or My devices only. Then, perform the same steps on the new computer.
- Right-click the file or folder you want to share and click Share. Next, select another computer from the device list.
- The target computer will then receive a notification, and you can choose to accept receiving the shared files.
Lenovo Migration Assistant FAQ
Bottom Line
Lenovo Migration Assistant is a powerful and easy-to-use tool that makes data migration between Lenovo computers a breeze. Its intuitive design and flexible transfer methods make it an ideal choice for most Lenovo users upgrading to new devices.
For scenarios where Lenovo Migration Assistant falls short, such as cross-brand migrations or full hard drive cloning, alternatives like MiniTool Partition Wizard offer reliable solutions.
If you have any questions or suggestions on how to use MiniTool Partition Wizard, do not hesitate to contact us via [email protected]. We’ll reply as soon as possible.
About The Author

Position: Columnist
Vega enjoys helping people with computer problems, including disk management, data recovery, data backup, and more. She is constantly expanding her knowledge in related fields. And she will continue to bring more easy-to-understand professional articles to help people solve various problems on the PC.
User Comments :