A lot of users want to downgrade Windows 10 Pro to Home due to some reason. However, most of them have difficulties in doing that. Don’t worry. MiniTool shows you how to downgrade from Windows 10 Pro to Windows 10 Home without data loss.
According to user reports, their Windows 10 Home upgrades to Pro accidentally due to a sudden update or being a part of Insider Programmer. However, they can’t reactivate the Windows 10 Pro edition using the previous activation key. So, they want to downgrade their Windows 10 edition.
To downgrade Windows 10 Pro to Home, some people use the Windows 10 Media Creation Tool to reinstall Windows 10 Home, but the Setup automatically installs a copy of Windows 10 Pro. Here is a true example from the answer.microsoft.com forum:
For some reason, my Windows 10 Home has magically upgraded itself to Pro, only of course I do not have the product key for Pro so it will not activate. I cannot do a clean install of Home – which is what most people suggest – because when I run the Media Creation Tool, it automatically tries to install a copy of Pro. I never see an option to choose Home instead. How can I “downgrade” to Home so the system will correctly reactivate itself?https://answers.microsoft.com/en-us/windows/forum/all/downgrade-from-windows-10-pro-to-home/345f5464-cb7a-44b3-8856-237cbec072c8
Important Things Before Your Do
Before you start downgrading from Windows 10 Pro to Home, you need to know something important.
Back up Your System Disk
The first thing is that you should make a full backup of all data because a normal clean installation is not inevitable during the downgrade process. As you know, a clean installation will completely erase your system disk. So, it is highly recommended you back up your system disk beforehand.
Here MiniTool Partition Wizard can help you do that easily. It is a powerful partition manager that boasts many features like Migrate OS to SSD/HD, Convert NTFS to FAT32, Rebuild MBR, Extend Partition, Wipe Hard drive, etc. Let’s see how to use it to back up your system disk.
MiniTool Partition Wizard DemoClick to Download100%Clean & Safe
Step 1. Prepare an empty external storage device and connect it to your computer to store the backup.
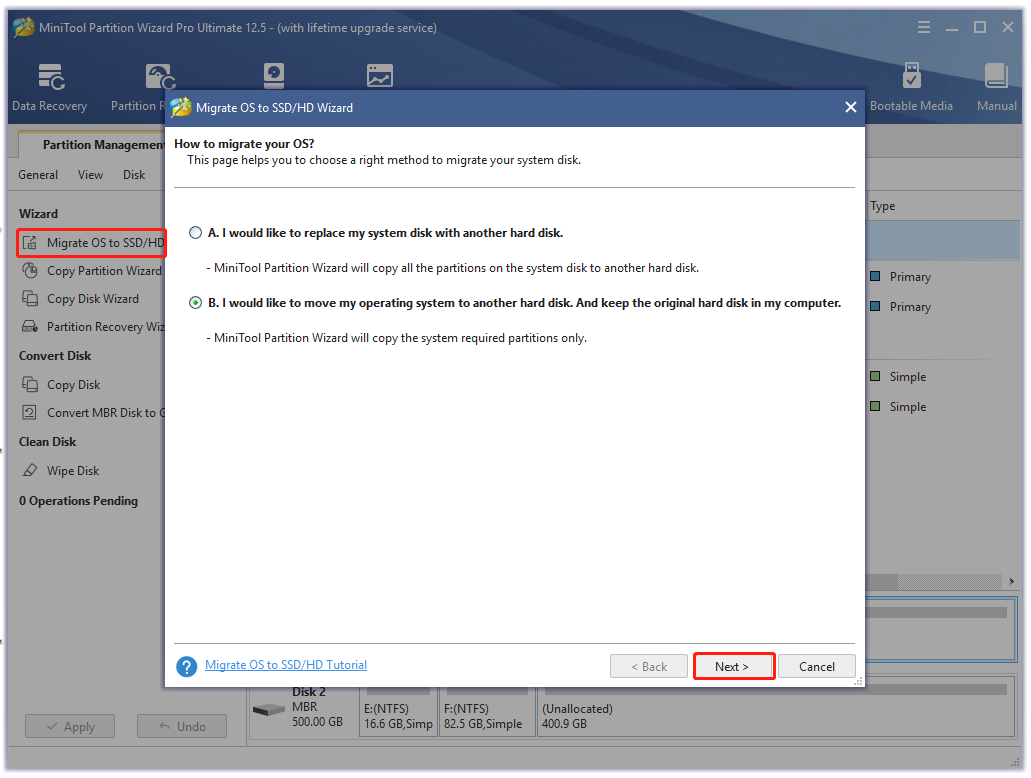
Step 2. Launch the software to enter its main interface, and then select Migrate OS to SSD/HD Wizard from the left action pane.
Step 3. Select an option to migrate OS. If you want to copy the system required partitions only, select Option B. If you want to copy all partitions on the system disk, select Option A. Then click on OK.
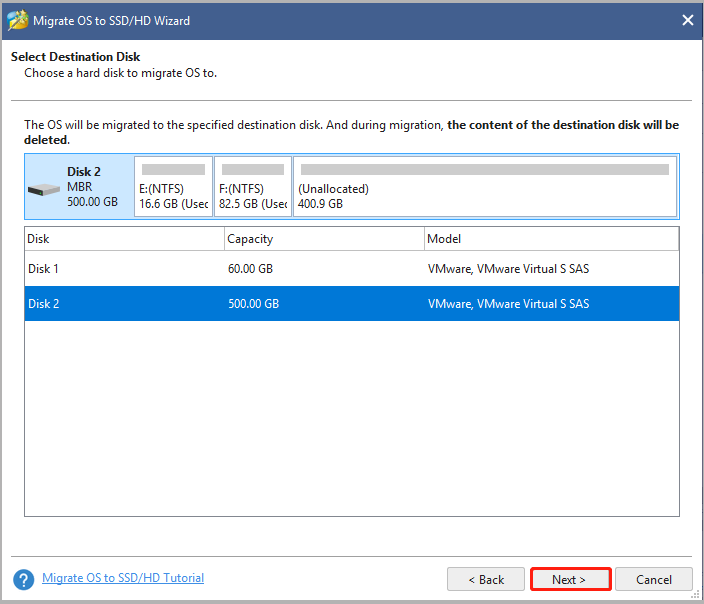
Step 4. Select the target drive you want to migrate OS to and click on Next, and click on Yes to confirm it.
Step 5. Select a copy option based on your needs and click on Next to go on.
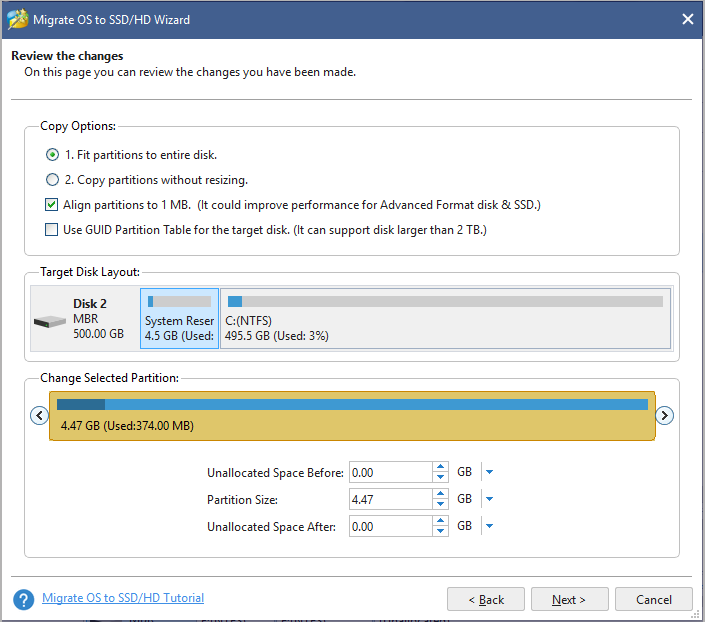
Step 6. Review the changes you just made and click on Finish to confirm that. Finally, click on Apply to execute the pending operations.
Get a Windows 10 Home License
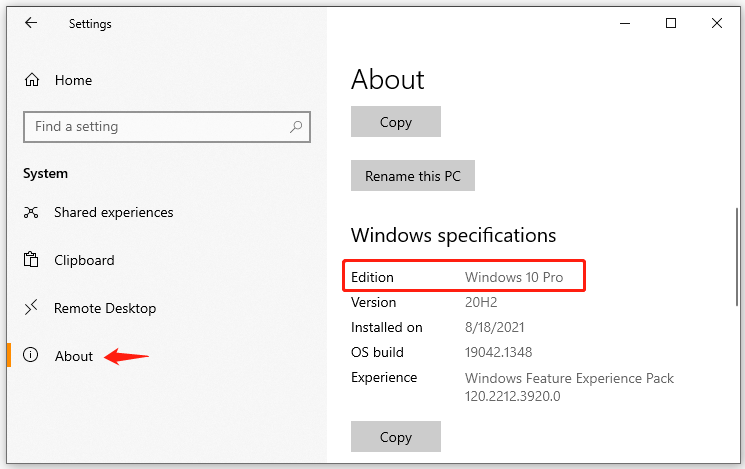
In addition, you need to get a Windows 10 Home edition license that you can reactive your system correctly. Make sure you are using Windows 10 Pro edition. If you are not sure that, follow the steps below to view the Windows specifications:
Step 1. Press Win + I keys to open the Settings window and navigate to the System section.
Step 2. Select About from the left pane and go to Windows specifications where you will check if your edition is Windows 10 Pro.
How to Change from Windows Pro to Home
How to change from Windows 10 Pro to Home? Two ways can help you downgrade from Windows 10 Pro to Home. Let’s start trying.
# 1. Downgrade Windows 10 Pro to Home via Media Creation Tool
To downgrade from Windows 10 Pro to Home successfully, you need to change the edition ID and Product name of Windows 10 Pro to Home in Registry Editor and then clean install Windows 10 using the media creation tool. Here is a full guide for you.
Part 1. Change Windows 10 Pro Edition ID and Name to Home
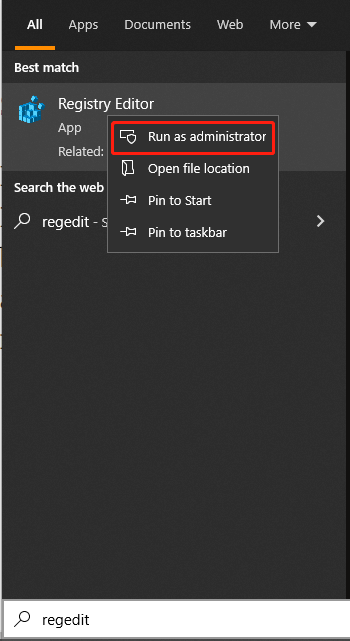
Step 1. Type regedit in the Search box, and then right-click the Regedit app from the Best match and select Run as administrator. Click on Yes in the UAC window when you are prompted to continue.
Step 2. In the Registry Editor window, go to the following path via the left navigation bar.
ComputerHKEY_LOCAL_MACHINESOFTWAREMicrosoftWindows NTCurrentVersion
Step 3. With CurrentVersion selected in the left pane, head over to the right pane and look for the ProductName string value. Double click it and changes its value data from Windows Pro to Windows 10 Home, and click on OK to save the change.
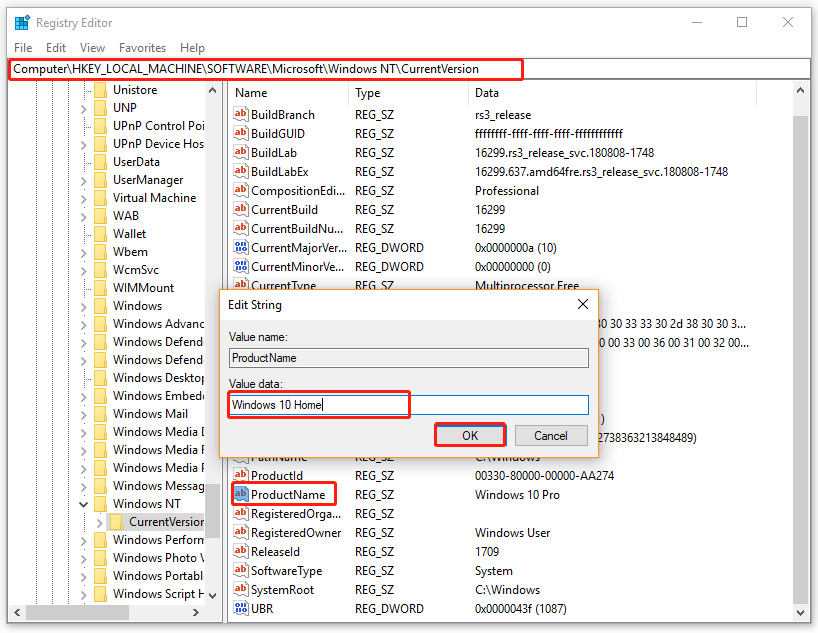
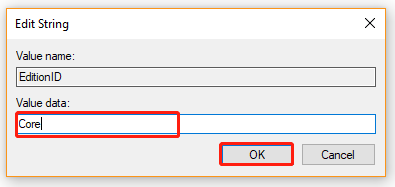
Step 4. Double click the EditionID string value, and then change its value data from Professional to Core and click on OK.
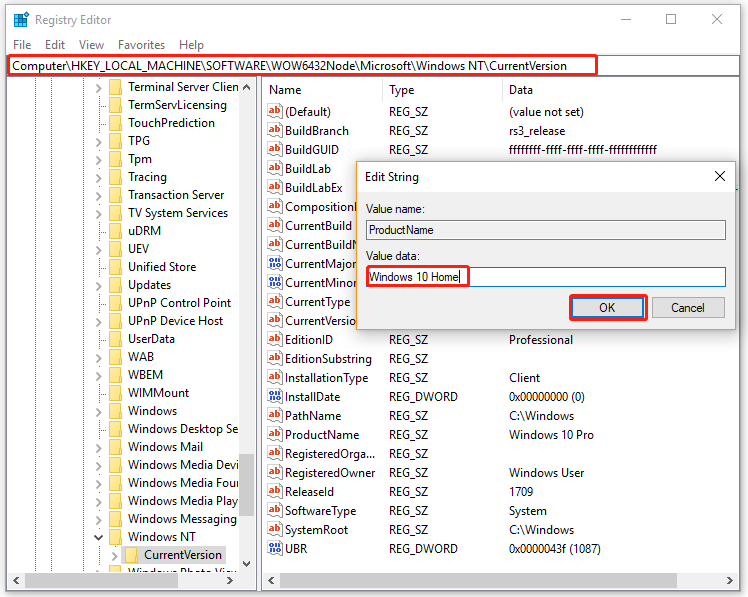
Step 5. Go to the following path, and then repeat the same process in Steps 3 – 4 to change the value data of ProductName and EditionID, and save changes.
ComputerHKEY_LOCAL_MACHINESOFTWAREWOW6432NodeMicrosoftWindows NTCurrentVersion
Once you completed all the above steps, close the Registry editor and move down to the next part.
Part 2. Downgrade from Windows 10 Pro to Home
Now, let’s see how to how to change from Windows 10 Pro to Home using the media creation tool.
Step 1. Click here to download Windows 10 Media Creation Tool from Microsoft Official website.
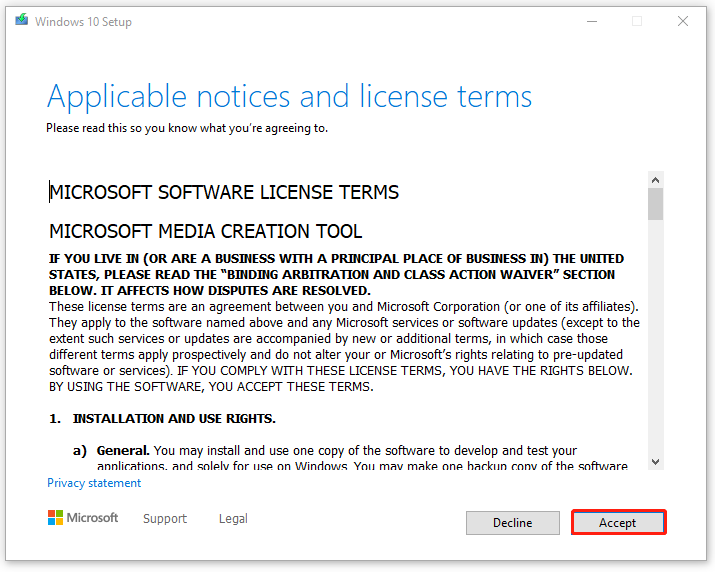
Step 2. Once downloaded, run the Media Creation Tool to access the Window 10 Setup page and click on Accept to continue.
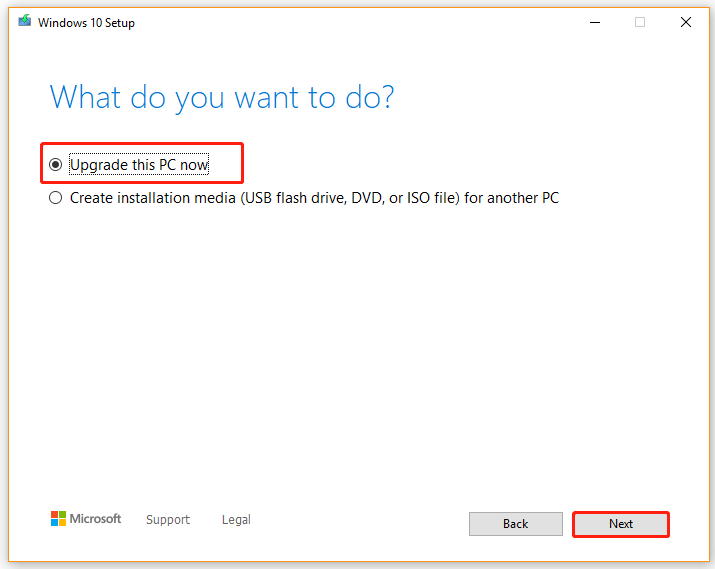
Step 3. Select Upgrade this PC now and click on Next. Then Windows 10 will start downloading. This process may take you some time, so please wait patiently.
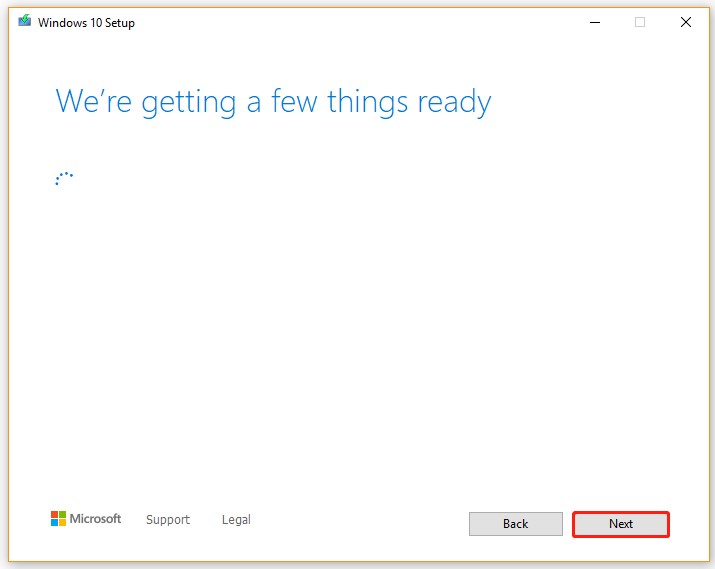
Step 4. Once downloaded, Windows 10 Setup will start getting things ready as the screenshots below:
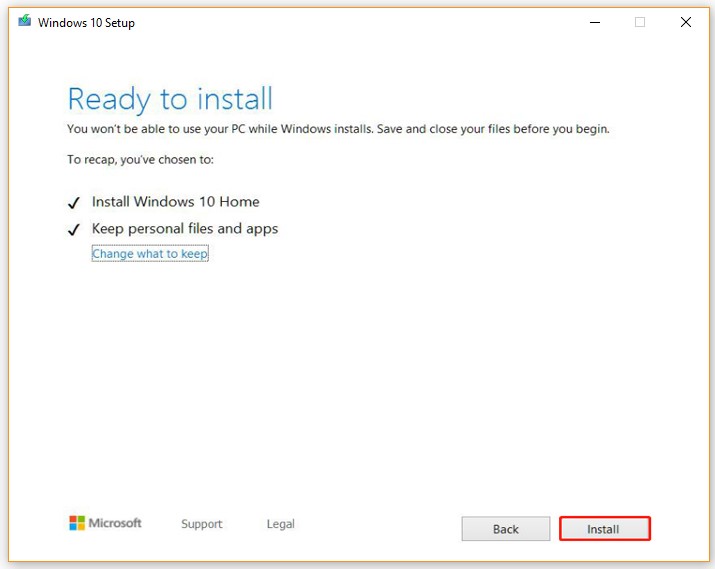
Step 5. In the Ready to install window, click on Install and follow the on-screen instructions to complete the process. When you are on the Activate Windows screen, make sure that you enter the Windows 10 Home activation license code.
After the installation is finished, you can sign in to your computer and open the Settings app to check if you have downgraded from Pro to Home.
# 2. Downgrade Windows 10 Pro to Home via a Windows 10 ISO File
Some other people report that they downgrade from Windows 10 Pro to Home directly using the Windows 10 ISO file. To do so, you also need to change the ProductName and EditionID of Windows 10 Pro just like Part 1 in the above method and then use the ISO file to clean install your system. Here’s a tutorial:
Step 1. Download Windows 10 ISO file and save it on your PC. Make sure you download the Windows 10 Home edition.
Step 2. Mount the ISO file to your drive.
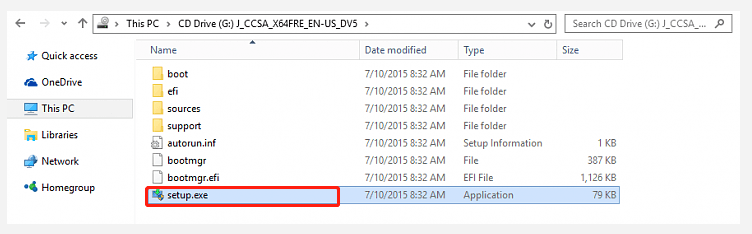
Step 3. Press Win + E keys to open the File Explorer, and then open the drive you mounted the ISO file and run the setup.exe file to access Windows 10 setup. Click on Yes in the UAC window when you are prompted to continue.
Step 4. Windows 10 Setup will start preparing and click on the Change how Windows Setup downloads updates link.
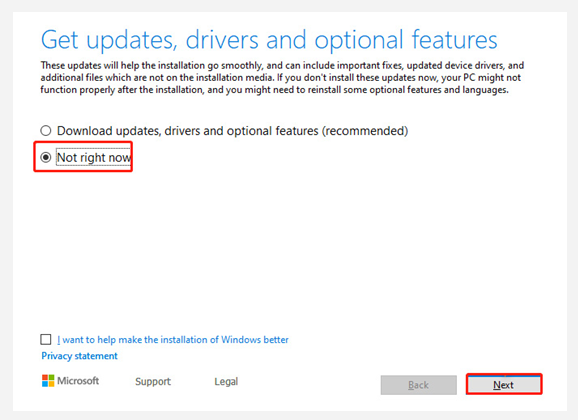
Step 5. Untick the checkbox next to I want to help make the installation of Windows better, and then select the Not right now option and click on Next to go on.
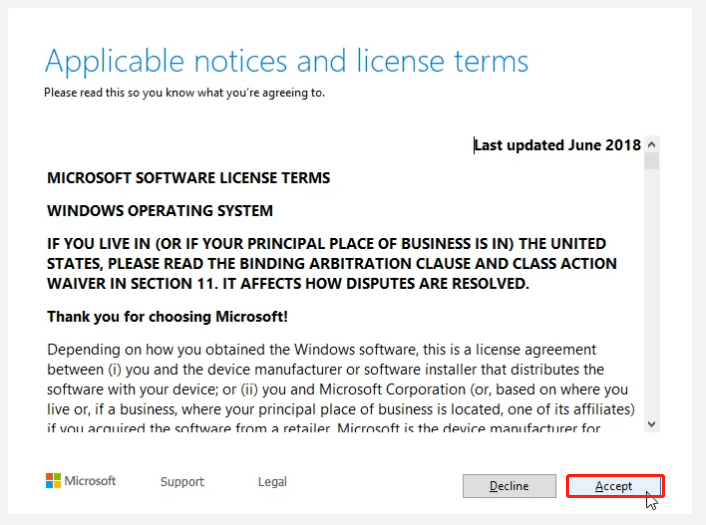
Step 5. Then Windows 10 Setup will now start getting things ready. Once you are ready, click on Accept for the applicable notices and license terms of Windows 10.
Step 6. The installation process is the same as the process you use the Media Creation Tool. So, you just need to follow the on-screen prompts to complete the installation. Once done, your computer should change from Windows 10 Pro to Home.
Bottom Line
How to downgrade from Windows 10 Pro to Windows 10 Home? To do so, you need to change the Product Name and EditionID of Windows 10 Pro in Registry Editor, and then perform a clean install using the Windows 10 Media Creation Tool or the ISO file. Since this process will erase your system disk, make sure that you back up all important data beforehand.
Have you any better suggestions or opinions on the Windows 10 downgrade operation? If you have, please write them down in the following comment area. You can also send us an email to [email protected] when you have difficulties in using MiniTool Partition Wizard.
User Comments :