A great many users still don’t know how to mount ISO Windows 10. If you are one of them, then you come to the right place. In this post, MiniTool provides a complete guide on Windows 10 ISO mount/unmount.
Windows 10 ISO is a widely used container format that was designed to store the contents of a physical disk like a CD/DVD. With the ISO file, users can create a Windows 10 bootable USB drive for installing or reinstalling. However, a lot of users are still confused about how to mount ISO Windows 10. Don’t worry. Here is a full guide.
Before you download the Windows 10 ISO file, we recommend you firstly check the basic requirements for installing. For that:
- Processor: 1 gigahertz (GHz) or faster processor or System on a Chip (SoC)
- RAM: 1GB for 32-bit or 2GB for 64-bit
- Hard drive space: 16GB for 32-bit or 32GB for 64-bit
- Graphics card: DirectX 9 or later with WDDM 1.0 driver
- Display: 800×600
Microsoft provides the built-in tools for the Windows 10 mount ISO without extra software. Here you can mount and unmount ISO Windows 10 using File Explorer or Windows PowerShell.
![How to Install Windows 10 on Raspberry Pi 4 [Full Guide]](https://images.minitool.com/partitionwizard.com/images/uploads/2021/08/windows-10-on-raspberry-pi-4-thumbnail.jpg)
# 1. Windows 10 ISO Mount/Unmount Using File Explorer
After you download Windows 10 ISO file and save it to your computer, you can perform the ISO mount Windows 10 by following the guide below:
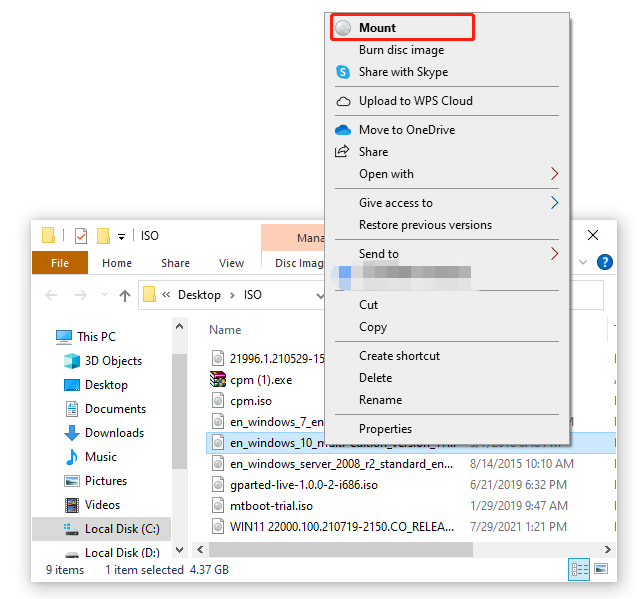
Step 1. Press Win + E keys to open the File Explorer, and then locate the Windows 10 ISO image file.
Step 2. Right-click the .iso file and select Mount. After that, you can access the contents of this file by selecting the virtual drive from the left navigation pane.
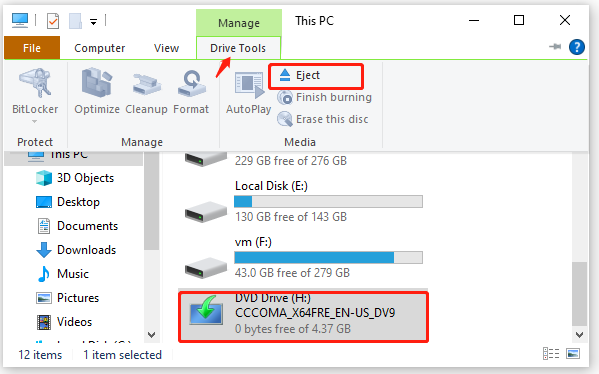
Step 3. If you want to unmount ISO Windows 10, you can open the File Explorer and expand the This PC category.
Step 4. Right-click the virtual drive that you just mounted and select Eject. Alternatively, you can select the virtual drive, and then locate Drive Tools and click on Eject from the top menu bar. Once done, the Windows 10 ISO file will no longer be accessible until you mount it.
# 2. Windows 10 ISO Mount/Unmount Using PowerShell
Another simple method on the Windows 10 mount ISO is to run certain commands with PowerShell. Here’s how to do that:
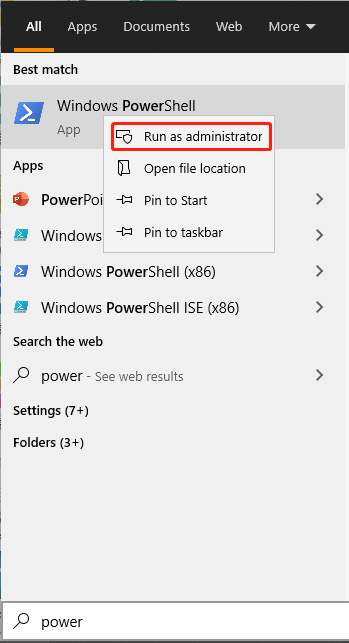
Step 1. Type powershell in the search box, and then right-click Windows PowerShell from the top result and select Run as administrator. Click on Yes in the popped-up UAC window.
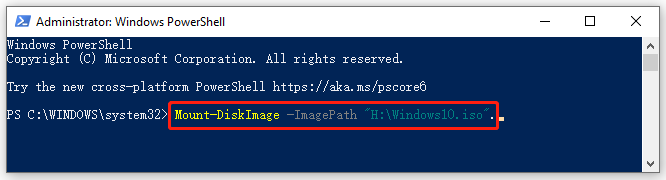
Step 2. In the pop-up window, type the following command to mount Windows 10 ISO and hit Enter. For example, the image path of the virtual drive on my computer is H, then this command for Windows 10 ISO mount should be Mount-DiskImage -ImagePath “H:Windows10.iso”.
Mount-DiskImage -ImagePath “PATHTOISOFILE”
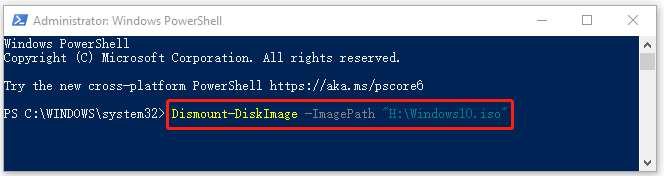
Step 3. If you want to unmount Windows ISO file, you can type the following command and hit Enter. Here make sure you replace the “PATHTOISOFILE” with the actual path of the virtual drive. For example, this command for unmounting ISO file in the H: virtual drive should be Dismount-DiskImage -ImagePath “H:Windows10.iso”.
Dismount-DiskImage -ImagePath “PATHTOISOFILE”
Now, the full guide on Windows 10 ISO mount/mount has been illustrated. If you have other questions on the Windows 10 ISO, the following several posts may help you:
User Comments :