Introduction to Chrome OS Flex
Chrome OS Flex is released by Google for old Windows and macOS devices. It is a successor to CloudReady, which is a compiled OS based on the source codes of Chromium OS, but CloudReady was later acquired by Google.
You can install this OS on almost any PC. This light OS mainly relies on the network rather than local applications and does not require a lot of hardware resources, so the old devices can run very smoothly.
To know the difference among Chrome OS Flex, Chrome OS, and CloudReady, you can read the following post:

How to Install Chrome OS Flex on a PC
Some people may want to install Chrome OS Flex on Chromebooks, Windows, macOS, or Linux. No matter what PC you use, you can follow the guide below to complete the Chrome OS Flex installation.
Stage 1. Create a Chrome OS Flex Installation Disk
Step 1: Open Google Chrome on your Chromebook or Windows/Mac PC. Go to the Chromebook Recovery Utility extension page and click the Add to Chrome button. Once the extension is added to the Chrome browser, click the Extensions icon at the top right corner. Then, click the Chromebook Recovery Utility extension to run it.
Step 2: Once the Chromebook Recovery Utility tool opens, it says you’ll need an 8 GB or larger USB flash drive or SD card that you don’t mind erasing. Insert such a USB drive into your PC. Then, click the Get Started button.
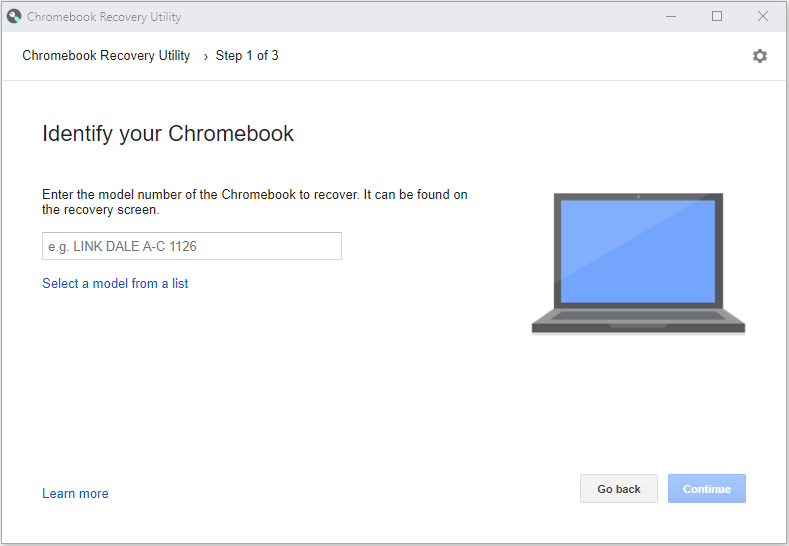
Step 3: You are asked to identify your Chromebook. Click the Select a model from a list link.
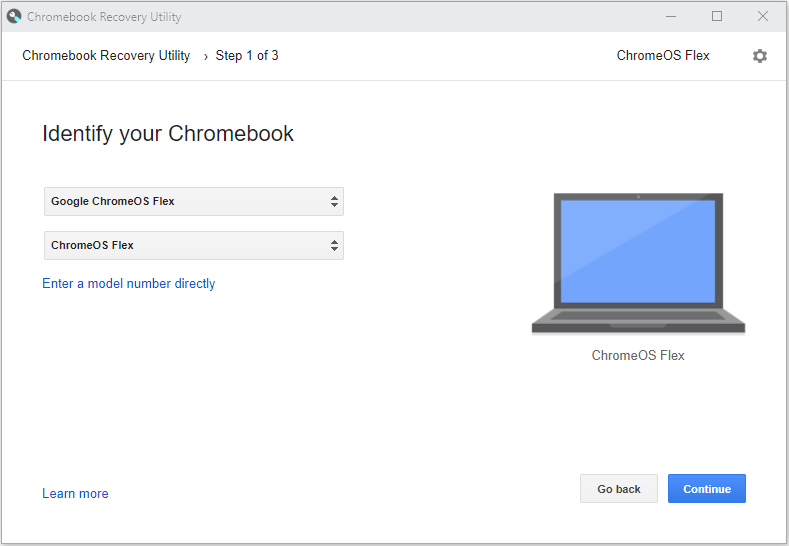
Step 4: You are asked to select a manufacturer and a product. Expand the manufacturer menu to select Google ChromeOS Flex, and expand the product menu to select ChromeOS Flex. Then, click the Continue button.
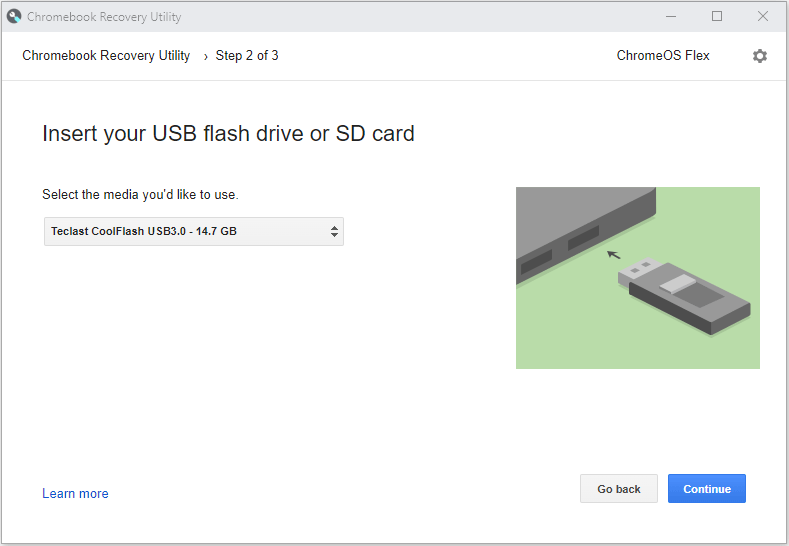
Step 5: Select the USB drive you inserted just now and click the Continue button.
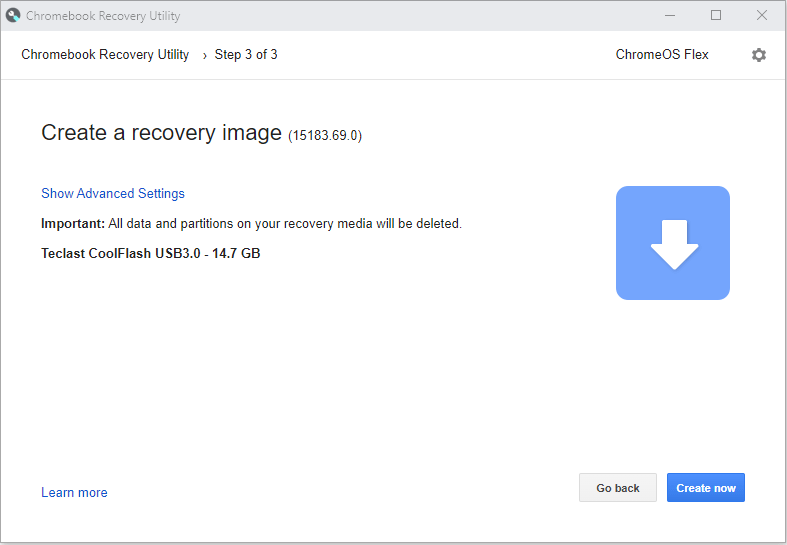
Step 6: Read the important warning. If it is OK, click the Create now button. Then, it will start to download and write the Chrome OS Flex image to your USB drive. When the process is completed, you can get a Chrome OS Flex installation disk.
How To Run Google Chrome OS From Your USB Drive
Troubleshooting:
When I use the Chromebook Recovery Utility tool, it is stuck on Step 3. It has downloaded the Chrome OS Flex installation file but doesn’t write it to the USB drive. The writing process keeps 0 percent. How to solve this issue?
Some people report that running Google Chrome as an administrator can solve this issue. In addition, Google Support says a SanDisk USB drive can also cause this issue. Formatting the USB drive or using a USB drive from a different manufacturer may solve this issue.
But in my case, the above methods fail. My solution is as follows:
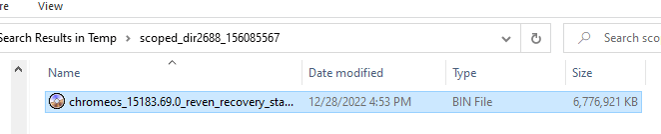
Step 1: Find the Chrome OS Flex download on the PC and drag it to the Desktop. Because the Chromebook Recovery Utility tool has completed the Chrome OS Flex download, I can find it in my PC’s temp folder. The path is C:UsersAdministratorAppDataLocalTemp. The Chrome OS Flex download is a .bin file contained in a folder whose name starts with “scoped_dir“.
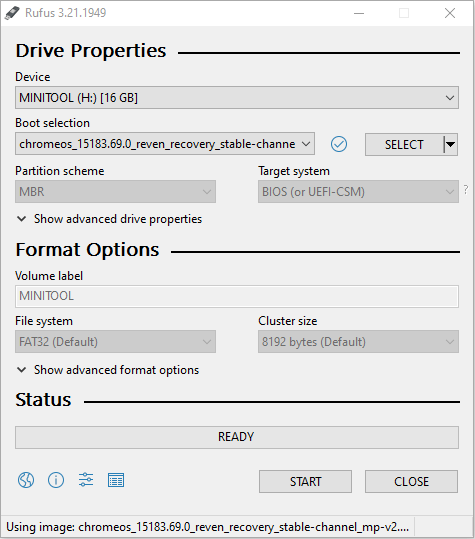
Step 2: Burn the BIN file to the USB drive. In this step, I use Rufus, a free burning program without installation.
- Download the latest Rufus from its official website.
- Double-click the rufus.exe file to launch this program directly.
- On the Rufus tool, under Device, make sure the USB drive is selected.
- Under Boot selection, click the Select button.
- On the file search window, click the ISO Image drop-down menu in the bottom right corner and select All files (*.*).
- Navigate to the Chrome OS Flex BIN file and click the Open button.
- On the Rufus tool, click the Start button and wait until the burning process is completed. Then, you can click the Close In this way, you can also get a Chrome OS Flex installation disk.
[Solved] How to Fix Chrome OS Is Missing or Damaged?
Stage 2. Back Up Your PC
Chrome OS Flex installation will erase your entire hard drive. If you just want to experience it and then install the original system back, I recommend you back up your PC first. In addition, if something goes wrong during the Chrome OS Flex installation, the PC backup will return your PC to its original status.
Here is the guide on how to back up your PC via MiniTool Partition Wizard.
MiniTool Partition Wizard DemoClick to Download100%Clean & Safe
Step 1: Connect an external hard drive to your PC. Launch MiniTool Partition Wizard. Click on Copy Disk Wizard in the toolbar. Then, click Next.
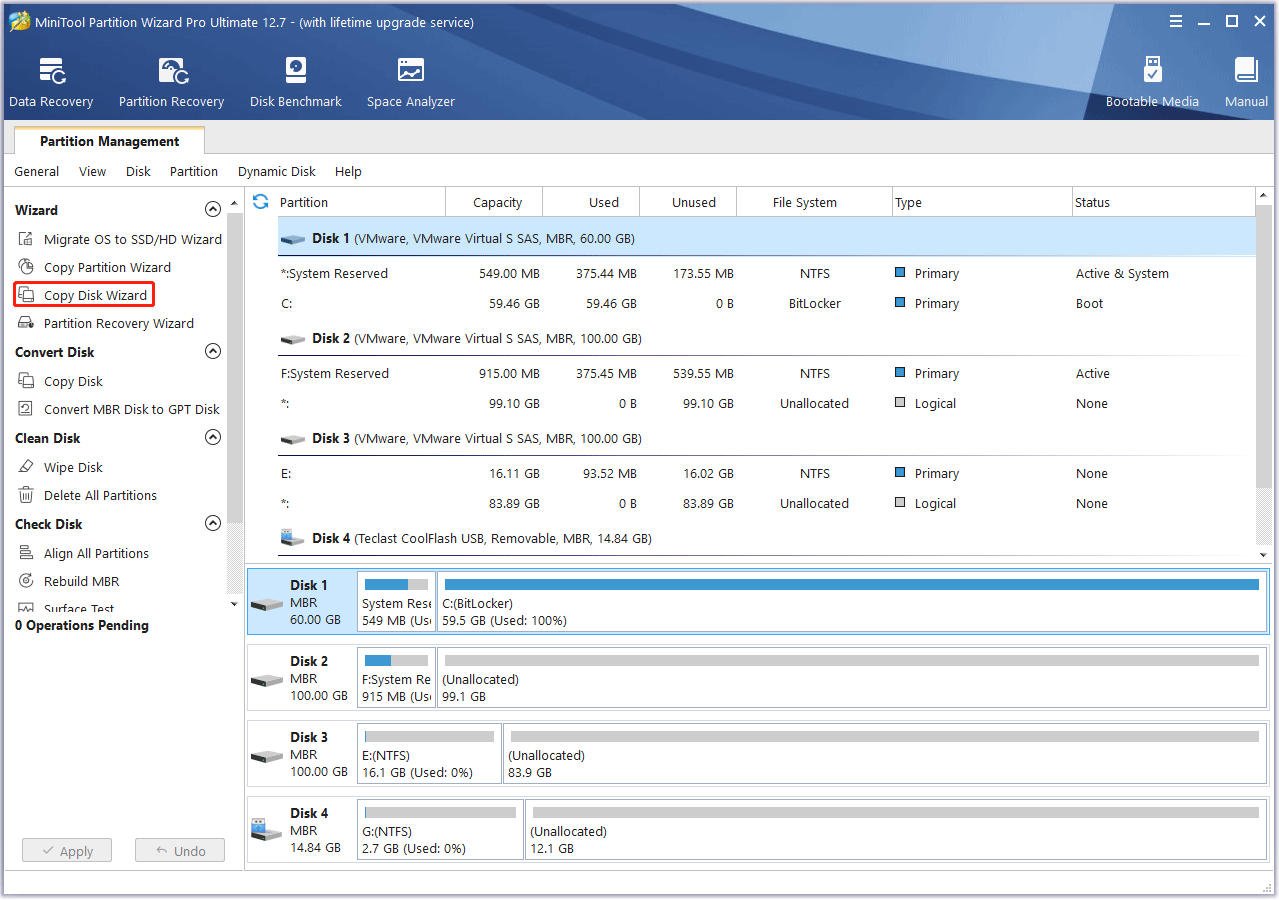
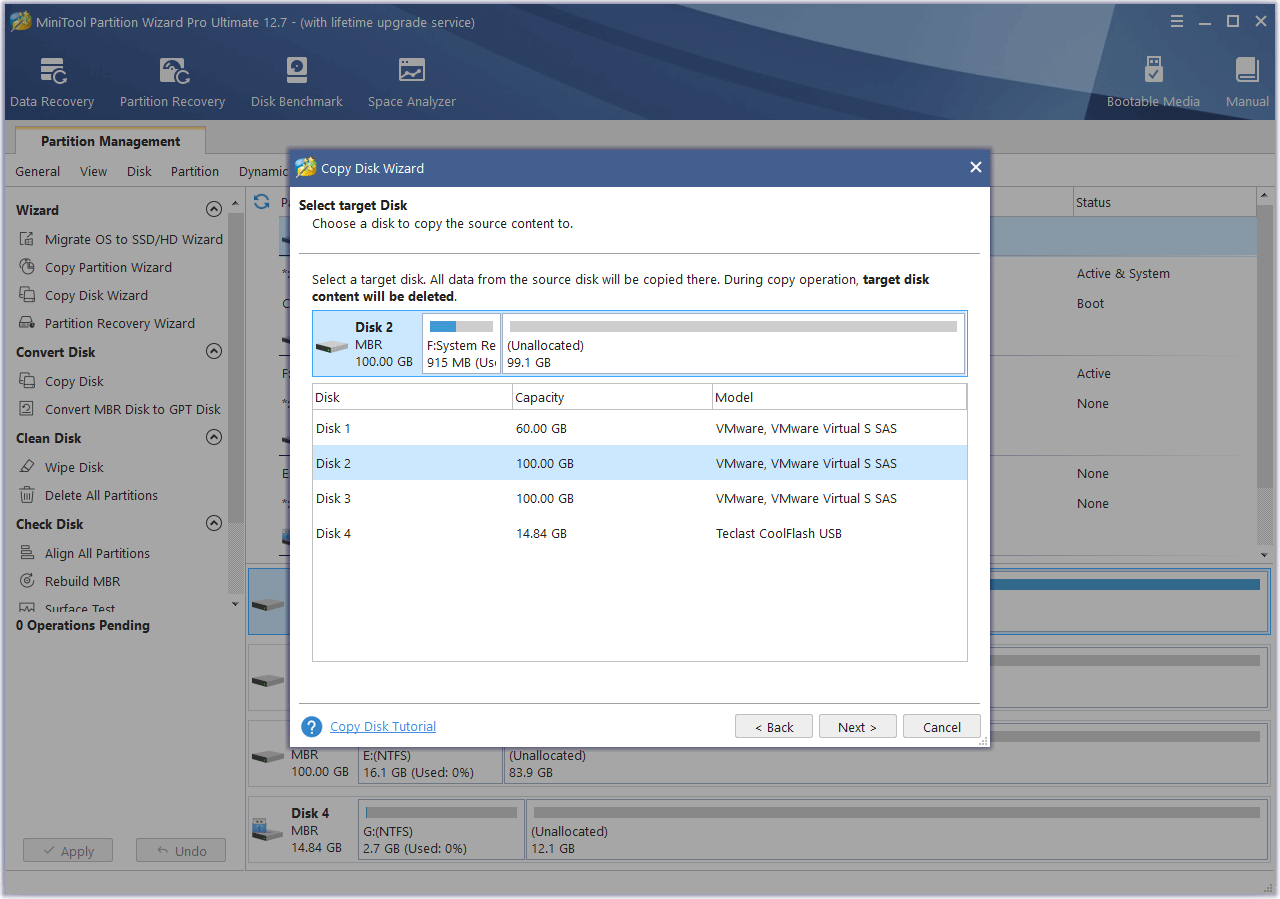
Step 2: Select the system disk to copy and click Next.
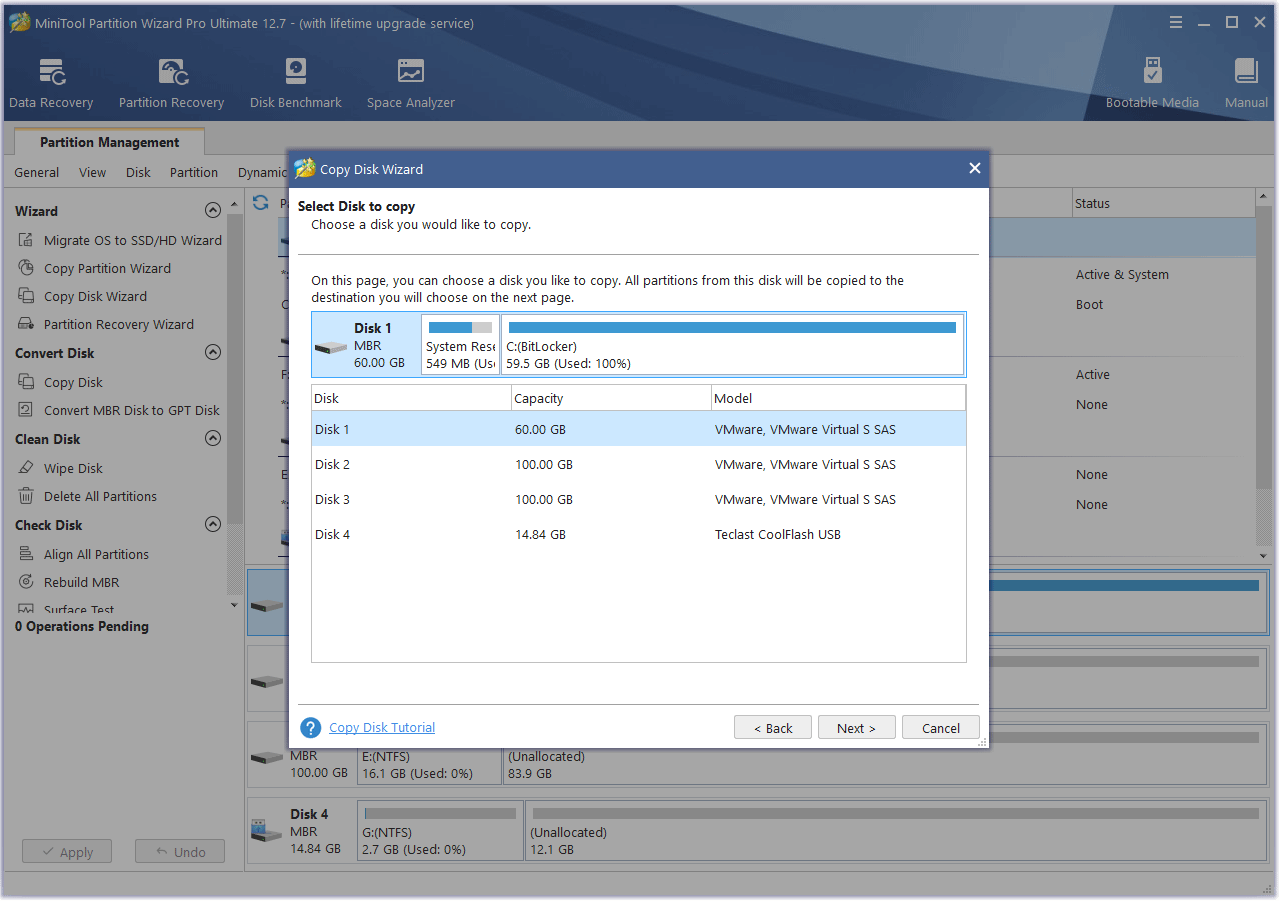
Step 3: Select the external hard drive as the destination disk and click Next. The external hard drive could be smaller than the system disk. As long as the used space on the system disk is not bigger than the external hard drive, the cloning process can be done successfully. Then, click Yes when it warns you that all the data on the external hard drive will be destroyed.
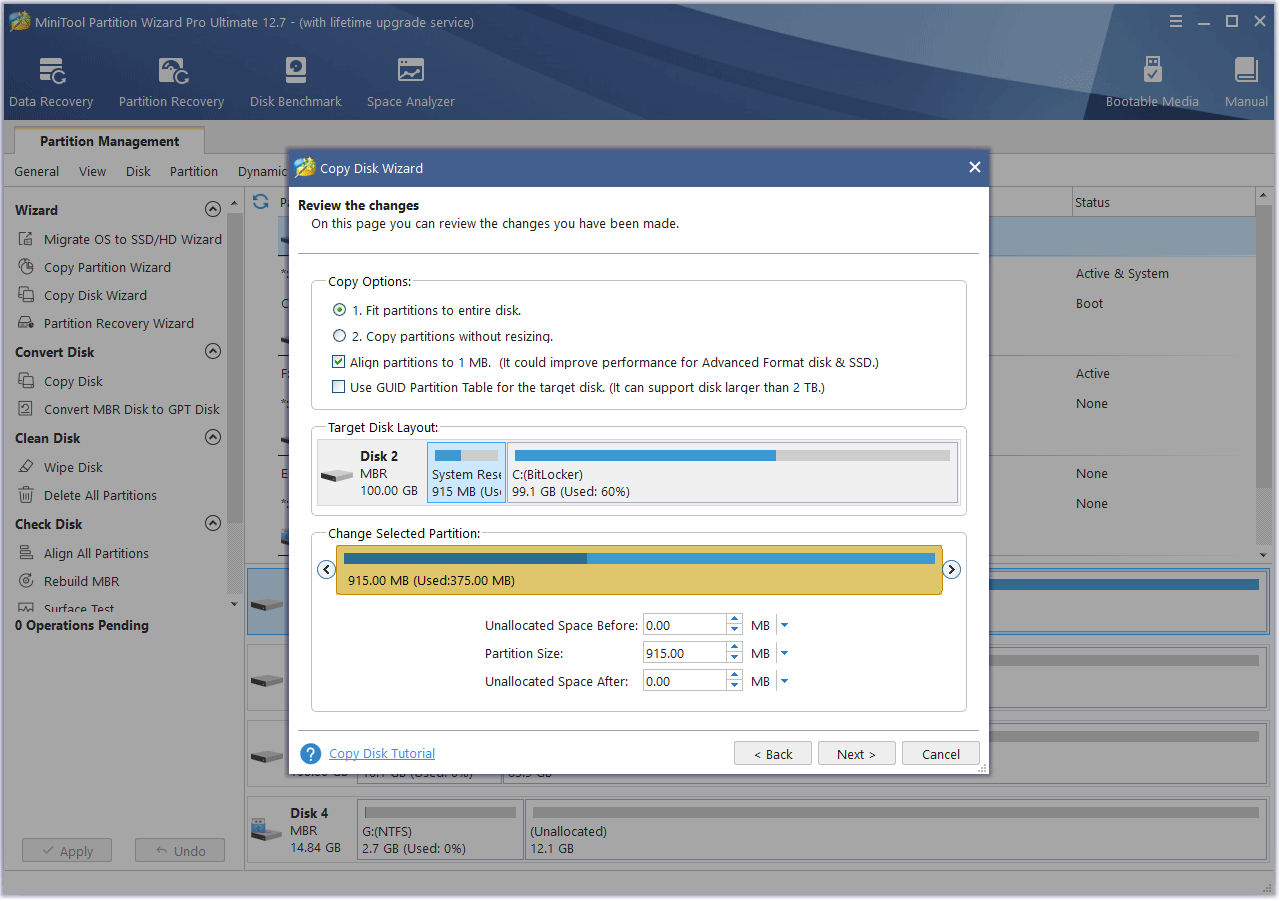
Step 4: On the Review the changes window, keep all to the default options and click Next.
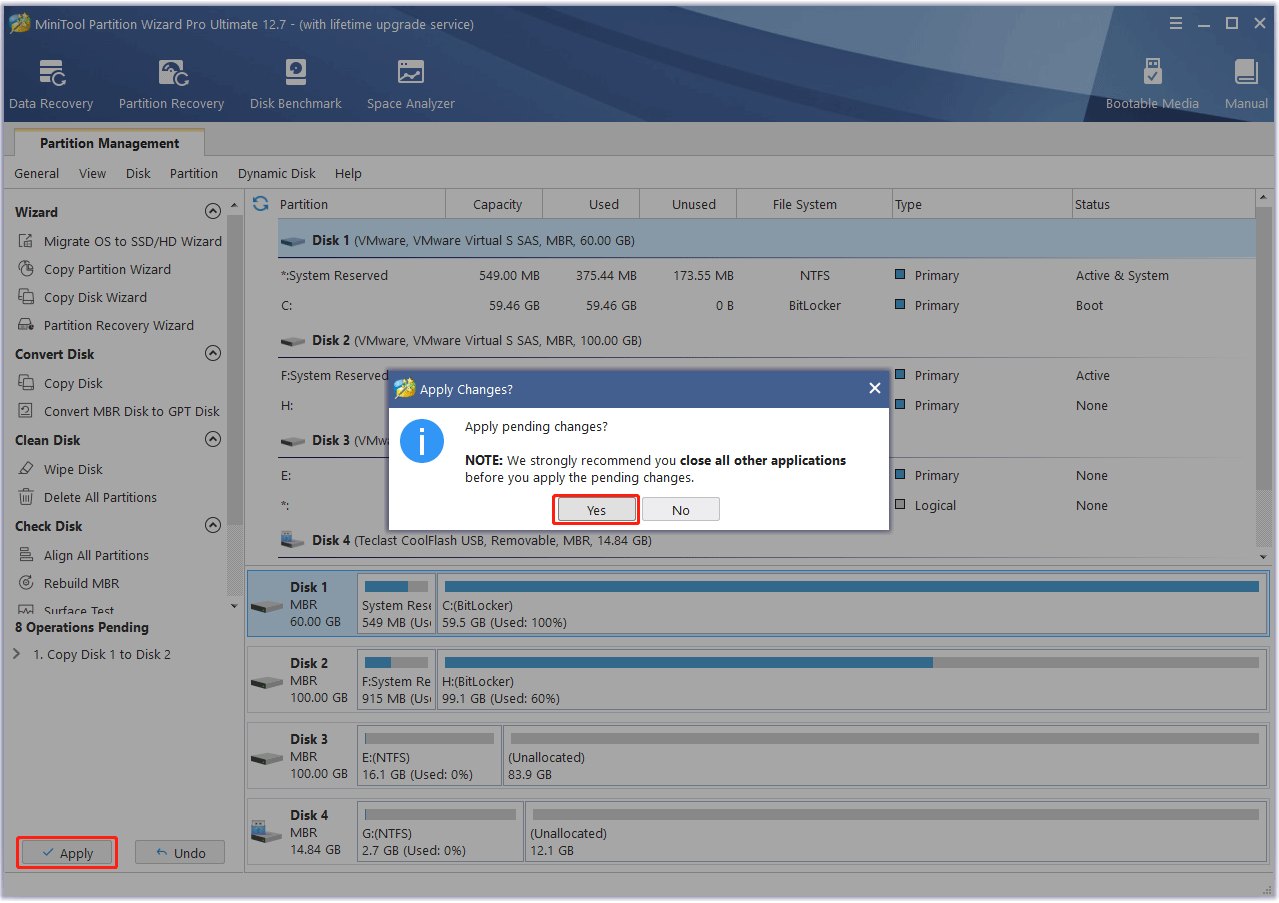
Step 5: Read the note and click Finish. Then, click the Apply button to execute the pending operation. A window may pop up, click Yes.
Stage 3. Chrome OS Flex Install
After you get a Chrome OS Flex installation disk and make a PC backup, you can start the Chrome OS Flex installation. But before proceeding, you should ensure your PC meets the minimum Chrome OS Flex installation requirements:
- CPU: Intel or AMD x86-64-bit
- RAM: 4 GB
- Storage: 16 GB
Then, you can follow the guide below to install Chrome OS Flex on Chromebook and any other PC.
Step 1: Insert the Chrome OS Flex installation disk into a computer. Power on this computer and press the BIOS key (F2, F12, Del, Esc, etc.) when the PC logo appears to enter firmware. If these common keys don’t work, you need to search for the BIOS key online for your PC model.
Step 2: In the firmware, go to the Boot tab to set the USB drive as the first boot device. Then, press F10 to save changes and exit the firmware. Then, the PC will boot from the Chrome OS Flex installation disk.
If your PC doesn’t boot up from the Chrome OS Flex installation disk smoothly, for example, it boots to a black screen or says that no OS was found, then you can try setting the boot mode to UEFI and see if the PC can boot up successfully. To get more troubleshooting tips, you can refer to this Google page.
Step 3: When the PC boots up, you will see a welcome window. Click the Get Started button. Select Install ChromeOS Flex and click Next. Click the Install ChromeOS Flex button. It will warn you that the installation will erase your entire hard drive. Click the Install button to confirm this operation.
Step 4: After the installation is completed, you need to click the Get Started button and configure some Chrome OS Flex settings.
- Uncheck the box before the Optional and accept the Google terms of service.
- Decide who is using this Chrome device (you or a child).
- Sign in to your Chromebook.
- Decide whether to sync your Chrome device.
- Decide whether to allow the hardware data collection.
- Decide whether to use Google Assistant.
- Decide whether to connect the device to your phone.
- When you are all set, click the Get Started button. Then, you can use Chrome OS Flex.
I have shown you how to install Chrome OS Flex on a PC from scratch. This guide works on any PC.
Why Is My Chromebook So Slow? 9 Easy Ways To Speed It Up
How to Create a Chrome OS Flex VM
Many people may want to install Chrome OS Flex VMware or Chrome OS Flex VirtualBox. However, neither Chrome OS Flex VMware nor Chrome OS Flex VirtualBox is possible currently.
Many users have tried using VMware or VirtualBox to create a Chrome OS Flex VMware or Chrome OS Flex VirtualBox, but none of them succeed.
Tip: Many people report that Chrome OS Flex runs on QEMU and they have published their commands. However, it seems that their commands only work on Linux systems. Therefore, currently, we can’t create a real Chrome OS Flex VM on a Windows PC. If you really want to experience it on Windows, you can create a CloudReady VM.
In addition, Chrome OS Flex doesn’t support dual boot because it will erase the entire hard drive. Therefore, you can’t experience Chrome OS Flex on Windows via a virtual machine or dual boot, unless Google removes these limits or some people solve these technical difficulties and share their ways with us.
Bottom Line
Is this post useful to you? Do you know how to create a Chrome OS Flex VM on Windows? Have you encountered problems when installing Chrome OS Flex on your PC? Please share them with us in the comment zone below.
In addition, if you encounter problems when using MiniTool Partition Wizard, please feel free to contact us via [email protected]. We will get back to you as soon as possible.
About The Author

Position: Columnist
Linda has been an editor at MiniTool for seven years. She continuously learns about computers and puts her knowledge into practice. Moreover, she is particularly knowledgeable in disk management, data recovery, system installation, and PDF editing. Her articles typically reference multiple examples or are based on her own experience, providing users with the most suitable solutions.
User Comments :