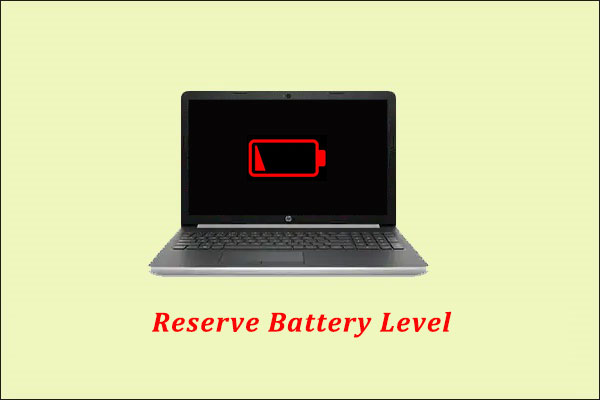
Has your laptop suddenly turned off when it has enough battery left? If so, your Windows laptop may display a wrong battery percentage. Read this post, in which MiniTool shows you how to solve this problem through 3 ways.
Every battery has a specific number of charge and recharge cycles. It is certain that no battery will last as long as it did when you bought the laptop. No matter how lightly you use your laptop, the total capacity of the battery will always decrease over time. Typically, you’ll notice an obvious reduction in battery run time after 18 to 24 months.
However, if your laptop suddenly turns off when it seemingly had enough battery left, your laptop may be displaying the wrong battery percentage. This is not an uncommon phenomenon and usually happens to notebooks. This problem is usually caused by the faults with the battery hardware or the Windows software.
Then, how to fix this problem and get your laptop to display the right battery charge level? You can try the following solutions.
Solution 1. Calibrate Your Laptop Battery
If you are sure your laptop is displaying the wrong battery percentage, you can calibrate your laptop battery through the following steps:
Step 1: Fully charge the battery. You should connect the notebook to an external power source until the battery is fully charged.
Step 2: Disable Hibernate and Sleep mode to ensure that you can discharge the battery as soon as possible later.
- Right-click the battery icon in the taskbar and then click Power Options to access the Power Options Alternatively, you can access the Power Options window by searching Control Panel in Cortana to open it, then clicking Power Options in Control Panel.
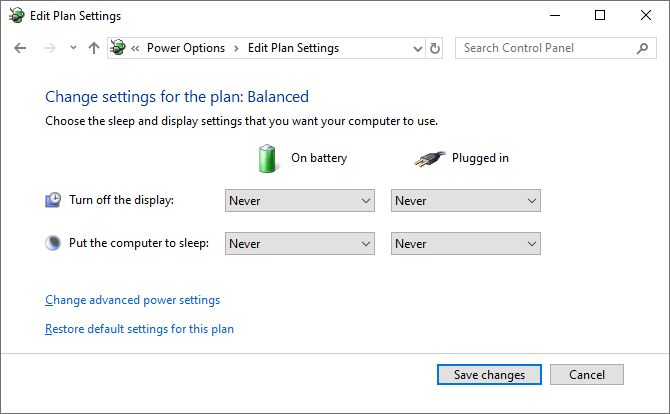
- Click Change when the computer sleeps from the left menu. Then, take note of your existing settings here because you will need to put them back later.
- Change all the dropdowns to Never (Turn off the display and Put the computer to sleep). Then, click Save changes. This action will make you return to the Power Options
- Click Change when the computer sleeps again and then click Change advanced power settings.
- Expand Battery and then expand Critical battery level. Take note of the current percentage because you may need to restore it later.
- Click the On battery percentage and set it as low as possible.
- Expand Critical battery action and ensure that On battery is set to Hibernate. If it isn’t, click to change it.
- Click OK to save the changes.
Step 3: Discharge the battery. Leave the notebook turned on and disconnect the notebook from external power. Use the battery to power the notebook until the battery is completely discharged. During discharging process, you can use the laptop to make the discharge faster.
Step 4: Charge the laptop again. Connect the laptop to an external power source and charge the battery to 100 percent. Please note that if the computer is off, don’t turn it on until the battery is fully charged.
Step 5: Re-enable Hibernate and Sleep mode. Go back into the Windows power plan settings and follow the previous instructions to set everything back to how it was or adjust them to something new if you want.

Solution 2. Reinstall Battery Drivers
The wrong battery percentage reading may also occur due to missing or corrupted battery drivers. If so, you should reinstall battery drivers through the following steps:
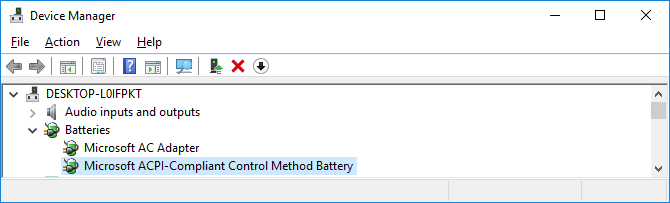
- Press “Windows + X” keys and then choose Device Manager.
- Expand Batteries and then right-click on Microsoft ACPI-Compliant Control Method Batteryto choose Uninstall device.
- After the driver is uninstalled, click Action > Scan for hardware changes from the top menu to reinstall the driver.
- Restart your computer.
Solution 3. Update Windows
If your Windows is outdated, the battery percentage displayed when you hover the taskbar icon may be different from the percentage that shows when you click it. Therefore, you should always keep Windows up to date to keep your system protected and to benefit from the latest features.
To update Windows, please refer to the following steps:
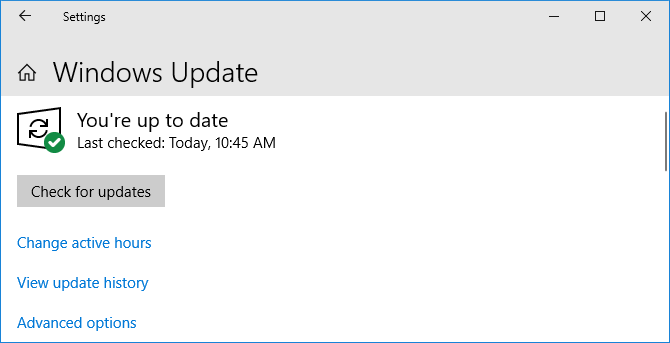
- Press “Windows + I” keys simultaneously to open Settings.
- Click Update & Security and then click Check for updates. Any available updates will automatically download and install.
If all the above methods don’t work for you, you should check whether your laptop battery is getting old and not providing much power, if so, you should turn on Battery saver mode or replace your battery.
About The Author

Position: Columnist
Linda has been an editor at MiniTool for seven years. She continuously learns about computers and puts her knowledge into practice. Moreover, she is particularly knowledgeable in disk management, data recovery, system installation, and PDF editing. Her articles typically reference multiple examples or are based on her own experience, providing users with the most suitable solutions.
User Comments :