This article will show you how to enlarge hard disk virtual machine if you set the disk to be so small at the beginning of creating virtual machine and will also introduce you a simple way to manage virtual hard drive.
A Brief Introduction to Virtual Machine of VMware Workstation
VMware Workstation is a program which makes it possible for users to set up one or more virtual machines on a single physical machine or run multiple operating systems simultaneously.
A virtual machine is an emulation of a particular computer system and operates based on the computer architecture and functions of a real or hypothetical computer. Each virtual machine works separately and functions like a real machine.
If you want to run virtual machine successfully, specialized hardware, software, and system should be involved. Well then, how to set up a virtual machine?
How to Create Virtual Machine on VMware Workstation
After the ISO file of operating system has been downloaded and VMware Workstation has been installed, you can follow the steps as below to create a virtual machine:
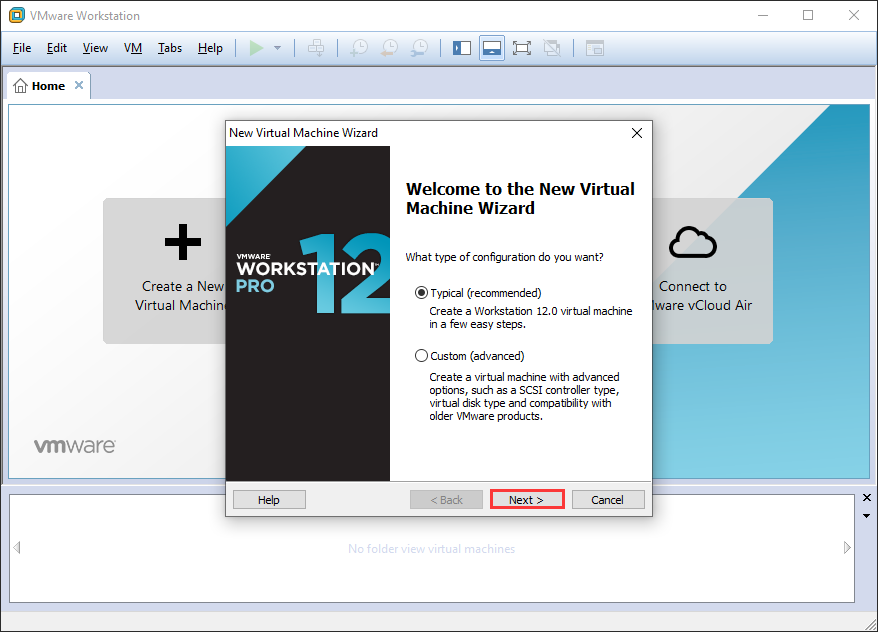
Step 1. Launch VMware Workstation. Then you need to choose Create a New Virtual Machine.
Step 2. Then, choose a type of configuration and click Next to continue. It is recommended to choose Typical.
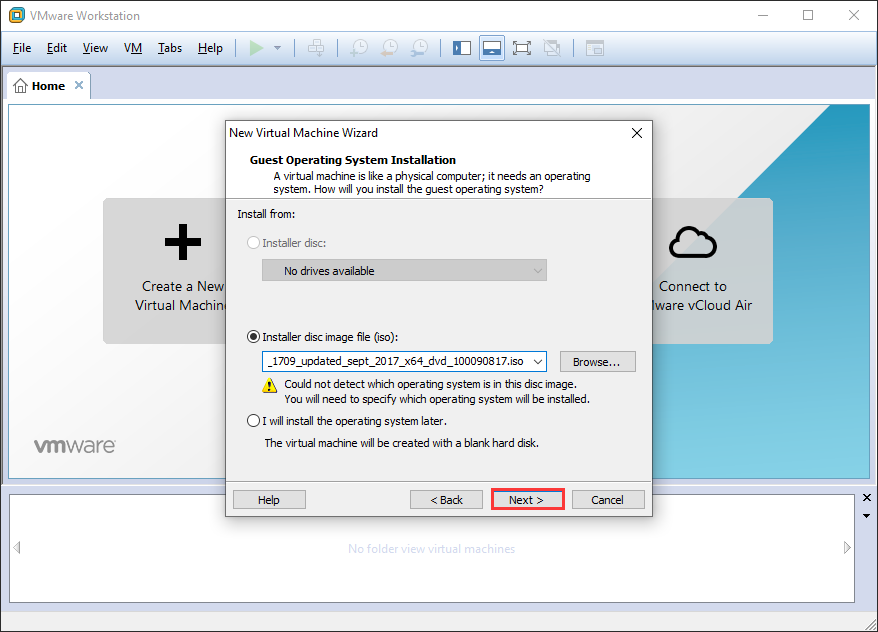
Step 3. Then you will get the interface below. Now you can install guest operating system either from installer disc, or from installer disc image file (ISO).
Of course, you can also choose to install it latter. And here we select the second one since there is no drive available: click Browse… to select the downloaded ISO file from physical machine, and then click Next.
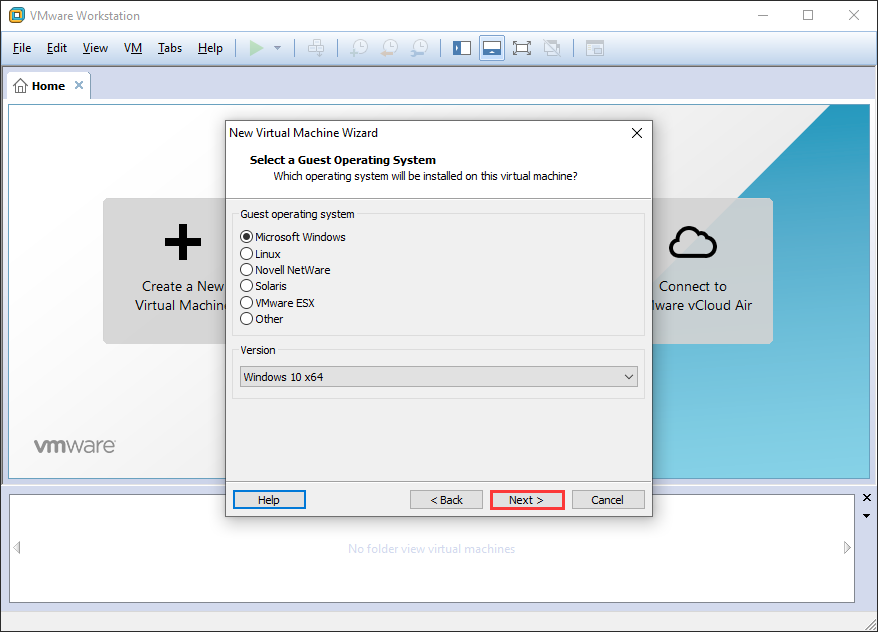
Step 4. Select a guest operating system (the system you want to install for virtual machine), and click Next.
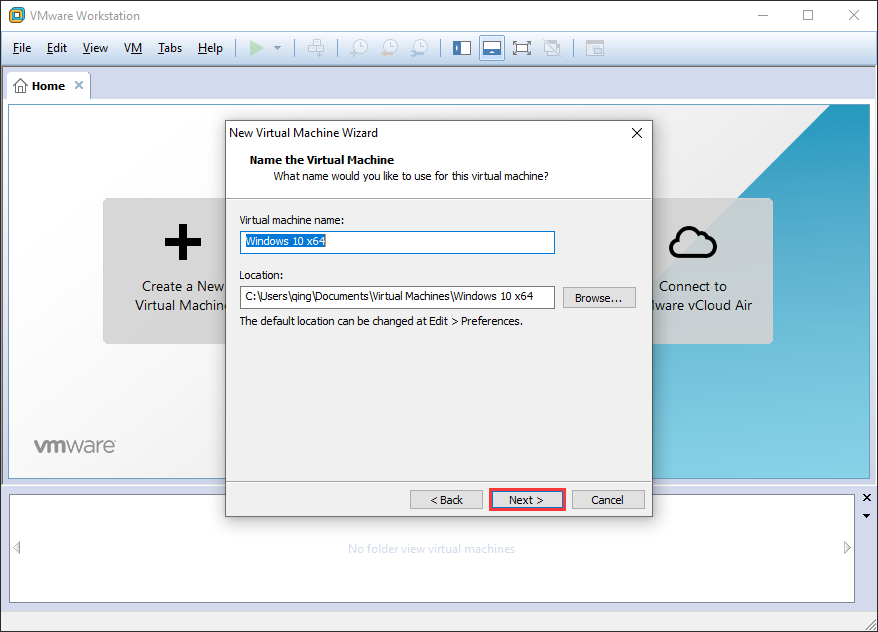
Step 5. Next, name the virtual machine and appoint it with a location on physical machine. Then click Next.
Step 6. After these steps, we need to set virtual hard drive capacity (a virtual hard disk can function like a physical hard disk, so it can be used to save different kinds of files, too). Then click Next.
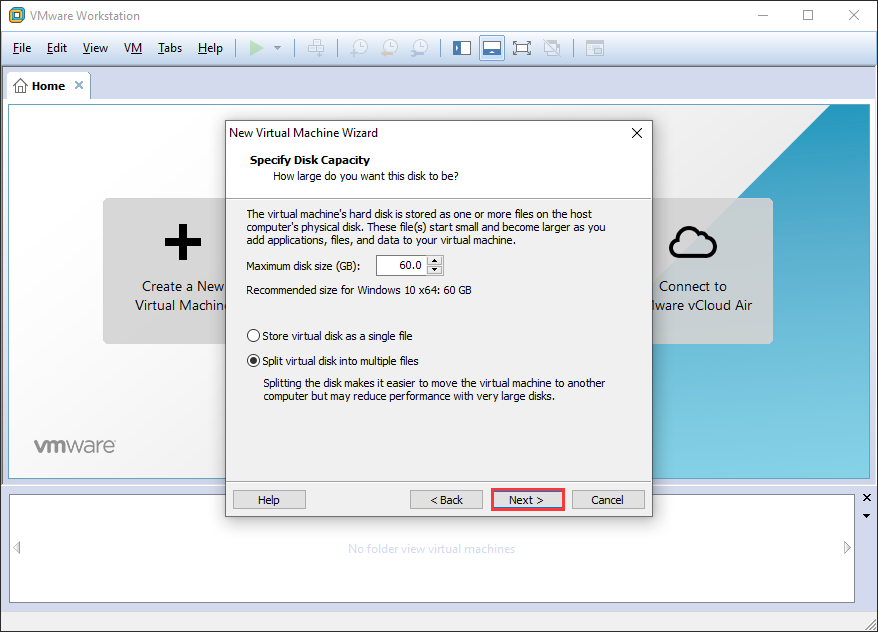
The maximum disk size will be set to be smaller by default (may be 60GB), but we can change it by typing the exact value.
However, some users may click Next directly to continue rather than reset a new hard disk capacity. As a result, they get a very small hard disk which may be out of space after a period of time.
Under this situation, users badly need to increase virtual machine disk size. Well then, how to add disk VMware workstation or increase virtual machine disk size? We will introduce detailed steps after the problem how to create virtual machine is solved.
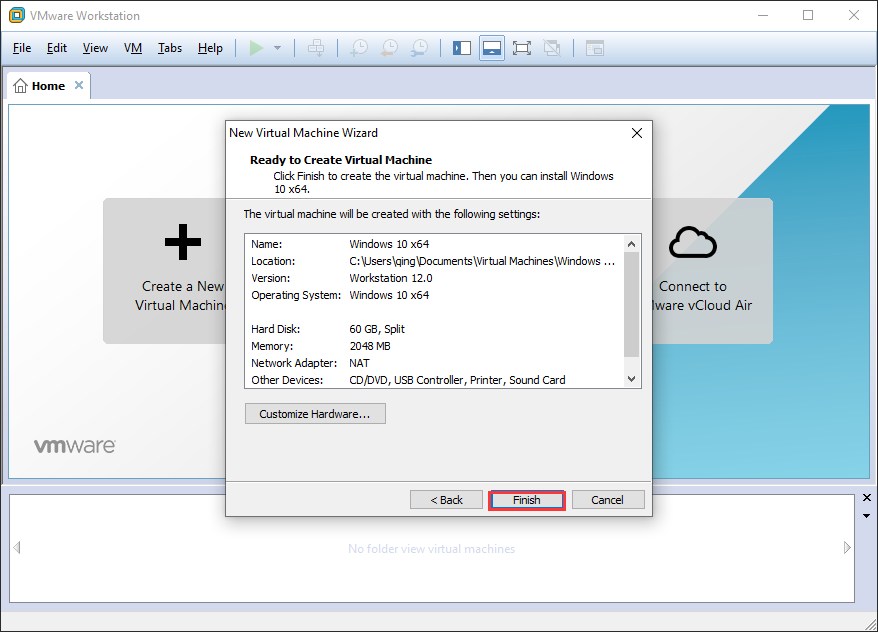
Step 7. Once the hard disk capacity is set, we need to configure hardware for this virtual machine. We can either click Finish to employ default hardware configuration or customize it, which depends on our own demands.
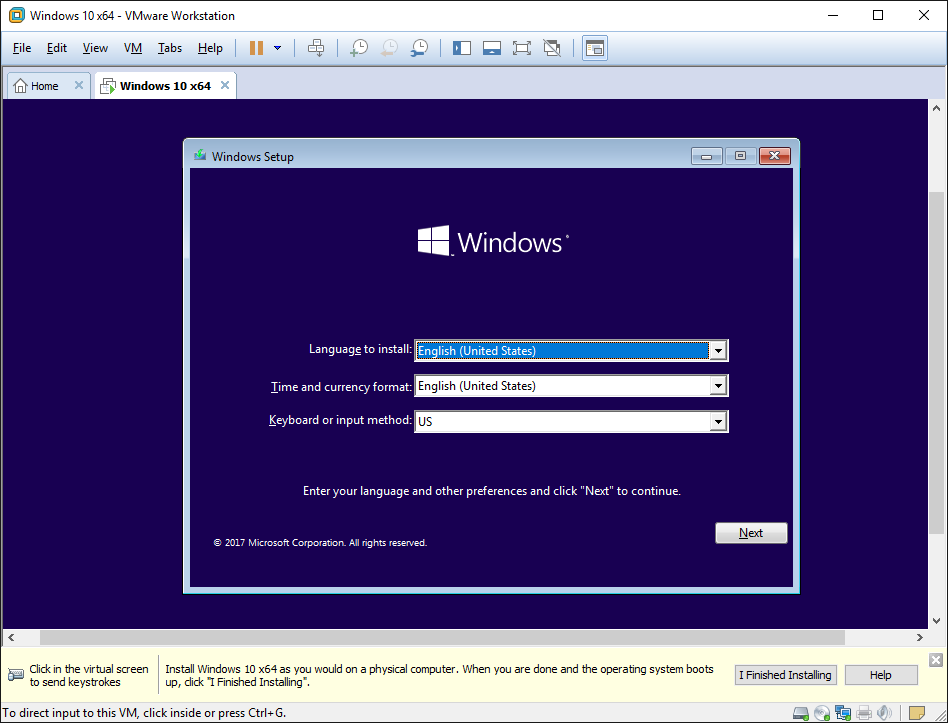
Step 8. After that, the virtual machine we are creating appears in VMware Workstation. You can power on this virtual machine, and the system installation interface will appear in a short time. At this time, install Windows 10 on virtual machine like install system on physical disk.
Once the installation is completed, we can use the virtual machine normally. But what if the hard disk was set too small when we were creating virtual machine? Next, let’s see the specific solution, and here we just take Windows 10 operating system for example.
How to Increase Virtual Machine Disk Size or Add New Virtual Hard Disk
It’s amazing that users can add disk VMware workstation and increase virtual machine disk size without replacing physical hard disks, and it can be completed from the GUI (Graphical User Interface) of VMware Workstation.
Next let’s see how to increase hard disk space in VMware virtual machine and how to add disk VMware workstation and with detailed steps.
1. Expand Virtual Hard Drive in VMware Workstation
This part will show you how to enlarge hard disk virtual machine with detailed steps and screenshots.
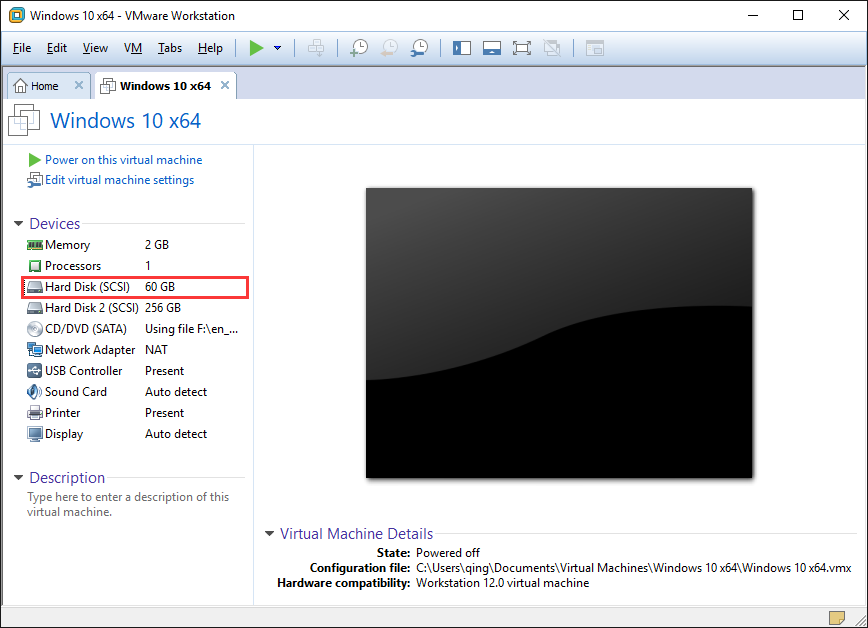
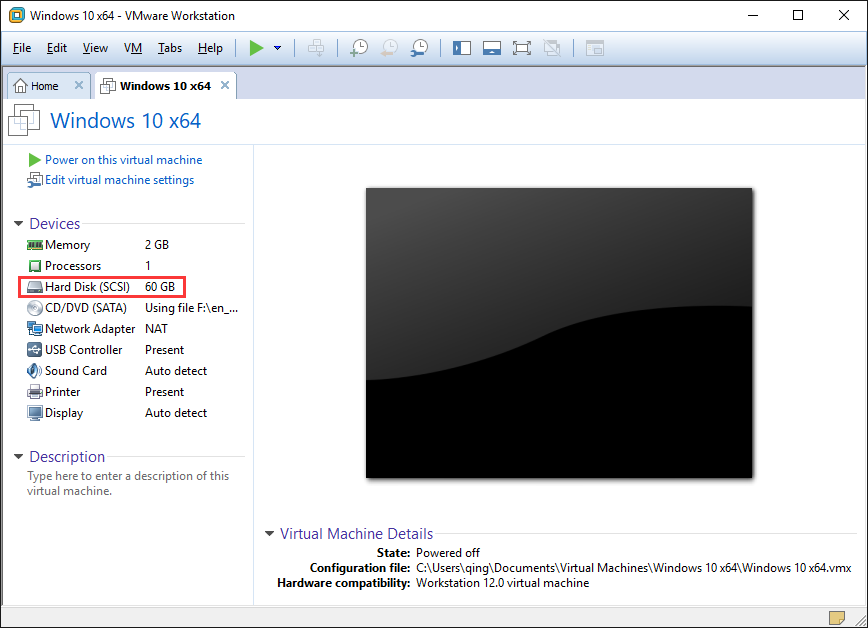
Step 1. Choose Hard Disk under Devices.
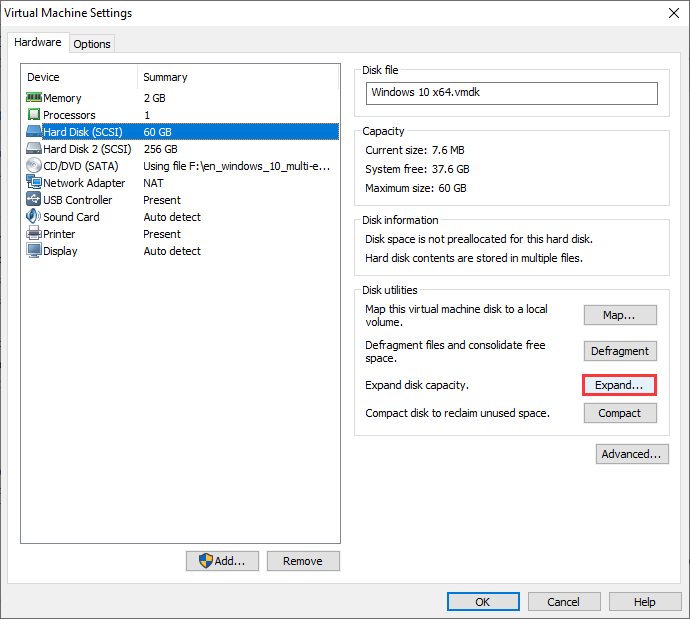
Step 2. Click Hard Disk. And on the right side, you can Expand button, click it to go on.
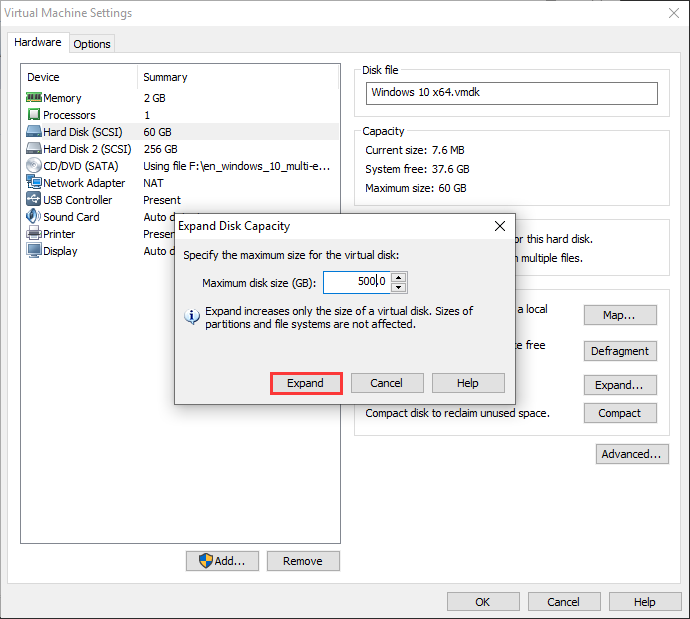
Step 3. Specify the maximum size for the virtual disk and click Expand.
Step 4. Click OK.
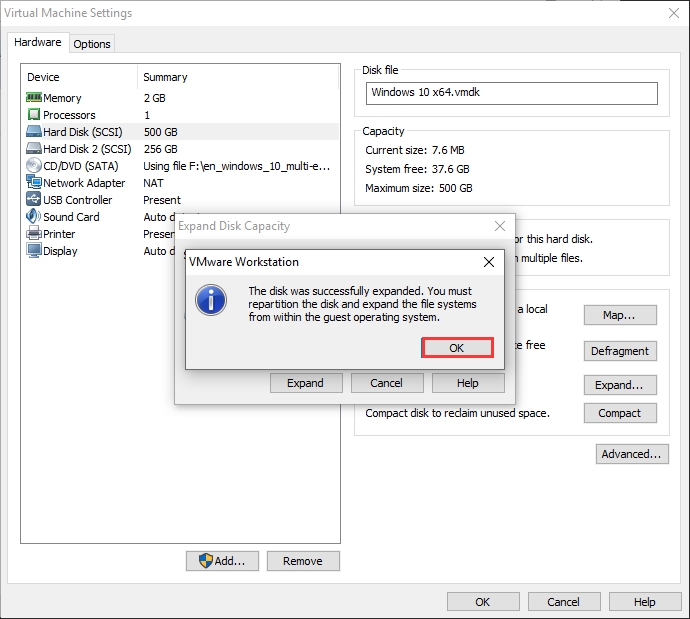
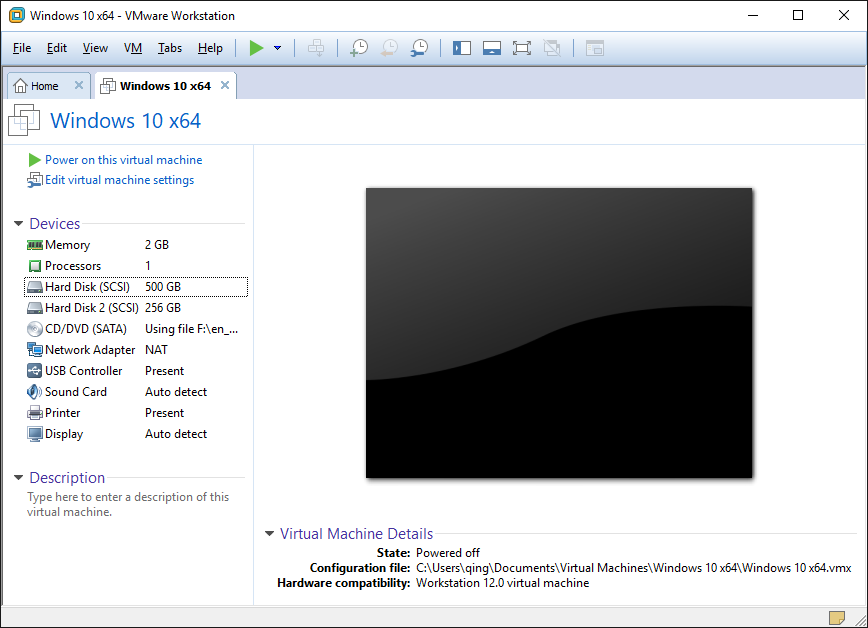
Step 5. After we expanded the VMware disk, we can see the hard disk size has been changed in VMware Workstation.
Actually, apart from enlarging the existing disk to increase storage space, we can add new hard disk as well. Let’s see the specific operations.
2. Add New Virtual Hard Disk for Virtual Machine
On one virtual machine, we can configure it with multiple hard disks to increase storage capacity, and detailed steps are as follows.
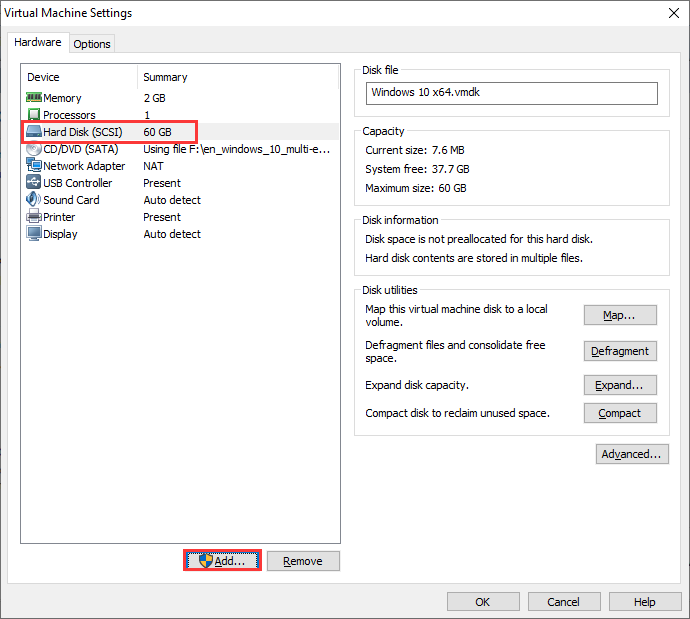
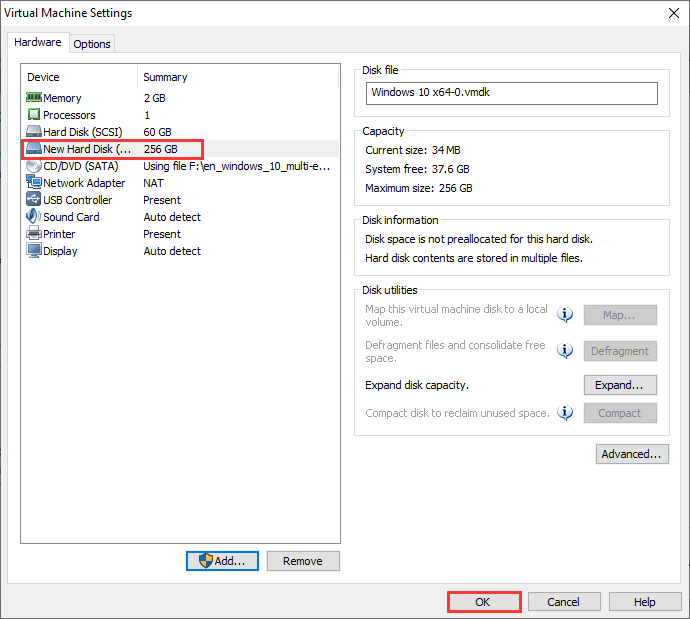
Step 1. Open the VMware Workstation and open a virtual machine from the physical hard disk to get the following window. Then choose Hard Disk under the Devices item since we need to add hard disk rather than any other hardware component.
Step 2. In this interface, select Hard Disk and click Add button.
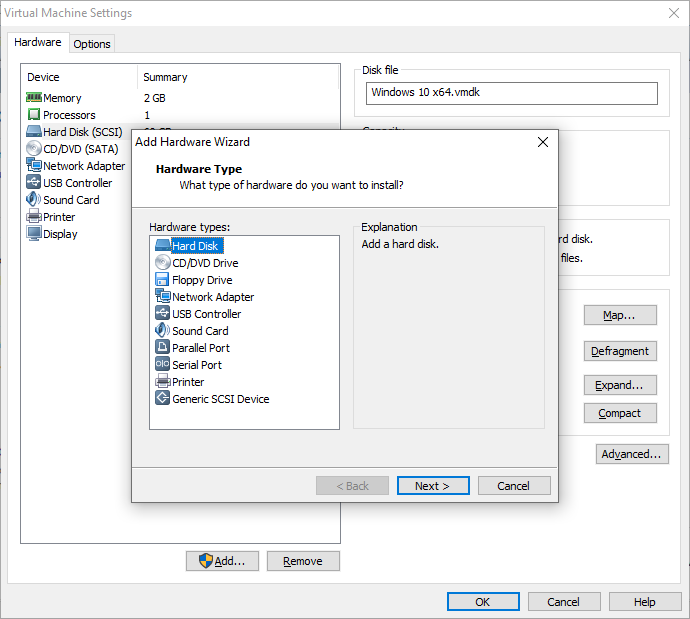
Step 3. In the list of Hardware types, select Hard Disk and click Next.
Step 4. Follow the step-by-step instruction to add hard disk to VMware virtual machine and set capacity for the new virtual hard disk according to our demands. At last, click OK to apply all previous changes.
Now the new disk has been added. At this time, as long as we open the virtual machine and initialize the new disk to either MBR or GPT in Disk Management utility, we can use it to save data.
This is how VMware increase disk size. Actually, there is still another way to increase hard disk capacity, and it is to make use of the command prompt tool, but this way requires complex operations and professional knowledge so that we are easy to make mistakes.
Therefore, VMware highly suggests making a backup for the virtual machine before increasing the size of hard disk with this way, and we do not recommend using it. For more information about this solution, you can check this post: Increasing the size of a virtual disk of VMware.
However, though the entire hard disk has been enlarged or a new disk has been added, the added space is the form of unallocated space.
So how can we make use of the expanded hard disk space in virtual machine? There are 2 choices: one is to create a new partition, and the pother is to extend an existing partition to it.
How to Make Use of the Increased Hard Disk Space in Virtual Machine
Create New Simple Volume in Virtual Hard Disk
To use this space, we can open the corresponding virtual machine, and then enter Windows snap-in Disk Management utility.
Step 1. Right-click Windows Start menu and If you do not know how to enter this program, please see how do I open partition manager.
Step 2. Right-click the unallocated space and choose the first option New Simple Volume.

Step 3. Follow the New Simple Volume Wizard to create a new partition and set properties like partition size, file system and allocation unit size (also called cluster size) for this partition.
Nevertheless, most of the time we are more inclined to extend an existing partition to the increased space rather than create new partitions since existing partitions (especially the partition C) are easy to run out of disk space. Next, let’s see how to extend a partition.
Enlarge Hard Disk Partition of Virtual Machine with MiniTool Partition Wizard
If your virtual machine is running Windows Vista or more recent Windows operating systems like Windows 7, Windows 8, and Windows Server 2012, try extending partition in Disk Management, because these operating systems provide the function Extend Volume.
Nevertheless, there are 2 big limitations in this function: it cannot extend a primary partition to non-adjacent unallocated space; the partition we want to extend should be formatted with NTFS or RAW. In other words, the increased space can only be added to the last primary partition.
Therefore, we had better look for other ways to extend partitions of virtual hard disk, for example, using a third-party software.
Actually, there is a free partitioning tool that can help enlarge hard disk partition in virtual machine wherever the unallocated space is located and using such this kind of software can simplify operations and enhance data security – that is MiniTool Partition Wizard Free Edition.
Now, let’s see detailed steps to increase partition size in VMware Workstation.
Step 1. Download and install the freeware to virtual machine. Of course, you can download it in physical machine and then transfer it to virtual machine if VMware Tools has been installed.
MiniTool Partition Wizard FreeClick to Download100%Clean & Safe
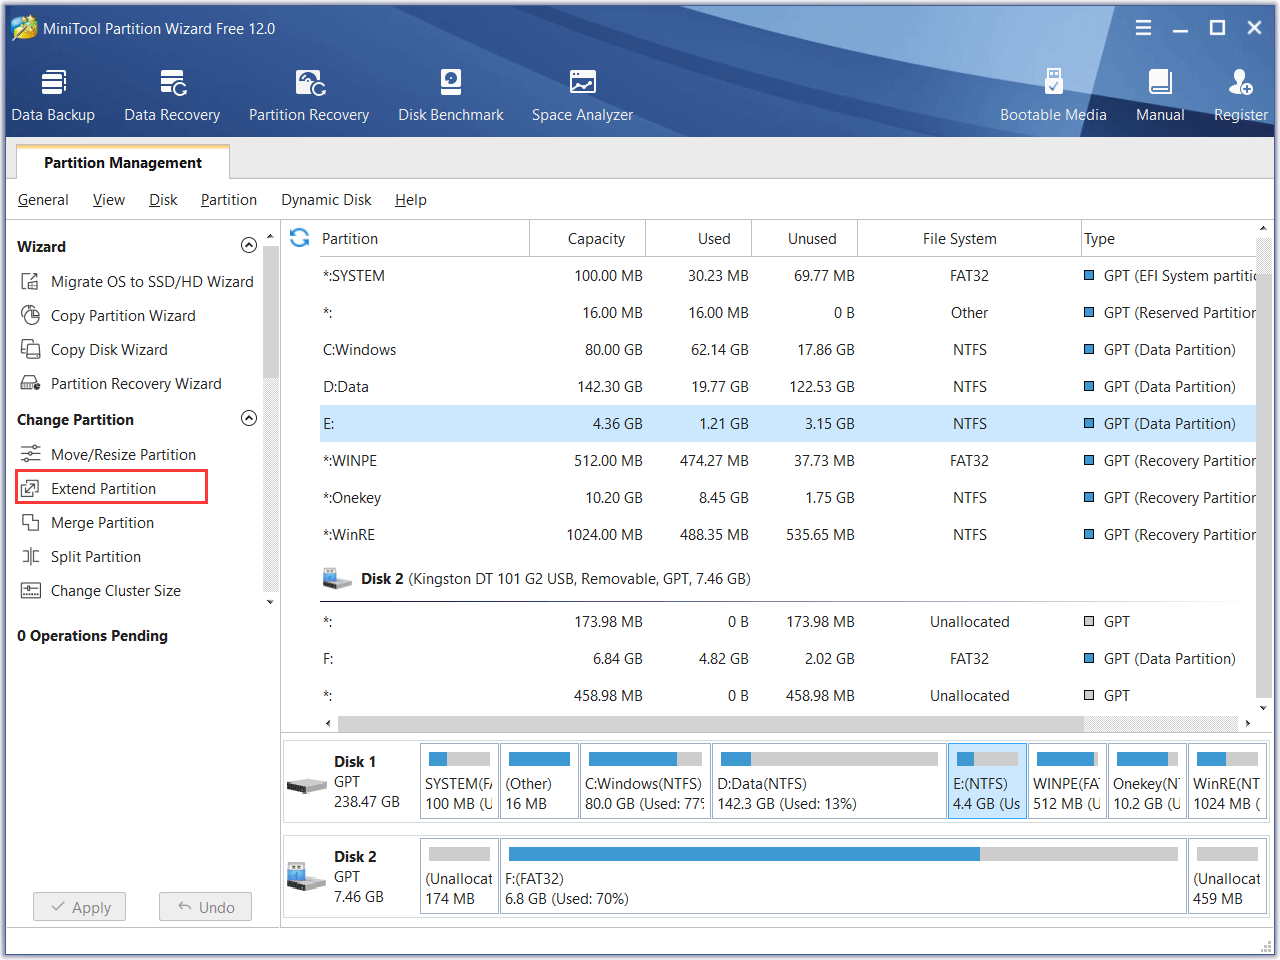
Step 2. Launch the program. In this interface MiniTool Partition Wizard will list all recognized hard disks and partitions, and users need to select a partition and choose Extend Partition feature from the left pane.
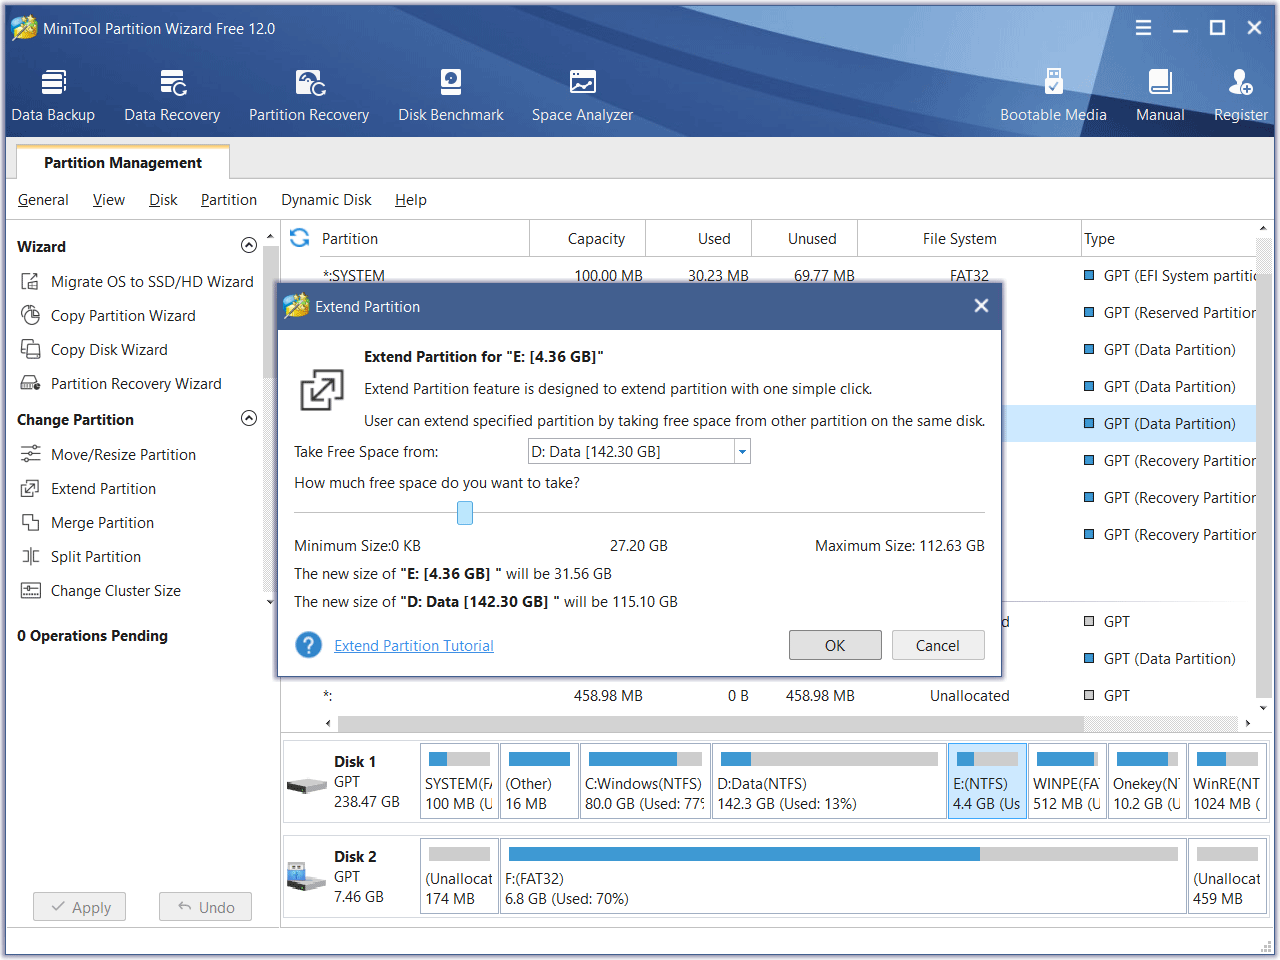
Step 3. Then, select the unallocated space under the drop-down menu of Take Free Space from. And drag the sliding handle to decide how much space to take from the unallocated space. Next, click OK to go back to the main interface below:
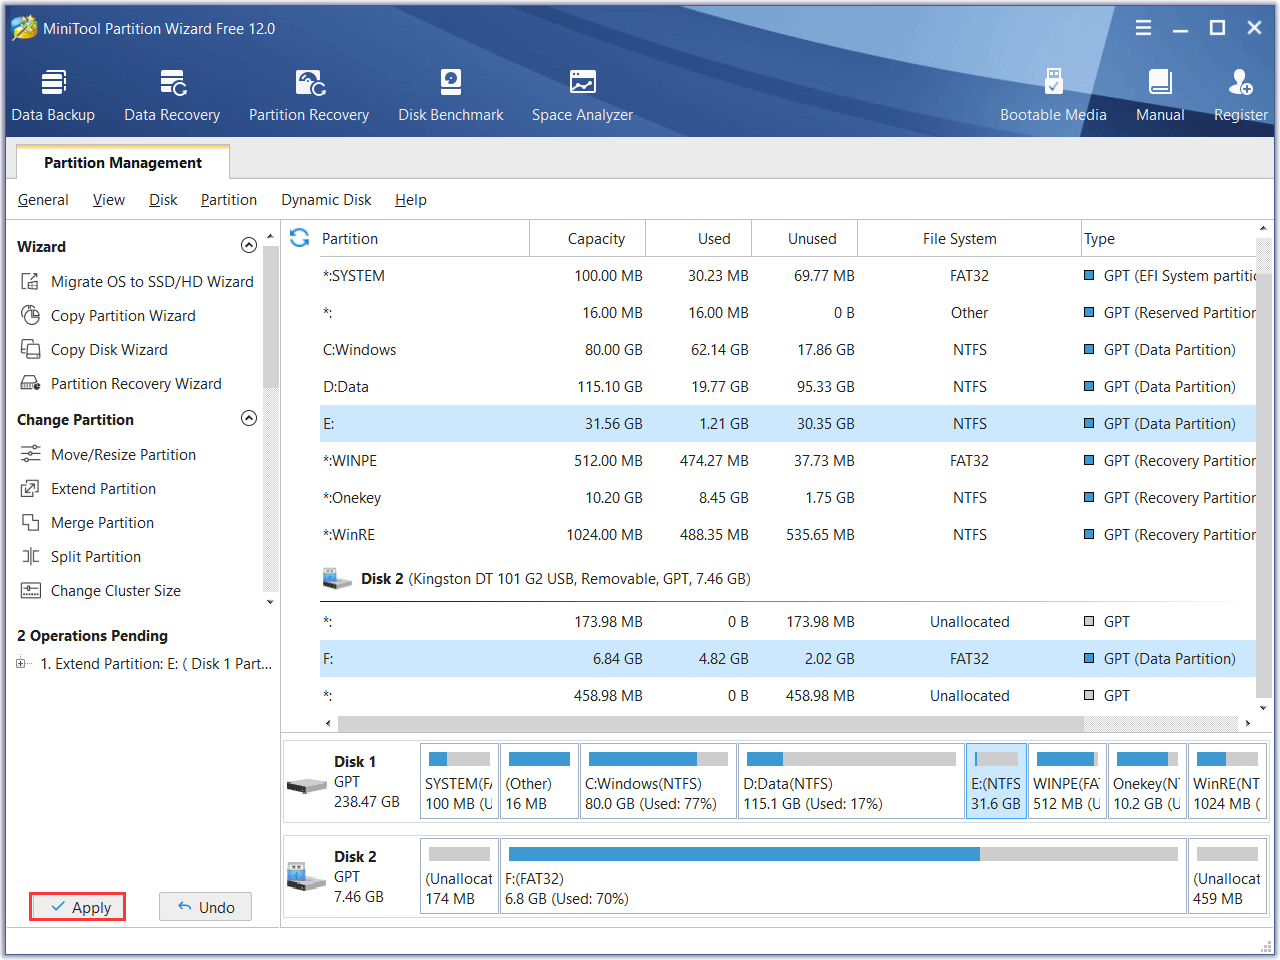
Step 4. Now we can see the partition has been extended. At this time, we only need to click Apply button on the top to make this change applied.
Actually, apart from enlarging hard disk partition in virtual machine, MiniTool Partition Wizard Free Edition is capable of doing lots of other partitioning operations, like create partition, delete partition, format partition, move/resize partition, wipe disk/partition, copy disk, convert FAT to NTFS, merge partition, convert MBR to GPT, etc.
It can be your all-in-one partition manager in virtual machine. Try using it to manage your disks and partitions in virtual machine of VMware Workstation.
MiniTool Partition Wizard FreeClick to Download100%Clean & Safe
Bottom Line
After reading this post, you must have learned how to create virtual machine, add new virtual hard disk, increase virtual machine disk size, and enlarge hard disk partition of virtual machine by following the steps above.
If you have any question about how to manage virtual hard drive with MiniTool Partition Wizard Free Edition, you can leave a message in the following comment zone and we will reply as soon as possible. If you need any help when using MiniTool software, you can contact us via [email protected].
User Comments :