Many users are troubled by the Windows Image Acquisition high CPU issue. What is Windows Image Acquisition? How to fix it? This post of MiniTool will discuss these questions in detail.
What Is Windows Image Acquisition
Windows Image Acquisition (WIA) is a Microsoft driver service that can be used by your graphics software to communicate with the hardware including printers, scanners, digital cameras, and other video devices. It is a standard and imaging Application Programing Interface (API) for Microsoft Windows Me and later Windows operating systems.
Sometimes, however, you may encounter the Windows Image Acquisition high CPU issue like many people. What causes it? According to a survey, the issue can be caused by some problems with the imaging hardware, outdated CPU driver, and corrupted system files. Don’t worry. There are several effective methods to fix it.
How to Fix the Windows Image Acquisition High CPU Issue
There are 4 simple ways to fix the Windows Image Acquisition high CPU issue. Let’s try them one by one.
Method 1. Restart the Windows Image Acquisition Service
The first and most effective way is to restart the Windows Image Acquisition service. Many users have confirmed that it can fix the high CPU issue. Let’s follow the steps below to have a try.
Step 1. Press Win + R keys to open the Run dialog box, and then type services.msc in the box and hit Enter to open the Services window.
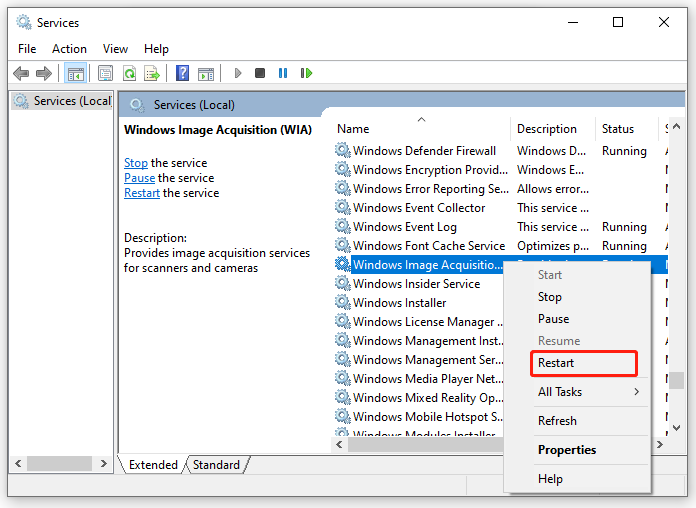
Step 2. Scroll down the list of services to the Windows Image Acquisition (WIA) service, and then right-click it and select Properties. Also, you can right-click the WIA service and select Restart.
Step 3. In the Properties window, click on Stop to stop the service temporarily, and then open your Task Manager and see if the service host Windows Image Acquisition issue disappears.

Method 2. Check the Imaging Hardware Issues
Another common reason for the svchost.exe service host: Windows Image Acquisition (WIA) high CPU problem is your imaging hardware. In this case, you need to check all related imaging hardware and all the pending tasks, including printers, scanners, cameras, and so on.
To do so, you can disconnect the imaging hardware from your computer and restart it, then re-plug it back in and following Method 1 to restart the WIA service. Besides, you can cancel all existing tasks by clicking the icon present in your taskbar and deleting all the tasks. After that, you can restart the computer and check if the WIA high CPU issue is fixed.
Method 3. Update the CPU Driver
Sometimes an outdated or corrupt CPU driver can trigger the service host Windows Image Acquisition high CPU problem. For that, you can try updating the CPU driver.
Step 1. Right-click the Start menu and select Device Manager from the context menu.
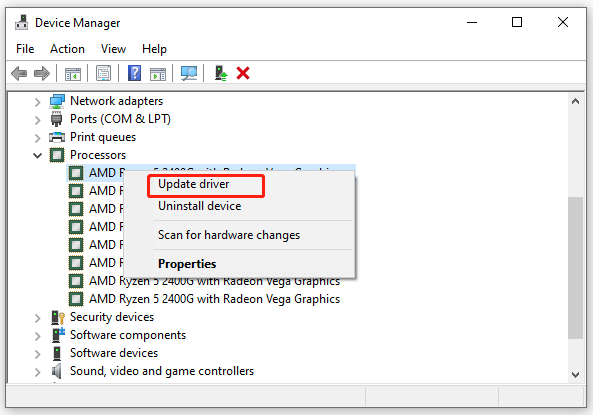
Step 2. In the Device Manager window, expand the Processors category and right-click the CPU driver that you want to update, then select Update driver.
Step 3. Then there are 2 options to update chipset drivers. Here you can select the Search automatically for updated driver software option, which can help you install the updated CPU driver automatically.
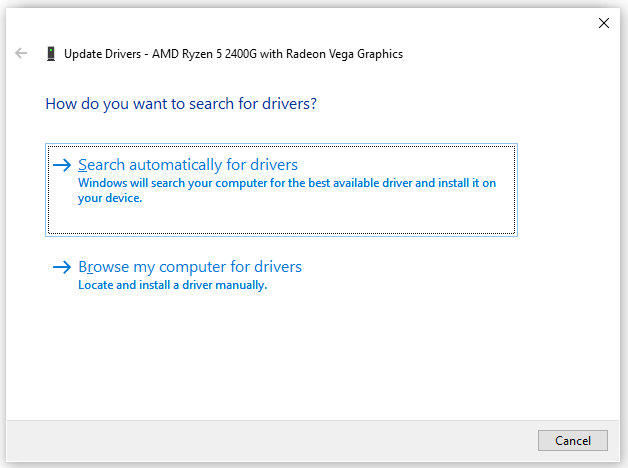
Step 4. Windows will search for the updated CPU drivers automatically, and then you can follow the on-screen prompts to install the drivers on your computer.
Method 4. Run System File Checker
If all the above methods fail to work, then it may indicate the system files get corrupted or missing. So, we recommend you run System File Checker to scan and repair corrupted system files.
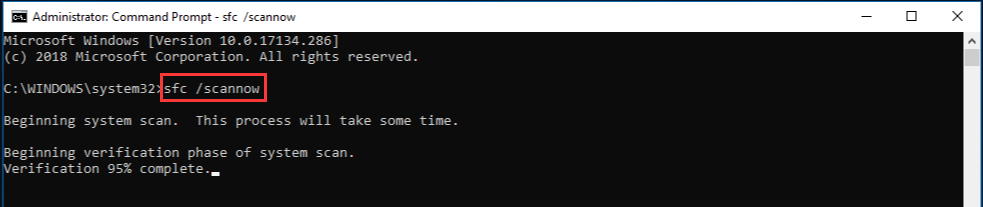
Step 1. Type command in the search box, and then right-click the Command Prompt from the top result and select Run as administrator.
Step 2. In the elevated Command Prompt, type sfc /scannow command and hit Enter. After that, this tool will scan and repair the corrupted system files. This process may take you some time and make sure that it completes.
Now, restart your computer and see if the WIA high CPU/Disk problem goes away.
![How to Fix High Definition Audio Controller Code 10 [6 Ways]](https://images.minitool.com/partitionwizard.com/images/uploads/2021/08/high-definition-audio-controller-code-10-thumbnail.jpg)
User Comments :