As the newest version of the Microsoft operating system, Windows 11 has attracted a large number of users since its release. However, you may also encounter various troubles while running on the system, such as UWP apps are slow, can’t update Windows 11 Defender, AMD driver crashing, and the one discussed in this post.
Why Windows 11 LAN speed is slow? According to a survey, the main reason behind the problem is a poor internet connection. In addition, other factors like faulty cables, slow DNS servers, improper network settings, outdated network driver, and even a VPN client are also responsible for slow LAN Speed in Windows 11.
![How to Fix Camera Error 0xa00f4292 in Windows 10/11? [8 Ways]](https://images.minitool.com/partitionwizard.com/images/uploads/2022/03/camera-error-0xa00f4292-thumbnail.jpg)
Fix 1. Check Your Newtrok Connection
The first thing you should do is to check if your internet works fine on other devices. If it still doesn’t work, then it indicates that you need to optimize your internet connection. Here you can refer to the following tips:
- Restart your router or modem. To do so, you can unplug your router from the power, and then wait for about 60 seconds and re-plug it.
- Use a wired connection. A wired connection provides you with a faster and more stable internet connection than wireless connections.
- Limit the number of active connections on your network. If your internet is shared among multiple users at the same time, then you may not get enough bandwidth.
Fix 2. Switch to a Different DNS Server
Sometimes a problem with the DNS server can trigger the Windows 11 LAN speed lag. In this case, you can try switching to a different DNS server like Google (8.8.8.8 and 8.8.4.4), Cisco OpenDNS (208.67.222.222 and 208.67.220.220), and Cloudflare DNS (1.1.1.1 and 1.0.0.1). Here’s how to do that:
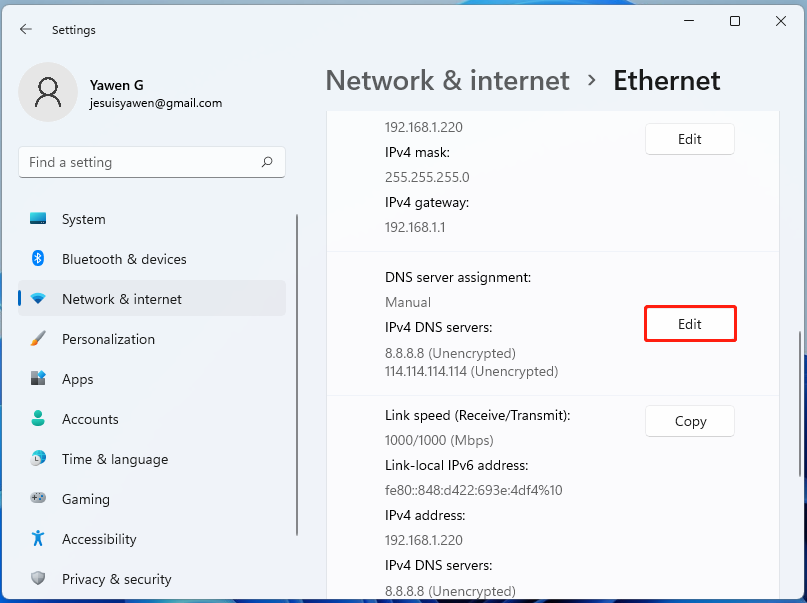
Step 1. Press Win + I keys to open the Settings window, and then select Network & internet from the left panel and click on Ethernet from the right side.
Step 2. Click on Edit next to the “DNS server assignment” text.
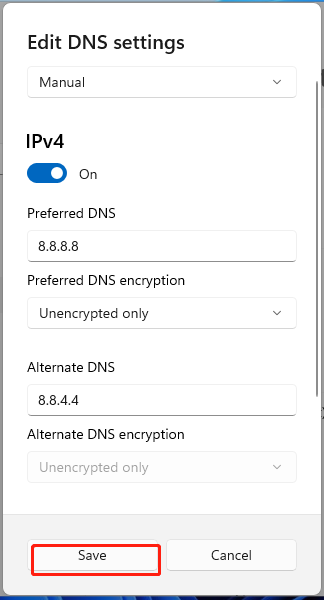
Step 3. In the pop-up Edit DNS settings dialog box, select Manual from the drop-down menu.
Step 4. Set the toggle of IPv4 to On, and you will see two textboxes named Preferred DNS and Alternate DNS.
Step 5. Then enter the DNS server that you want to use. For example, enter 8.8.8.8 in the Preferred DNS and 8.8.4.4 in the Alternate DNS if you want to use the Google DNS server. Click on Save to confirm the change.
Now, you can check if the slow LAN Speed in Windows 11 issue gets solved.
Fix 3. Change the Speed and Duplex Settings
If you have the Speed and Duplex settings selected improperly, you may also experience the Windows 11 LAN speed lag problem. So, it’s important to make sure that your Duplex settings match the bandwidth. For that:
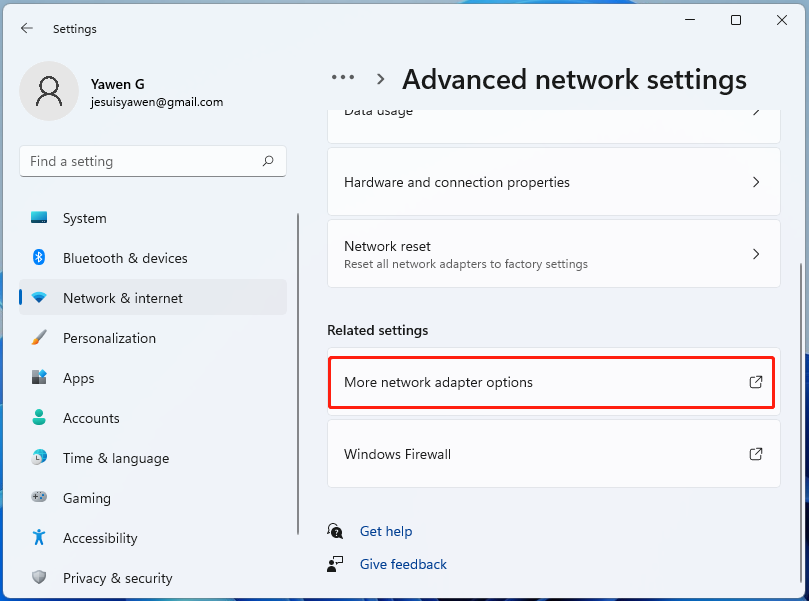
Step 1. Open the Settings window again, and select then Network & internet and click on Advanced network settings > More network adapter options from the right panel.
Step 2. In the Network Connections window, right-click the ethernet adapter and select Properties.
Step 3. Click on Configure, and then switch to the Advanced tab in the Properties window.
Step 4. Select the Speed & Duplex option from the Property drop-down menu.
Step 5. If your bandwidth is 100Mbs or near that, select 100 Mbps Full Duplex from the Value drop-down menu. Then click on OK to save the change. If you still have the Windows 11 LAN speed slow issue, you can try setting the value to 1.0 Gbps Full Duplex.
Fix 4. Update the Network Adapter Driver
Outdated network adapter driver is also responsible for internet speed slow on Windows 11. So, we recommend you keep the network adapter driver updated.
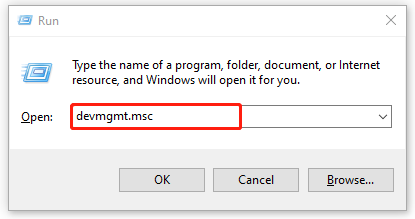
Step 1. Press Win + R keys to open the Run dialog box, and then type devmgmt.msc in it and hit Enter to open Device Manager.
Step 2. Expand the Network Adapter category, and then right-click the active driver and select Update driver.
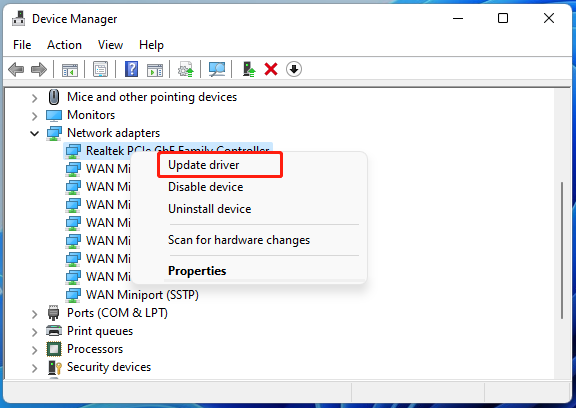
Step 3. Select the Search automatically for drivers option and follow the on-screen instructions to complete the update.
Fix 5. Uninstall the VPN Client
Some users reported that a third-party VPN client can slow down the LAN speed on Windows 11. If this scenario applies to you, you can try turning off the VPN and uninstalling the client.
Step 1. In the Settings window, click on the Apps from the left panel and select Apps & features from the right panel.
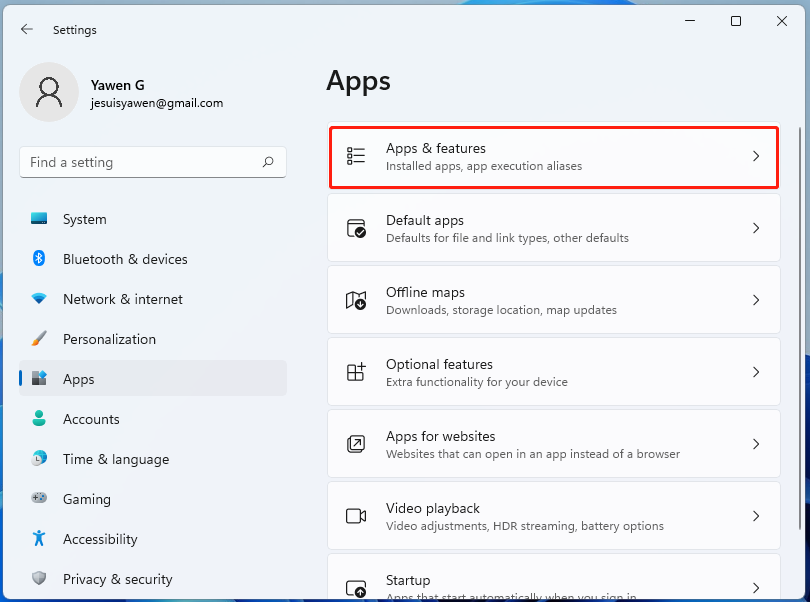
Step 2. Scroll down the list of apps to the VPN client, click on the three vertical dots and click on Uninstall. Then confirm this operation.
Once uninstalled, restart your PC and check if the Windows 11 LAN speed is slow.
Fix 6. Disable the Windows Update Service
As you know, the Windows update service is usually running in the background and it can consume your bandwidth. To speed up the Windows 11 LAN, you can try disabling this service.
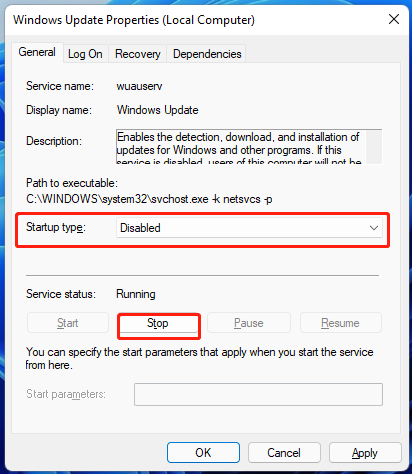
Step 1. Type services.msc in the Run box and hit Enter to open the Services window.
Step 2. Scroll down the list of services to the Windows Update option, double click it and click on Stop in the Properties window.
Step 3. Select Disabled from the Startup type menu and click on Apply and OK to save the change. If the Windows 11 LAN speed slow issue persists after that, you can re-enable the Windows Update service in the same location.
Fix 7. Disable IPv6
Some users reported that they managed to fix the Windows 11 LAN speed lag problem by disabling IPv6. Here you may have a try.
Step 1. In the Settings window, click on Network & internet > Advanced network settings > More network adapter options.
Step 2. Right-click the ethernet adapter and select Properties.
Step 3. Untick the checkbox next to Internet Protocol Version 6 (TCP/IPv6) and click on OK.
Fix 8. Disable Large Send Offload
In addition, disabling the Large Send Offload feature can help fix the slow LAN speed issue in Windows 11. Here’s how to do that:
Step 1. Follow Step 1 in Fix 4 to open Device Manager.
Step 2. Expand the Network Adapter category, and then right-click the active driver and select Properties.
Step 3. Go to the Advanced tab, and then select Large Send Offload v2 (IPv4) from the Property drop-down menu and select Disabled from the Value drop-down menu.
Step 4. Click on OK to save the change.
If none of the above methods work, you may consider contacting your internet service provider for help.
User Comments :