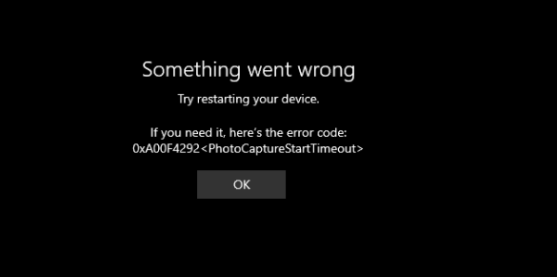
When running the camera app in Windows 10/11, many people receive the “Something went wrong, 0xa00f4292 photocapturestarttimeout” error message. Don’t worry. This post of MiniTool explores several proven solutions to the error.
According to user reports, the 0xa00f4292 error often occurs when using a webcam device on Windows 10/11. The error code is accompanied by the “Something went wrong. Try restarting your device” message. What causes the 0xa00f4292 photocapturestarttimeout error? Usually, improper driver installation, antivirus interference, outdated device driver, insufficient permissions, and even corrupt system files can trigger the camera error.
Solution 1. Restart the Camera App
As the error message suggests, you may fix the Windows 10 camera app something went wrong error by restarting your device. Here you can restart the camera app and its related programs in Task Manager.
Step 1. Press Ctrl + Shift + Esc to invoke Task Manager.
Step 2. In the Processes tab, right-click the Camera app and select End task.
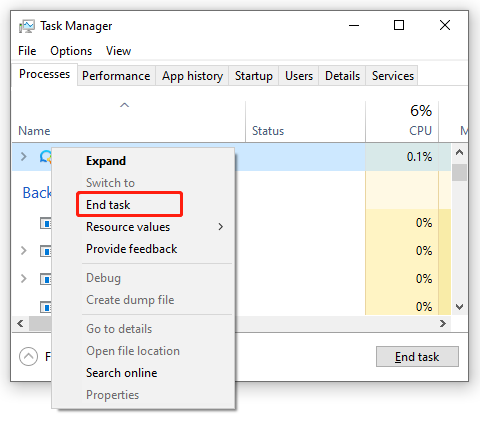
Step 3. See what apps are using the camera and end them in Task Manager. Then restart the app and see if the 0xa00f4271 camera error persists. If it is, restart your computer or move down to the following solutions.
Solution 2. Allow Apps to Access Your Camera
Sometimes the photo capture file creation failed error just occurs due to insufficient permissions. Now, follow the steps below to grant enough access to your device and apps.
Step 1. Press Win + I keys to open the Settings app and click on Privacy.
Step 2. Scroll down the left pane to the App permissions section, and then select Camera and make sure the “Allow apps to access your camera” switch is toggled on.
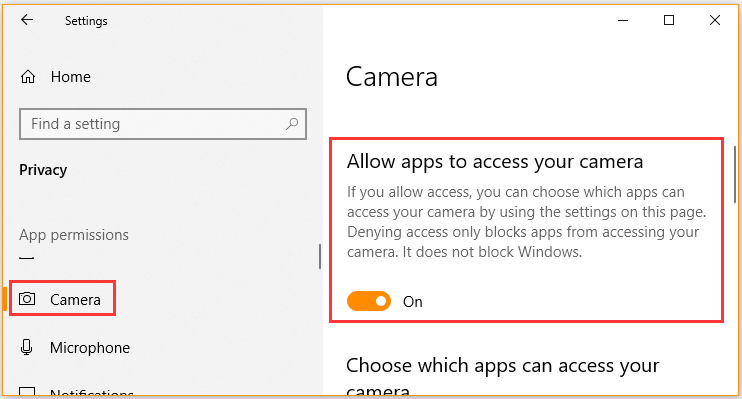
Step 3. Continue to scroll down, and then choose which apps can access your camera and toggle on it.
Once done, restart the app and check if the Windows 10 camera app something went the wrong issue gets solved.
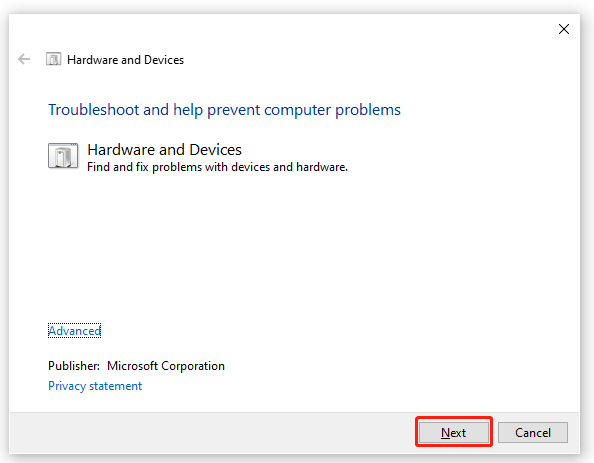
Solution 3. Run Hardware and Devices Troubleshooter
The Hardware and Devices troubleshooter is a Windows built-in tool that can help troubleshoot the issues related to the hardware devices. Gere you can try running the troubleshooter to fix the 0xa00f4271 camera error.
Step 1. Press Win + R keys to open the Run dialog box, and then type cmd in it and hit Enter.
Step 2. In the Command Prompt window, type the following command and hit Enter to access the Hardware and Devices troubleshooter.
msdt.exe -id DeviceDiagnostic
Step 3. Click on Next to run the troubleshooter.
Step 4. Then this troubleshooter will automatically detect issues with the hardware. Click on Apply this fix to fix the issues.
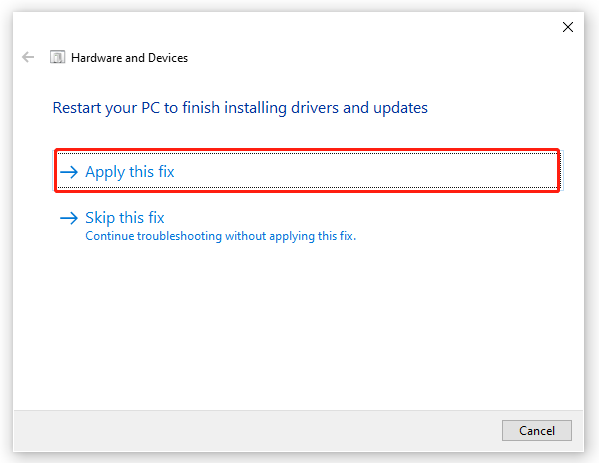
Step 5. Restart your computer for the changes to take effect.
Solution 4. Update Your Camera Drivers
The 0xa00f4271 media capture failed event error can be caused by outdated or corrupt camera drivers. To avoid this problem, we recommend you keep the driver updated.
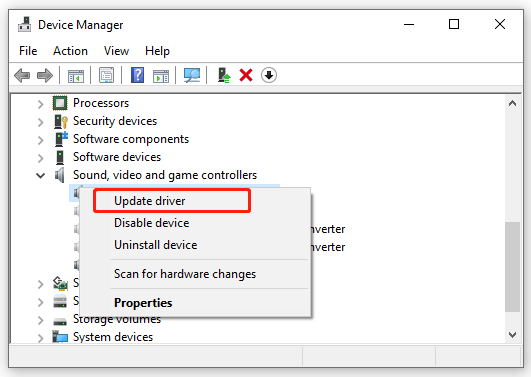
Step 1. Press Win + R keys to open the Run dialog box, and then type devmgmt.msc in the box and hit Enter to open this program.
Step 2. In the Device Manager window, expand the Cameras, Imaging devices, or Sound, video and game controllers category, and then right-click on the webcam device and select Update driver.
Step 3. Select the Search automatically for driver option and follow the on-screen prompts to install any available drivers.
Solution 5. Reinstall the Webcam Driver
If the updating driver can’t help fix the Windows 10 camera app something went wrong error, you may consider reinstalling the webcam driver. This is because the device driver may get corrupted.
Step 1. Follow Steps 1 to 2 in Solution 4 to open the Device Manager.
Step 2. Right-click the Webcam driver and select Uninstall device.
Step 3. In the pop-up dialog box, select the checkbox for Delete the driver software for this device and click on Uninstall. Then wait for the uninstallation to complete.
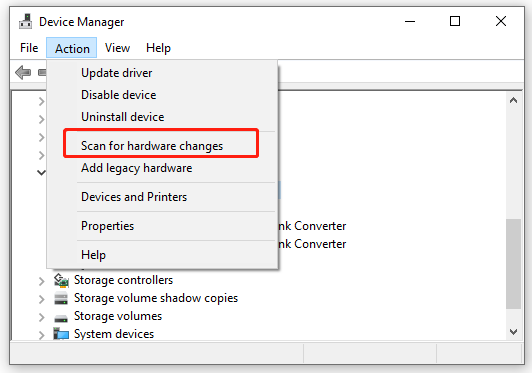
Step 4. Once uninstalled, select Action from the top menu and click on Scan for hardware changes. This will scan for hardware changes and reinstall the appropriate drivers for you.
Solution 6. Allow Your Camera Apps Through Windows Firewall or Antivirus
Some users reported that the Windows Firewall and certain antivirus software may interfere with the camera app or its process. In this case, you can all the camera app through your security programs. For that:
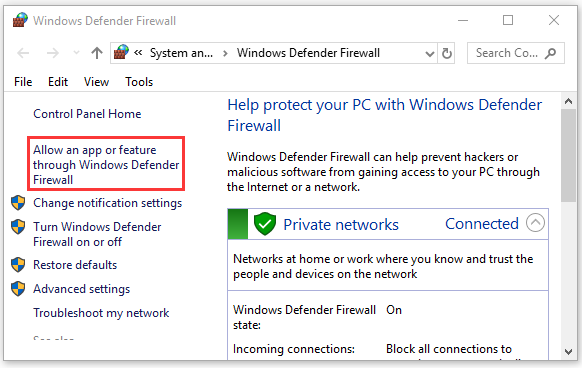
Step 1. Type firewall in the search box and then select the Windows Defender Firewall from the context menu.
Step 2. Click on Allow an app or feature through Windows Defender Firewall from the left pane.
Step 3. Click on Change settings, and then select the checkbox for Camera and the related apps that are using the camera, and tick the checkbox for both Private and Public networks.
Step 4. Click on OK to save the changes.
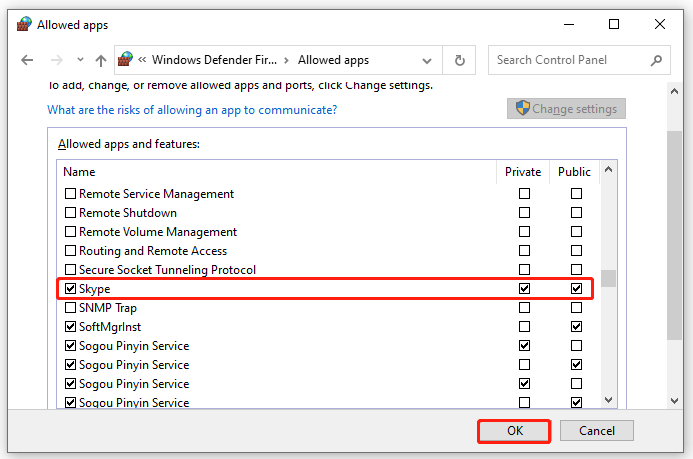
After that, you can restart the camera app and see if the 0xa00f4292 photocapturestarttimeout error is cleared.
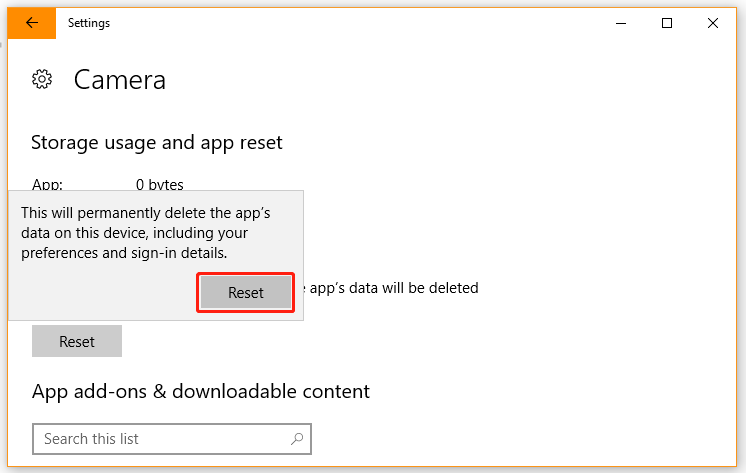
Solution 7. Reset the Camera App
Some users reported that they managed to fix the photo capture file creation failed 0xa00f4292 error by resetting the Camera app. Let’s have a try.
Step 1. Open the Settings app and go to the Apps section.
Step 2. Scroll down the right sidebar to the Camera app and click on Advanced options.

Step 3. Scroll down and click on Reset. Then confirm this operation.
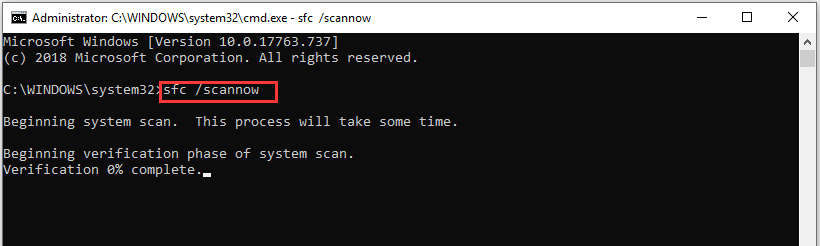
Solution 8. Run System File Checker
If none of the above solutions work, the camera error 0xa00f4292 could be triggered by corrupted or missing system files. So, we recommend you run an SFC scan to check for system files.
Step 1. Type cmd in the search box, and then right-click the Command Prompt app and select Run as administrator.
Step 2. In the elevated command prompt, type sfc /scannow and hit Enter to start this scan. Then wait patiently for this repair to complete.
User Comments :