Do you play Counter-Strike: Global Offensive (CS: GO)? Have you received “VAC was unable to verify your game session”? Here are 3 solutions offered by MiniTool Software and you can have a try if you’re bothered by this issue.
Counter-Strike: Global Offensive, developed by Valve and Hidden Path Entertainment, is a multiplayer first-person shooter video game. Recently, many players complain that they encountered VAC was unable to verify your game session on CS: GO. It is quite annoying because matchmaking will fail once this error happens.
What is VAC and why does this error happen? Let’s see in the following contents.
For a fair and non-ludicrous experience in online settings, some games have provided a protection technique, Valve Anti-cheat System (VAC). It is designed to protect users from the masses that some users who cheat codes to improve the chances of winning.
It sounds like a wonderful technique. However, it seems that there are some problems with the VAC program especially for the popular games like CS: GO.
Don’t worry. You can fix “VAC was unable to verify your game session” error easily and quickly by yourself. Just try the following solutions one by one.
Solution 1: Re-Login into or Restart Your Steam Client
There may be some changes in the regular operating system framework, which leads to “VAC was unable to verify your game session” error eventually. An easy way to solve the problem is to re-login into your Steam account. If it doesn’t work, you can try restarting your Steam.
Let’s see the detailed steps.
Step 1: Open Steam.
Step 2: Click your profile name at the top right corner of Steam. Then select Log out of account from the drop-down menu.
Step 3: There will a pup-up window reminding you that this will log you out of Steam and you will need to re-enter your account name and password to use Steam again. Just click LOGOUT to continue.
Step 4: Re-login into your account by following the onscreen instructions.
Then you can try opening CS: GO or the other program that receives the error “VAC was unable to verify your game session” and check if the error disappears. If it still exists, you can following the steps below to restart your Steam client.
Step 1: In your Steam client, click Steam from the upper left corner. Then click Exit.
Step 2: Open Steam again. In the interface, click Steam and choose Go Offline.
Step 3: In the following window, click RESTART IN OFFLINE MODE.
Step 4: Click Steam option and select Go Online. Then in the pop-up window, click RESTART AND GO ONLINE.
Step 5: Once Steam is restarted, launch you game and check if the error “VAC was unable to verify your game session” disappears.
If you still see VAC was unable to verify your game session on CS: GO, you can move on to the next solution.

Solution 2: Restart the PC
If the certain computer items which are utilized to protect the game rights of users are already used by other third-party programs, errors like “VAC was unable to verify your game session” might appear. To solve the problem, you can restart your device to end all the programs which might lead to this error.
Then launch Steam and check if your CS: GO works properly without the error message about VAC.
Solution 3: Verify the Game Files
When you encounter “VAC was unable to verify the game session” error, there may be some missing or corrupted game files. You should check them with Steam client.
Step 1: In Steam, click LIBRARY from the tool bar.
Step 2: Right-click your game Counter-Strike: Global Offensive and select Properties.
Step 3: Choose LOCAL FILES tab, and then click VERIFY INTEGRITY OF GAME FILES.
Step 4: Wait for a while patiently. When the process is completed, click CLOSE.
Then you can launch your game and the issue should have been fixed.
Solution 4: Updated Your Device Drivers
Corrupted or outdated drivers could also lead to “VAC was unable to verify the game session” issue. You need to keep your device drivers up-to-date, especially graphics card driver and sound driver.
Here is the tutorial on how to update graphics card driver. If the problem still exists, you may also need to update other drivers.
Step 1: Press Win + R to open Run window. Then input devmgmt.msc and click OK to enter Device Manager.
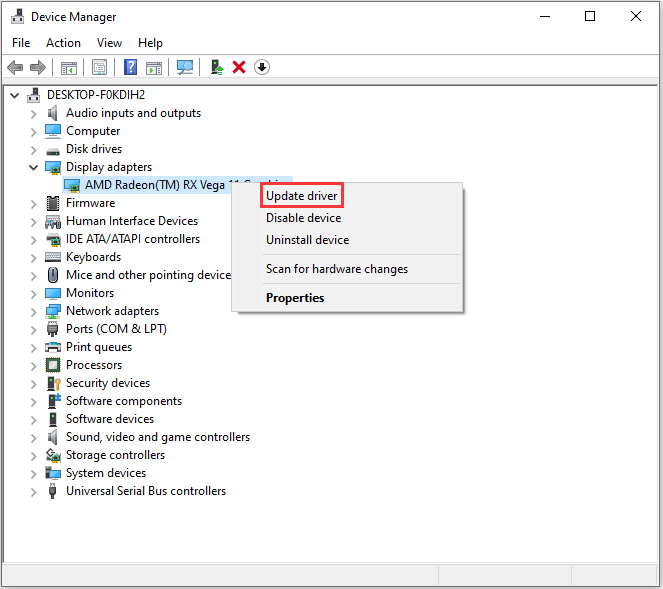
Step 2: Double-click Display adapters to expand it.
Step 3: Now right-click your graphics card and select Update driver. Then, choose Search automatically for updated driver software and follow the onscreen instructions to finish the process.
Step 4: You will be asked to restart your computer after the update is installed. Just click Restart now.
After you update the driver, you can run your game and check if the problem has been solved.
If the above method failed to update drivers, you can use a professional third-party program to do that. Driver Easy Pro can detect all outdated drivers and update them with just one click. Here is the guide:
Step 1: Install Driver Easy and launch it. Click the Scan Now button.

Step 2: After the scanning process is completed, click the Update All button to download and install the latest drivers for all devices with outdated drivers.

Solution 5: Repair the Steam.exe via Command Prompt
Another reason for “VAC was unable to verify the game session” problem is that there are errors on the Steam client itself. When there are any damaged or corrupted files or incomplete system configuration files in the client, you might see the mentioned error. In this case, you can repair the Steam.exe with Command Prompt.
Here are the detailed steps.
Step 1: Press Win + R to invoke Run window.
Step 2: In the pop-up Run window, input cmd in the box and press Enter to open Command Prompt.
Step 3: Type the following command or copy and paste it to the command and then press Enter to execute it:
C:Program Files (x86)SteambinSteamService.exe” /repair
This might take some time. You need to wait patiently until the process is completed. Then restart your PC to make the changes to take effect. Launch Steam and open the game that was stopped by “VAC was unable to verify your game session error” to check if this solution works.
Solution 6: Disable or Uninstall Your Antivirus Temporarily
Antivirus software could also be the factor which leads to this “VAC was unable to verify the game session” issue. Because it may disrupt the VAC settings when it is scanning and repairing applications in the background to protect your computer from virus attack.
To solve the problem, you should remove the Steam application from the scanning process. You just need to navigate to the settings of your antivirus application and add the Steam to the excluded files folder. If you still keep receiving the mentioned error, try disabling your antivirus temporarily or even reinstalling the antivirus.
Here is how to uninstall a program on PC.
Step 1: Press Win + S to open Search. Then search for Control Panel and open the app.
Step 2: In the top right corner, select View by: Category. Then click Uninstall a program.
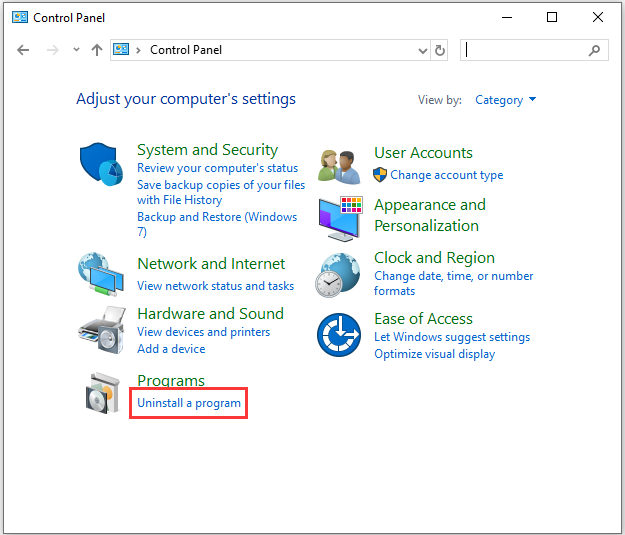
Step 3: In the list of programs and features, right-click your antivirus and select Uninstall. Then follow the onscreen instructions to finish the process.
If the problem is fixed after uninstalling the antivirus, you might need to give up this antivirus program and use another reliable one, or contact the support of your antivirus program to get solutions.
Bottom Line
Don’t worry if you see “VAC was unable to verify your game session” error message when you want to launch a game like CS: GO. These solutions above are tried by plenty of users and they have fixed the problem successfully. Hope one of the solutions could also be helpful for you.
If you have better ideas about this topic, please don’t hesitate to send us an email via [email protected] or leave a message in the following comment section.
VAC Was Unable to Verify Your Game Session FAQ
“VAC was unable to verify the game session” error could be caused by various factors. To solve the problem, you can try:
- Re-login into your Steam account or relaunch Steam client
- Restart the PC
- Verify the game files
- Update your device drivers
- Repair the Steam.exe via Command Prompt
- Disable antivirus temporarily
For more detailed information, you can refer to the solutions introduced in this post.
User Comments :