A great number of users are confused about the Unified Write Filter feature, but most of them don’t know how to use it on Windows 10. In this post, MiniTool explains its definition and provides an installation and use guide of the UWF feature.
What Is Unified Write Filter
Unified Write Filter (UWF) is a practical file system write filter that’s used to protect your system and user files on the local drive from any changes. It can protect your selected drive by redirecting and intercepting any writes to the drive (settings changes, saved data, and app installation) to a virtual overlay.
This UWF Windows feature brings many benefits for users:
- Protect most supported writable storage devices, including physical HDDs, SSDs, internal USB drives, and external SATA devices.
- Use the UWF Windows feature to make the read-only storage media show as a writable volume.
- Provide a clean experience for workplaces that have frequent accesses, like schools. This is because the virtual overlay created by UWF is usually cleared during a reboot or when a guest user logs off.
- Supports paging to increase virtual memory if the page file exists on the unprotected volume.
- Improve security and reliability for kiosks and loT-embedded devices in which new apps are not expected to be installed frequently.
- Reduce wear on some write-sensitive storage devices like Solid-State drives.
Of course, this feature also has some limitations. It is an optional Windows 10 feature that can only be used on Windows 10 Enterprise, Windows 10 IoT Enterprise, and Windows 10 IoT Core. In addition, it’s not fully supported except for the FAT and NTFS file systems. For example, you cannot create file exclusions on an exFAT volume. To know more features of the UWF Windows feature, you can click here.
What is UWF? Now, I believe that you have already known the answer. Let’s see how to install and use it on Windows 10.
How to Install Unified Write Filter
Since Unified Write Filter is an optional feature, you need to install it before you use it. The most common way is to install UWF on a customized Windows image. To do so, follow the steps below.
Step 1. Type cmd in the search box, and then right-click the Command Prompt from the top result and select Run as administrator. Click on Yes in the UAC window to grant the admin right for Command Prompt.
Step 2. Press Win + E keys to open the File Explorer, and then copy and paste the install.wim file to a temporary folder on your hard drive, and rename it to C:wim.
Step 3. Create a new directory: md c:wim.
Step 4. In the elevated Command Prompt window, type the following command and hit Enter to mount the image.
dism /mount-wim /wimfile:c:bootmediasourcesinstall.wim /index:1 /MountDir:c:wim
Step 5. Then you can continue to enable Unified Write Filter using CMD or using the following method we will explain. To do so, run the following commands in order.
- dism /image:c:wim /enable-feature /featureName:Client-UnifiedWriteFilter
- dism /unmount-wim /MountDir:c:wim /Commit
Step 6. To activate UWF, you can run the following commands. (Here we take the C drive for example)
- uwfmgr filter enable
- exe volume protect C:
How to Use Unified Write Filter
Before you enable and use the UWF feature on Windows, we want you to know some changes that UWF will make to your system. For that:
- Disable SuperFetch
- Disable system restore
- Disable Paging files
- Disable fast startup
- Turn off file indexing service
- Turn off the Defragmentation service
How to Turn on Unified Write Filter
How to turn on Unified Write Filter? Now, follow the steps below to enable it.
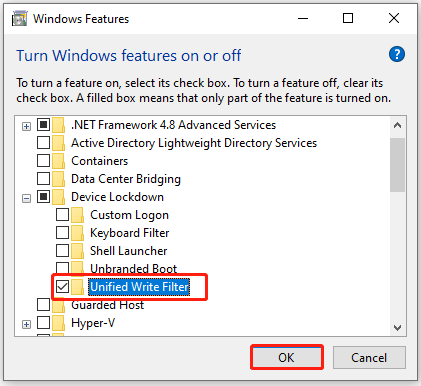
Step 1. Click Start, type Turn Windows features in the Search box and select Turn Windows features on or off from the top result.
Step 2. In the Windows Features window, expand the Device Lockdown category and tick the checkbox next to Unified Write Filter.
Step 3. Click on OK to save the change and close the window.
How to Use UWF for a Drive on Windows 10
Once you enable the feature on Windows, you can use it to protect your drive or do other something based on your needs.
Step 1. Open the elevated Command Prompt window just like Step 1 in the UWF installation part.
Step 2. Copy and paste the following command in the CMD window and hit Enter to enable write protection for the drive. Here you can replace the C: with the drive you want to protect.
uwfmgr.exe volume protect C:
Step 3. Restart your computer and everything you write to the disk during the session will be available only till the next startup.
Step 4. You can check if the UWF is enabled for your drive by running the command below:
uwfmgr.exe get-config
Further reading: If you want to see the current overlay settings where UWF stores temporary data, run this command: uwfmgr overlay get-config. If you want to use Disk overlay, run this command: uwfmgr overlay set-type Disk.
![How to Connect to Exchange Online PowerShell? [Full Guide]](https://images.minitool.com/partitionwizard.com/images/uploads/2022/01/connect-to-exchange-online-powershell-thumbnail.jpg)
User Comments :