Error – There Is No Disk in the Drive
When you start your computer, you may receive the following error message:
“There is no disk in the drive. Please insert a disk into drive DeviceHarddiskDr.”
This comes in the form of a popup, and even you click the option to cancel, retry, or continue, you only make the popup continue to come up. The only way to exit the pop-up window is to close the process in Task Manager.
According to a survey, many Windows users are troubled by the error “there is no disk in the drive, please insert a disk into drive”. If you do a Google search, you will find a lot of confusing information related to this issue. Here is an example we extracted from community.spiceworks.com:
I just installed Spiceworks on my Win 7 machine and now I am getting an error:
“spiceworks.exe – No Disk
There is no disk in the drive. Please insert a disk into drive DeviceHarddisk1DR1”
Read a few other posts about this but doesn’t seem to be working for me.
Let me know what kind of answers you guys find? Thanks!
Possible Causes for No Disk Error Windows 7/8/10
Generally speaking, this is caused by a removable disk that contains no media. According to support.microsoft.com, “there is no disk in the drive” can occur when either of the following conditions is true:
- You have a removable drive configured as drive letter C.
- You do not have a removable disk in the removable disk drive.
In light of these potential factors that cause this irritating error, we decide to assist you with the best resolutions to fix there is no disk in the drive.
Solution 1. Restart Computer
Have you tried restarting the machine? The Windows popup appears because the application is attempting to scan all of the listed drives. If a drive was probably removed without the OS being aware, no disk in drive error Windows 10/8/7 appears. Restarting Windows probably fixes it right away.
Solution 2. Remove Removable Media
Are you using some sorts of removable media on this machine, like a USB hard drive or CD ROM device? In addition, mobile phones being connected to your PC sometimes can also cause this issue. Get them off your PC and have a check.
Solution 3. Upgrade or Uninstall
This way is put forward by Spiceworks users. Usually, when seeing such an error message, we would suspect the problem lies in the application mentioned in the pop-up window. According to Spiceworks users’ description, after upgrading the Spiceworks to the latest version, “there is no disk in the drive” error no longer happening.
But to some users, only uninstalling makes sense. When they reinstall, the error comes back. So we suggest having a try on upgrading the application which brings the error message to the latest version or uninstalling it and then having a check.
Solution 4. Edit Registry
By Google search, you will find this solution is mentioned in several Windows support forums and YouTube channels. Altering your Windows Registry can turn off the error message, not knowing what problem this would cause.
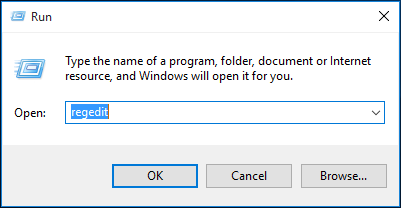
Step 1. Press Win + R keys to call out the Run box. Then type “regedit” in the blank and press OK. Registry Editor will require the user account control, click “Yes” when you see it.
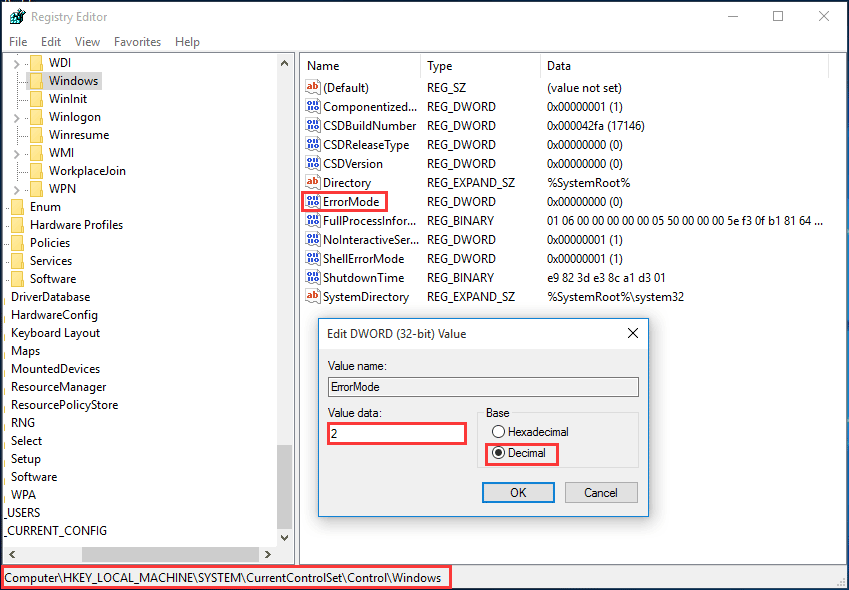
Step 2. Now follow this path to reach the ErrorMode key and make the changes:
“HKEY_LOCAL_MACHINESYSTEMCurrentControlSetControlWindows”
- Navigate to ErrorMode in the right panel.
- Double click on it and change the value data from 0 to 2.
- Then change the Base from “Hexadecimal” to “Decimal”.
- Finally, press “OK” to save this change.
Exit Registry Editor and check if “there is no disk in the drive” issue persists. If this solution does not help, continue reading the next one.
Solution 5. Disable Unused Drive in Device Manager
If you have multiple USB media connected and some of them you will never use, you may consider disabling such drives.
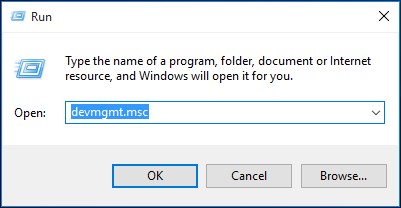
Step 1. Press Win + R to open the Run dialog. Then type “devmgmt.msc” and click OK.
Step 2. In the Device Manager window, expand Disk Drives and find the removable drive which keeps reporting “there is no disk in the drive” issue. Then right-click on it and select “Disable”.
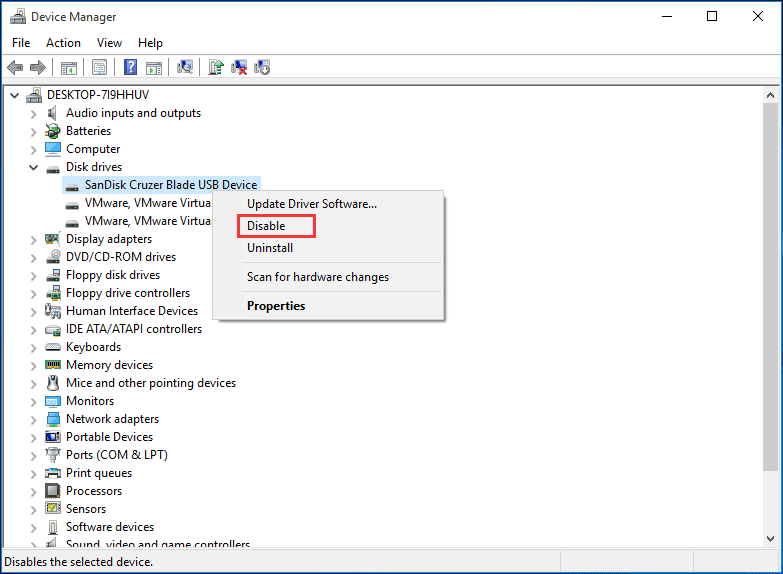
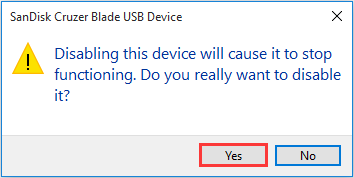
Step 3. Immediately you will receive a message saying “Disabling this device will cause it to stop functioning. Do you really want to disable it?” At this time, click “Yes”.
Step 4. After rebooting, check out whether this issue is solved or not.
Solution 6: Change Drive Letter
Like what we have mentioned in the above content, if the drive letter C is assigned to another removable disk, “there is no disk in the drive” issue can also appear.
To resolve no disk in drive error Windows 10/8/7, change the drive letter assignment for the removable drive to any letter other than C. You can use one of the following methods:
Use Partition Manager
First of all, you may consider employing a professional yet free partition manager to do this as such software usually brings easier operations. Here MiniTool Partition Wizard is recommended.
MiniTool Partition Wizard offers a user-friendly interface and easy-to-follow instructions. With this freeware, the problem of there is no disk in the drive can be perfectly solved.
Download and install it on the computer first and follow the wizard below.
MiniTool Partition Wizard FreeClick to Download100%Clean & Safe
- Launch MiniTool Partition Wizard Free to get its main interface.
- Select the partition you want to change its drive letter and choose “Change Drive Letter” from the action panel.
- In the pop-up window, drop down the New Drive Letter box and choose a drive letter you prefer. Then press “OK” to confirm.
- Click “Apply” to save this change.

Use Disk Management
In addition to using third-party partition manager, Windows troubleshooting Disk Management utility is a good choice for you to reset drive letter. Here you just need to follow the simple steps below:
- Insert a removable disk before you start the computer. Then log on to the computer as Administrator.
- Right-click on This PC, click Manage and then Disk Management under Storage.
- Right-click the partition or volume on the removable disk you want to change, and then click “Change Drive Letter and Paths” from the context menu.
- In the pop-up window, click “Change” and then choose the drive letter you want to use and click “OK”.
- Click “Yes” when you receive the message that reads “Some programs that rely on drive letters might not run correctly. Do you want to continue?” Disk Management will finish this job within one minute.
Solution 7. Reformat the Hard Drive
Formatting is helpful and necessary when your removable drives become corrupted, unreadable, inaccessible so that “there is no disk in the drive” error occurs. However, formatting will definitely lead to data loss.
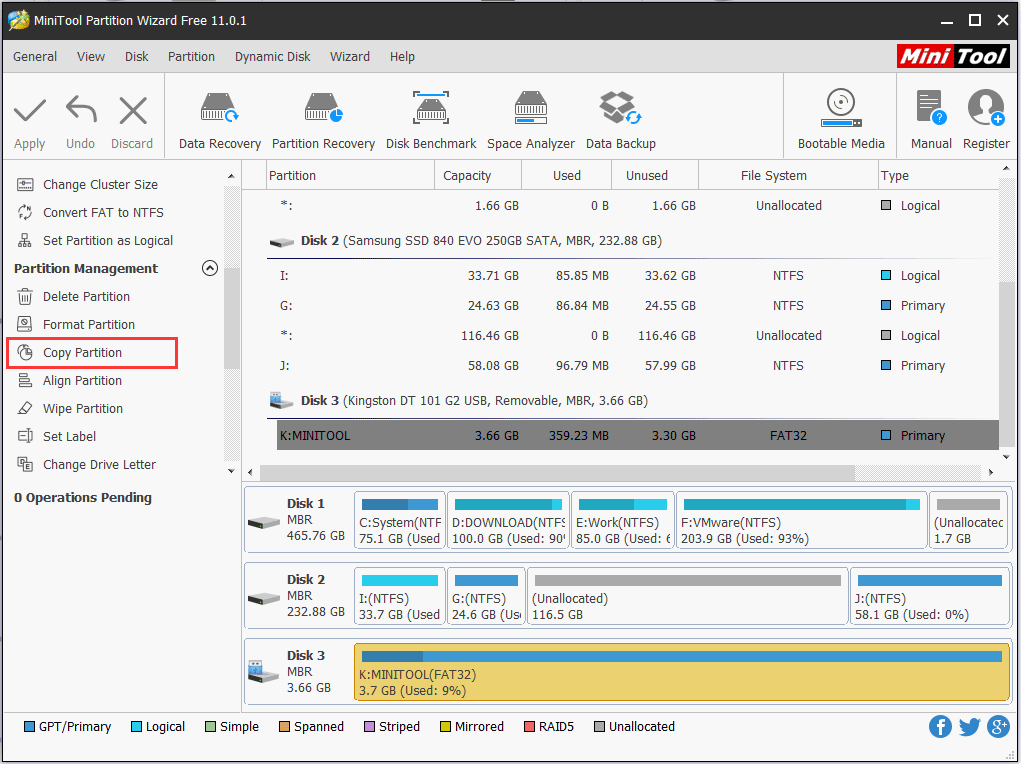
Here you can employ the “Copy Partition” feature of MiniTool Partition Wizard to back up the hard drive.
MiniTool Partition Wizard FreeClick to Download100%Clean & Safe
Step 1. Select the removable disk from which you need to save data and choose “Copy Partition” from the action panel.
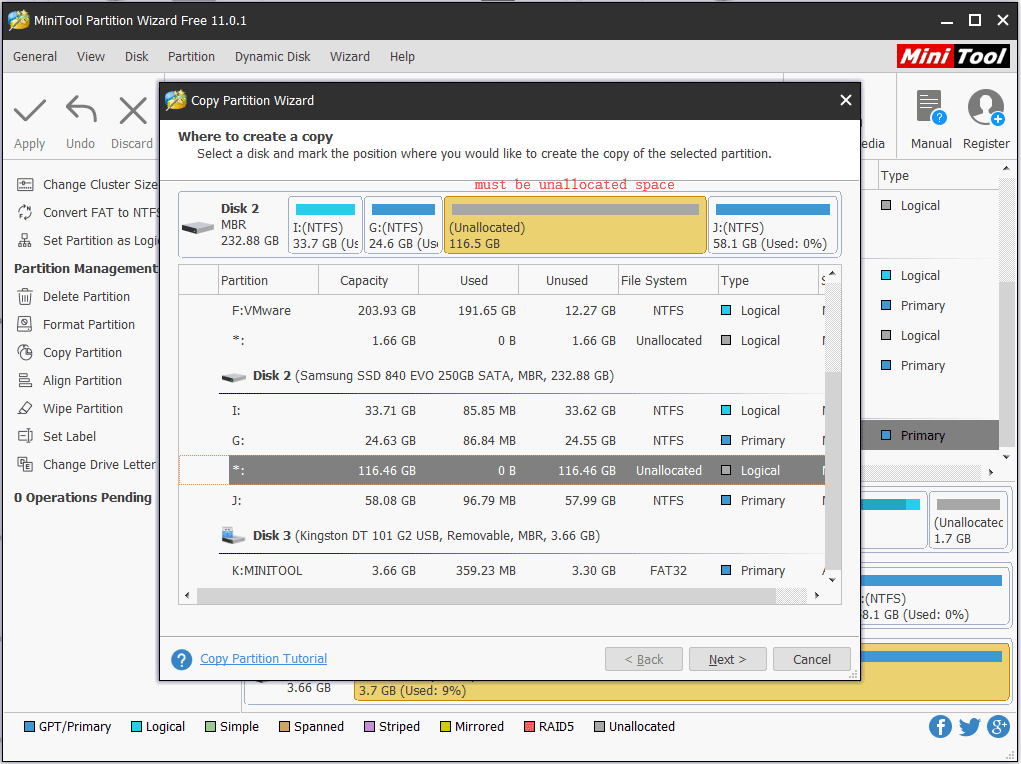
Step 2. In the pop-up window, choose an unallocated space which is large enough to save all data on the removable disk and click “Next”. (Tip: if there is no unallocated space, you may have to use “Move/Resize Partition” feature to shrink a partition for enough unallocated space.)
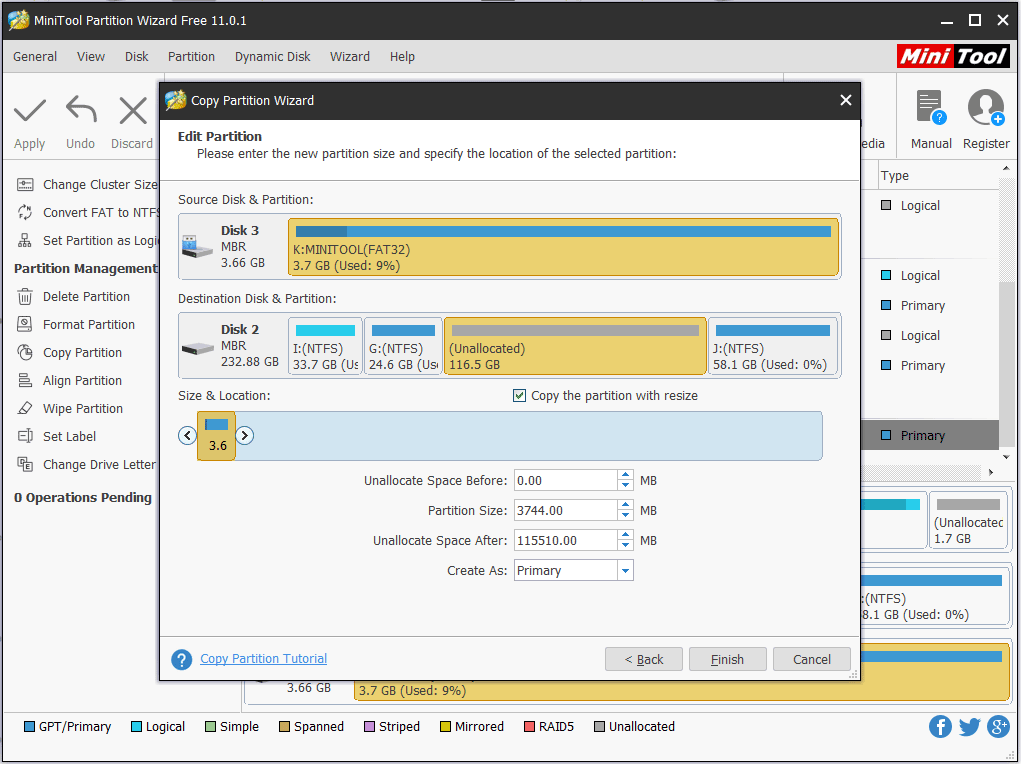
Step 3. Here you can adjust the newly created partition size by dragging the slider bar or keep it that way and click “Finish”.
Step 4. Back to the main interface, you can preview the newly created partition which will hold all data on the removable disk. Finally, you can click “Apply” to execute the partition copy.
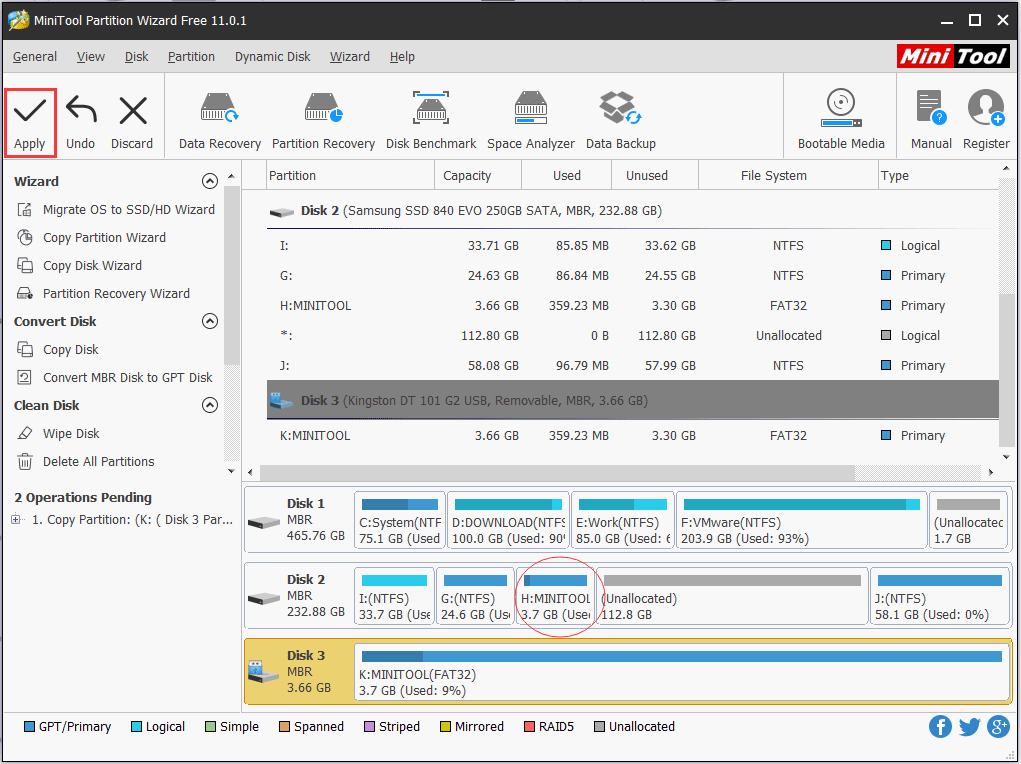
After making data backup, it is time to do the formatting.
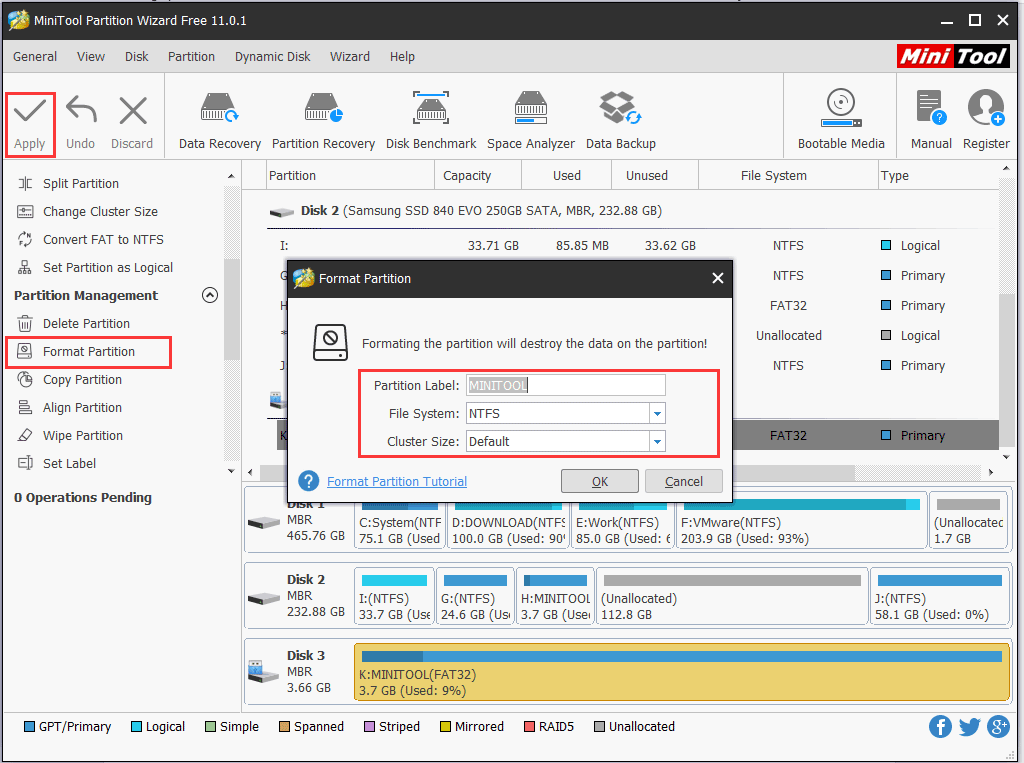
- Select the drive to be formatted and choose “Format Partition” from the action panel.
- In the pop-up window, select a file system and click “OK” button to go back to the main interface.
- Finally, you need to click “Apply” button to start the formatting.
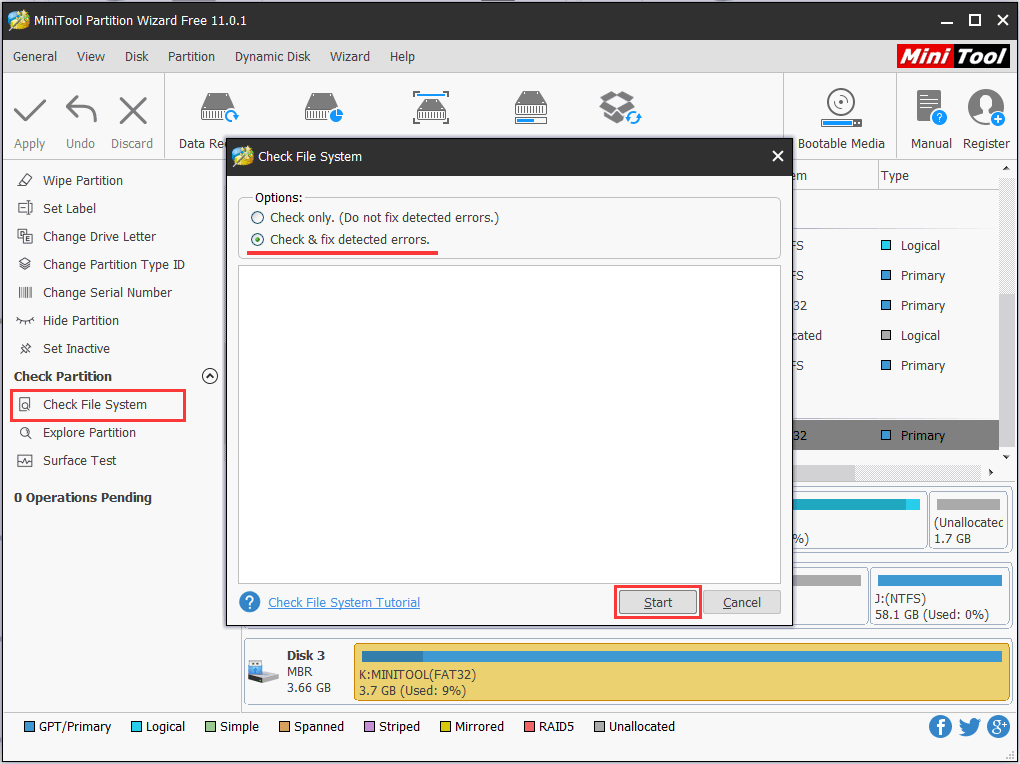
Solution 8. Check Disk Errors
It is not impossible that some disk errors can also bring “there is no disk in the drive” error. Luckily, with MiniTool Partition Wizard, you can easily have a check for the removable disk and fix some errors.
Check File System
- In the main interface of MiniTool Partition Wizard Free, find the removable disk that keeps reporting no disk in the drive error and choose “Check File System” from the action panel.
- In the pop-up window, select an option to check the file Here we recommend choosing “check & fix detected errors”.
- Finally, click the “Start” button and wait for MiniTool Partition Wizard to finish.
Check Bad Sectors
Also, you may wonder if there are some bad sectors on the hard drive, leading to no disk error Windows 7/8/10. Here MiniTool Partition Wizard Free can make detection of a disk or partition for sector errors. After the test completes, a report will be produced.
- Select the removable disk which you suspect the existence of bad sectors and choose “Surface Test” from the action panel.
- In the pop-up window, click “Start Now” and this partition manager will start scanning every sector of the selected hard drive, checking for bad sectors. For hard disk errors, they will be marked with red blocks.
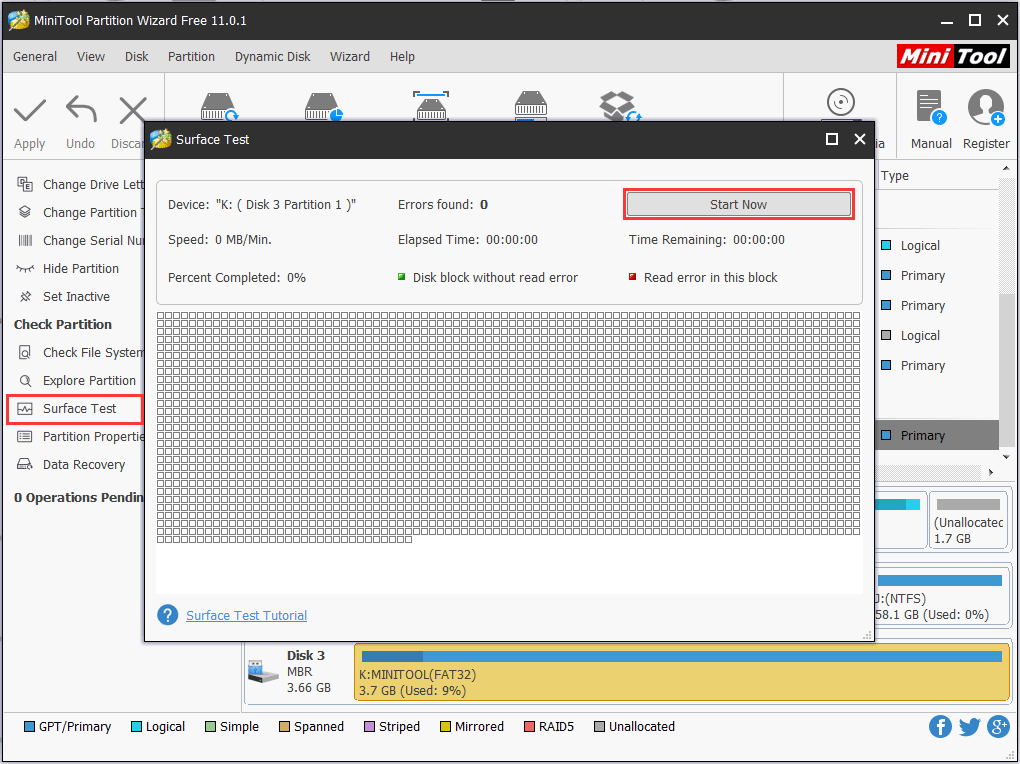
When the scanning is finished, you know the health condition of your disk and whether you need to replace the hard drive. If there are bad sectors on the removable disk, you should seek for professional aid to shield these sectors. If you intend to abandon this disk, data rescue should be the first concern.
Summary
Reading here, we guess you have learned some solutions to fix “there is no disk in the drive, please insert a disk into drive” error. If you have a nice suggestion, welcome to leave it in the following comment section, this would help more users.
For any questions towards using MiniTool Partition Wizard, please contact us by sending an email to [email protected]. Thanks in advance!
About The Author

Position: Columnist
Rodin is an enthusiastic IT writer focusing on Windows trends, disk partition management and data recovery. She loves to write and share her idea about the useful tips and tricks on personal computers' maintenance. If you are looking for methods to improve your computer performance, manage hard drives and recover data from different devices, Rodin can provide reliable solutions for data management.
User Comments :