Sometimes, you might find that the system queued Windows Error Reporting Files is huge and you want to delete it to free up disk space. In this article, MiniTool Partition Wizard will show you how to delete huge system queued Windows Error Reporting files with 3 different methods.
About System Queued Windows Error Reporting Files
The system queued Windows Error Reporting Files are used by Microsoft Windows for error reporting and solution checking.
These files contain the error reports related to the software and hardware problems and are stored temporarily in the system. They are generated by your Windows system and will be sent back to Microsoft for solutions to those problems. And Microsoft may include fixes for reported problems in the future updates according to the feedback.
But with time going on, these files may take lots of space on your system, and many Windows users have reported the system queued Windows Error Reporting huge issue. So, you may want to remove these files to free up the disk space.
Actually, the normal functioning of your OS won’t be affected if you delete system queued Windows Error Reporting Files. But you should know that removing them may prevent built-in troubleshooters and other utilities from applying the correct repair strategy.
If you have decided to remove them, just keep on your reading to get the methods.
How to Delete System Queued Windows Error Reporting Files
You can choose to delete system queued Windows Error Reporting Files using Disk Cleanup or Windows Settings, or delete manually. The detailed instructions are listed below.
Method 1: Make Use of Disk Cleanup Utility
Disk Cleanup is a Windows built-in tool that can help you delete part or even all of unnecessary files. To delete system queued Windows Error Reporting Files using this utility, just follow the steps below:
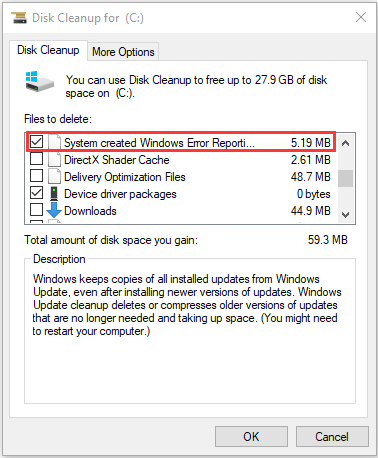
Step 1: Press Windows + S, input disk cleanup, and click the result to open the utility.
Step 2: Select your system drive (commonly C: drive) and click OK button. This tool will start scanning your drive and calculating how much space you will be able to free.
Step 3: Click the Clean up system files button in the lower-left corner and repeat the step 2.
Step 4: Check the System created Windows Error Reporting Files and other items you want to remove, and click OK button. In the confirmation prompt, click Delete Files button to remove the files permanently.
Some users complain that they cannot delete the files in Disk Cleanup. If you are facing the same problem, try running Disk Cleanup as administrator and doing the same operations introduced above. Alternatively, you can jump to the next method.
Related article: What Is Safe to Delete in Disk Cleanup? Here Is the Answer
Method 2: Use Windows Settings App
You can also delete Windows Error Reporting files in Windows Settings. Here’s what you need to do.
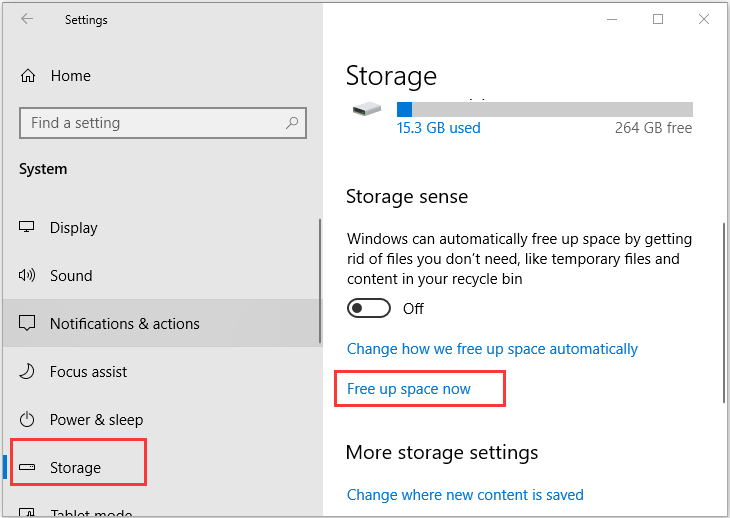
Step 1: Right-click the Start button and choose Settings to open it.
Step 2: Navigate to System > Storage and click Free up space now in the right pane.
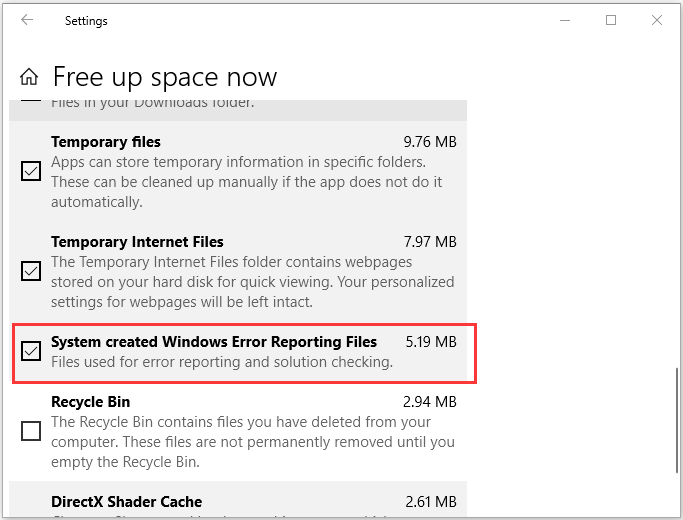
Step 3: Wait patiently until the scanning process is completed. Select System created Windows Error Reporting Files and scroll the page to the top to click Remove files.
Method 3: Delete the Files Manually
Alternatively, you can also choose to delete the Windows Error Reporting (WER) files manually in File Explorer. In this way, you don’t need to spend time on waiting for the scanning process.
Step 1: Press Windows + E to open File Explorer. Go to the View tab and check Hidden items.
Step 2: Copy and paste the path C:ProgramDataMicrosoftWindowsWER to the upper search bar in File Explorer and press Enter key to locate the WER folder.
Step 3: You will see several folders here. Now open each of them and delete all their contents.
Step 4: Go to empty your Recycle Bin to delete the system queued Windows Error Reporting Files permanently.
User Comments :