How to take a screenshot on your computer? Some people prefer using Snipping Tool. However, many people face the issue “Windows 10 Snipping Tool not working”. Why does Snipping Tool not work? How to fix Snipping Tool not working? Read the post from MiniTool Partition Wizard and you will get the answers to these questions.
Snipping Tool Not Working Windows 10
Snipping Tool is an easy-to-use screenshot utility on Windows operating systems. However, some users report Windows 10 Snipping Tool not working.
The snipping tool has suddenly stopped working on one desktop PC with Windows 10 using both Chrome and Edge. When ‘New’ or a mode is selected, the screen goes either black or grey.answers.microsoft.com
When the issue “Snipping Tool not working” happens, please first relaunch the screen utility and see if it works again. If not, the possible causes that lead to the issue include corrupted system files, software conflict, etc., and based on these causes, we recommend that you carry out the following solutions.
Solutions to Snipping Tool Not Working Windows 10
- Restart Windows File Explorer
- Run the sfc/scannow command
- Run Windows Update troubleshooter
- Find out conflicting software
Fix 1: Restart Windows File Explorer
If File Explorer of your system is stuck in an error state, Snipping Tool may not work as expected. In this case, restarting File Explorer through Task Manager can bring Snipping Tool to work again.
Step 1: Right-click your taskbar and then choose Task Manager.
Step 2: Find File Explorer, right-click it, and choose Restart.
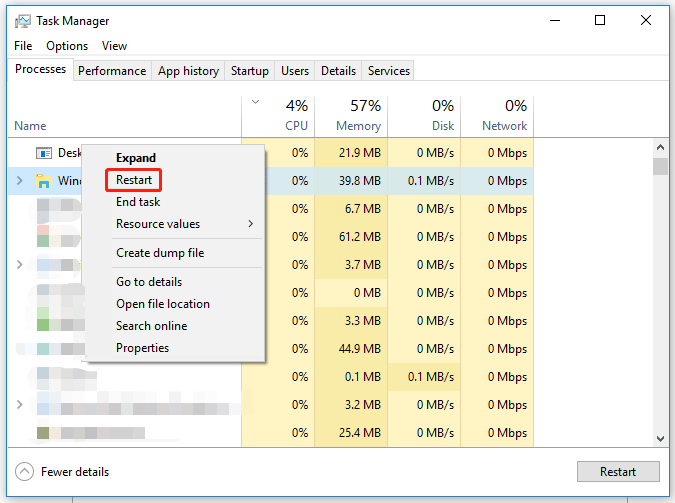
Now go to Snipping Tool and see if it works. If it still doesn’t work, restart your computer.
Fix 2: Run sfc/scannow
If the first solution fails to work, then try running the sfc/scannow command to remove and repair the corrupted system files.
Step 1: Run Command Prompt (or Windows PowerShell) as administrator.
- Type Command Prompt into the Windows search bar.
- Right-click the search result and choose Run as administrator.
Step 2: Once inside the Command Prompt window, type sfc/scannow and hit the Enter key to run it.
Step 3: Type snippingtool.exe and hit the Enter key to launch Snipping Tool.
Fix 3: Run Windows Update Troubleshooter
If the issue “Windows 10 Snipping Tool not working” persists, try running the Windows Update Troubleshooter.
How to run the Windows Update troubleshooter? Follow the tutorial below.
Step 1: Right-click the Windows icon on the taskbar and choose Settings.
Step 2: Click Update & security on the Settings window.
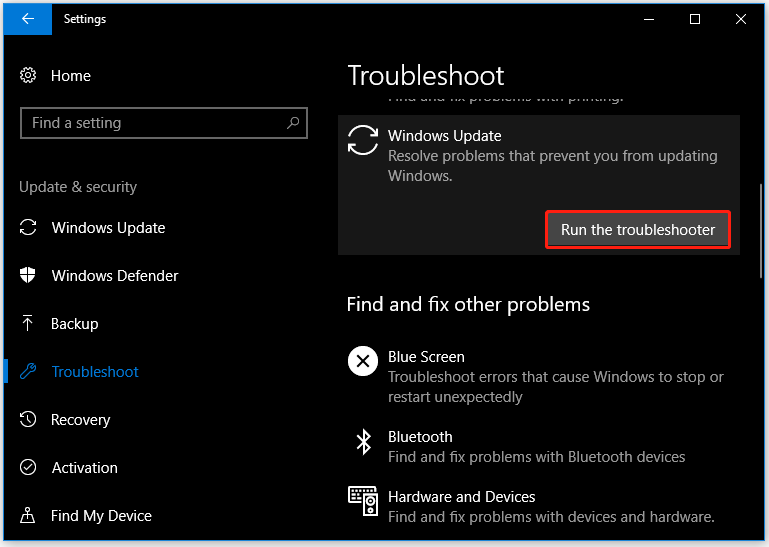
Step 3: Switch to Troubleshoot on the left side, then click Windows Update on the right side, and click Run the troubleshooter.
Fix 4: Find out the Conflicting Software
Is the issue “Snipping Tool not working Windows 10” solved? If not, the software you installed on your computer might conflict with Snipping Tool and cause the latter not to work.
How to find the conflicting software? Follow the tutorial below.
Step 1: Type system configuration into the Windows search bar and hit the Enter key to open System Configuration.
Step 2: Once System Configuration opens, switch to the Services tab. Then, tick the checkbox for Hide all Microsoft services.
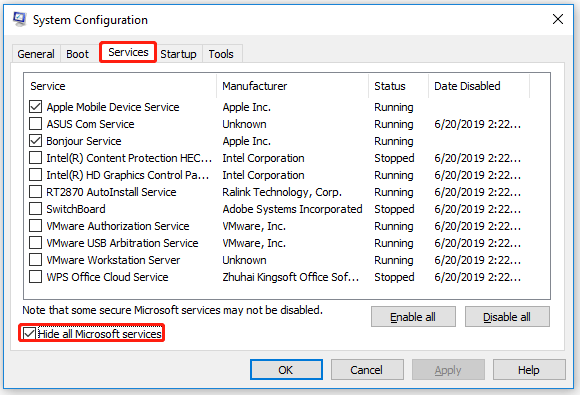
Step 3: Disable the suspected services, especially related to the newly installed software.
Step 4: Open Snipping Tool and see if it works. If it works, it signifies that software confliction does exist and you should disable software that causes the confliction to ensure Snipping Tool works again.
That’s all about how to fix “Snipping Tool not working Windows 10”. Hope the four solutions can help you get rid of the issue.


User Comments :