The Raspberry Pi is a series of small, single-board computers. It can be connected to a computer monitor or television and used with a standard keyboard and mouse, just like a regular desktop computer.
It’s important to note that the Raspberry Pi does not come pre-installed with an operating system. It’s a bare metal device. Before use, you need to install the operating system onto an SD card.
Sometimes you may encounter the Raspberry Pi 3 won’t boot, or the Raspberry Pi 4 not booting issue.
So, what causes this problem? And how can it be solved? This article will answer these questions one by one below.
![How to Install Windows 10 on Raspberry Pi 4 [Full Guide]](https://images.minitool.com/partitionwizard.com/images/uploads/2021/08/windows-10-on-raspberry-pi-4-thumbnail.jpg)
About the Raspberry Pi Not Booting Issue
When the Raspberry Pi boots up, one or more LEDs will light up.
By observing the Raspberry Pi’s LEDs, you can gain some useful insights. Normally, the green (ACT) light will flash, indicating SD card activity. The red (PWR) light will flash when the voltage is below 4.65V.
If the Raspberry Pi is functioning correctly, both the PWR and ACT lights will be on.
The following are the flashing patterns and meanings of the ACT LED when booting fails:
- 3 flashes: start.elf file not found.
- 4 flashes: start.elf file cannot boot (corrupted). Note that this does not apply to RPI 4.
- 7 flashes: kernel.img file not found.
- 8 flashes: SDRAM not recognized. In this case, you need to update the bootcode.bin/start.elf firmware.
Why Is the Raspberry Pi Not Booting?
While the Raspberry Pi is easy to use, it can encounter some problems. Failure to boot is one common issue.
Here are some common reasons that may cause this problem.
- Power issues: Insufficient power supply may prevent the Raspberry Pi from booting.
- Incorrect cable connections: Incorrect or loose cables can be the root cause of boot problems.
- Corrupted operating system: If the Raspberry Pi’s SD card does not have an operating system installed, or if the operating system files are corrupted, it will not be able to boot.
- Damaged SD card: The SD card may be damaged due to poor quality or prolonged use, preventing the Raspberry Pi from booting.
How to Fix the Raspberry Pi Not Turning on Issue
Is your Raspberry Pi not booting? Don’t worry! This article will provide solutions to this issue. Just follow the guides below to troubleshoot.
Method 1: Check the Power Supply
Power supply issues are one of the most common reasons why devices fail to boot. When a Raspberry Pi fails to power on, the first thing you should do is to check whether the power supply is working properly.
Raspberry Pis have high power requirements, especially when connected to peripherals such as keyboards and mice, where the overall current demand increases significantly.
If the power output is unstable, even if the power indicator light is on, the device may not be able to boot into the system.
Note: Different Raspberry Pi models have different power interfaces and power requirements. The Raspberry Pi 4 uses a USB Type-C power interface, with an officially recommended output of 5V/3A. Raspberry Pi 3 and earlier models (such as generations 1 and 2) use a Micro-USB interface for power supply.
When selecting a power adapter, ensure that its output parameters meet the official requirements of the corresponding model.
Method 2: Check HDMI Settings
If the Raspberry Pi is powered on but the screen still doesn’t display anything, the problem is likely with the display output settings.
In this case, you need to check the HDMI connection and related settings.
First, ensure the HDMI cable is correctly connected to the HDMI 0 port and that the connection is secure. If there’s still no display, it’s recommended to replace the HDMI cable.
If the hardware connection is fine, you need to check the system’s display configuration file.
The Raspberry Pi’s display parameters are usually stored in the config.txt file. Here are the steps to modify config.txt:
Step 1: Insert the SD card into your computer.
Step 2: Open the SD card in File Explorer and navigate to bootpartition.
Step 3: Locate the config.txt file.
Step 4: Open it with a text editor and add or modify the following parameters:
- hdmi_force_hotplug=1 (Force HDMI output.)
- hdmi_safe=1 (Start HDMI in safe mode, suitable for troubleshooting display compatibility issues.)
After setting it up, reconnect the SD card to the Raspberry Pi and check if the problem is resolved.
Method 3: Install Operating System
The Raspberry Pi will fail to boot if the operating system is not installed correctly, incompatible with the Raspberry Pi, or corrupted.
In this case, you can install an officially supported Raspberry Pi operating system. The easiest way is to use Raspberry Pi Imager.
Here are the detailed steps:
Step 1: Insert the SD card into your computer using a card reader. Download the latest version of Raspberry Pi Imager from the Raspberry Pi website. Then run the installer.
Step 2: Open Raspberry Pi Imager to enter the main interface.
Step 3: Click the Device tab, select your Raspberry Pi model, and then click Next.
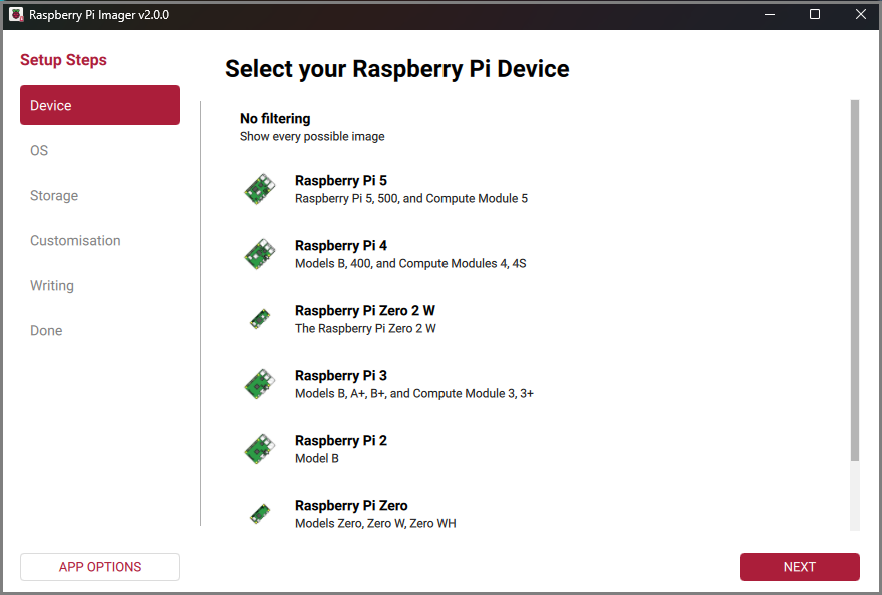
–image from raspberrypi.com
Step 4: Click the OS tab, select from the available operating systems, and then select Next.
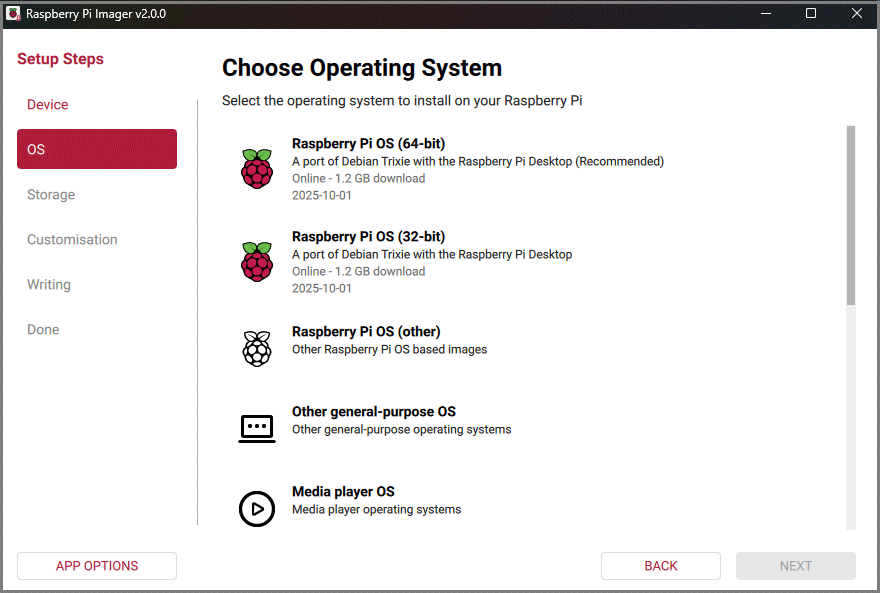
–image from raspberrypi.com
Step 5: In the Storage tab, select the storage device to write the image to. Then select Next.
Step 6: Before writing, Imager will prompt you to apply custom settings, such as username and password, Wi-Fi credentials, etc.
Step 7: After completing these settings, click Next to write the image to the SD card, which will erase existing data.
Once finished, insert the SD card into the Raspberry Pi and connect it to power. Check if the “Raspberry Pi 4 not booting” problem is resolved.
Method 4: Format SD Card
If you’ve confirmed that the power supply and HDMI cable are working properly, but the Raspberry Pi not turning on, the next thing to check is the SD card.
The SD card is a crucial component for the Raspberry Pi to boot the operating system and store data.
If the SD card has errors, the Raspberry Pi will be unable to load the system correctly, resulting in a boot failure.
In this case, you can format the SD card to FAT32 or exFAT for best compatibility and then rewrite the system image.
MiniTool Partition Wizard, a free partition manager, can format USB to FAT32, resize/extend/delete partitions, convert MBR to GPT, wipe hard drives, format a hard drive, etc.
Note: The Raspberry Pi OS will usually format the boot partition to FAT16 or FAT32 and the system partition (rootfs) to EXT4.
Here is how to use this software to format the Raspberry Pi SD card.
MiniTool Partition Wizard FreeClick to Download100%Clean & Safe
Step 1: Connect the SD card to your Windows PC and then open MiniTool Partition Wizard to its main interface.
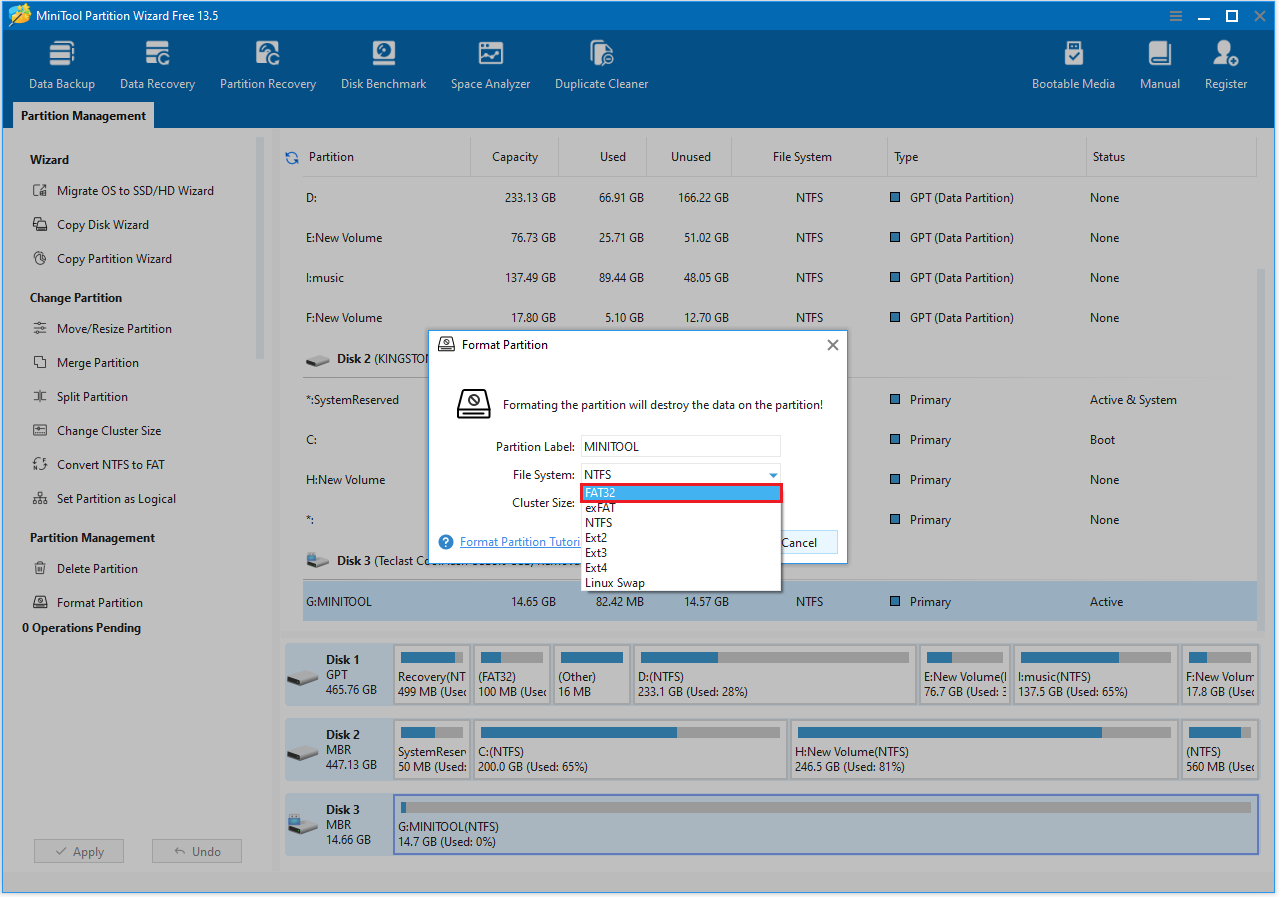
Step 2: Right-click the SD card partition and choose Format.
Step 3: In the pop-up window, you can drop down the File System box and choose FAT32 (exFAT is also OK) file system as the destination file system. Then click OK.
Step 4: You can preview that the SD partition will have a FAT32 file system. Now you need to click the Apply button to save all changes.
After formatting, you can re-download the operating system to the SD card using the steps mentioned above. Then connect the Raspberry Pi again to see if the problem is resolved.
How to Prevent the Raspberry Pi Not Turning on Issue
Problems with Raspberry Pi failing to boot can usually be avoided with proper setup and maintenance.
Here are some effective preventative measures to help ensure your Raspberry Pi boots up correctly and runs stably:
- Use a reliable power adapter: Insufficient or unstable power is a common reason why a Raspberry Pi might fail to boot. Therefore, please use an official or high-quality power adapter.
- Safe shutdown: Do not unplug the power cord while the red or green LED indicator is flashing. Enter the command “sudo poweroff” and wait until the LED indicator stops flashing before unplugging the power cord.
- Cable quality: Regularly check the USB-C or Micro-USB cable to ensure it is functioning correctly.
- Avoid overheating: The Raspberry Pi is prone to overheating under high load, which can lead to system instability or boot failure. Therefore, proper cooling is necessary.
- Regularly check the HDMI connection: Ensure the HDMI connection is secure to avoid display issues caused by a loose connection.
- Use a stable operating system image: If the operating system image file on the SD card is corrupted or incomplete, the Raspberry Pi will not boot correctly.
- Ensure you are using a high-quality SD card: High-quality SD cards are less likely to suffer physical damage, while low-quality cards may cause the Raspberry Pi to fail to boot.
Raspberry Pi Not Booting FAQ
Additionally, the Raspberry Pi may overheat and enter protection mode to prevent hardware damage when running under high load for extended periods.
In this case, you can try reformatting the SD card and using Raspberry Pi Imager to re-flash the operating system image.
1. Download Raspberry Pi Imager and use it to install the operating system onto your SD card.
2. Connect a USB keyboard, USB mouse, and HDMI cable to your monitor.
3. Connect an Ethernet cable and plug in the official power adapter. The Raspberry Pi will boot up automatically, with both red and green lights illuminating simultaneously.
4. Follow the on-screen instructions to set up your Raspberry Pi.
1. Overheating: Overheating can cause the Raspberry Pi to freeze after booting. Ensure good air circulation around the device and avoid placing the Raspberry Pi in a confined space.
2. Corrupted system files: If the SD card has bad sectors or system files are corrupted, it can also cause the system to freeze. Try reinstalling the operating system and using a high-quality SD card to reduce the risk of data corruption.
Bottom Line
A Raspberry Pi failing to boot is a common problem that can be caused by a variety of factors. If you encounter this issue, you can refer to the solutions provided in this article for troubleshooting and repair.
If you have any questions or suggestions while using MiniTool Partition Wizard, contact us via [email protected] for further assistance.
About The Author

Position: Columnist
Cecilia has been an editor at MiniTool for two years. She primarily focuses on disk and partition-related content, with particular expertise in disk cloning, partition recovery, and PDF document conversion. She is dedicated to providing users with clear and accurate solutions to help them efficiently resolve common computer problems.
User Comments :