When the computer is affected by the stop code PROCESS1_INITIALIZATION_FAILED 0x0000006B, the problems that the computer may encounter are frequent restarts, bug checks, irregular screen flickering and temporary freezing of the desktop area.
Problems related to the Bootcat.cache file are the main reason for this Windows 10 PROCESS1_INITIALIZATION_FAILED error. The lack of .dll files, bad areas of the hard disk, using the old version of the operating system also cause the same problem.
When you encounter such a problem, you may look for a way to fix it. Luckily, the following is how to fix the error: Windows 10 PROCESS1_INITIALIZATION_FAILED.
Disable Automatically Restart to Ensure Smooth Operation
Once PROCESS1_INITIALIZATION_FAILED Windows 10 error appears on your computer, the main problem you will face is the frequent automatic restart of Windows 10. So, before fix this error, you need to disable automatic restart to ensure smooth operation.
Step 1: Restart your computer while continuously press the F8 key until you get Windows logo on screen.
Step 2: In this window, select Safe Mode.
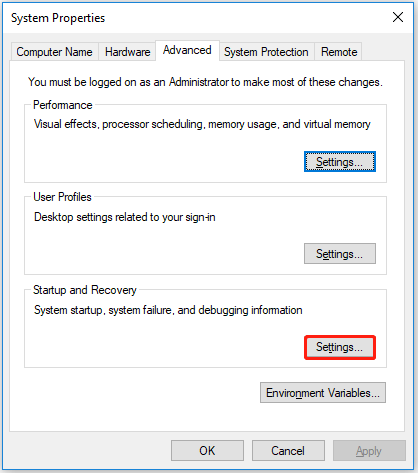
Step 3: After Windows boot into Safe Mode, type sysdm.cpl in the search box and click OK.
Step 4: Under the System Properties, select the Settings button located under the Startup and Recovery section.
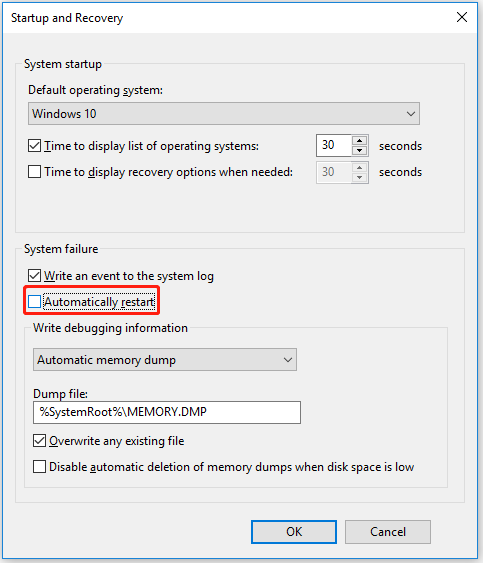
Step 3: Under the System failure section, uncheck the Automatically restart box. Then click the OK button.
Solution 1: Perform a Windows Startup Repair
PROCESS1_INITIALIZATION_FAILED Windows 10 error caused a very serious system crash in Windows, which may affect Windows 10 startup. Therefore, the Startup Repair tool will fix the problem that restricts Windows 10 startup.
Step 1: Insert the installation media drive (such as CD/DVD/USB) into the Windows 10 computer.
Step 2: Restart Windows and press any key during startup.
Step 3: Choose your language preference. Then Click the Next button.
Step 4: Click Repair your computer.
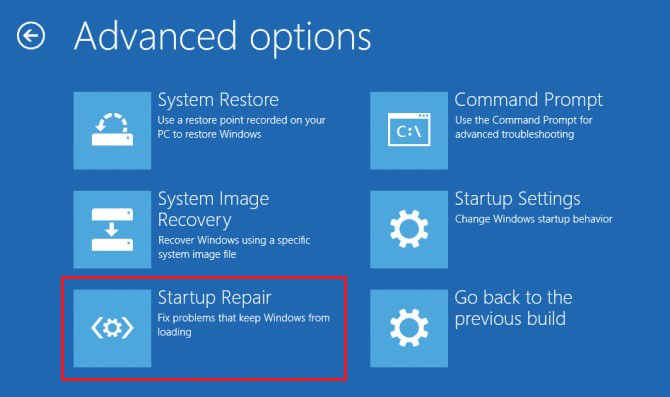
Step 5: Click Troubleshoot > Advanced options > Startup Repair.
When the Startup Repair is complete, try to boot normally in Windows. If you still receive the “Process1 initialization failed” error, or if Startup Repair fails to repair your PC, please proceed to the next method.
Solution 2: Fix Disk Errors
The bad sectors or the corrupted file system in the hard disk are likely to cause the PROCESS1_INITIALIZATION_FAILED BSOD error in Windows 10.
Way 1. Run CHKDSK Utility
You can use the CHKDSK utility to investigate and repair bad sectors in the disk drive to fix this error.
Step 1: Restart your computer while press the Shift key to enter the Advanced Startup window.
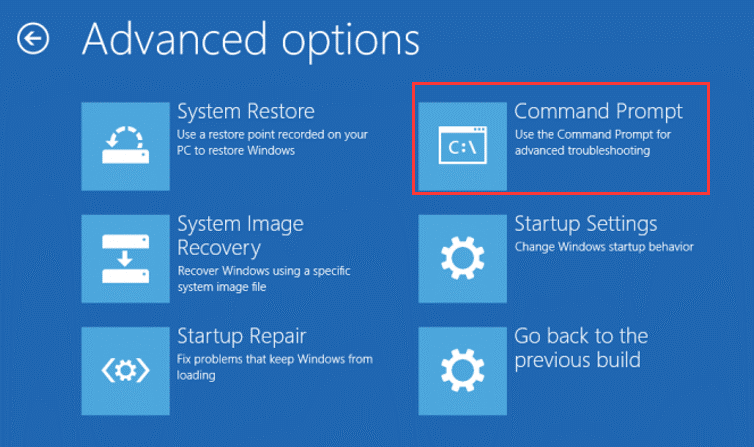
Step 2: Select Troubleshoot and then Advanced Options. In the Advanced Options window, select the Command Prompt option.
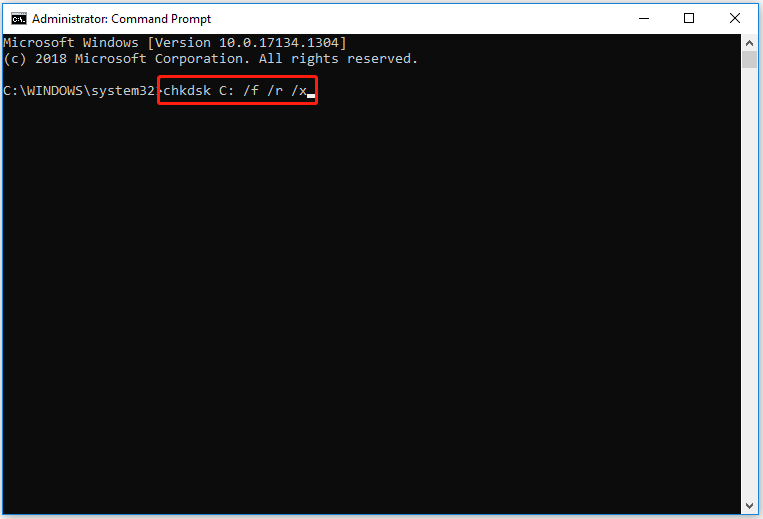
Step 3: In Command Prompt, type chkdsk C: /f /r /x command and press Enter key to execute (replace the letter of drive with that your system drive).
Step 4: Run chkdsk command for every partition. After execution, restart the computer and check if the error is resolved.
Way 2. Use MiniTool Partition Wizard
If the above method fails to solve the issue, you can use a professional disk management tool to check hard disk problems. It is recommended that you try MiniTool Partition Wizard. How to use MiniTool Partition Wizard to check hard disk problems? The steps are as follows.
You can use the Check File System and Surface Test feature to help you solve PROCESS1_INITIALIZATION_FAILED BSOD error.
MiniTool Partition Wizard FreeClick to Download100%Clean & Safe
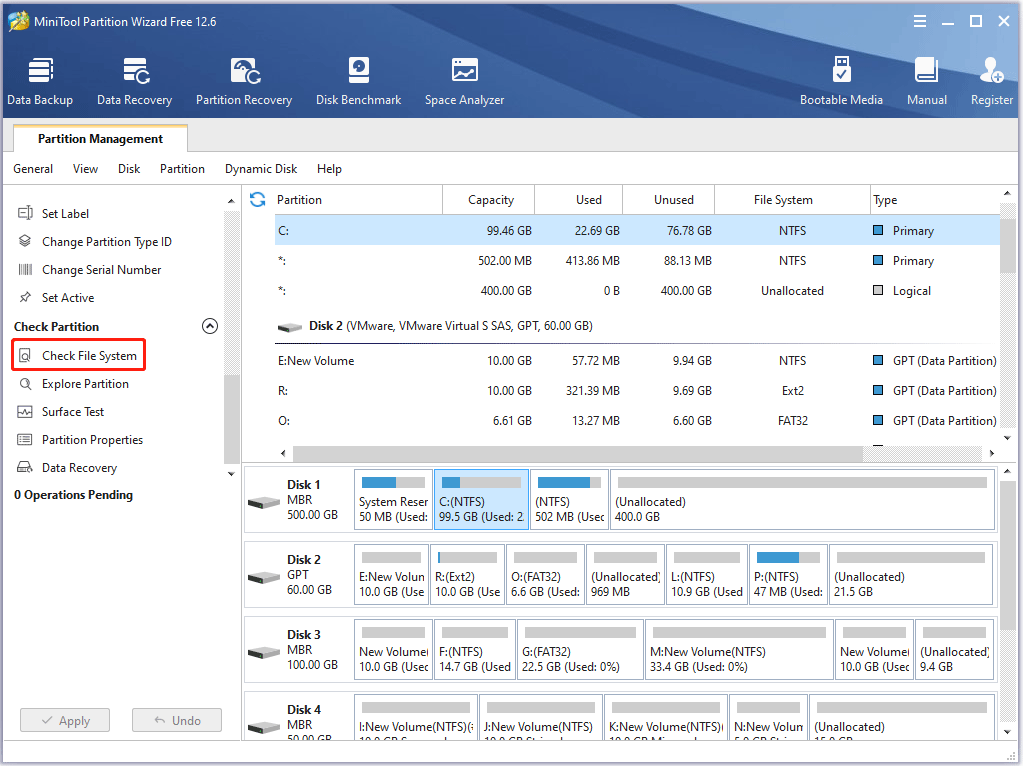
Step 1: Launch MiniTool Partition Wizard to get the main interface.
Step 2: Then select the partition on the hard disk and select Check File System on the left operation panel.
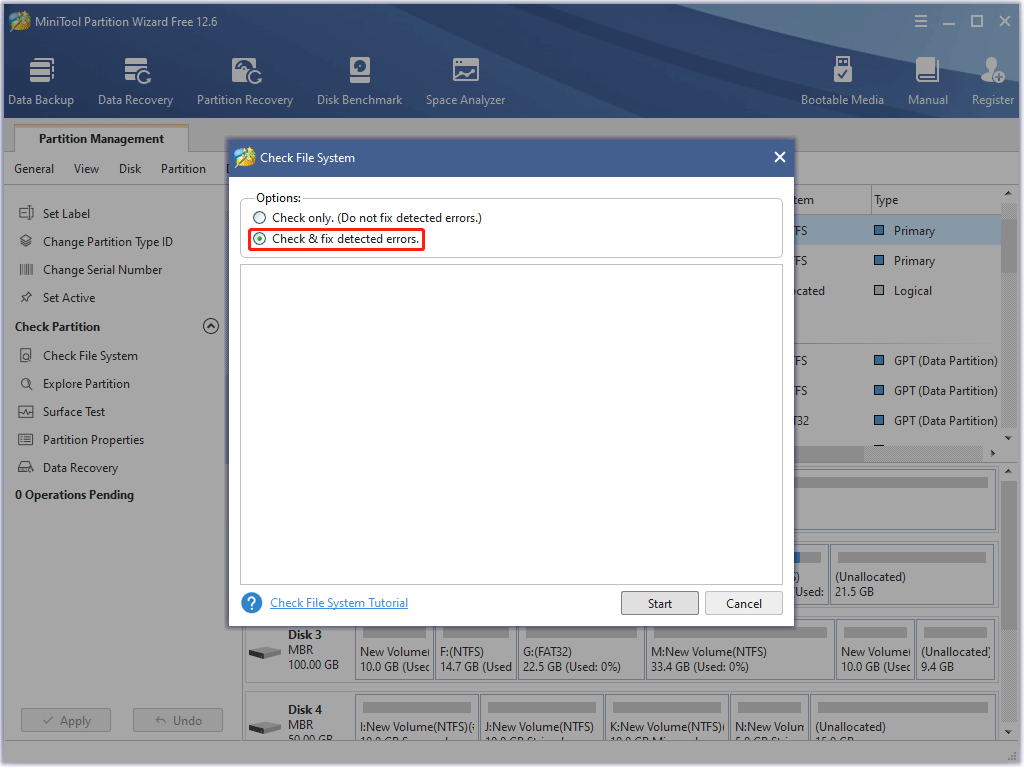
Step 3: In the pop-up window, select Check & fix detected errors and click the Start button.
Step 4: MiniTool Partition Wizard will start scanning the file system. After the scan process completed, you can see the scanning and repairing result.
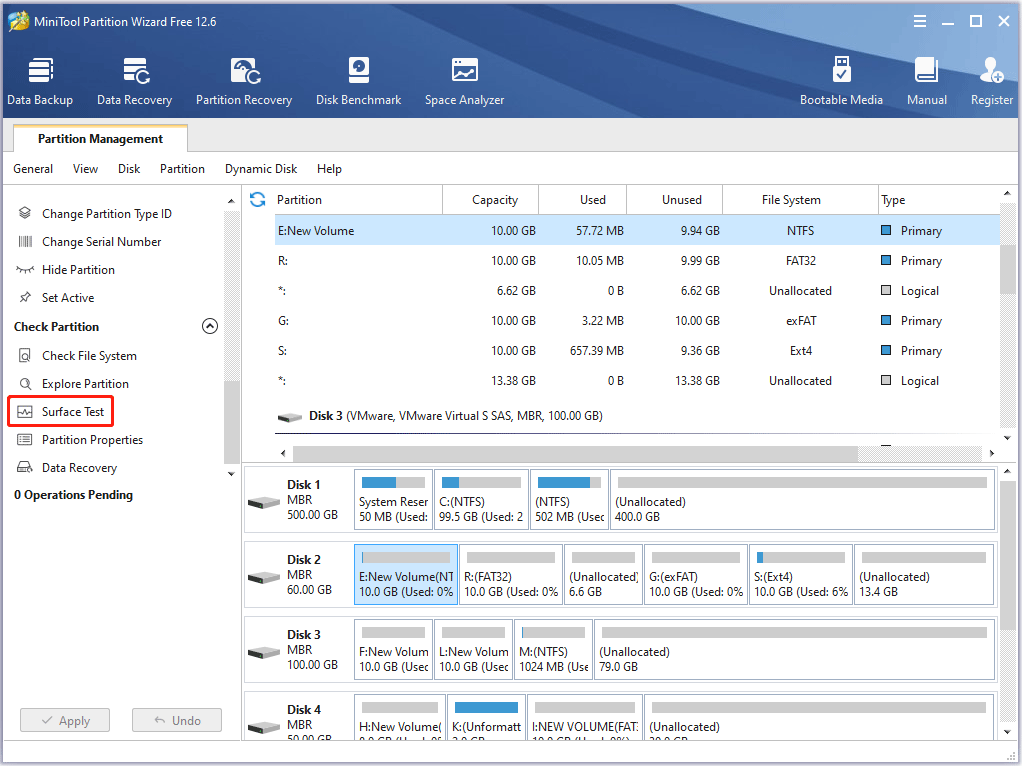
Step 5: Then select the partition on the hard disk and select Surface Test on the left operation panel.
Step 6: In the pop-up window, click the Start Now button to immediately check the bad sectors for Windows 10.
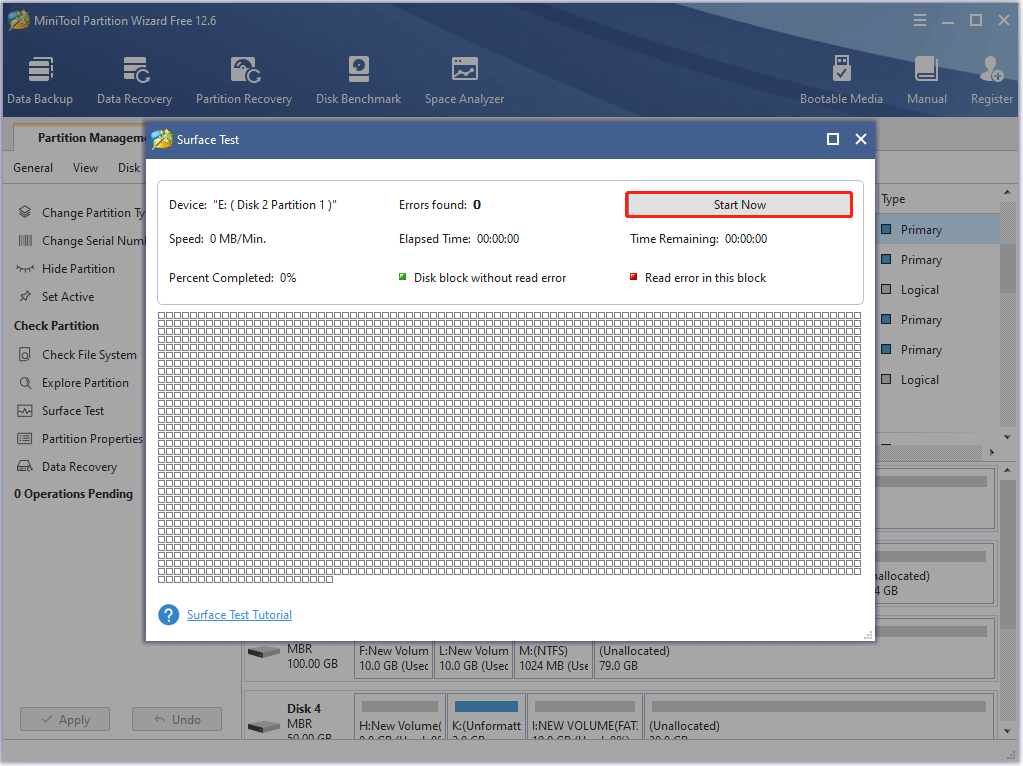
Step 7: When the hard drive error test process is completed, the disk blocks that have no read errors will be marked in green. However, if MiniTool Partition Wizard finds some hard disk errors, the blocks will be marked as red.
Solution 3: Delete the Bootcat.cache File
Once the Bootcat.cache file is damaged or resized at startup, Windows 10 will encounter PROCESS1_INITIALIZATION_FAILED BSOD. It is a component of CodeIntegrity, and its location in Windows is “C:WindowsSystem32Codeintegrity”. In order to solve this PROCESS1_INITIALIZATION_FAILED error, you need to delete Bootcat.cache file. Here are the steps to help you do that.
Step 1: Press the Windows + I key to open Settings, and navigate to the Update & Security > Recovery > Advanced startup option. Then click Restart now.
Step 2: When the blue screen appears, select Troubleshoot > Advanced options > Command Prompt.
Step 3: In the Command Prompt window, type the following commands in order and press Enter:
c:
cd windowssystem32codeintegrity
del bootcat.cache
After the deletion is complete, exit the command prompt and restart Windows 10.
The system will automatically recreate the Bootcat.cache file and fix the PROCESS1_INITIALIZATION_FAILED error.
Solution 4: Copy Bootcat.cache File from Another Computer
If removing the Bootcat.cache file from your computer does not resolve the PROCESS1_INITIALIZATION_FAILED blue screen error, you can copy the Bootcat.cache file from a fully functional and error-free computer running the same version of Windows 10.
Step 1: Insert USB flash drive to another computer.
Step 2: Press Windows + E key to open File Explore and navigate to following location: C:windowssystem32codeintegrity. Then right click on Bootcat.cache file and choose Copy.
Step 3: Remove the drive and insert it into the affected computer.
Step 4: Copy and paste the Bootcat.cache file to C:Windowssystem32codeintegrity.
Solution 5: Replace the NTDLL.DLL from Another Computer
The lack of some DLL files such as ntdll.dll is also the cause of the PROCESS1_INITIALIZATION_FAILED blue screen. To fix the error, you can copy the NTDLL.DLL file from the protected computer and paste it into the System32 folder of the affected computer.
Step 1: Insert USB flash drive to another computer.
Step 2: Go to C:WindowsSystem32 and copy all files with a .dll extension. Paste the project to the USB drive.
Step 3: Remove the drive and insert it into the affected computer.
Step 4: Copy and paste all .dll files to C:WindowsSystem32.
Step 5: Launch the Command Prompt and enter the following command:
regsvr32 (name of DLL file)
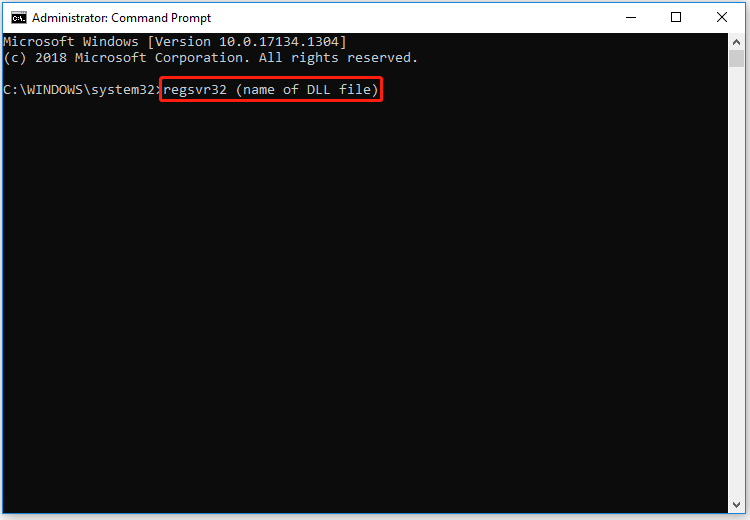
Step 6: Reboot your computer.
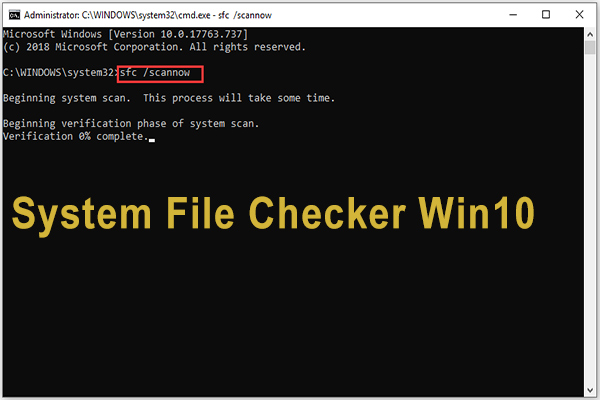
Solution 6: Run System File Checker
Damaged or rewritten system files may cause the error “PROCESS1_INITIALIZATION_FAILED”. You can use System File Checker to solve these broken system files.
Step 1: Press Windows + S key and type cmd.exe in the search of the box. Then right-click it and select Run as administrator.
Step 2: In the Command Prompt window, type sfc /scannow and press Enter.
Step 3: Restart your computer.
Solution 7: Repair Windows Image File Using DISM Tool
After the image file is damaged by a third-party tool or malware attack, it will cause a blue screen or blue screen error in Windows 10. Therefore, running the DISM (Deployment Image Servicing and Management) tool is the best way to repair defective image files.
Step 1: Press the Windows key to open the Start menu.
Step 2: Click the Power icon and select the Restart option while holding down the Shift key.
Step 3: After the restart is complete, the window will boot to Automatic Repair.
Step 4: In the blue screen that appears, select Troubleshoot > Advanced Options > Command Prompt.
Step 5: In the Command Prompt, type DISM.exe /Online /Cleanup-image /Restorehealth. Then press Enter.
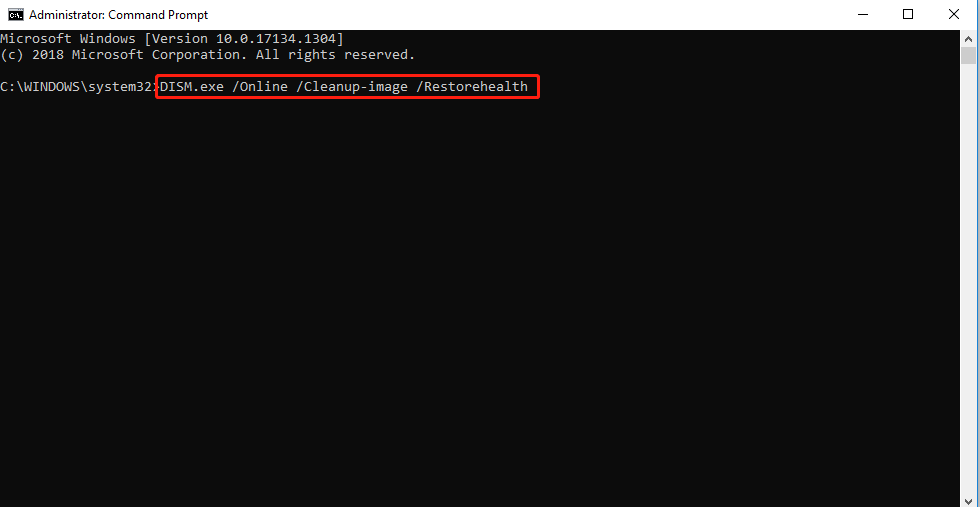
Step 6: After the DISM scan is over, restart your computer.
Solution 8: Update Drivers with Device Manager
Outdated device drivers cause PROCESS1_INITIALIZATION_FAILED errors in Windows 10. Then you can use Device Manager to update and fix them.
Step 1: Press Windows + S key and type Device Manager in the search box. Then press Enter.
Step 2: Refer to the error code you received, and check the update of the driver that caused the problem by right-clicking and selecting Update Driver.
Step 3: In a pop-up window, select Search automatically for updated driver software.
Then your Windows 10 will check, download and install the latest and appropriate driver.
Solution 9: Scan Your Entire System
You can check for malware by scanning the entire system. The steps are as follows:
Step 1: Open the Settings, and navigate to the Update & Security > Windows Security >Virus & threat protection option.
Step 2: In the Windows Defender Security Center, click the Scan now option.
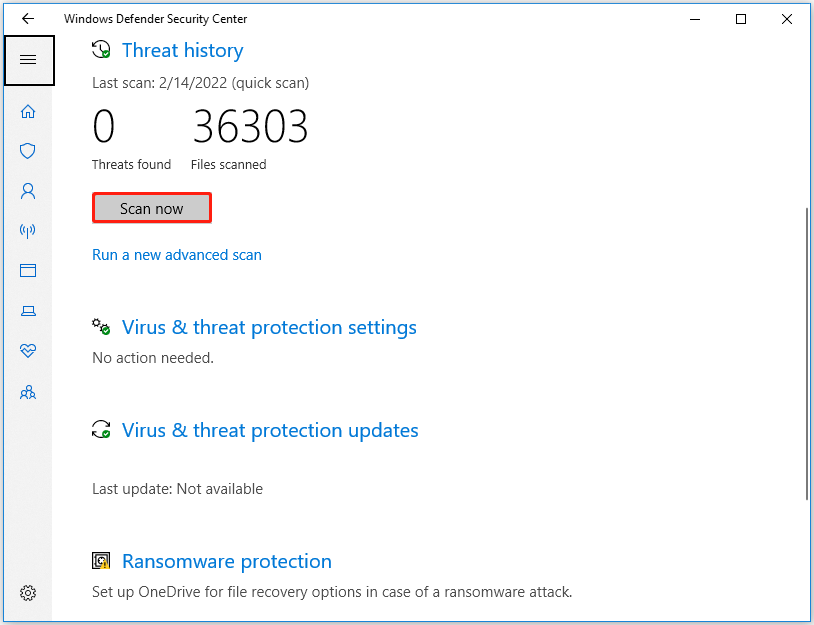
The Windows Defender Security Center will now start to detect if there are any threats on the system. After the scan is over, you will notice the results. If the scan finds any threats, click the Clean threats button to remove them from the system.
Solution 10: Run System Restore
The latest changes in Windows may contradict the Windows registry, resulting in the PROCESS1_INITIALIZATION_FAILED error. So, load back to the previous state through system restore.
Step 1: Press Windows + R key to open Run and type rstrui. Then press Enter key.
Step 2: When the System Restore window opens, click on the Next option to generate a restore of the device.
Step 3: Select the latest and click Next to continue. Finally, click Finish to let start this process.
Solution 11: Reinstall Windows 10
If none of these methods help you resolve the PROCESS1_INITIALIZATION_FAILED” error, please try to reinstall Windows.
Step 1: Create an installation media (DVD, CD, or USB flash drive) to install the operating system. Then insert it into the computer.
Step 2: When prompted, press any key (F2, DEL, F12) to enter BIOS. Then set the installation media as the first boot order to boot the computer.
Step 3: On the Windows Installer, click the Next button.
Step 4: Click Install now button.
Step 5: Follow the on-screen instructions to complete the setup configuration. When the installation process is completed, you just need to log in with your account.
Bottom Line
Now we have reached the end of this article. The above content is all about the solutions for PROCESS1_INITIALIZATION_FAILED Windows 10.
After trying so many solutions, we believe that you may have successfully solved your problem. If you have any suggestions or need any help when you use MiniTool Wizard Partition, you are welcome to send us an email at [email protected] or leave a comment below. Thank you in advance.
About The Author

Position: Columnist
Vega enjoys helping people with computer problems, including disk management, data recovery, data backup, and more. She is constantly expanding her knowledge in related fields. And she will continue to bring more easy-to-understand professional articles to help people solve various problems on the PC.
User Comments :