Do you want to boost GPU performance for gaming? Overclocking can help you. If you don't know how to overclock GPU correctly, you can try MSI Afterburner OC Scanner. This tool will help you determine the best OC configuration. In this post, MiniTool Partition Wizard will show you how to use this tool.
About MSI Afterburner OC Scanner
MSI Afterburner is a graphics utility developed by MSI. It can help you overclock GPU, do benchmarking, and monitor in-game graphics performance like CPU usage, GPU usage, RAM usage, FPS, etc.
Afterburner was originally developed with MSI cards in mind. However, since its release, the software utility has been tweaked to work alongside every other aftermarket GPU.
What is MSI Afterburner OC Scanner? MSI Afterburner OC Scanner is a tool helping you overvlock better. This tool uses an algorithm developed by NVIDIA for the RTX 20 series graphics cards. It will check what card you are running and then determine the highest stable overclock settings for your graphics card.
To calculate the best overclocking settings, the MSI Overclocking Scanner will increase clockspeed by one step and then stress the GPU to see if this clockspeed is stable. It will repeat this process until the GPU fails to maintain stability under load. At that point, the last known stable clockspeed will be set as the maximum value.
Improve PC Performance for Gaming via MSI Game Boost & Other Ways
How to Use MSI Afterburner OC Scanner
Some people may be worried that overclocking will cause any kind of damage to the expensive equipment inside the PC. Fortunately, most Graphics Processors have built-in safety measures that restrict the changes you can make with overclocking software like Afterburner to values they consider to be safe. If necessary, action can be taken to ensure the safety of the product.
To use MSI Afterburner OC Scanner for overclocking, please refer to the following steps:
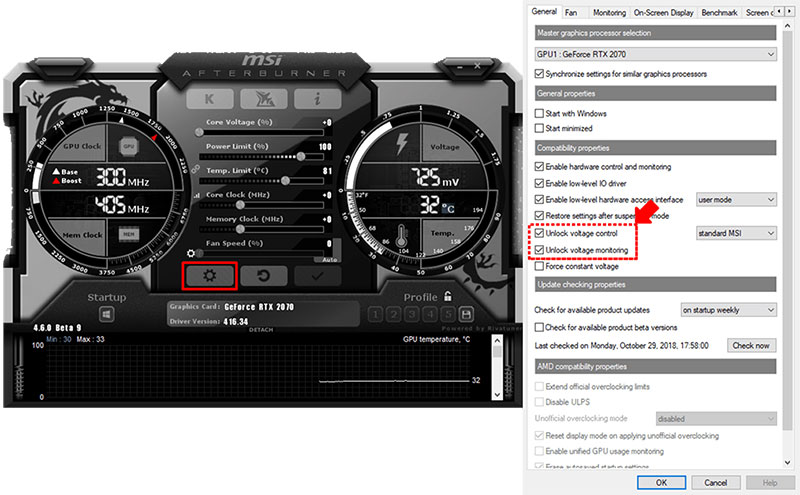
Step 1: Open MSI Afterburner and click the gear button. In the General tab, check Unlock voltage control and Unlock voltage monitoring to enable detailed control of your graphics card.
Step 2: Set the sliders for Core Voltage, Power Limit and Temp Limit to the right a little and then click the Apply button.
Each time set the sliders to the right a little and then test them to ensure system stability.

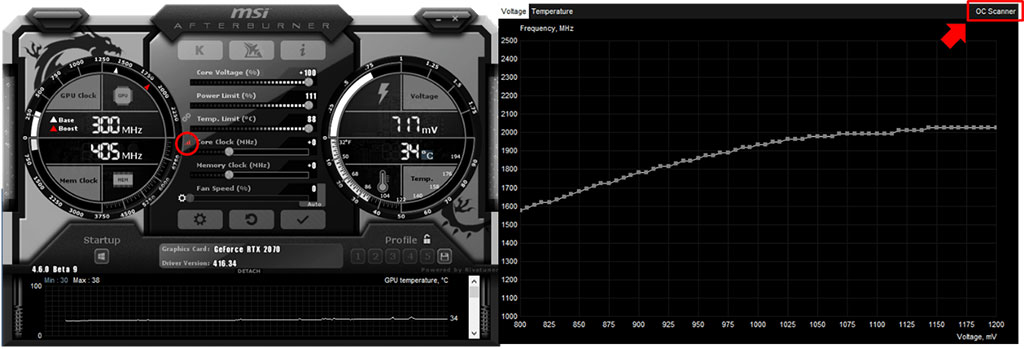
Step 3: Click on the button left of the Core Clock (MHz) to open the Voltage/Frequency Curve window. At the top right of window you will see the OC Scanner button.
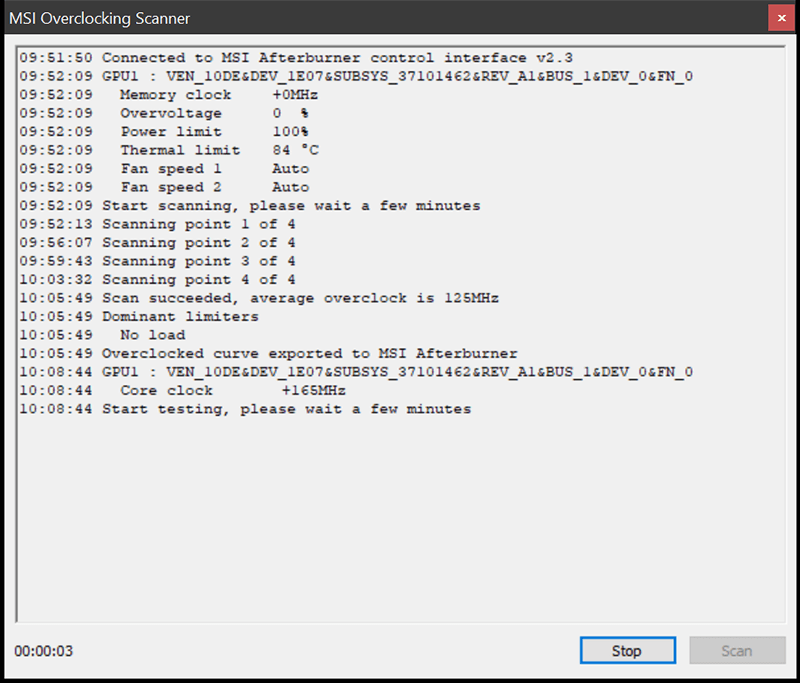
Step 4: Click the OC Scanner button to open the OC Scanner window. The OC Scanner window will show two options: Scan and Test. Click the Scan button and the tool will increase clockspeed and then stress the GPU. This process will be repeated four times to cover 4 different Voltage levels.
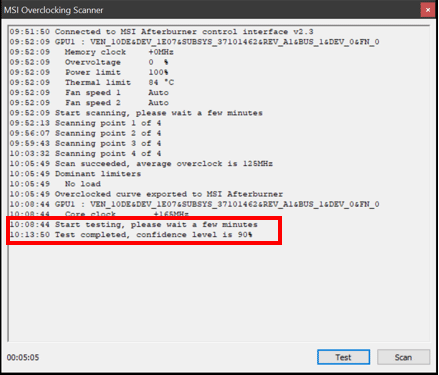
Step 5: After running the Scanner, please run the Test option. The option will verify the stability of the profile generated by the OC Scanner and provide the results in a ‘confidence level’. If the level is above 60%, the OC configuration should be fine to use.
Step 6: Close the MSI Overclocking Scanner and go back to MSI Afterburner main interface. You will see the value of Core Clock has changed from “+0” to “Curve“. It means that the OC configuration has passed the test and you can use it. Click the Apply button to use it.
About The Author

Position: Columnist
Linda has been an editor at MiniTool for seven years. She continuously learns about computers and puts her knowledge into practice. Moreover, she is particularly knowledgeable in disk management, data recovery, system installation, and PDF editing. Her articles typically reference multiple examples or are based on her own experience, providing users with the most suitable solutions.
User Comments :