What Does Java Virtual Machine Launcher Error Mean
Java Virtual Machine, also known as JVM, is a virtual environment that allows a computer to run Java programs written in other programming languages that are translated to Java bytecode. Without the JVM, Java programs won’t run properly. Here’s a user who encountered the Java Virtual Machine launcher error in Eclipse.
I’m having an issue with the eclipse JVM launcher. Last night, everything was working fine, as far as I know, nothing at all has changed on my pc since then. However, I woke up this morning to find that when I run any of my projects in eclipse, I receive this error: Java Virtual Machine Launcher- Error: could not open C:Program FilesJavajre1.8.0_60libamd6jvm.cfg
https://stackoverflow.com/questions/33324363/how-to-fix-eclipse-java-virtual-machine-launcher-error
After analyzing extensive user reports, the Java Virtual Machine launcher errors mainly occurs when running in Eclipse and Minecraft. It’s so annoying that the failed to create the Java Virtual Machine error will prevent you from opening the Java-based software.
The error usually indicates that your computer cannot read or understand the bytecode you’re trying to execute. There are different possible reasons behind the Minecraft could not create the Java Virtual Machine error, such as insufficient permissions, corrupt/missing Java components, and incompatibility issues.
![Java Was Started But Returned Exit Code=13 in Eclipse? [Fixed]](https://images.minitool.com/partitionwizard.com/images/uploads/2022/08/java-was-started-but-returned-exit-code-13-thumbnail.jpg)
How to Fix the Java Virtual Machine Launcher Error
How to fix the Java Virtual Machine launcher errors? Here we summarize some effective fixes. You can try them in order until the JVM error gets fixed.
# 1. Add a New System Variable for Java
Many users reported that Minecraft could not create the Java Virtual Machine error can be resolved by adding a new system variable for Java. You may have a try.
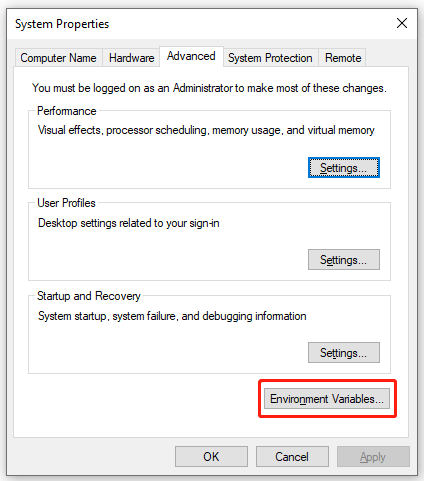
Step 1. Type system variable in the Search box and select Edit the system environment variables from the Best match.
Step 2. In the pop-up window, navigate to the Advanced tab and click on Environment Variables.
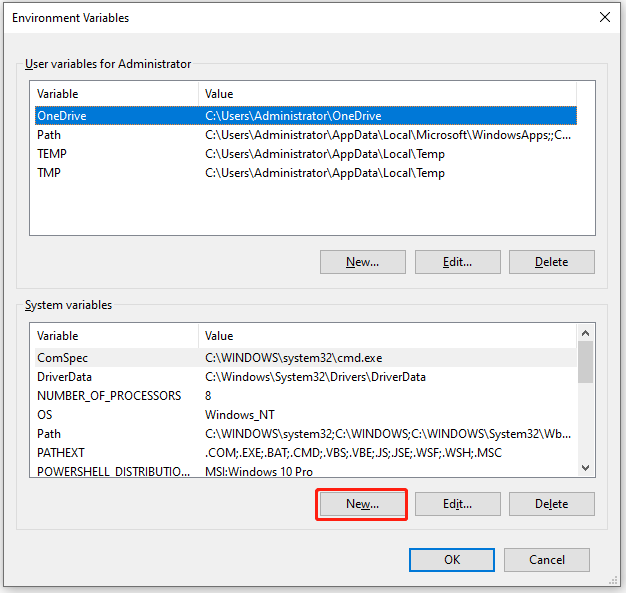
Step 3. Click on New under the System variables window.
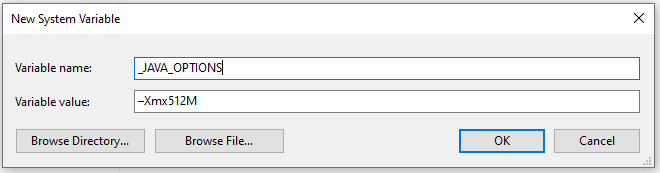
Step 4. Input _JAVA_OPTIONS in the Variable name box, and then input –Xmx512M in the Variable value box and click on OK to save the change. This will increase RAM allocation to 512 megabytes for Java.
Step 5. Click on OK in the Environment Variables window.
Once done, restart the program and check if the Java Virtual Machine launcher error Minecraft disappears.
# 2. Run Java as an Administrator
The “failed to create Java Virtual Machine” error can occur due to insufficient admin rights. Here you can follow the steps below to run the program with admin rights.
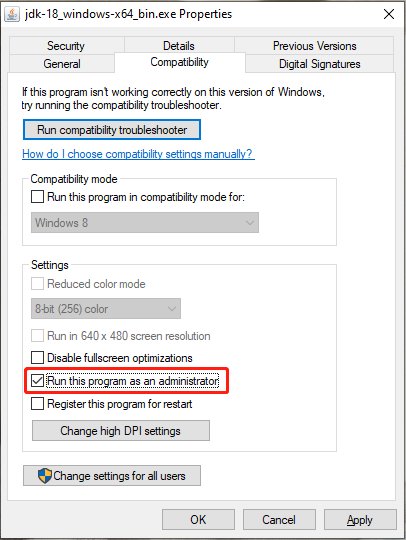
Step 1. Right-click the Java executable file and select Properties. If you can’t find the file, type Java in the search box, right-click the Java icon, and select Open file location.
Step 2. In the Properties window, go to the Compatibility tab and select the Run this program as an administrator option.
Step 3. Click on Apply and then on OK to save the change.
Now, you can relaunch the program and see if the “failed to create the Java Virtual Machine” error gets fixed.
# 3. Reinstall Java
Sometimes the Java Virtual Machine launcher errors can occur due to corrupted or outdated Java components. In this case, you can try reinstalling Java and see if it works.
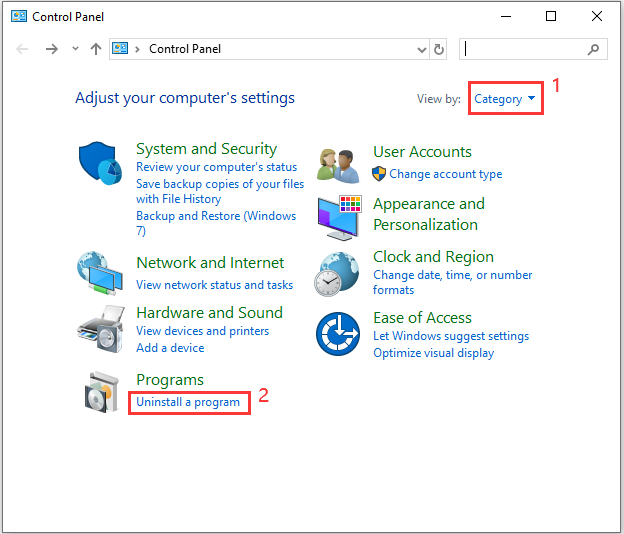
Step 1: Press Win + S to open Search. Then search for Control Panel and launch it.
Step 2: In Control Panel, select View by: Category in the upper right corner. Then click Uninstall a program.
Step 3: Select each Java-related program from the list and then click Uninstall. Follow the onscreen instructions to finish the process.
Step 4. Once uninstalled, you can go to the Java official website, download the latest version and install it. If you don’t know how to do that, refer to one of the tutorials:
Java Runtime Environment Download and Install for Windows 10/11
Java Virtual Machine (JVM) Download & Install for Windows 10/8/7
Download, Install, and Update Java 32 Bit & 64 Bit [JDK vs JRE]
Further Reading: Do you want to manage your partition and disk on Windows effectively? MiniTool Partition Wizard is a good choice that can help you extend/resize/delete partition, convert a disk to MBR/GPT, migrate OS, etc. Besides, it can help fix various problems such as C drive full, and corrupt file system. Perhaps you need such a tool.
User Comments :