Sometimes, some users might want to upgrade Windows Storage Pool for Storage Spaces. Well, how to upgrade Storage Pool on Windows 10/11? This article from MiniTool Partition Wizard would show you a step-by-step guide on how to do that.
Space helps protect your data from drive failure and expands storage over time as you add drives to your PC. You can use Storage Spaces to combine two or more drives in a Storage Pool, and then use the capacity in that pool to create virtual drives called Storage Spaces.
In Storage Spaces, with an upgraded Storage Pool, you can optimize drive usage and remove drives from the storage pool without compromising the Storage Pool’s protection against drive failure.
If you created a Storage Pool in Windows 8.1 and upgraded to Windows 10 or migrated Storage Pool drives to Windows 11/10, it is recommended that you upgrade your existing Windows 11/10 Storage Pool. In this post, we will show you how to upgrade Storage Pool for Storage Spaces in Windows 11/10.
How to Upgrade Storage Pool
You can upgrade Storage Pools Windows 10/11 in two quick and easy ways. Try one of them to do that.
Way 1: Upgrade Storage Pool via Storage Space Settings
To upgrade Storage Pool for Storage Spaces via the Settings app in Windows 10/11, you can follow the steps below:
Step 1: Press the Win + I key to open Settings.
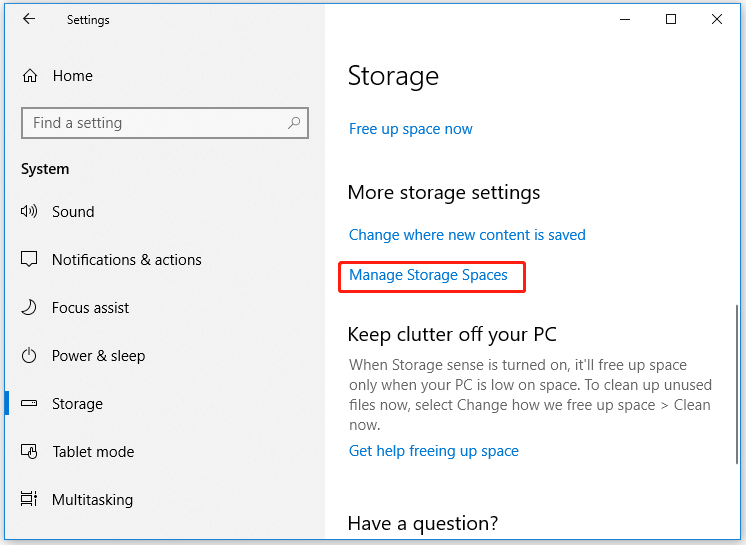
Step 2: Go to System > Storage, and then scroll down and click on the Manage Storage Spaces link on the right panel.
Step 3: In the Storage Spaces window, click the Change settings button, and then click on Yes if prompted by UAC.
Step 4: Click the Upgrade pool link for the Storage Pool you want to upgrade. Then click the Upgrade pool button to confirm the operation.
Once done, you have successfully upgraded Windows Storage Pool.
Way 2: Upgrade Storage Pool via PowerShell
To upgrade Storage Pool for Storage Spaces via PowerShell in Windows 10/11, follow the steps below:
Step 1: Press the Win + X key to open the Power Use Menu. Then choose Windows PowerShell (Admin) to launch PowerShell in admin mode. And click Yes on the UAC window.
Step 2: In the Windows PowerShell window, type Get – StoragePool and press Enter. And make note of the FriendlyName of the Storage Pool you want to upgrade.
Step 3: Type the command below and press Enter:
Upgrade-StoragePool -FriendlyName “Name”
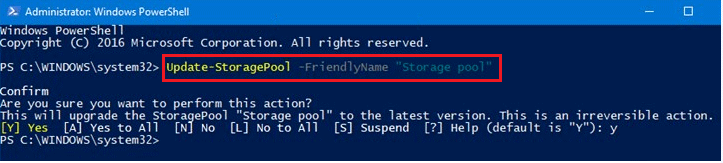
Tip: Replace the Name placeholder with the actual FriendlyName of the Storage Pool you noted earlier in the output.
Step 4: When prompted in PowerShell, type Y and press Enter to confirm.
Bonus: Increase Storage Space with MiniTool Partition Wizard
To increase storage space in Windows 10/11, you can try a professional partition manager, which is effective and reliable. Its Extend Partition and Move/Resize Partition features enable you to increase disk size with ease.
When you want to extend a partition to non-contiguous unallocated or free space, or when there is no unallocated or free space on the disk, Extend Partition is recommended. Proceed as follows:
MiniTool Partition Wizard FreeClick to Download100%Clean & Safe
- Download and install this program on your computer. Then run it to get its main interface.
- Click the target drive and choose Extend Partition from the left side panel.
- Choose the drive that you would like to take free space from and move the handlebar to determine the amount of space you are going to take. Then click OK.
- Click Apply to execute the operation.

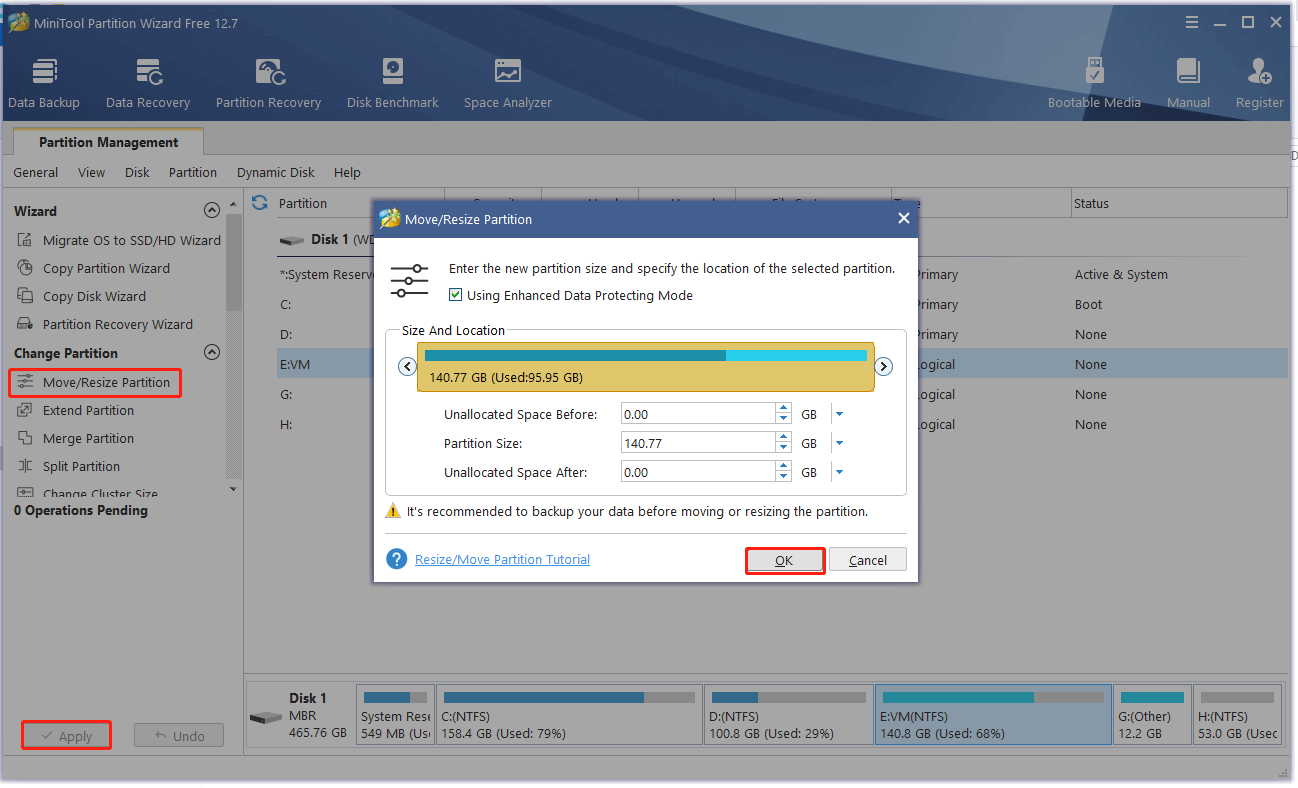
When there is continuous unallocated space in front of or behind the drive to expand on the disk, it is recommended that you use Move/Resize Partition to increase the disk space.
- Click the target drive and choose Move/Resize Partition from the left side panel.
- Lengthen the handle to take up more unallocated space. Then click OK.
- Click Apply to carry out the operation.
About The Author

Position: Columnist
Vega enjoys helping people with computer problems, including disk management, data recovery, data backup, and more. She is constantly expanding her knowledge in related fields. And she will continue to bring more easy-to-understand professional articles to help people solve various problems on the PC.
User Comments :