This article will teach you how to install a CPU processor on the motherboard for desktop computers step by step. To learn more details about how to upgrade CPU processor, just visit MiniTool partition tool website.
After the daily usage of your computer for several years, the CPU processor, which functions as the heart of a computer, is tending to wear out. Then, the performance of the machine decreases, such as responding speed. Therefore, a great many users want to do CPU upgrade to regain good computer performance.
Especially, for game players, it is of great importance to equip with a better CPU to run their games.
How to Install a CPU: Check Compatibility of Motherboard
When you purchase a new CPU (also called processor), the most important thing you should take into consideration is the compatibility problem. You should make sure the new CPU you are going to buy is compatible with your current motherboard.
Way 1. Check Motherboard Compatibility with Its Specification
Find the specification of your motherboard. In the specification document, it tells the details of motherboard components. The most important one is the socket type the motherboard supports. Different motherboard (AMD, Intel or Gigabyte) supports different socket types. And, the same motherboard uses multiple socket types depending on the processor. The specification will provide you with the necessary socket information.
Kind reminder:
- Not all CPUs from the same manufacturer use the same socket.
- You are not allowed to install an AMD CPU on an Intl CPU motherboard, or vice versa.
Way 2. Check Motherboard Compatibility Visually
1. Power off your computer by pressing the Power switch on the back of the computer’s CPU box (host case).
2. Unplug all connections from the CPU box.
3. Stand yourself on the ground (ground yourself) to protect you from discharging static electricity if you accidentally touch the motherboard or other sensitive electronic components.
4. Lay the box on a table or the floor and open the case.
5. Find the motherboard model number on the motherboard. The motherboard number is usually the largest text consists of numbers and letters, and usually locates near the RAM slots, the CPU socket or between the PCI slots.
6. Search the motherboard number online and find its compatibility details.
Then, you can carry out the process of how to install CPU.
Way 3. Check Motherboard Compatibility Using CMD
1. Search “command prompt” in the Taskbar and open the Command Prompt.
2. Type “wmic baseboard get product, manufacturer, version, serialnumber” in the CMD and press Enter.
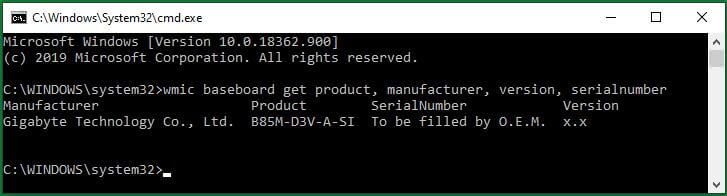
3. View the info of your motherboard including manufacturer, product, serial number as well as version.
4. If one of the above info is unclear, you can use the existing info together with “motherboard” to search the missing info online.
Way 4. Check Motherboard Compatibility by Third-party Software.
If the built-in or official methods can’t solve your problem, you can always rely on third party programs. Here, to check the details of your motherboard, you can depend on applications like Speccy and CPU-Z. They are both free and easy-to-use tools. You can just download, install and launch it on the target computer and view the details of your motherboard to finish the preparation for how to install a Processor.
Way 5. Check Motherboard Compatibility by Asking Help from Technicians
If none of the above ways help you find the motherboard information you want, you can take the motherboard out of the host case and take it to a computer repair store or some similar store. There, it should be some technician who can tell what the socket types your motherboard use. Also, he may give you his advice on what CPU is better for your motherboard.
Way 6. Replace the Old Motherboard with a New One
If you finally fail to find a CPU that can match your current motherboard, or, if your old motherboard can’t support the modern CPU processor that you like very much, you can change your mind to get a new motherboard that is compatible with your new CPU. Yet, if you decide to replace your old motherboard, you will probably need to upgrade your old RAM still due to compatibility problems.
Also Read: [2020 Guide] How to Choose a Motherboard for Your PC?
How to Install a CPU: Remove Old CPU
If you are going to upgrade your motherboard together with upgrading CPU, you can skip this part and directly move to the next section. If not, just follow the below steps to remove the old CPU processor out of the current motherboard.
Step 1. Turn off your computer and unplug all cables that connected to the host case.
Step 2. Lay the case down with the back connectors resting close the ground.
Step 3. Remove the side panel maybe with some tools like a screwdriver.
Step 4. Ground yourself.
Step 5. Remove the CPU cooler. Usually, it is a metal heatsink with a fan attached and installed on the top of the CPU. Also, there are liquid coolers such as water coolers.
Most stock coolers have 4 prongs that can be undone with fingers or a flathead screwdriver. Some coolers have a bracket on the back of the motherboard that should be removed first before removing the cooler.
Even you have popped the cooler off the motherboard, it can still be attached to the CPU by the thermal paste. Just twist the cooler back and forth to detach it. If you plan to reuse the cooler, you can wipe off the excess thermal paste from the cooler with rubbing alcohol.
Step 6. Remove all other components and cables that are blocking you from reaching the CPU processor. Yet, make sure you remember how to put everything back to their original locations.
Step 7. Detach the lever on the side of the CPU socket cover to pop the socket cover. Then, you can remove the CPU processor from the socket on the motherboard.
If you plan to keep the old CPU, you’d better store it in an antistatic bag. As for old AMD CPU, it is recommended to sink it into antistatic foam and avoid damaging the pins.
You may also like: How to Upgrade Motherboard and CPU without Reinstalling Windows?
How to Replace CPU: Install New CPU
If you are replacing your old motherboard with a new one. You have to, first of all, remove all components and cables from the old motherboard. Then, remove the old motherboard from the host case. Finally, install your new motherboard into the case and reconnect all components and cables. If you choose to continue to use your old motherboard, just ignore the content of this paragraph.
Step 1. Ground yourself and make sure of it easily by touching a metal water tap again. Otherwise, an electrostatic discharge can easily fry your new processor when you take it out of the packaging.
Step 2. Take the new CPU out of its protective packaging. During the process, make sure to grab it by its edges and avoid touching its pins and contacts.
Step 3. Put the CPU in the correct position relying on the triangle or notches. Then, lay it into the socket gently without forcing and flat without an angle.
Step 4. When successfully insert the CPU into the socket, close the socket cover and relatch the cover.
Step 5. Apply a layer of thermal paste on the top of the new CPU and reinstall the old CPU cooler or install a new cooler. Also, connect the cooler into the CPU_FAN connector on your motherboard.
Step 6. Connect all components and cables that you unplugged earlier and reattach the side panel.
Step 7. Place the hose case back in the normal position and connect all cables to its back.
Step 8. Try to power on your computer. If you upgrade CPU without changing motherboard, your machine will boot up normally. Make sure your new CPU is recognized in System Properties on the CPU-Z software.
Step 9. If you upgrade your motherboard, or your new CPU is quietly different from your old one, or you have boot issues after installing the new CPU processor, you should reinstall your operating system to fit your new hardware equipment.
The above is all about how to install a CPU. I believe the process is complete and clear. Though there is little difference for different people when they install their CPU processor, the main guide is the same. Hope this tutorial can help you.
About The Author

Position: Columnist
Helen is a tech writer with over 10 years of experience. She specializes in creating easy-to-follow guides for video editing, media file conversion, and computer performance. Helen doesn't just write—she tests every software herself and listens to feedback from users and experts. Her goal is to make complex programs simple so that everyone can solve their tech problems with confidence.
User Comments :