There are a total of three network profiles on the computer, including private, public, and domain. Private and Public are available to all computers, while Domain is only available when the device is joined to a domain. If you are a regular home computer user, there are two main types of network profiles (Public and Private).
Well, how to change network profile type in Windows 11? Please keep reading.
How to Change Network Profile Type in Windows 11?
To change the network profile type in Windows 11, follow these three methods:
Method 1: Use Windows Settings
This is the best and easiest way to switch between various network profile types in Windows 11. To change the network profile type using Windows settings, follow these steps:
Step 1: Press the Win + I key to open the Windows Settings.
Step 2: Click on the Network & internet option on the left side. Then click on Wi-Fi or Ethernet categories on the right and click on a connection to change its profile type.
Step 3: Under the Network profile type section, select either Public or Private.
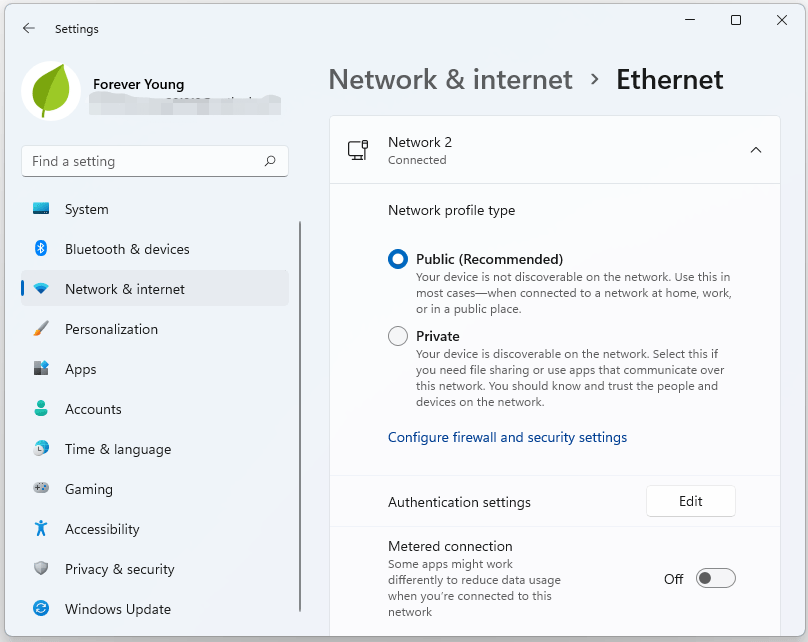
Once complete, your computer will continue to use the selected network profile type.
Method 2: Use Registry Editor
You can also use Registry Editor to change the network profile type. To change the network profile type using Registry Editor, follow these steps:
Step 1: Press the Win + R key and type regedit in the Run dialog box to open the Registry Editor.
Step 2: Go to the path:
HKEY_LOCAL_MACHINESOFTWAREMicrosoftWindowsNTCurrentVersionNetworkListProfiles
Step 3: Expand the Profiles folder to view its subkeys and each represents a saved network profile. On the right of each network profile, look for the ProfileName string value that holds the network-friendly name. Then find the one you want to configure.
Step 4: Once you find the required network, double click on the Category REG_DWORD value and set its Value data to one of the following numbers:
- 0= Public
- 1= Private
- 2= Domain
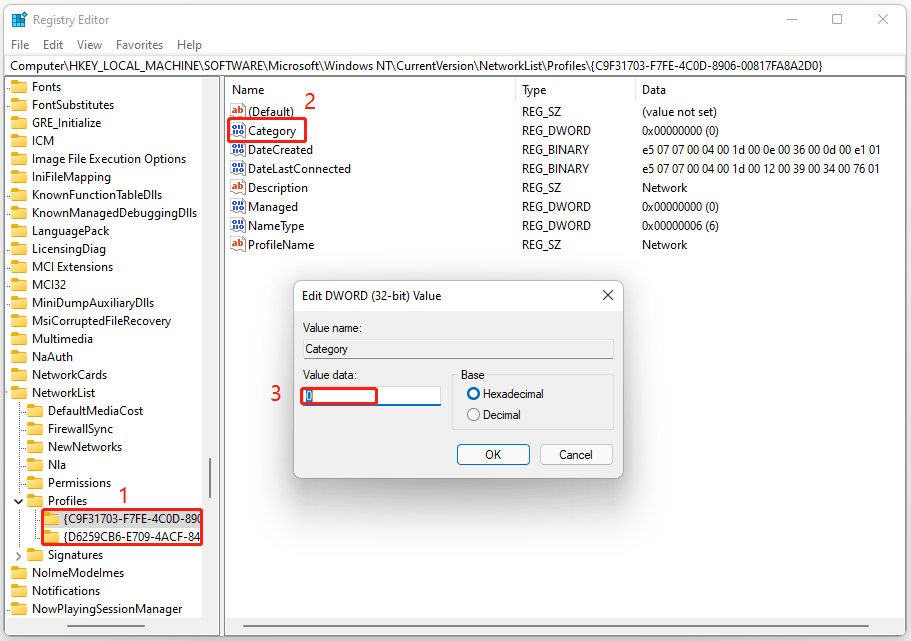
Step 5: Restart your computer to ensure the networking settings are applied.
Method 3: Use Windows PowerShell
Windows PowerShell can let you change the network profile type. The steps are as follows:
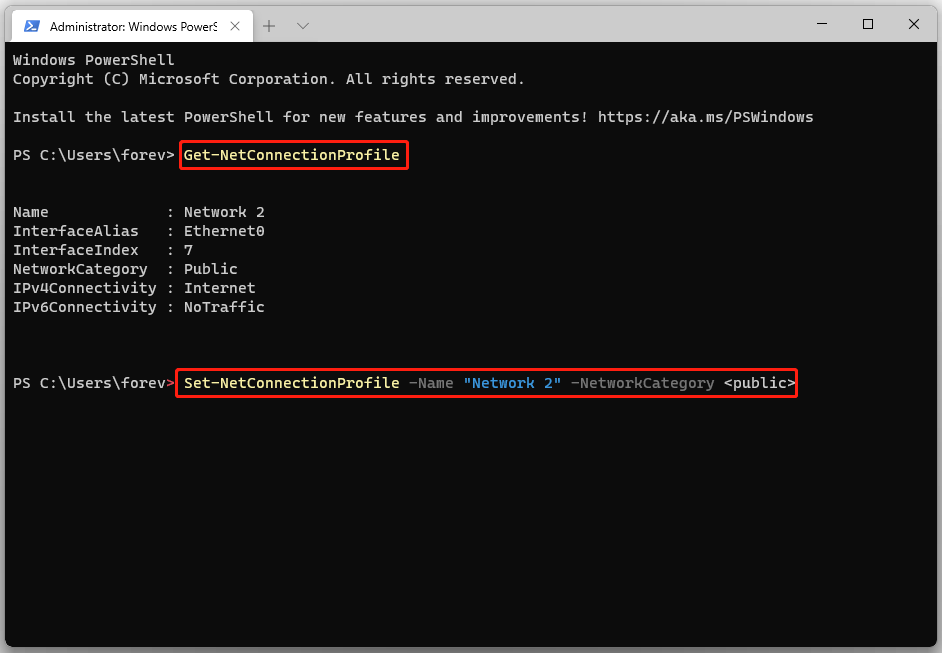
Step 1: Search for powershell in the Taskbar search box. Then right click on the result and click on Run as administrator. When the UAC prompts, click the Yes button.
Step 2: Type the Get-NetConnectionProfile command to get the list of network profiles stored on your computer.
Step 3: Make a note of the network name for which you want to change the profile type. Then type the following command: Set-NetConnectionProfile -Name “your network name” -NetworkCategory <Type>. Replace “your network name” with the actual name of your network profile, and replace <Type> with one of the following values: Private, Public, or DomainAuthenticated.
Method 4: Use Local Security Policy
The last method to Windows 11 change network profile type is using Local Security Policy. Here is the guide:
Step 1: Press the Win + R key to open the Run dialog. Then type secpol.msc in the Run dialog box to open Local Security Policy.
Step 2: In the left panel, click on Network List Manager Policies. On the right side, double click the network you want to change.
Step 3: In the next dialog, switch to the Network Location tab. Under the Location type section, select Public or Private. And for the User permissions section, select the User cannot change location option.
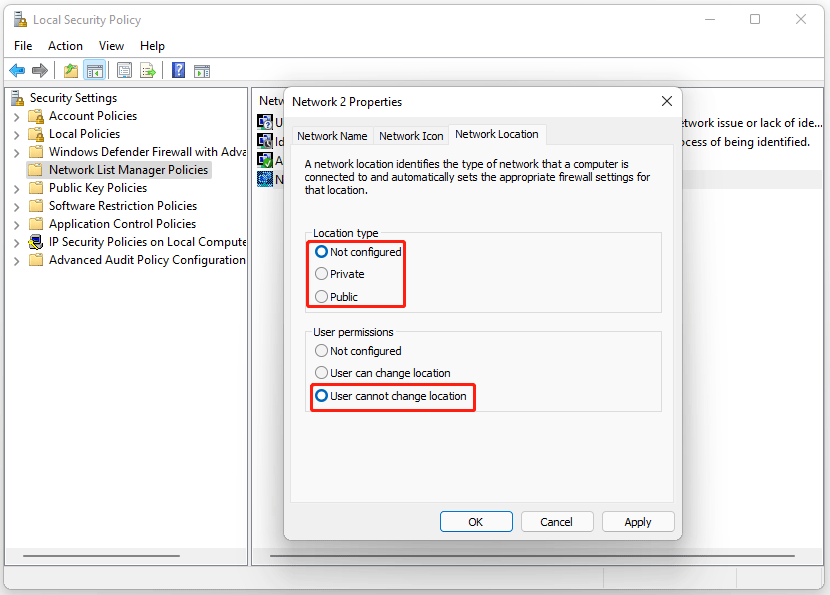
Step 4: Finally, click the Apply button to complete.
Bottom Line
After reading this post, you may find it is not being very complicated to change network profile type in Windows 11. And if you have any problems with this article, please contact us and we will answer them as soon as possible.
About The Author

Position: Columnist
Vega enjoys helping people with computer problems, including disk management, data recovery, data backup, and more. She is constantly expanding her knowledge in related fields. And she will continue to bring more easy-to-understand professional articles to help people solve various problems on the PC.
User Comments :