This post introduces the reasons for building a general/gaming PC, the needed components for building a PC, general PC build costs, and gaming PC build costs. Also, it gives a full guide to help you migrate your OS from your old PC to the newly built PC.
How to build a PC? How much does it cost to build a PC? Many people ask these questions on the Internet. For example, here is a user report from the forum:
... I am as new as it gets to the pc world. I literally don’t have a clue what any of you guys are talking about in this sub, but all I know is that I want to build a strong gaming pc. any responses would be much appreciated!!!https://www.reddit.com/r/buildapc/comments/v3hqrw/how_much_would_it_cost_to_build_a_decently_strong/
Do you also have the same questions? If so, just read this post from Partition Magic to get a full guide on that.
Why Do You Need to Build a PC?
If you’re unfamiliar with computers, purchasing a pre-built PC is a good option. You don’t need to consider which components you should buy for your PC, as all components are compatible.
However, for those who love DIY and have more computer knowledge, building a PC yourself can be wonderful. Besides, there are some other reasons that can cause people to build a PC in self. Here are the main reasons for a person to build a general PC:
- Customization: Building a PC gives you full control over the components, from the CPU and GPU to the case and cooling system. This lets you select parts that exactly suit your performance needs and style.
- Cost: Building your own PC can be more cost-effective than purchasing a pre-built system with similar performance, even if it’s not always cheaper. You can find deals, avoid paying for unnecessary pre-installed software or services, and potentially reduce labor costs.
- Performance: Building a PC allows you to get the best performance by selecting components that are compatible and tailored to your needs, such as gaming, video editing, or other intensive tasks.
- Satisfaction: Building a PC successfully can bring a sense of accomplishment and pride to you.
- Upgradability: It’s easier to upgrade the components on a self-built computer than in a pre-built computer. To upgrade it, you just need to buy compatible components and then replace them in the PC.
- Repair: If you build a PC yourself, you can easily find and troubleshoot which components are damaged and replace them in time.
- Avoiding bloatware: Pre-built PCs often come with pre-installed software that you may not need or want, whereas building a PC allows for a clean installation of the operating system and desired software.
- Beyond gaming: Gaming PCs are more powerful than general PCs, and can be used for various other tasks, including video editing, graphic design, and 3D modeling.
- Specialized for Games: Gaming PCs have superior processing power that can handle the latest and most demanding games. Also, it is often at higher resolutions and frame rates than consoles.
- Mods: On a gaming PC, players can use mods and customization options to modify games, enhance graphics, and add new content. For console players, only a few consoles support mods, and they are not as numerous or flexible as on PC.
- Wider game library: PC gamers have a wider game library than console gamers, including older titles through emulation, and a wide selection of free-to-play games.
What Parts Are Required to Build a PC?
Just as above says, there are various reasons that push us to build a PC. So, what parts are required to build a PC? To build a PC, you need a motherboard, CPU, GPU, CPU cooler, RAM, storage (HDD or SSD), PSU, case fans, and a PC case.
Also, you need an operating system and peripherals like a monitor, mouse, keyboard, speakers, etc. Here is the detailed breakdown:
Motherboard
It is the main circuit board that connects all the components to run a PC. The most common sizes are ATX, Micro-ATX, and Mini-ITX.
When you choose it, you need to select a motherboard that is compatible with your chosen CPU and RAM. Also, you need to consider its expansion slots (PCIe for GPU, M.2 for SSDs).
CPU (Central Processing Unit)
It is the brain of a computer and is responsible for processing instructions, performing calculations, and managing data processing for all computer operations.
If you want to build a gaming PC, you need to choose a CPU with a high clock speed and multiple cores for optimal gaming performance. For instance, you can consider Intel Core i7/i9 or AMD Ryzen 7/9 processors.
CPU cooler
It can be divided into liquid cooling and air cooling. Its responsibility is to keep the CPU from overheating.
To build a gaming PC, you should invest in a good CPU cooler (air or liquid) to manage heat, especially with high-end CPUs.
GPU (Graphics Processing Unit)
It can help a computer handle the visual outputs. It is not necessary for an integrated graphics PC, while it is crucial for these PCs that are aiming for gaming or handling graphics-intensive tasks.
To enhance performance, choose a high-quality GPU like NVIDIA RTX 40 series or AMD Radeon RX 7000 series, which offer ray tracing and DLSS.
RAM (Random Access Memory)
It provides short-term memory for the CPU to enable it to access data quickly. Normally, more RAM means better performance, particularly for multitasking and handling demanding applications. There’s a point where the benefits diminish.
To build a gaming PC, high-speed RAM (DDR5) is recommended, with a minimum of 16GB (2x8GB) for an optimal experience.
Storage (HDD/SSD)
It provides long-term storage for your data (including files, games, and the operating system). Normally, SSDs (Solid State Drives) are faster than traditional HDDs (Hard Disk Drives).
To build a gaming PC, you’d better choose an SSD (NVMe).
PSU (Power Supply Unit)
It converts the main high-voltage alternating current AC to low-voltage direct current (DC) power for all the components in the PC.
You need to ensure the PSU has enough wattage to power all components, including the GPU and CPU.
Case Fans
It’s the fans for the PC case. It works by creating airflow within the computer case. Draws cooler air from outside to cool the overheated components inside the case, and then expels the warm air.
If you love fantastic lighting effects, you can add aesthetic appeal with RGB fans.
PC case
It is the house of all the internal components of a desktop computer. It offers physical protection and airflow (generated by the case fans).
When choosing a computer case, prioritize hardware compatibility, cooling performance, expandability, design, usability, and material quality. Ensure it fits your components, then select based on design and features.
Capture Card
A capture card is a device that facilitates the transfer of audio and video signals from a source (usually a game console or other input device) to a computer, where they can be recorded, stored, and streamed to other devices.
If you plan to stream or record gameplay, a capture card is necessary.
Peripherals
Peripherals are devices that connect to a computer to enhance its input, output, and storage capabilities, although they are not essential for basic operation. Normally, a keyboard, a mouse, and a monitor are the needed devices for interaction.
Input Devices: Keyboards, mice, webcams, microphones, scanners, and game controllers (like joysticks or gamepads).
Output Devices: Monitors, printers, and speakers.
Storage Devices: External hard drives, USB flash drives, and memory card readers.
Communication Devices: Modems and network adapters.
Operating system (OS)
It is the fundamental software that manages a computer’s software & hardware and interacts with the computer user. It includes Windows, macOS, and Linux.
How Much Does It Cost to Build a PC?
After knowing what parts are required to build a PC, you may want to know how much does a PC cost. Normally, building a general-purpose PC can cost anywhere from $500 to $3000 or more, depending on the desired performance level and components.
Here is the detailed breakdown:
A. Entry-Level:
To build a PC just for some casual gaming or basic tasks, you just need to spend $500 – $1200. This range offers a system capable of handling everyday tasks, some light gaming, and media consumption.
B. Mid-Range:
If you want to build a mid-range PC for moderate gaming or content creation, you need to prepare at least $1200 – $2000. This level provides a good balance of performance for most modern games at 1080p or 1440p resolution, as well as for content creation and multitasking.
For gamers, it provides better performance, ray tracing capabilities, and visual fidelity. Also, it allows for some flexibility in choosing higher-end components.
C. High-End:
If you want to build a high-end PC for high-performance gaming and professional use, you need to increase your budget to $3000+ or higher. This range is for those seeking top-tier performance for 4K gaming, VR, high refresh rates, or demanding professional workloads.
How To Build a PC from Components?
After buying all the needed components, you may want to know how to assemble them into a PC. No worries. This section offers a full guide:
Do a Preparation:
- Prepare a Phillips screwdriver and an anti-static wrist strap.
- Find a large, well-lit, non-carpeted area.
- Gather all the PC components together and place them on the side.
Component Installation:
- Wear an anti-static wrist strap, take out the motherboard, and place it safely.
- Remove the CPU and install it carefully.
- Apply thermal paste if needed.
- Install the cooler according to its manual and connect its fan to the motherboard.
- Open RAM clips, align RAM, and press until locked.
- Insert the I/O shield into the case.
- Screw the motherboard onto the standoffs, aligning the I/O ports.
- Place and secure the PSU in the case.
- Mount SSDs/HDDs into drive bays.
- Remove the PCIe cover and install the GPU until it clicks.
- Plug in the 24-pin ATX power connector and 8-pin CPU power cables from the PSU to the motherboard.
- Connect front panel cables (power button, USB, audio) to motherboard headers.
- Route and secure cables behind the tray.
- Connect the monitor to the GPU and test power-on for BIOS access.
- If successful, power down, close the case, and prepare for OS and driver installation.
How to Download and Install Drivers & OS for the Newly Built PC?
After assembling your computer, you may need to download and install the OS and drivers. To do that, you just need to use the Media Creation Tool to create a bootable USB drive, boot from it, and then install and activate Windows. Next, download and install the needed drivers.
Here is the step-by-step guide:
Part 1. Create a Windows installation media
Part 2. Install Windows OS
Step 1. Boot your PC from the USB bootable media, and then follow the on-screen guide to access the Windows 11 Setup window.
Step 2. Select the language settings for Language to install and Time and currency format. Then, click Next to continue.
Step 3. Select keyboard settings for Keyboard or input method and click Next.
Step 4. In the Select setup option window, choose the Install Windows 11 option, check the box of “I agree everything will be deleted, including files, apps, and settings”, and then click Next.

Step 5. In the next window, if you already have the Windows product key, you can enter it under Enter Product key. If you don’t have the key now, you can click I don’t have a product key to activate Windows 11 later.
Step 6. Select the image that you want to install and click Next. Then, read Applicable notices and license terms, and click Accept.
Step 7. Select the location to install Windows in the next window. Also, you can create partitions here. Then, click Next to move on.
Step 8. After that, click Install to continue. Once done, you need to choose your country or region, and then click Yes.
Step 9. Choose your keyboard layout or input method and click Yes. If it asks whether you want to add a second keyboard layout, click Skip.
Step 10. Then, name your device and click Next. After that, your computer will restart.
Step 11. Choose Set up for personal use and click Next. Then, your PC will run into the update process.
Step 12. Next, follow the on-screen guide to sign in, create a PIN, choose your privacy settings, etc., to complete the initial setup.
Part 3. Install drivers
After entering the main interface of Windows 11, you can navigate to the motherboard manufacturer’s website to download and install the needed drivers. Here are the detailed steps:
- Launch Microsoft Edge on your computer.
- Navigate to your motherboard manufacturer’s website.
- Download the necessary drivers.
- Then, run the installer for each driver.
- Once done, you can install drivers for your PC successfully.
How to Migrate Your OS from an Old PC to the Newly Built PC?
If you don’t want to do a clean install for the newly built PC, you can also choose to migrate your OS from the old PC to the new one. To do that, I highly recommend MiniTool Partition Wizard.
It is a professional and feature-rich tool that offers the Migrate OS to SSD/HD feature to help you migrate your system with ease. Besides, this feature-rich tool can also help you partition hard drive, rebuild MBR, convert MBR to GPT, and perform data recovery, etc.
Here’s how to use it to migrate your OS:
Step 1. Click the Download button below to get the MiniTool Partition Wizard installation package, run the file, and follow the on-screen instructions to install this software on your computer.
MiniTool Partition Wizard DemoClick to Download100%Clean & Safe
Step 2. Then, launch this app to enter the main interface and select Migrate OS to SSD/HD Wizard from the left panel.
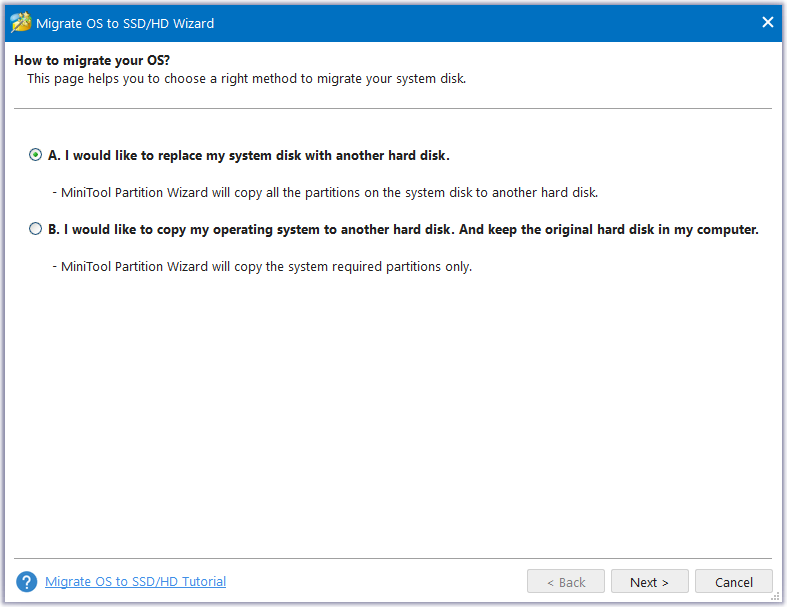
Step 3. Choose the right method to migrate your system disk.
Option 1. To Copy the Whole System Disk
Firstly, select option A. I would like to replace my system disk with another hard disk. and click Next.
Then, choose the target disk to migrate the system disk to and click Next.
Next, set the Copy Options and adjust Target Disk Layout by inputting the exact partition size in MB, GB, or TB.

Reminder:
- If you select the “Fit partitions to entire disk” option, the software will automatically resize the partition to occupy the whole disk.
- If you select the “Copy partitions without resizing” option, this software will retain the original disk partition sizes on the new disk.
- If you migrate the OS from an MBR to a GPT disk or MBR to an MBR disk, you can also see the other two copy options: Align partitions to 1MB. and Use GUID Partition Table for the target disk.
- If you check the box of Align partitions to 1MB., this software could improve performance for Advanced Format disk & SSD.
- If you check the box of Use GUID Partition Table for the target disk., this software will help you to use the disk larger than 2 TB.
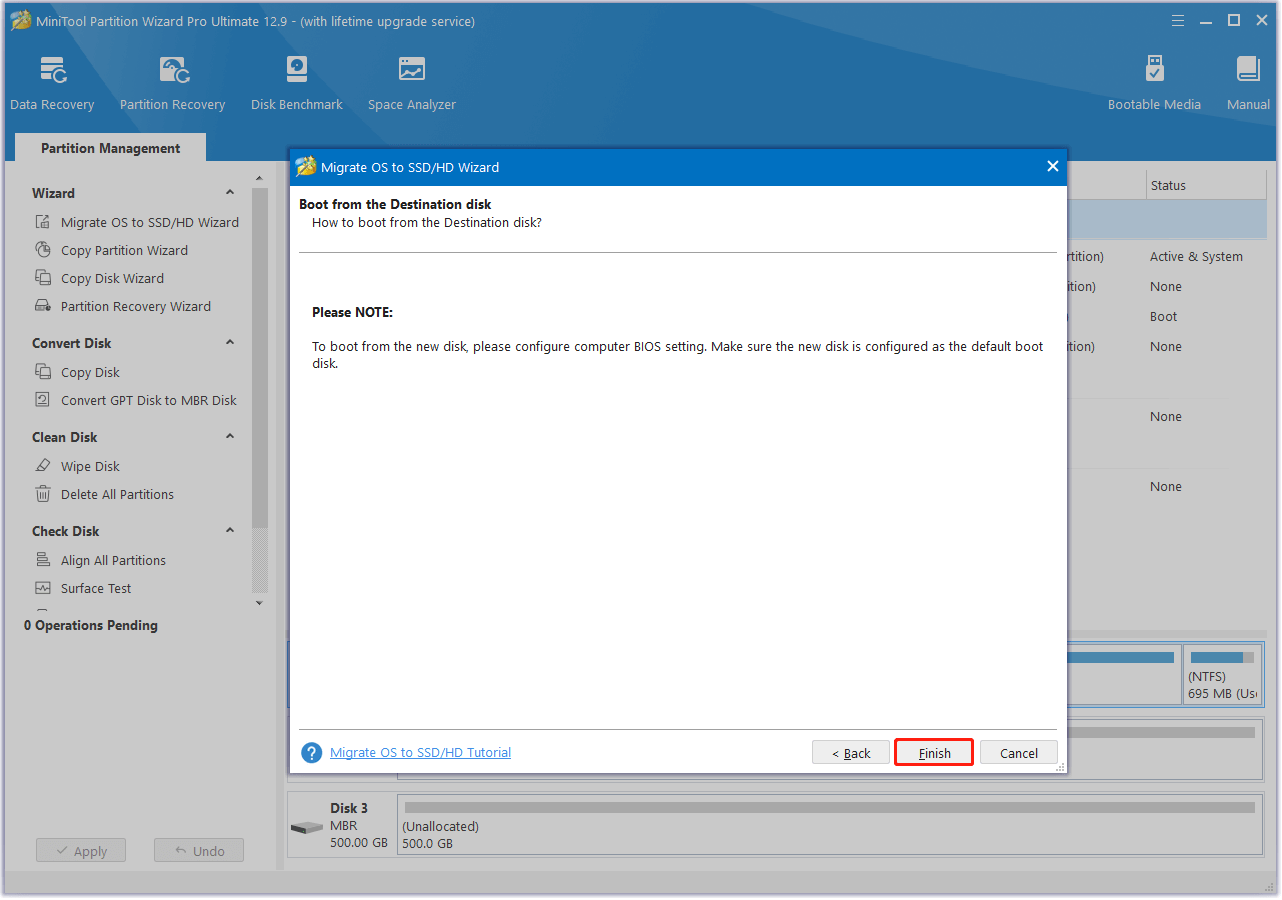
After that, click Next. If you receive a Notice with the message “To boot from GPT disk, please remember to change BIOS mode to UEFI”, click OK to continue.
Then, read the Note and click Finish to go back to the main interface.
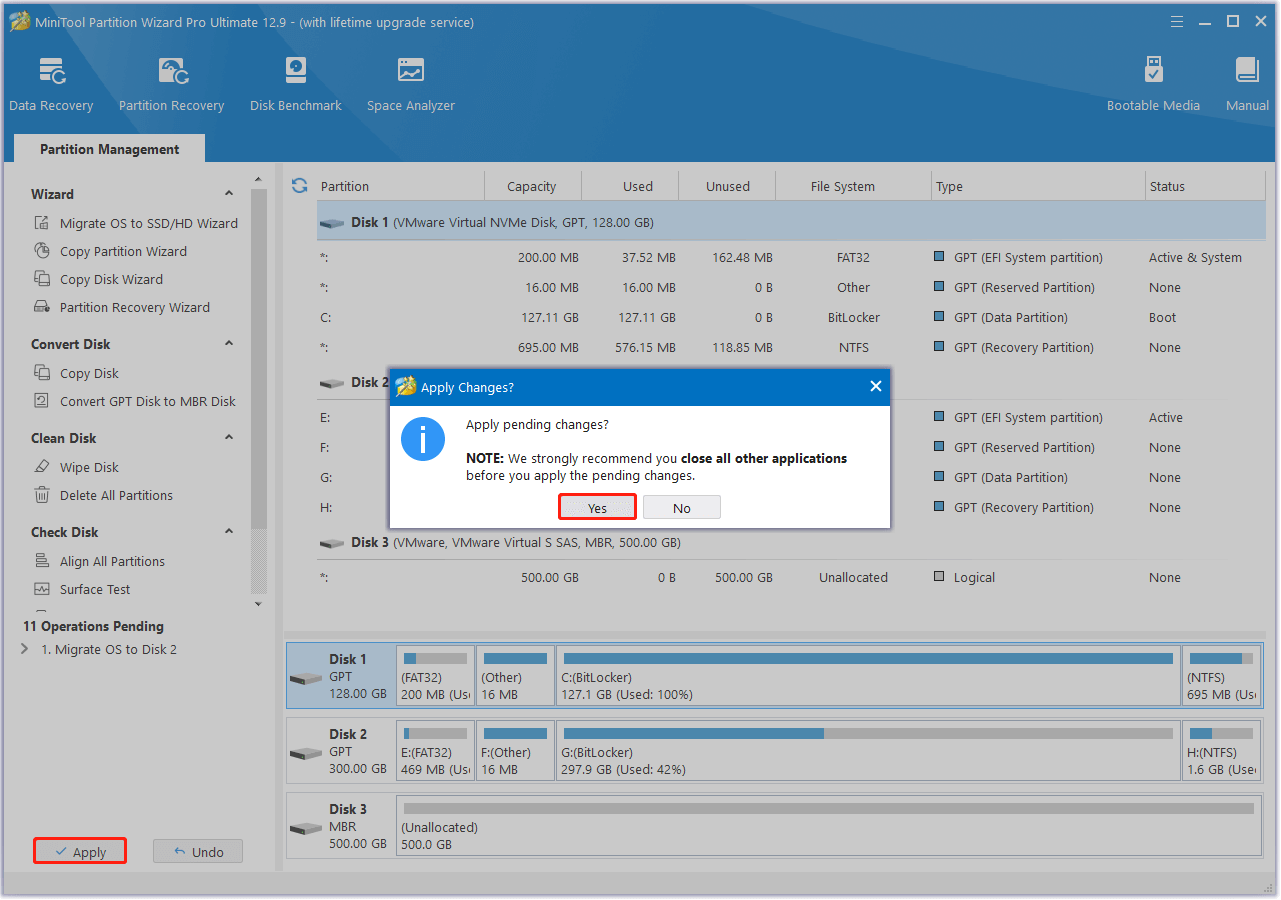
Now, click Apply and Yes to execute the pending operations. Once done, your OS will migrate to the new SSD/HDD successfully.
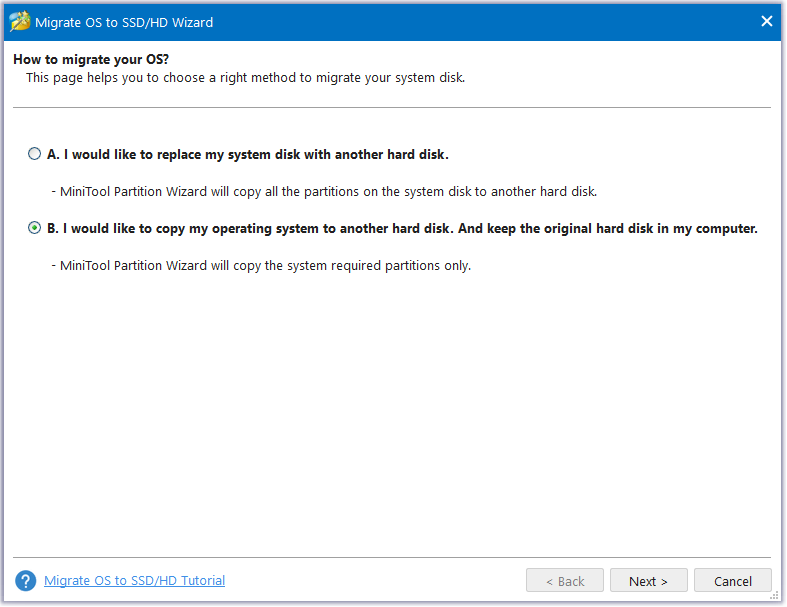
Option 2. To Migrate Windows Only
In this situation, you need to select option B. I would like to move my operating system to another hard disk. And keep the original hard disk in my computer.
Then, choose the target disk, and click Next.
Next, choose Copy Options according to your needs, adjust the Target Disk Layout, and then click Next to move on.
After that, read the Note and click Finish.
In the main interface, click Apply to execute the pending operation, and click Yes in the prompt window to confirm.
To Sum Up
How much does it cost to build a gaming PC? From this post, you can get some good plans for building a general PC and a gaming PC. Besides, you can know how to install OS and drivers for a newly built PC and how to migrate OS from an old PC to a newly built one without data loss.
What’s more, if you have any suggestions or encounter issues while using MiniTool Partition Wizard, you can contact us by sending an email to [email protected]. We will send the replies to you as soon as possible.
FAQ About Building a PC
Note: $1000 budget often only covers the PC tower itself. You'll need to factor in the cost of a monitor, keyboard, mouse, and other peripherals.
About The Author

Position: Columnist
Charlotte is a technology columnist with a strong focus on the Windows operating system, specializing in disk management, backup, and data recovery. She is passionate about analyzing computer errors, identifying root causes, and delivering practical solutions. In her free time, she stays updated on the latest developments in computer systems and hardware while continuously learning new technologies to broaden her expertise. Her writing style is clear and easy to understand, making complex technical topics accessible even to users with limited computer knowledge.
User Comments :