Download and Install Latest Drivers for GIGABYTE PCs
GIGABYTE is one of the leading motherboard vendors in the world. However, it not only produces motherboards but also manufactures custom graphics cards and laptop computers. Its laptop products include the AORUS series, the AERO series, and the GIGABYTE Gaming series.
If your PC is bought from GIGABYTE, you can install the latest GIGABYTE drivers for your PC through the following 2 simple ways.
Way 1. Use Device Manager
This tool is built in Windows and you don’t need to install any third-party software. Here is the guide:
- Open Device Manager.
- Expand the corresponding directory.
- Right-click on a device and choose Update driver.
- Select “Search automatically for updated driver software“. This will automatically detect, download, and install the driver.
However, in most cases, this tool will not tell you which drivers you should update even if some drivers are out of date. Therefore, I recommend you use the next way to update GIGABYTE drivers.
Way 2. Use GIGABYTE App Center
GIGABYTE App Center is the official software that helps you download the latest GIGABYTE drivers. This software supports Windows 10 and 11 64-bit and requires Microsoft .NET Framework 4.5. Here is the guide:
- Go to the GIGABYTE support utility page and download the GIGABYTE App Center tool.
- Unzip the file and run the installer file to install the app.
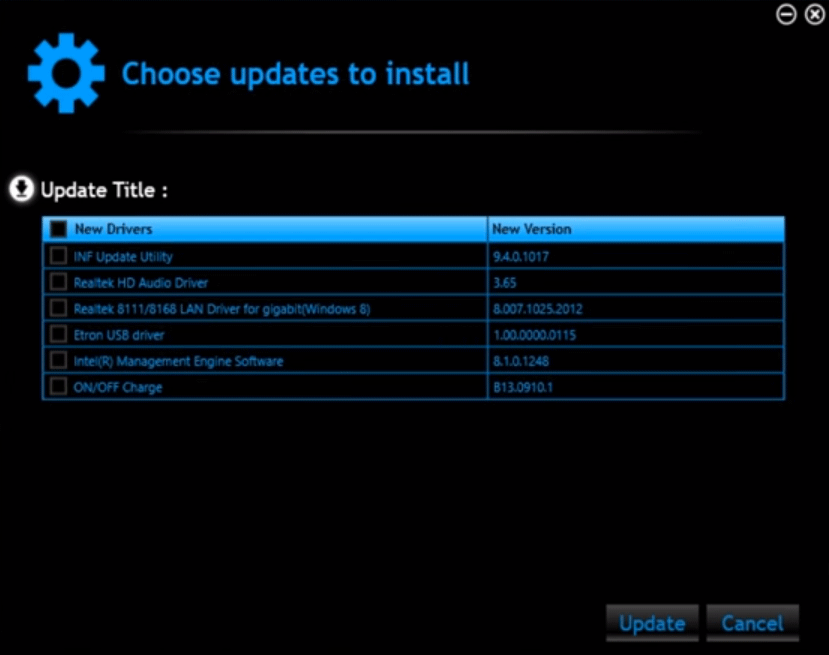
- Launch this app and then a window will pop up at the bottom right corner of the screen. Please click the Live Update section.
- This software will check for GIGABYTE driver updates. Then, it will list all the latest GIGABYTE drivers for your PC and you just need to choose what you want to install and click the Update button.
Download and Install GIGABYTE Motherboard Drivers via @BIOS
To install GIGABYTE motherboard drivers easily, I recommend you use @BIOS offered by GIGABYTE. Here is the guide:
Step 1: Go to the GIGABYTE support utility page and download the GIGABYTE App Center and @BIOS tools. Then, @BIOS requires you to install APP Center first, so please install APP Center and @BIOS in order.
Step 2: Shut down your PC. Then, restart your PC and enter firmware. You should make sure the Intel Hyper-Threading technology is disabled in BIOS. After booting into Windows, you should close all applications and TSR (such as anti-virus programs) to avoid unexpected errors during the BIOS update process.
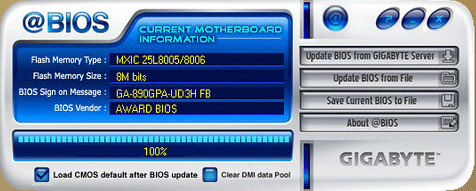
Step 3: Press Windows key + R and then type “msinfo32” into the Run box. Please check the Baseboard Product information. It will tell you the model name of your motherboard. Then, launch @BIOS and update GIGABYTE motherboard drivers using the following two ways.
- Update BIOS through Internet: Please click Update BIOS from GIGABYTE Server, select “GIGABYTE @BIOS server in xx”, and select the exact model name of your motherboard. It will automatically update the GIGABYTE motherboard drivers.
- Update BIOS NOT through Internet: If your Internet is good or you can’t find the BIOS file in the @BIOS server, you can try this method. Please click Update BIOS from File, select the unzipped BIOS file, and then follow the on-screen instructions to complete the update process.
There is another way to help you update the GIGABYTE motherboard drivers. To get it, please refer to this post: 3 Steps to Update BIOS GIGABYTE.
About The Author

Position: Columnist
Linda has been an editor at MiniTool for seven years. She continuously learns about computers and puts her knowledge into practice. Moreover, she is particularly knowledgeable in disk management, data recovery, system installation, and PDF editing. Her articles typically reference multiple examples or are based on her own experience, providing users with the most suitable solutions.
User Comments :