This post is written to introduce you how to fix “an error occurred while Windows was synchronizing” issue. Here, 6 feasible fixes are collected by MiniTool and you can try them one by one.
Windows provides a feature of automatic clock synchronization, enabling users to sync their time automatically by using the Windows menu to connect with an NTP server. However, users might encounter a message prompting that an error occurred while Windows was synchronizing.
This issue often happens to specific NTP servers including time.windows.com and time.nist.gov. And the reasons for this issue could be various. Luckily, you can fix it easily just by using the following methods.
Fix 1: Restart Windows Time Service
The error might occur if the Windows Time service is not running or stuck in a limbo state. So, you can try restarting the service.
Step 1: Press Windows + R to open Run window. Input services.msc and click OK to open Services app.
Step 2: Locate Windows Time service. Right-click it and choose Properties.
Step 3: Set the Startup type to Automatic. Click Stop to temporarily stop the service, and then click Start to restart Windows Time service.
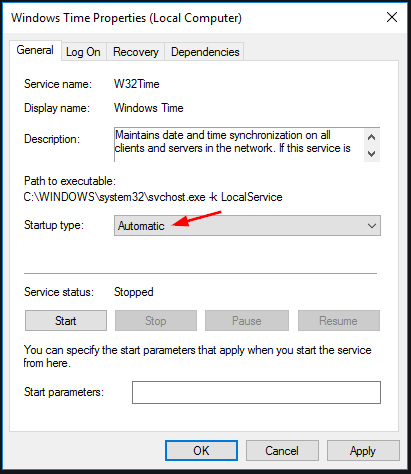
Step 4: Click Apply and OK to save the changes.
Now, you can check if your Windows can synchronize time properly.
Fix 2: Use a Different Server
As this issue happens to specific servers, you can use a different time server to fix it. Here is a simple guide on how to do it.
Step 1: Type timedate.cpl in Run dialog box and click OK to open Date and Time window.
Step 2: Switch to Internet Time and click Change settings.
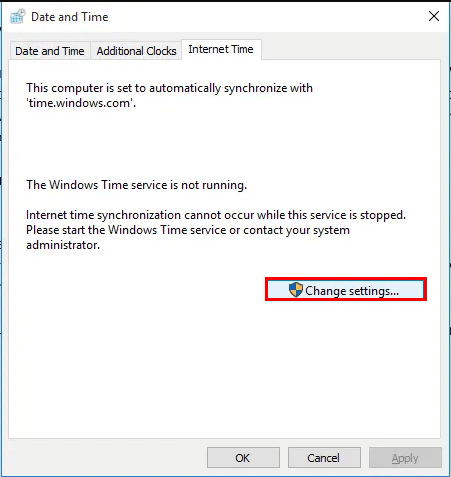
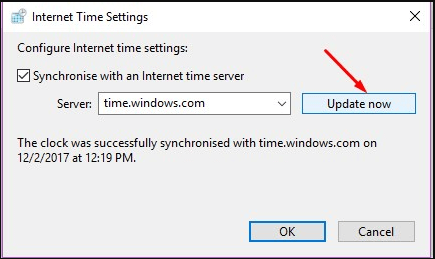
Step 3: Check Synchronise with an Internet time server. Choose a different time server from the drop-down menu, and click Update and OK button.
Now, you can check if error synchronizing is resolved. If it still exists, try using switching to other usable servers. You can also move to the next fix directly.
Fix 3: Re-register W32Time
Another potential reason for this issue is that W32Time is not registered. You can re-register it in Command Prompt.
Step 1: In Run dialog, input cmd and press Ctrl + Shift + Enter to open Command Prompt as administrator.
Step 2: Type the following command one by one and press Enter after each:
- net stop w32time
- w32tm /unregister
- w32tm /register
- net start w32time
- w32tm /config /manualpeerlist:pool.ntp.org /syncfromflags:manual /update
Step 3: After W32Time is re-registered successfully, restart your computer.
Now, there should be no problem with your Windows synchronizing.
Fix 4: Disable Third-Party Firewall
We have to admit that Firewall is a useful tool to prevent potentially dangerous applications from access your Internet. However, your installed third-party firewall might interfere Windows synchronizing and cause “and error occurred while Windows was synchronizing” issue.
Thus, you need to disable your third-party firewall to avoid that it interrupts the connection between the time server and your computer. Or, you can uninstall the program directly. If you are using the built-in Firewall tool, you should bring it back to the default settings.
If disabling Firewall doesn’t remove the issue, you can continue with the following fix.
Fix 5: Adjust the Update Interval
Adjusting the default update interval is also a proven solution to error synchronizing. You can make by editing your registry.
Step 1: Open Registry Editor by inputting regedit in Run box and clicking OK.
Step 2: Navigate the following path:
HKEY_LOCAL_MACHINESYSTEMCurrentControlSetServicesW32TimeTimeProvidersNtpClient
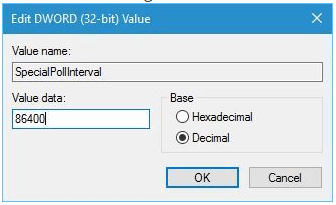
Step 3: In the right pane, double-click SpecialPollInterval entry to open its Properties.
Step 4: In the pop-up window, choose Decimal in Base section, and change the default Value date to 86400 which represents 1 day. Then, click OK to save the change.
Once it’s done, exit Registry Editor and restart your computer. The date and time on your computer will get updated after each day, and the error should have been fixed.
Fix 6: Add More Servers to Your Registry
In most cases, this error can be fixed by using a different time server, just as Fix 2 shows. If you want to use other servers except those shown in the Date and Time settings, you can add those you want to your Registry. Here’s a quick guide.
Step 1: Open your Registry Editor and navigate to the following path:
HKEY_LOCAL_MACHINESOFTWAREMicrosoftWindowsCurrentVersionDateTimeServers
Step 2: In the right pane, you can see several Strings named with different numbers. These Strings represent your time servers. Now, right-click the empty space and choose New > String Value.
Step 3: In the pop-up dialog, enter an appropriate number as the name, input the time server you want as the Value date, and finally click OK to add the server.
Here are some time servers proven to be workable. You can add any of them as your needs:
- time-a.nist.gov
- time-b.nist.gov
- 105.37.11
- pool.ntp.org
- isc.org
- north-america.pool.ntp.org
- windows.com
- nist.gov
After adding the needed server, you can go to Time and Date settings to put it into use. As for the detailed steps, you can refer to Fix 2.
![[Solved] An Error Occurred While Applying Security Information](https://images.minitool.com/partitionwizard.com/images/uploads/2020/02/an-error-occurred-while-applying-security-information-thumbnail.png)
User Comments :