Have you received the Result Code: E_FAIL (0x80004005) when starting a VirtualBox VM? This post from MiniTool Partition Wizard offers you 4 simple ways to solve this problem. Keep reading to get them!
VirtualBox E_FAIL (0x80004005) Error
VirtualBox is an open-source type-2 hypervisor for x86 virtualization. It can be installed on Microsoft Windows, macOS, Linux, Solaris, and OpenSolaris. It supports the creation and management of guest virtual machines running Windows, Linux, BSD, OS/2, Solaris, Haiku, and OSx86, as well as limited virtualization of macOS guests on Apple hardware.
Many people use VirtualBox to run VMs. However, some people report that they have encountered the VirtualBox E_FAIL (0x80004005) error when starting a VM.
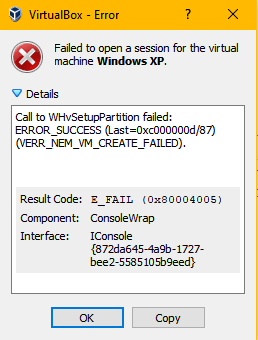
The error details, the component, and the interface may be various, but the “Failed to open a session for the virtual machine xx.” message and “Result Code: E_FAIL (0x80004005)” will not change.
How to Fix VirtualBox E_FAIL (0x80004005) Error
To solve the Result Code: E_FAIL (0x80004005), you can try the following methods.
Fix 1. Use CMD to Disable Hyper-V
Since version 6.0, VirtualBox is able to use the Hyper-V API to coexist next to Hyper-V. If you use an old version of VirtualBox, it may be incompatible with Windows Hyper-V. When the Hyper-V is enabled, VirtualBox VM won’t start.
Many people have confirmed that the Result Code: E_FAIL (0x80004005) may be caused by Hyper-V and disabling it will solve the problem. However, disabling Hyper-V in Windows Features may don’t work. You should disable Hyper-V using CMD. Here is the guide:
- Type “cmd” in the Windows search bar, right-click the best-matched result, and then click Run as administrator.
- Execute this command: bcdedit /set hypervisorlaunchtype off.
- Restart your PC and start the VirtualBox VM again to see whether the problem is solved.
Fix 2. Check the VM XML File
When the E_FAIL (0x80004005) error occurs, please navigate to the folder “C:UsersCOMPUTER_NAME.VirtualBoxMachinesVM_NAME” and check whether there are the following two files:
- VM_NAME.xml-prev
- VM_NAME.xml-tmp
When VirtualBox starts a VM, it needs to find an XML file. However, when the E_FAIL (0x80004005) error occurs, it seems that VirtualBox simply just couldn’t find “VM_NAME.xml” because this file technically doesn’t exist.
To solve this problem, you just need to make a copy of the “VM_NAME.xml-prev” file and rename the copy to “VM_NAME.xml”. Then, restart VirtualBox and it will work just fine.
Fix 3. Install VBoxDrv.inf Manually
VBoxDrv.inf is a driver used for VirtualBox. However, it’s possible that due to some permission issues, the installation of this crucial driver isn’t completed during the initial installation. Then, the VM won’t start and the error E_FAIL (0x80004005) occurs. In this case, you can solve the problem by installing the VBoxDrv.inf manually. Here is the guide:
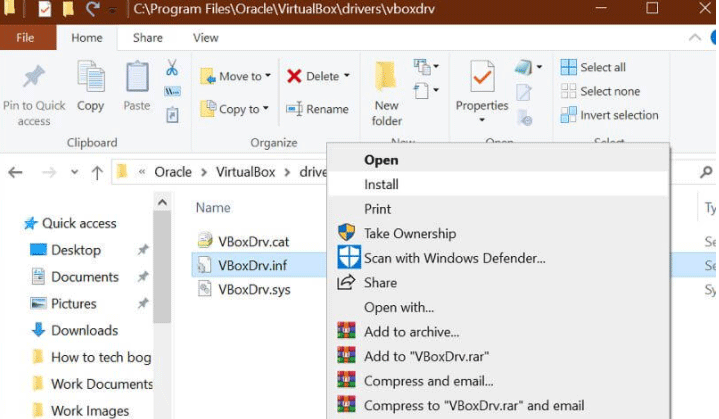
Navigate to the VirtualBox installation folder and find the VBoxDrv.inf. If you didn’t customize the installation location, the VBoxDrv.inf file path should be C:Program FilesOracleVirtualBoxdriversvboxdrv. Right-click this file and choose Install.
If all the above three methods fail to solve the problem, you can try reinstalling VirtualBox.
Fix 4. Install Optional Driver Updates
Some users report that the VirtualBox E_FAIL (0x80004005) error can be resolved by installing optional driver updates. This is certainly worth trying.
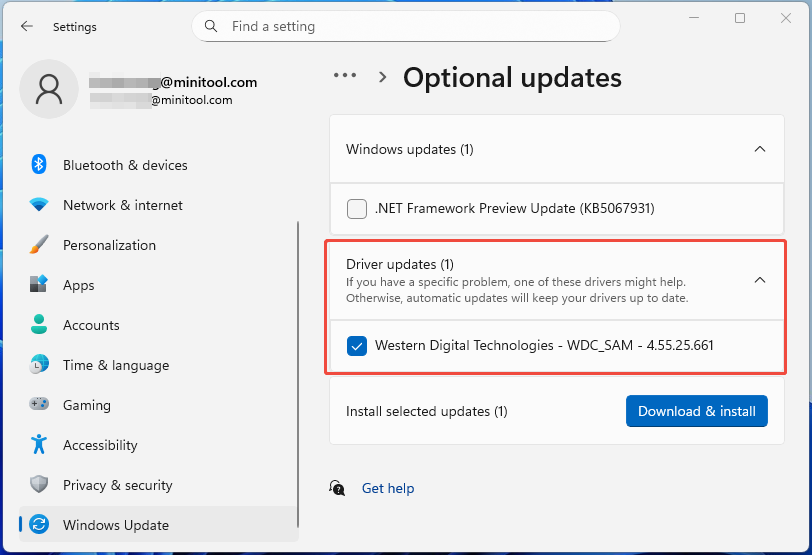
- For Windows 10: Press the Windows logo key + I to open Settings, go to Update & Security > Windows Update, click View optional updates, expand Driver updates, select these updates, and click Download and install.
- For Windows 11: Open Settings, go to Windows Update > Advanced options > Optional updates, expand Driver updates, select all updates under it, and click Download & install.
Bottom Line
Are the above methods useful to you? Do you have other solutions to the Result Code: E_FAIL (0x80004005) issue? Please share them with us in the following comment zone. I will appreciate that very much.


User Comments :