Generally, the DNS_PROBE_STARTED error comes out due to Domain Name Server (DNS) problems or network issues in Google Chrome on Windows 11. It’s a common error in Google Chrome and we have summarized multiple methods to fix it. If you have no clue how to work this error out, you can follow the solutions below.
Solution 1: Relaunch Google Chrome
When you face the DNS_PROBE_STARTED Windows 11 error, you can try relaunching Google Chrome first. This way can always help you solve various temporary issues. If the error persists after you relaunch the browser, then go on with more advanced methods.
Solution 2: Run the Internet Connections Troubleshooter
The Internet Connections troubleshooter is a built-in utility in Windows 11 that can repair almost all the issues related to network connections. So, when the Chrome DNS PROBE STARTED error appears, you can also try to fix it with this troubleshooter.
Step 1: Press Windows + I to open Windows Settings. Then select Update & Security.
Step 2: Go to Troubleshoot and then click Additional troubleshooters from the right side.
Step 3: Click Internet Connections and then click Run the troubleshooter. Then, the troubleshooter will begin detecting problems. If any issues are found, follow the on-screen instructions to fix them.
To improve your Internet connection, you can perform a restart for your router and modem.
Solution 3: Disable Antivirus Temporarily
In some cases, the third-party antivirus software installed on your PC and Windows Firewall will block the website and show you the DNS_PROBE_STARTED Windows 11 error. To avoid the error, you should temporarily disable the antivirus on your computer.
But please note that your system may be attacked by viruses or malware after the antivirus programs are disabled. So, you’d better enable them as soon as you fix the error.
Solution 4: Change Your IPv4/IPv6 DNS Address
After you get stuck in the Chrome DNS_PROBE_STARTED error, it’s possible to fix it by modifying your IP address. To do this, follow the steps below.
Step 1: Open Control Panel and then go to Network and Internet > Network and Sharing Center > Change adapter settings.
Step 2: Right-click your network and select Properties.
Step 3: Double-click Internet Protocol Version 4 (TCP/IPv4) or Internet Protocol Version 6 (TCP/IPv6) to open the Properties window.
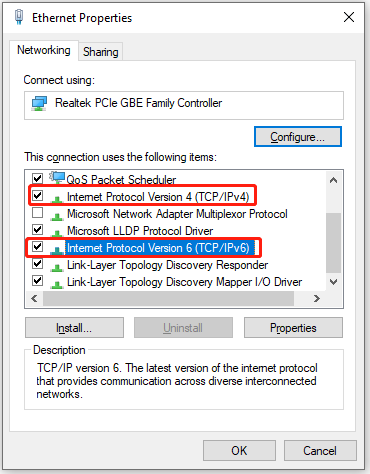
Step 4: Select the Use the following DNS server addresses option. Then enter 8.8.8.8 in the Preferred DNS server section and 8.8.4.4 in the Alternate DNS server section.
Step 5: Finally, click OK to save the changes.
Solution 5: Clear All the Cache and Cookies
Clearing the cache and cookies in Google Chrome may also help you solve the Chrome DNS_PROBE_STARTED error.
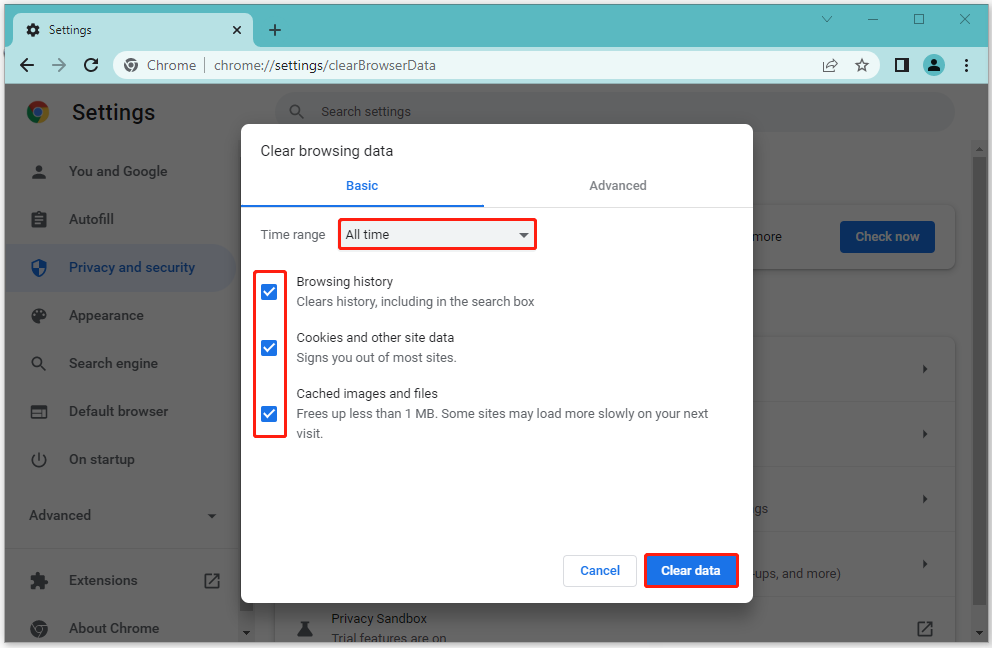
Step 1: Open Google Chrome. Then click the three-dots icon at the top-right corner.
Step 2: Select More tools > Clear browsing data.
Step 3: In the Basic option of the new window, select All time for Time range and then check all the three listed options.
Step 4: Finally, click Clear data to carry out the operation.
After that, relaunch Google Chrome to see if the error is resolved.
Solution 6: Flush Your DNS
The outdated or corrupted DNS cache may lead to the DNS_PROBE_STARTED error as well. In this case, you need to flush your DNS cache. To execute the operation, you can follow this full guide: How to Flush DNS Cache in Windows 11? [Step-by-Step Guide]
Solution 7: Uninstall and Reinstall the Network Driver
You might be able to repair the Chrome DNS_PROBE_STARTED error by reinstalling your network driver. The following are the detailed steps.
Step 1: Right-click the Start icon and select Device Manager. Then expand Network adapters.
Step 2: Right-click your network adapter and select Uninstall device.
Step 3: After the process finishes, restart your computer. Then Windows will automatically install a proper network driver for you.
All the above solutions are available. When you run into the Windows 11 Chrome DNS_PROBE_STARTED error, you can follow them one by one until you fix this issue. If you have problems with this error, you can leave a message in our comment part.
If you are looking for third-party software to manage your partitions and disks effectively, you can try MiniTool Partition Wizard. It’s a professional partition manager with various features. To get more information, you can visit the official website of MiniTool Partition Wizard.
User Comments :