What is HomeGroup? How do I delete a HomeGroup in Windows 10? What can I do if I can’t delete HomeGroup? If you are also trying to figure them out, this post of MiniTool is what you need.
What Is HomeGroup
HomeGroup is a Windows feature that allows you to share files and printers between trusted computers on the same local network. With this feature, you can share pictures, music, and other items more easily without installing drivers on multiple computers or copying files.
How to Delete HomeGroup on Windows 10
However, many users want to remove HomeGroup. How to delete HomeGroup on Windows 10? Let’s start exploring the answer.
Method 1. Leave HomeGroup and Turn off Its Service
To delete Remove HomeGroup, you need to choose the option to leave the HomeGroup and disable its service. Here’s a full guide for you.
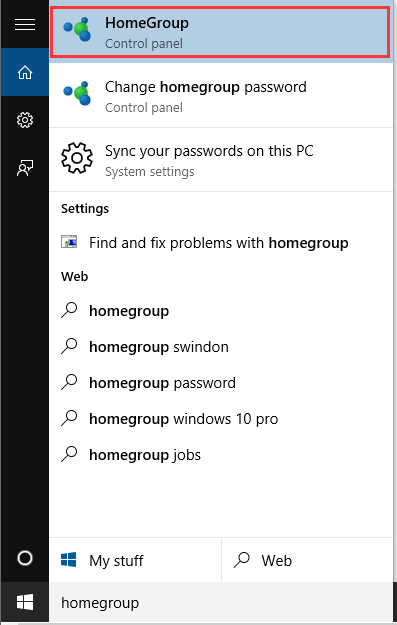
Step 1. Press Win + S keys to open the Windows Search box, and then type homegroup in it and select HomeGroup from the Best match.
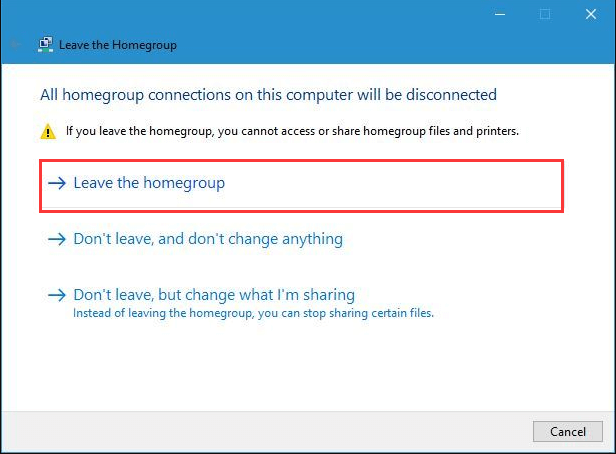
Step 2. Scroll down the right sidebar and click on the Leave the homegroup link under the Other homegroup actions section. In the pop-up window, click on Leave the homegroup. Now, continue with the steps below to remove HomeGroup icon.
Step 3. Press Win + R keys to open the Run dialog box, and then type services.msc in it and hit Enter.
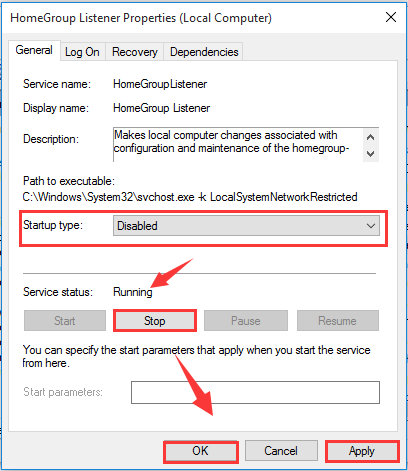
Step 4. Find the HomeGroup Listener and HomeGroup Provider services from the list of services, double click HomeGroup Listener to open its properties.
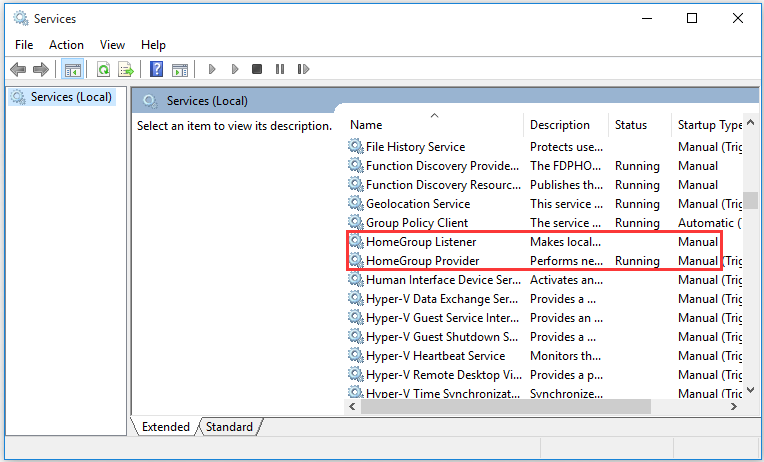
Step 5. In the Properties window, change the Startup type to Disabled and click on Stop.
Step 6. Click on Apply and OK to save the change. Then repeat the same steps for HomeGroup Provider.
Now, the HomeGroup icon should disappear from the Navigation Panel.
Method 2. Remove HomeGroup Icon from Registry Editor
In addition, you can use Registry Editor to delete HomeGroup icon from Navigation Panel. To do so, follow the steps below carefully.
Step 1. Type regedit in the Run dialog box and hit Enter.
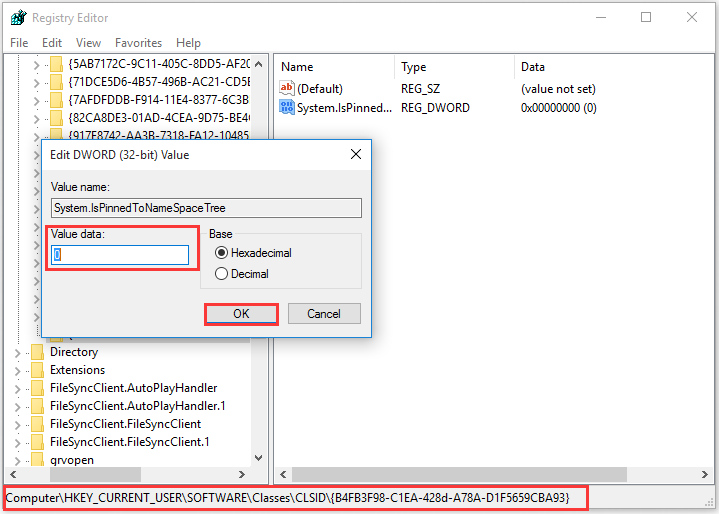
Step 2. Navigate to the following path from the left pane.
HKEY_CURRENT_USERSoftwareClassesCLSID{B4FB3F98-C1EA-428d-A78A-D1F5659CBA93}
Step 3. Double click the System.IsPinnedToNameSpaceTree DWORD and change its Value data to 0, and then click on OK. After that, the HomeGroup will disappear from the File Explorer menu.
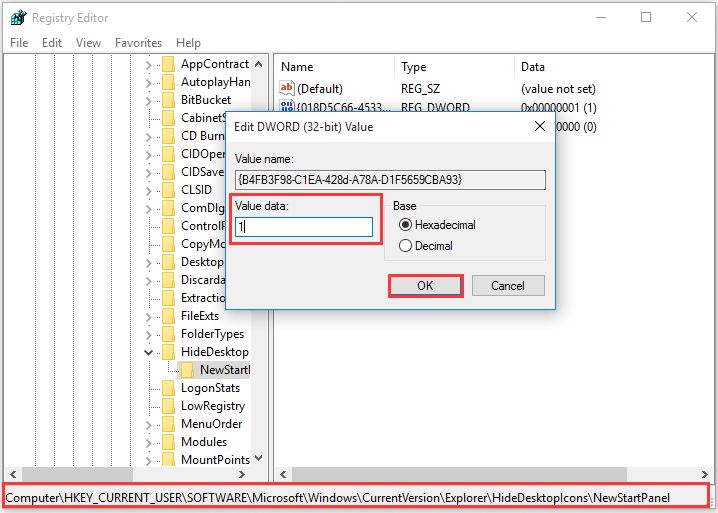
Step 4. If the HomeGroup icon still persists, navigate to the following path in the Registry Editor.
HKEY_CURRENT_USERSOFTWAREMicrosoftWindowsCurrentVersionExplorerHideDesktopIconsNewStartPanel
Step 5. Double click the {B4FB3F98-C1EA-428d-A78A-D1F5659CBA93} and change its Value data to 1, and click on OK.
Method 3. Change HomeGroup Advanced Settings
You can stop your computer from automatically joining HomGroup by changing its advanced settings. To delete HomeGroup, follow the steps below.
Step 1. Press Win + S keys to open the Windows Search box, and then type homegroup in it and select HomeGroup from the Best match.
Step 2. Click on the Change advanced sharing settings link.

Step 3. Scroll down to the HomeGroup connections section and select the Use user accounts and passwords to connect to other computers option, and then click on Save changes.
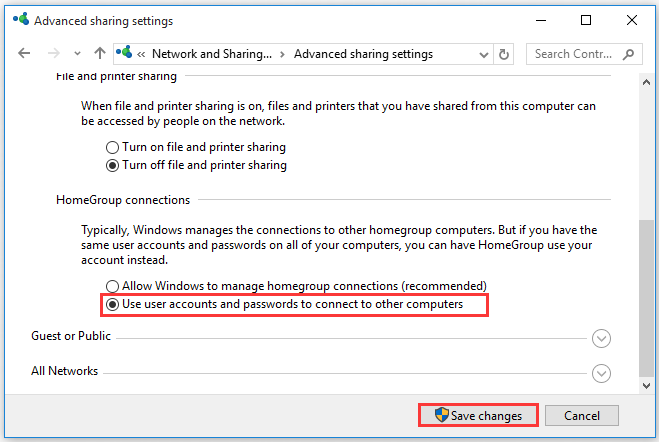
Now, restart your computer to apply this change and repeat the same steps on all connected PCs. After that, your computer won’t automatically connect to HomeGroup.
How do I delete a HomeGroup in Windows 10? I believe that you already have known the answer. However, some users report that Windows couldn’t remove your computer from the HomeGoup. How to fix it? Let’s go on.
What Can I Do If I Can’t Delete HomeGroup
If you can’t delete HomeGroup smoothly, you can refer to the following several solutions.
Solution 1. Turn off All PCs Connected to HomeGroup and Delete the PeerNetworking Folder
It’s proven by a few users that turning off all PCs connected to HomeGroup is helpful. Here you can have a try. If not, you can remove HomeGroup manually by deleting the contents of the PeerNetworking folder.
Step 1. Press Win + E keys to open the File Explorer and navigate to the following path.
C: WindowsServiceProfilesLocalServiceAppDataRoamingPeerNetworking
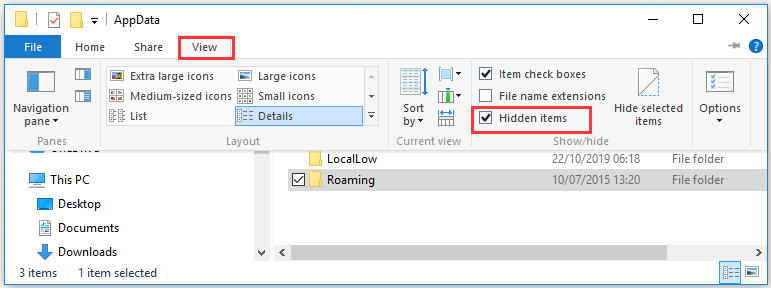
Step 2. Select all contents of PeerNetworking folder and press Delete.
Step 3. Restart your computer and leave the HomeGroup again.
Solution 2. Run a DISM Scan
According to a survey, the corrupted system files are responsible for the issue. To fix it, you can try running a DISM scan. For that:
Step 1. Type command in the search box, and then right-click the Command Prompt from the top result and select Run as administrator.
Step 2. In the elevated Command Prompt, type the following commands one by one and hit Enter after typing each one.
- exe /Online /Cleanup-image /Scanhealth
- exe /Online /Cleanup-image /Restorehealth
Now, wait patiently for the process to complete and don’t interrupt it.
Solution 3. Search for HomeGroup in File Explorer
Some users reported that they can delete HomeGroup simply by searching for the HomeGroup in File Explorer. Here’s how:
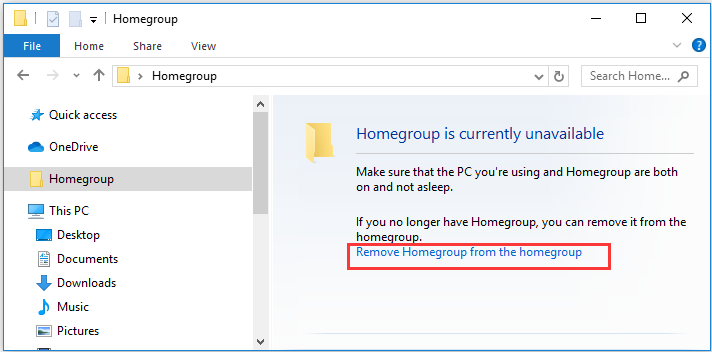
Step 1. Open your File Explorer again and locate the C drive.
Step 2. Once the C drive opens, type homegroup in the search box at the upper right corner.
Step 3. Select the HomeGroup or 08-HomeGroup shortcuts and open it. Then you will see Homegroup is currently unavailable message. Click Remove Homegroup from the homegroup.
User Comments :