What Is DCFWinService in Windows 10/11?
DFCWinService is a service of Dell Foundation Software. It can give you some of the messaging and support features that are unique to Dell.
But DCFWinService may show high CPU usage, mainly due to incompatibility with the latest Windows updates. After this problem occurs, you will find that your system becomes too slow and DCFWinService takes up a lot of CPU space (sometimes more than 90%) when you open the task manager.
Well, for DCFWinService high CPU usage, the following content shows you 3 ways to fix it. Please keep reading.
How to Fix DCFWinService High CPU Usage?
To fix DCFWinService high CPU usage, you can try the following methods.
Way 1: Clean Boot the System
If you add Dell Foundation Services to your system’s startup items, it may show up in your task manager and consume the CPU. Therefore, a clean boot of the system may solve the problem.
Here are the detailed steps:
Step 1: Type system configuration in the Windows Search box in the taskbar, and select the best-matched result.
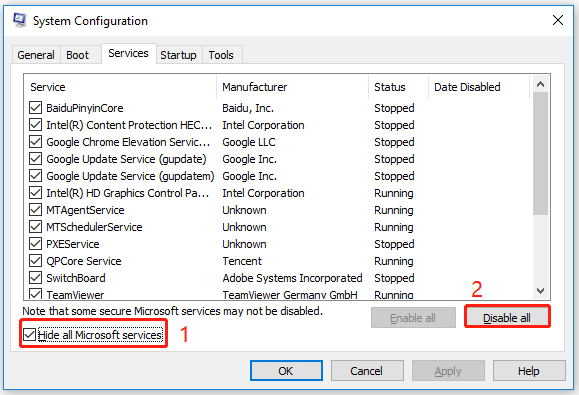
Step 2: Switch to the Services tab, select the Hide all Microsoft Services box, and click the Disable all button.
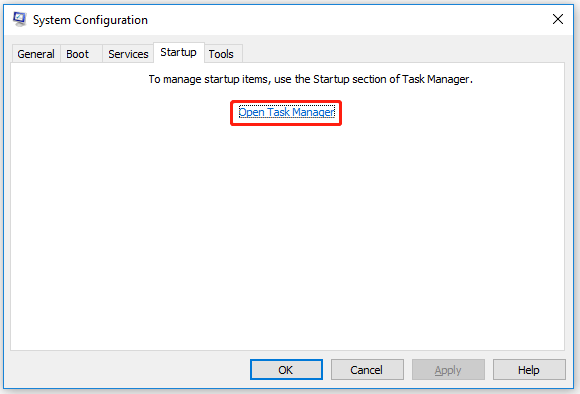
Step 3: Now, go to the Startup tab, then click Open Task Manager.
Step 4: In the Task Manager panel, find the DCFWinService or any other Dell-related service from the list.
Step 5: Right click on the service and select the Disable option.
Step 6: When you disable all the startup of unnecessary applications, close the Task Manager window, and then click on Apply > OK.
Step 7: Restart your PC and check if the high CPU usage by DCFWinService is normalized.
Way 2: Disable the DCFWinService
If a clean boot system doesn’t work for you, then you can disable DCFWinService in the Services Manager. Here is the guide:
Step 1: Type services in the Windows Search box, and select the Services app in the search results.
Step 2: When the Services opens up, find the DCFWinService service, then right click on it and select the Properties option.
Step 3: In the next pop-up window, extend the menu next to Startup status and select Disabled.
Step 4: Restart your PC and check if the DCFWinService has high CPU usage.
Way 3: Uninstall the Dell Foundation Services
If disabling the DCFWinService service does not work for you, then you may need to uninstall Dell Foundation Services in Applications and Features to resolve high CPU usage.
Here is how to do it:
Step 1: Press the Win + R key to open the Run dialog box. Then type appwiz.cpl and press Enter to open Programs and Features.
Step 2: In the Programs and Features window, find the Dell Foundation Services app from the list. Then right click on it and select the Uninstall option.
Step 3: Follow on-screen instructions to uninstall the app.
Step 4: Restart your PC and check if the DCFWinService has high CPU usage.
![[Solved] How to Fix LMS.exe High CPU Usage in Windows 10?](https://images.minitool.com/partitionwizard.com/images/uploads/2022/03/lms-exe-thumbnail.png)
Bottom Line
There are 3 ways to fix the DCFWinService high CPU error in Windows 10/11 in this article. Try them one by one until the error gets solved. Or, if you have other solutions, you can share them in the following comment zone.
About The Author

Position: Columnist
Vega enjoys helping people with computer problems, including disk management, data recovery, data backup, and more. She is constantly expanding her knowledge in related fields. And she will continue to bring more easy-to-understand professional articles to help people solve various problems on the PC.
User Comments :