Do you know what NTFS permissions are? A lot of users are confused about how to configure NTFS permissions on Windows 10/11. In this post, MiniTool summarizes 2 available ways to set NTFS permissions.
What Are NTFS Permissions
NTFS permissions are a set of permissions used to protect your files and folders stored on the partition with NTFS file system. These permissions can determine who can access certain files/folders such as user profiles. They can be assigned to groups or individual users. There are different types of NTFS permissions for files and folders which you can configure for.
- Full control: If you select this option, a user or group has all available permissions for files and folders, including add, modify, move, and delete. Besides, you can change NTFS permission for all files and subdirectories.
- Modify: This permission means that a user or group can modify a file or the contents in a folder.
- Read & execute: It allows a user or group to view and run executable files in a folder.
- List folder contents: It is an NTFS folder permission that determines if a user or group can list the content of a folder.
- Read: It means that a user or group can read the data in a file or folder but can’t read an executable file or open the folder where the files are stored if only assigning this permission.
- Write: It means that a user or group can change the content in a file, create files/folders, or write data and attributes for a folder.
Now, you should have an overall understanding of the NTFS permissions. Let’s see how to configure NTFS permissions.
![How to Online / Offline a Disk Using Diskpart? [Ultimate Guide]](https://images.minitool.com/partitionwizard.com/images/uploads/2023/03/online-offline-a-disk-using-diskpart-thumbnail.jpg)
How to Configure NTFS Permissions on Windows 10/11
How to set NTFS permissions on Windows 10/11? You can choose one from the following 2 simple methods.
Before You Do
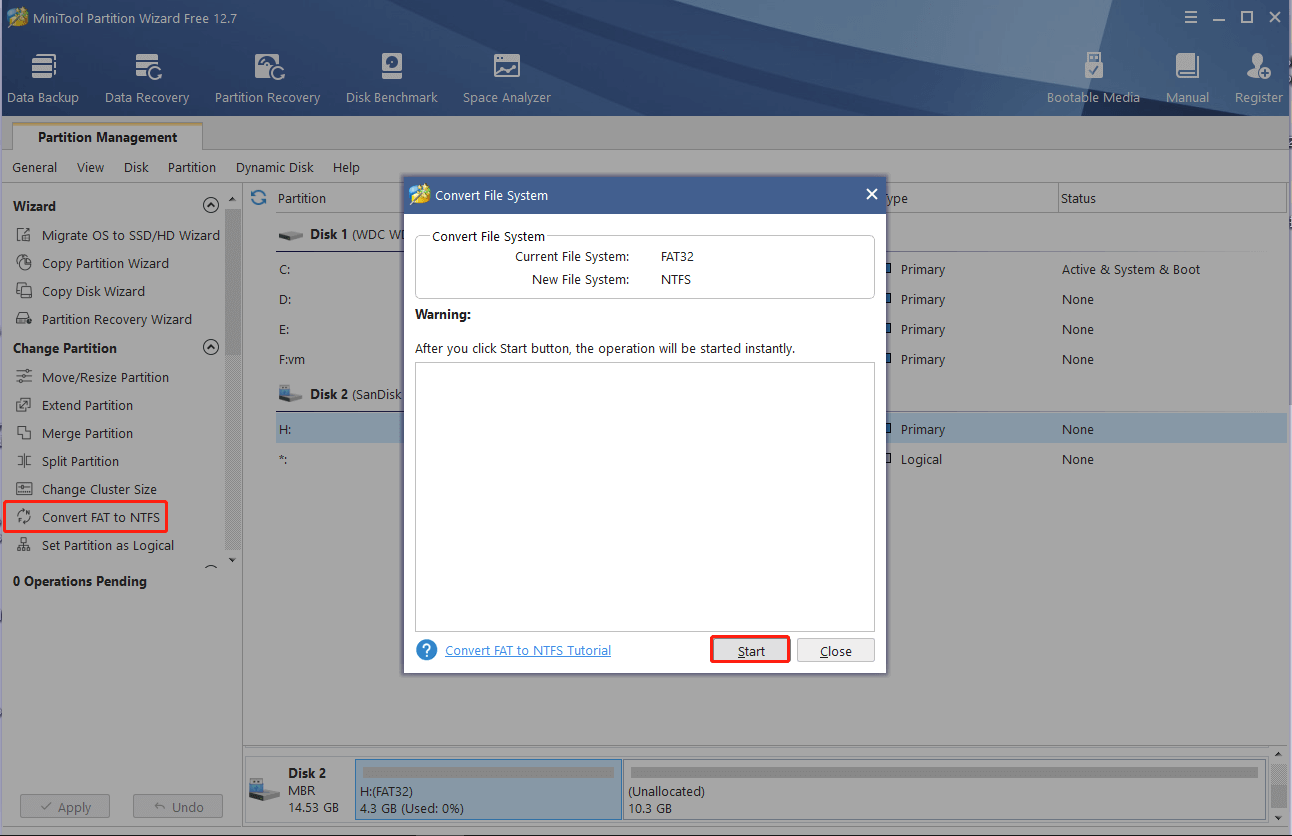
As you know, the NTFS permissions are only available for NTFS partitions, If you are using a FAT32 file system, you can’t configure NTFS permissions for a folder/file on that partition. In this case, you need to convert FAT32 to NTFS first.
How to convert FAT to NTFS without data loss? MiniTool Partition Wizard can do that easily. It is a professional and trustworthy partition manager that can convert MBR to GPT without data loss, convert dynamic disk to basic disk, format partition to NTFS/exFAT/Ext4/FAT32, and more.
MiniTool Partition Wizard FreeClick to Download100%Clean & Safe
Way 1. Set NTFS permissions in File Explorer
The first and most common way on how to set NTFS permissions for a folder is to use Windows File Explorer. Here are detailed steps:
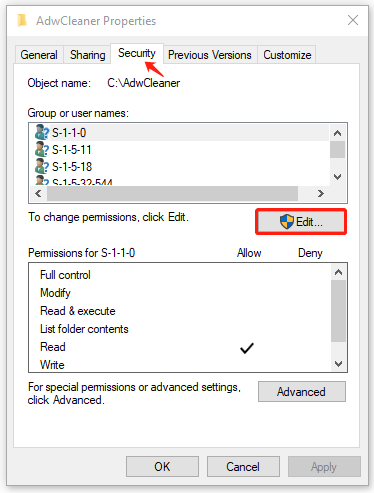
Step 1. Press Win + E keys to open the File Explorer, and then right-click the directory that you want to set NTFS permissions Windows 10/11 for and select Properties.
Step 2. In the Properties window, navigate to the Security tab and click on Edit to change NTFS permissions.
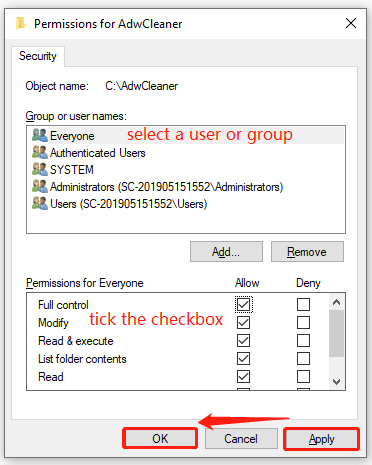
Step 3. Select your desired group or user names from the list, and then tick the checkbox of Allow or Deny next to the Permissions that you want to set, and click on Apply and then OK to save the change.
If you want to add a new user or group, you can click on Add and enter the desired name, and follow the on-screen prompts to complete the process.
Way 2. Set NTFS permissions PowerShell
Another advanced way is to let PowerShell set NTFS permissions. To do this work, you can follow the detailed steps below:
Step 1. Type powershell in the Search box, and then right-click Windows PowerShell from the top result and select Run as administrator.
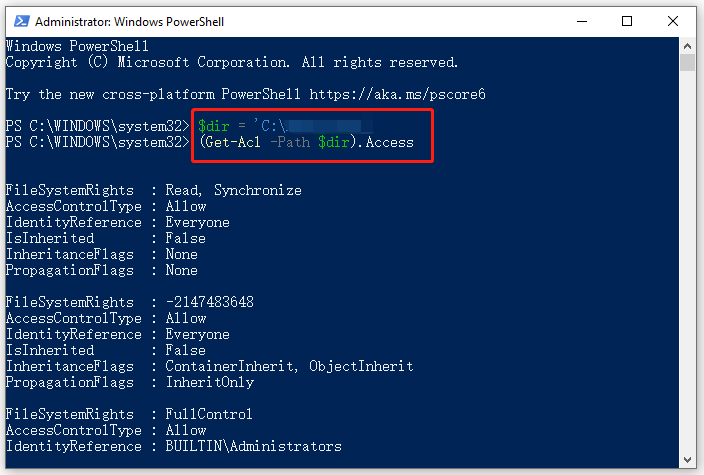
Step 2. In the elevated PowerShell window, type the following commands and hit Enter after each one to assign the path to your desired directory and view its permissions.
Here you need to replace the path with your actual directory. Also, you can run the (Get-Acl -Path $dir).Access | Format-Table -AutoSize command to view permissions in a more readable format.
$dir = ‘C:Pathtodirectory’
(Get-Acl -Path $dir).Access
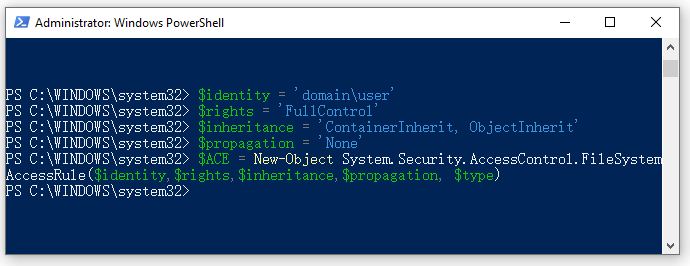
Step 3. Run the following commands in order and hit Enter after each one to create variables for permissions.
$identity = ‘domainuser’
$rights = ‘FullControl’
$inheritance = ‘ContainerInherit, ObjectInherit’
$propagation = ‘None’
$type = ‘Allow’
Step 4. Run the following command to combine all variables into a single object.
$ACE = New-Object System.Security.AccessControl.FileSystemAccessRule($identity,$rights,$inheritance,$propagation, $type)
Step 5. Run the following command to get access rights from the selected directory and store them in a variable.
$Acl = Get-Acl -Path $dir
Step 6. Type the following commands and hit Enter after each one to add the access rule and set the rule.
$Acl.AddAccessRule($ACE)
Set-Acl -Path $dir -AclObject $Acl
Now, you should set NTFS permissions PowerShell completely. If you want to remove NTFS permissions using PowerShell someday, you can run the following commands.
$Acl = Get-Acl -Path $dir
$Ace = $Acl.Access | Where-Object {($_.IdentityReference -eq ‘domainuser’) -and -not ($_.IsInherited)}
$Acl.RemoveAccessRule($Ace)
Set-Acl -Path $dir -AclObject $Acl
![A Volume with BitLocker Waiting for Activation? [Fixed]](https://images.minitool.com/partitionwizard.com/images/uploads/2023/03/bitlocker-waiting-for-activation-thumbnail.jpg)
User Comments :