A lot of Windows 10 users complain that their computer shuts down instead of sleeping. Are you also troubled by the Windows 10 shuts down instead of sleep issue? Don’t worry. MiniTool will share you with several effective troubleshooting methods.
It is reported that computer shuts down instead of sleeping even though the users choose to enter Sleep Mode. This vexing issue can happen due to a variety of causes such as power settings, a disabled BIOS setting, or a bug with the Intel Management Engine Interface (IMEI) driver.
After analyzing many posts and user reports, we summarize the top 4 troubleshooting methods. Now, let’s see how to fix Windows 10 shuts down instead of sleep.

Fix 1. Run Windows 10 Power Troubleshooter
The first and simplest method is to run the Windows power troubleshooter. It is a Windows built-in tool that can help troubleshoot many common issues such as Windows 10 shuts down during sleep. This method has been proven to be useful for some users. Have a try now.
Step 1. Press Win + I keys to open the settings windows and select the Update and Security tab in the pop-up window.
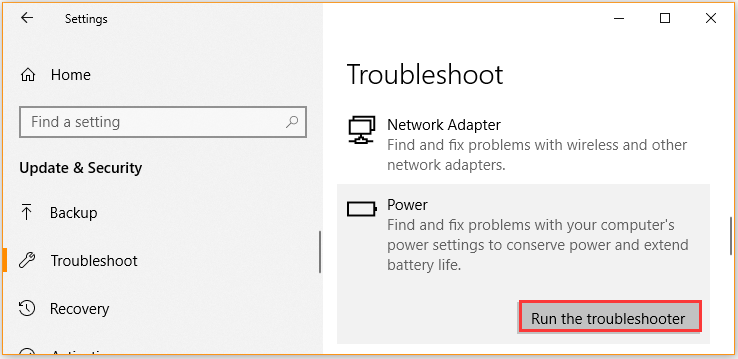
Step 2. In the Troubleshoot tab, scroll down the right sidebar and double click the Power section.
Step 3. Click on Run the troubleshooter button and follow the on-screen prompts to complete this process.
Once this troubleshooting process completes, check if the computer shuts down in sleep mode Windows 10 issue.
Fix 2. Check the Power Settings of Your Windows 10 PC
It is very likely that your power button is configured to shut down once you short press the power button. For these older computer models, the computer shuts down instead of sleeping issue is more frequently to occur.
You can follow the steps below to verify the power settings.
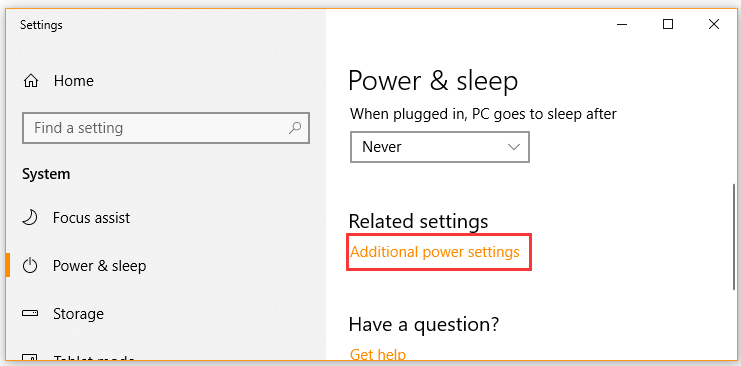
Step 1. Press Win + R keys to open the Run dialog box, and then type ms-settings:powersleep in the box and hit Enter.
Step 2. Inside the Power & sleep tab, click on the Additional power settings button on the right pane.
Step 3. Click on Choose what the power button does from the left pane.

Step 4. In the System settings window, change the behavior of When I press the power button to Sleep from the drop-down menu.
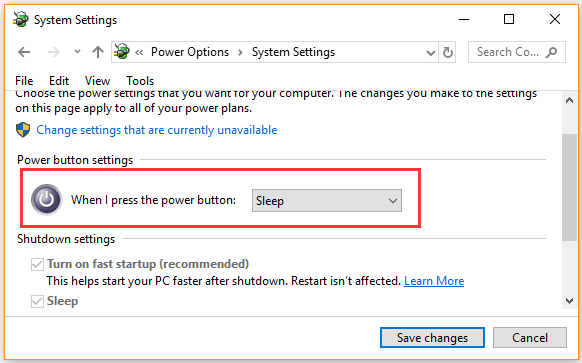
Step 5. Repeat the same step to change the behavior for each of these options, including When I press the power button to Sleep, When I press the sleep button, and also When I close the lid. After that, click on Save changes to exit the window.
Now, you can check if these setting has fixed the Windows 10 shuts down instead of sleep issue. If not, move on to the next methods.
Fix 3. Enable Power Saving Mode in BIOS
If the Power Saving Mode is disabled in BIOS settings, the sleep mode may function improperly which causes the computer shuts down in sleep mode Windows 10. So, please make sure the Power Save Mode is enabled in BIOS.
Step 1. Restart your computer and enter BIOS by pressing the appropriate key.
Step 2. Find the Power Saving Mode option and Enable it.
Step 3. Save the changes and exit BIOS.
Now, restart your computer and check if the Windows 10 shuts down during sleep issue is fixed.
Fix 4. Update Intel Management Engine Interface (IMEI) to the Latest Version
The outdated Intel Management Engine Interface (IMEI) driver can also trigger power issues. At this time, you need to uninstall the current driver and manually update it to the latest version. To do so, follow the steps below:
Step 1. Right-click the Strat menu and select Device Manager from the context menu.
Step 2. Expand the System devices category, and then right-click the Intel Management Engine Interface and select Properties.
Step 3. Navigate to the Driver tab and click on the Uninstall Device button. After this driver is uninstalled, restart your computer.
Step 4. Click here to download the latest version of the IMEI driver.
Step 5. Follow the on-screen instructions to complete this update.
User Comments :