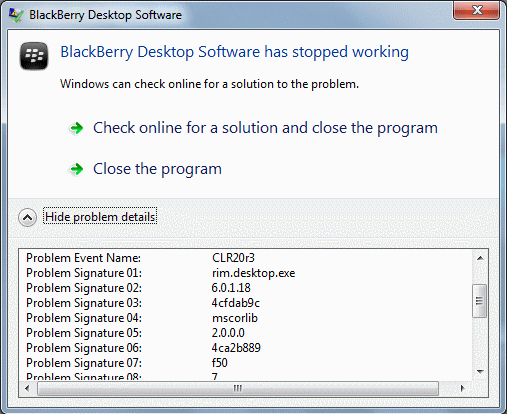
Sometimes, you may get "problem event name: CLR20r3" error. This error will cause an app to stop working. If you are facing this problem, you can read this post, in which MiniTool Partition Wizard shows you how to solve it.
Some people reported that their apps have crashed because of the CLR20r3 error. The problem event CLR20r3 may occur for the following reasons:
- Corrupted application files and settings.
- Corrupted application registry keys.
- And so on.
To solve this problem event, you can take the following measures.
Method 1. Reregister Windows Media Components
Step 1: Press “Windows + R” keys on your keyboard to open Run box, then type “cmd” in the Run box and press Enter to open Command Prompt.
Step 2: In Command Prompt, type the following commands one by one followed by an Enter after each command to execute all these commands:
- regsvr32 atl.dll
- cd C:WINDOWSeHome
- ehSched /unregServer
- ehSched /service
- ehRecvr /unregServer
- ehRecvr /service
- exe /unregServer
- exe /regserver
- exe /unregServer
- exe /regserver
Step 3: Exit the Command Prompt and restart your computer to see whether the problem is solved.
The Best Windows Media Center On Windows 10 – Check It Out
Method 2. Reinstall Windows Media Center
Reinstalling Windows Media Center may help to solve the CLR20r3 error. Please refer to the following steps:
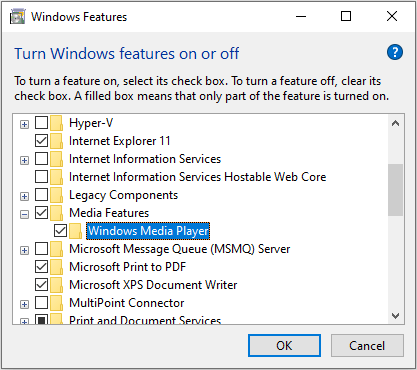
Step 1: Open Control Panel and then go to “Programs > Turn Windows features on or off”.
Step 2: Expand the “Media Features” menu by clicking on the “+” icon for deselecting the checkbox next to the “Windows Media Center” option.
Step 3: Restart your computer. Then, repeat all of these steps once again but select the checkbox next to “Windows Media Center” this time.
Step 4: Restart the computer again to see whether the problem is solved.
Best Ways To Fix Media Center Error On Windows 10
Method 3. Configure .Net Framework
Sometimes, the problem event CLR20r3 is caused by the lack of certain Microsoft .Net Framework version. In this case, you can solve the problem by configuring .Net Framework. When configuring the Microsoft .Net Framework, there are two occasions you should consider:
- You install correct Microsoft .Net Framework versions but you don’t enable them.
- The needed Microsoft .Net Framework versions are not installed.
According the above two occasions, there are different solutions.
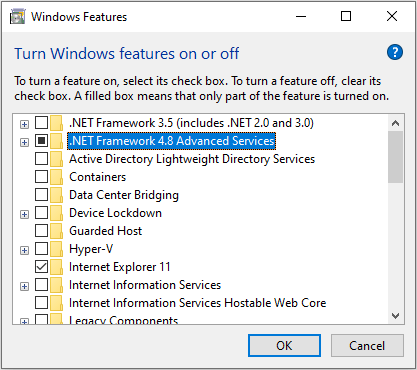
Case 1. Microsoft .Net Framework versions are not enabled. You can refer to the following steps to enable them:
- Press Windows Key + R.
- Type “control“and press OK.
- In the Control Panel, go to Programs > Programs and Features.
- Click on Turn Windows Features on or off
- Find .NET Framework services to make sure they are enabled.
Case 2. The needed Microsoft .Net Framework versions are not installed. You can refer to the following steps to solve the problem:
Step 1: Check what Microsoft .Net Framework versions you have installed.
![How to Check .NET Framework Version on Windows 10 [3 Methods]](https://images.minitool.com/partitionwizard.com/images/uploads/2020/06/how-to-check-net-framework-version-thumbnail.jpg)
Step 2: If you have installed a relatively high .Net Framework version, you can solve the problem by editing the application configuration file. Here are the code lines:
<configuration>
<startup>
<supportedRuntime version=”v2.0.50727” />
<supportedRuntime version=”v4.0” />
</startup>
</configuration>
Step 3: If your .Net Framework version is very low, you can solve the problem with two ways:
- Install the latest .Net Framework version and enable it.
- Upgrade Windows.
About The Author

Position: Columnist
Linda has been an editor at MiniTool for seven years. She continuously learns about computers and puts her knowledge into practice. Moreover, she is particularly knowledgeable in disk management, data recovery, system installation, and PDF editing. Her articles typically reference multiple examples or are based on her own experience, providing users with the most suitable solutions.
User Comments :