Many users reported that they failed to boot their computers due to the CLASSPNP.SYS BSOD error. This error often happens to Windows 10 and Windows 7 PC. If you are still struggling to figure it out, you can use the following several methods provided by MiniTool.
CLASSPNP.SYS is a critical system file in the Windows SCSC class that enables your PC to run normally. However, sometimes you may encounter the CLASSPNP.SYS BSOD error, which makes your computer stuck on the boot screen.
Usually, the hardware failures, corrupted file, BIOS configuration as well as device drivers could be responsible for the problem. So, we will discuss the corresponding solutions according to the possible causes. Now let’s see how to fix CLASSPNP.SYS BSOD error.
Before You Do
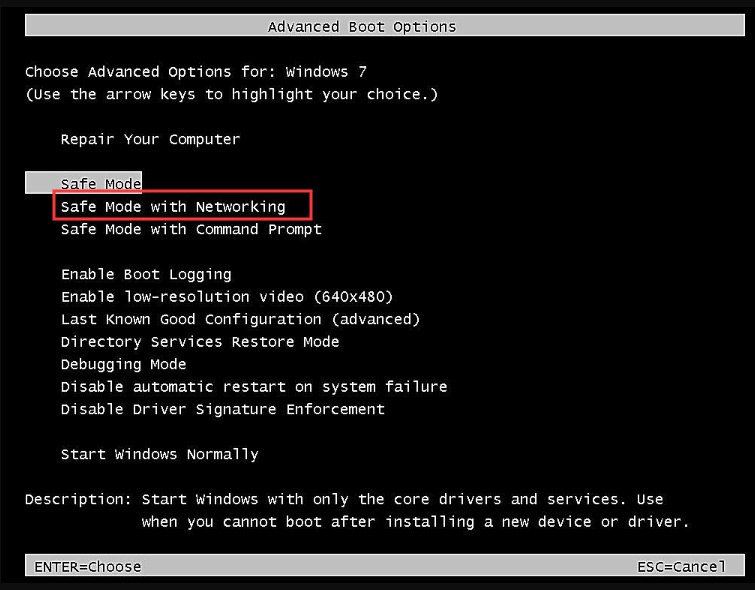
Considering you may fail to log into your system for the CLASSPNP.SYS BSOD, we recommend you boot your computer from Safe Mode with Networking, and then perform the following methods.
If you are using Windows 10 PC, you can read this article that provides you with detailed steps to enable Safe Mode with Networking on Windows 10.
If you are using Windows 7 PC, you can follow this guide.
Step 1. Press the Power button to turn on your PC. After 1 second, press the F8 key to open the Advanced Boot Options screen.
Step 2. Select the Safe Mode with Networking by pressing the arrow keys. After that, press Enter.
After rebooting your computer into Safe Mode with Networking, let’s begin to resolve the CLASSPNP.SYS BOSD error Windows 10/7.
Solution 1. Run System File Checker
The corrupted or missing CLASSPNP.SYSS can cause BSOD errors. Here you can try using System File Checker that is the most widely used tool to scan and repair the corrupted system to fix the CLASSPNP.SYS BSOD error. Here is how to do that:
Step 1. Press Win + R keys to open the Run dialog box, and then type cmd in it and press Ctrl + Shift + Enter keys to open the Command Prompt (Admin).
Step 2. In the elevated command prompt, type sfc /scannow and press Enter.
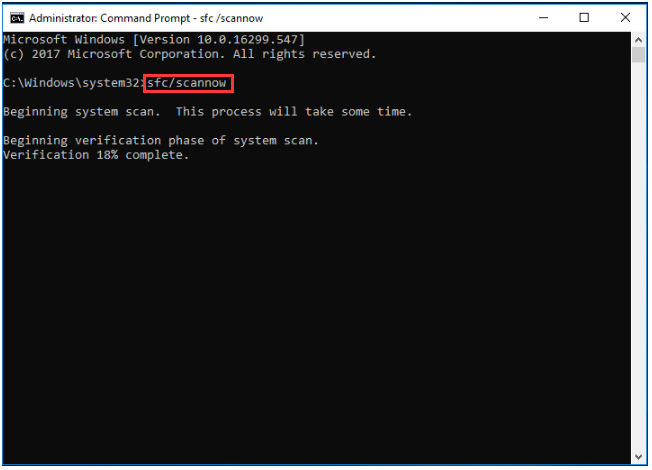
After the process completes, restart your computer and see if the CLASSPNP.SYS BSOD error still persists.
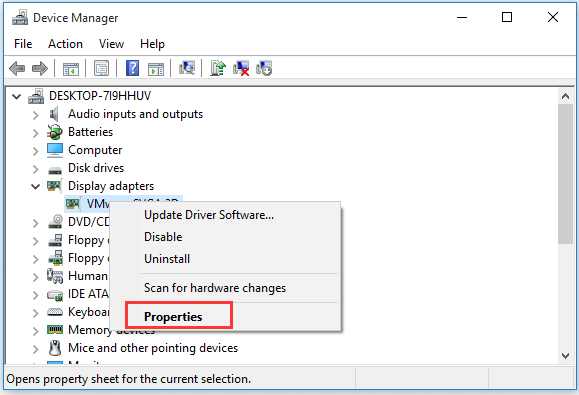
Solution 2. Update Your Device Driver
The wrong or outdated device drivers also could be responsible for the BSOD error. So, updating the device driver might troubleshoot the error. Let’s see how to update the device driver.
Step 1. Type device manager in the search box, and then select Device Manager from the contextual menu.
Step 2. Expand the Display adapters and right-click the device driver and select the Properties.
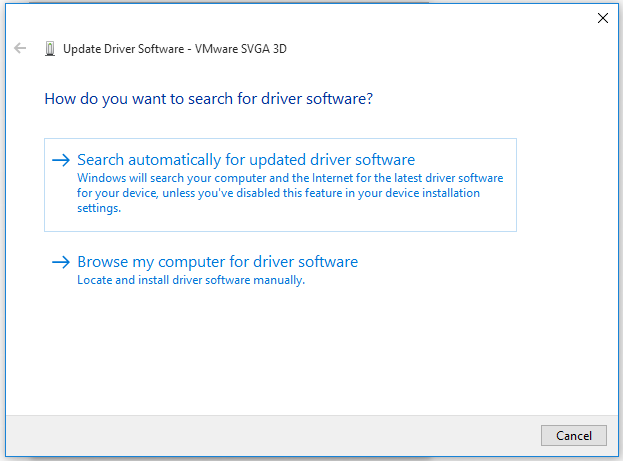
Step 3. In the new window, go to the Driver tab and click Update Driver button.
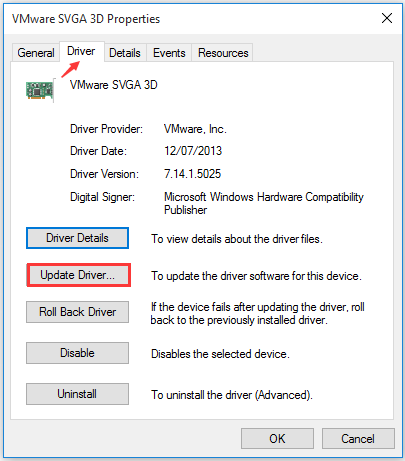
Step 4. Then pick one from the 2 options according to your needs. You can update the device driver automatically or manually.
After that, restart your computer and check if CLASSPNP.SYS blue screen issue is fixed. If not, move to the next method.
Solution 3. Remove Your Peripheral Devices
Sometimes your peripheral devices like USB mouse, external hard drive are also the common causes of CLASSPNP.SYS error. For this situation, you need to disconnect your peripheral device. It is very simple to operate.
Step 1. Shut down your computer.
Step 2. Disconnect the device and restart your computer.
If this method fails to work, move ahead.
Solution 4. Update the BIOS
BIOS (Basic Input and Output System) prompts the hardware initialization during the booting process of your PC. So, updating your BIOS may be a good solution to get rid of the CLASSPNP.SYS error.
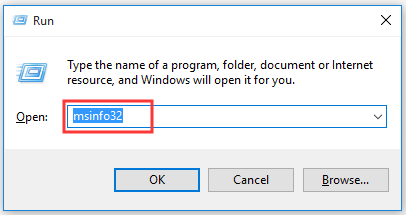
Step 1. Press Win + R keys to open the Run dialog box, and then type msinfo32 and hit Enter.
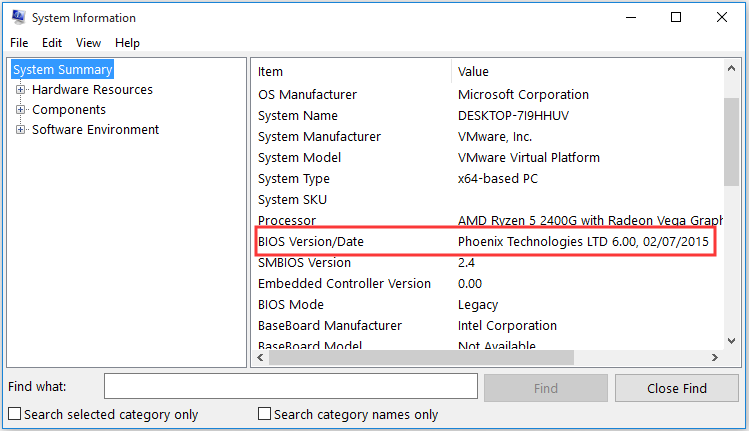
Step 2. In the System Information window, find your BIOS Version/Date and visit its official website.
Step 3. Then you can check the Support or Download section on the official website and look for the latest BIOS update.
Step 4. Download the file and install it on your computer properly.
Step 5. Restart your computer and see if the blue screen issue is resolved.
Solution 5. Check Your Hardware Corruption
If all the above methods fail to work, we recommend you check your hard drive corruption. This is because the damaged hard drive or RAM memory can also contribute to the blue screen problem. Usually, you can use the Windows built-in tool to scan your disk error.
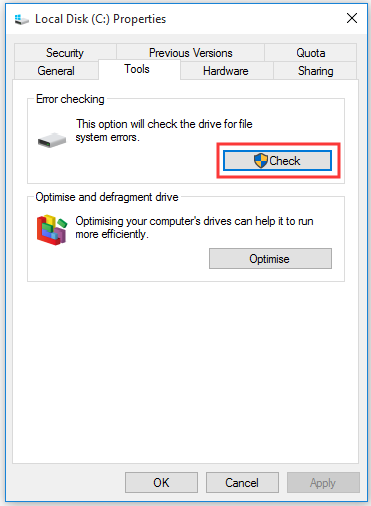
However, the fixing process will take you several hours to complete. So, it is highly recommended that you use professional software to save your time. Here MiniTool Partition Wizard can help you check your hard drive corruptions when you fail to boot your PC.
To check your hard drive corruption, you can read this article: How to Check Hard Drive and Fix the Error.
User Comments :