Thanks to the time server, it tracks the current date and time and distributed that time to connected computer through a computer network.
Nowadays, most computers automatically sync with a time server connected to be the Internet to keep their computer clocks up-to-date
So, if your computer shows the wrong time, there might be something wrong with the time server. In this case, you can try changing the time server. The following shows you how to change time server Windows 10.
How to Change Time Server Windows 10?
If your device displays the wrong time and it is not a time zone problem, you can try to change time server Windows 10 to solve the problem. If you don’t like the servers in the list, you can also add new servers. The steps are as follows:
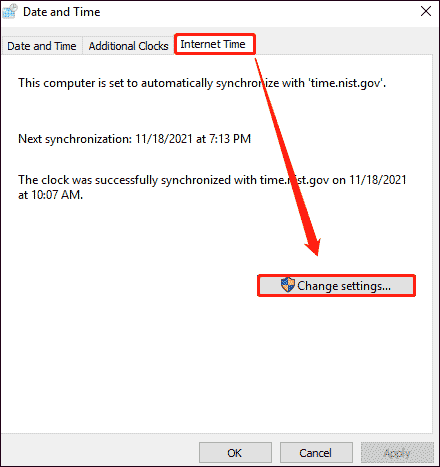
Step 1: Open the Control Panel, and navigate to the Clock, Language, and Region > Date and Time > Internet Time, and then click the Change Settings button.
Step 2: Check if the Synchronize with an Internet time server option is selected. Next to the Server, select a different server from the drop-down menu, such as time.nist.gov. And you can type the new address of the time server, such as pool.ntp.org.
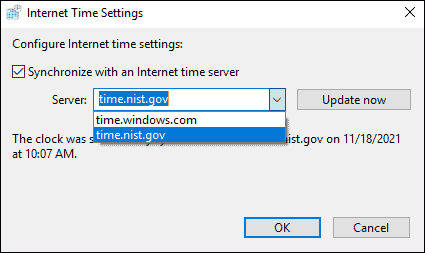
Step 3: Click the Update now button. In this window, you will see a message that shows the clock is successfully synchronized with time.nist.gov. And then the click OK button.
After completing these steps, Windows 10 will synchronize time with the server of your choice over the Internet.
In this way, you have to know how to change and add time server on Windows 10. But after changing the time server, if your computer cannot display the correct time, it means the time server appears synchronization problem.
How to Solve Time Server Synchronization Problem?
If your computer still cannot connect to the NTP server after changing the time server, you can use the Command Prompt program to reset the Windows time service configurations. Here is a tutorial to help you solve the time server synchronization problem.
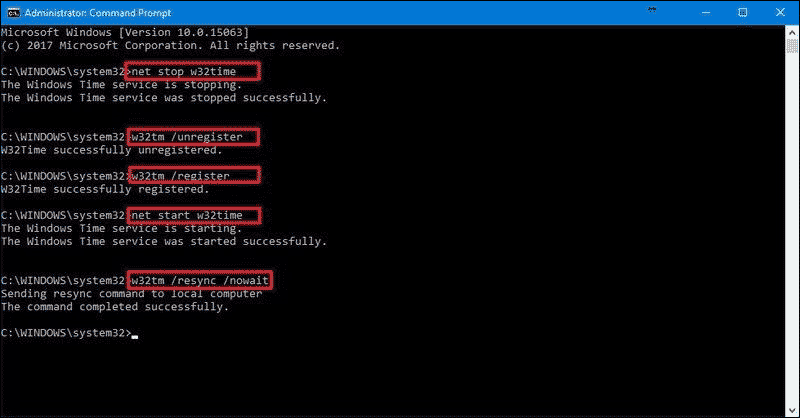
Step 1: Open the Start menu. In the search, type cmd.exe, right-click the result and select Run as administrator.
Step 2: Type net stop w32time and then press Enter to disable the Windows Time service.
Step 3: Type w32tm / unregister and then press Enter to unregister the Windows Time service and delete all setting information from the registry.
Step 4: Type w32tm / register and then press Enter to register the Windows Time service and load the default settings into the registry.
Step 5: Type net start w32time and then press Enter to start the Windows Time service.
Step 6: Type w32tm v / resync / nowait and then press Enter to force your computer to synchronize your computer without waiting.
Bottom Line
The above content is all about how to change time server Windows 10. Do you have any questions about this content? If you have any questions, please leave them in the comment zone and we will try to answer them as soon as possible.
About The Author

Position: Columnist
Vega enjoys helping people with computer problems, including disk management, data recovery, data backup, and more. She is constantly expanding her knowledge in related fields. And she will continue to bring more easy-to-understand professional articles to help people solve various problems on the PC.
User Comments :