This post of MiniTool mainly talks about CCXProcess including its basic definition, common issues with it, and methods to disable it. Besides, you will learn some extra information related to CCXProcess exe.
What Is CCXProcess Exe
CCXProcess, short for Creative Cloud Experience Process, is a process belonging to the Adobe Creative Cloud Desktop software. It launches automatically on startup and often creates multiple instances of cscript.exe or conhost.exe processes.
Generally speaking, the CCXProcess.exe is located under the “C:Program FilesAdobe” directory. Its average file size is 120KB.
Also read: Xhamstervideodownloader APK for PC/Mac/Android [Free Download]
Why Do You Need to Disable CCXProcess
Sometimes, you need to disable or even remove CCXProcess exe. Why? Firstly, you may encounter some issues with CCXProcess. Secondly, it is likely to pose a threat to your PC. Here, the two cases would be explained one by one.
Common issues with CCXProcess
Here are two most common CCXProcess.exe errors that may appear on your computer.
- File is missing or corrupt
- Unable to locate the file on startup
Is CCXProcess a virus?
The answer depends on the specific situation. If you run Adobe applications on the PC, then CCXProcess.exe should be a genuine file. The case is different if this process consumes lots of hardware capacities without any Adobe programs running.
In addition, some users also report performance issues with the system when they see the processes having a high CPU or memory usage. These issues can be caused by the incompatibility between the Adobe software and the AVG antivirus, or a virus attack. Then CCXProcess can be disguised as malware like a Trojan or a cryptocurrency miner with a legitimate process name.
Fortunately, you can check if it’s a virus using the steps below especially if you aren’t using Adobe software on your computer.
Step 1: Right-click on the Windows icon on the desktop and click Task Manager.
Step 2: In the Task Manager window, click on the Details tab.
Step 3: Find and right-click the CCXProcess.exe process, and then choose Open File Location. If you reach a folder without any association with Adobe, run a virus scan with immediate effect.
March 3 Warzone Update [UAVS, Iron Trials, and Bug Fixes]
How to Disable CCXProcess
You have three options to disable CCXProcess. Just choose one method according to your situation.
Option 1: Use the Adobe Creative Cloud
Step 1: Launch Adobe Creative Cloud on the desktop.
Step 2: Tap on the Settings button at the upper right corner of the window.
Step 3: Move to Preferences > General.
Step 4: Click Settings and then uncheck the Launch at Login option.
Step 5: Restart your computer to see if CCXProcess is disabled at startup.
Option 2: Use Task Manager
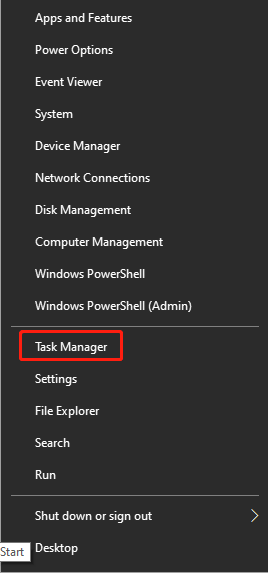
Step 1: Open Task Manager from the Start menu.
Step 2: Tap the Startup tab.
Step 3: Find and right-click on CCXProcess and click Disable.
Step 4: Reboot your PC and check if CCXProcess is disabled.
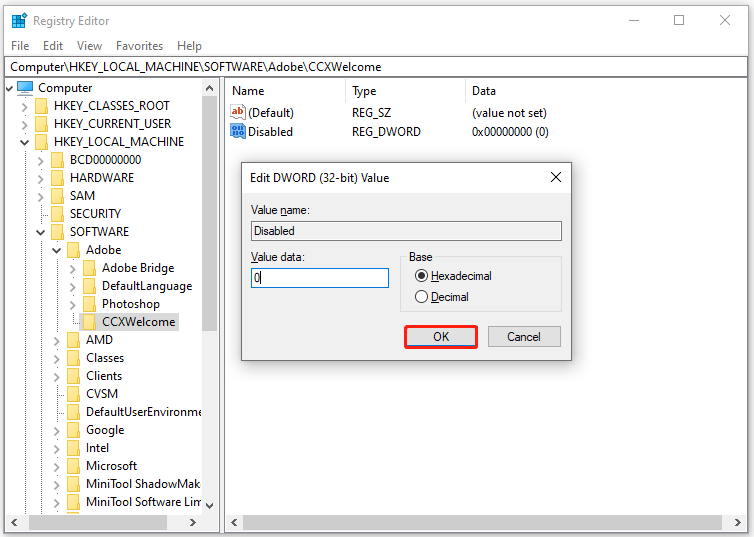
Option 3: Use Registry Editor
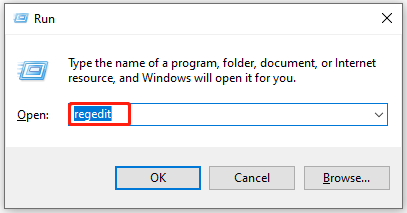
Step 1: Open Run dialog by pressing Windows and R keys, and then type regedit and hit Enter.
Step 2: Move to the Adobe option by following the path below. Then right-click on the Adobe folder and choose New > Key in the pop-up sub-menu.
HKEY_LOCAL_MACHINE>SOFTWARE>Policies>Adobe
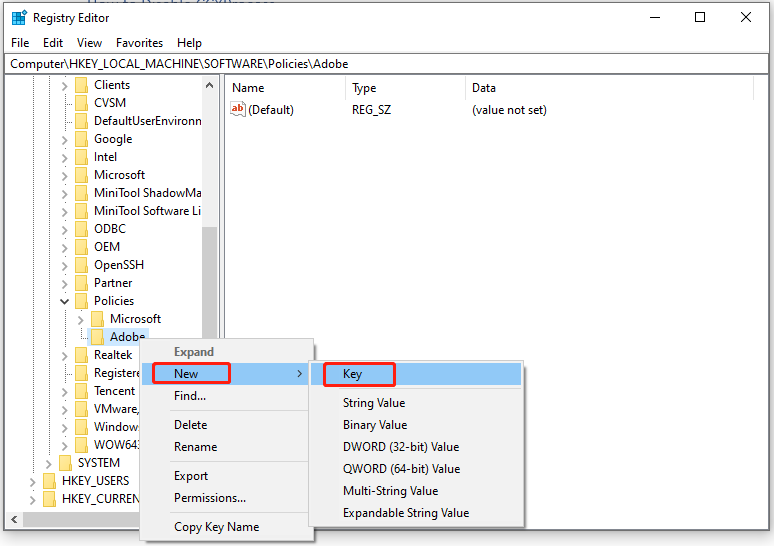
Step 3: Rename the key as CCXWelcome, and then choose it and move to the right side of the pane.
Step 4: Right-click on the empty area and select New > DWORD (32-bit) Value.
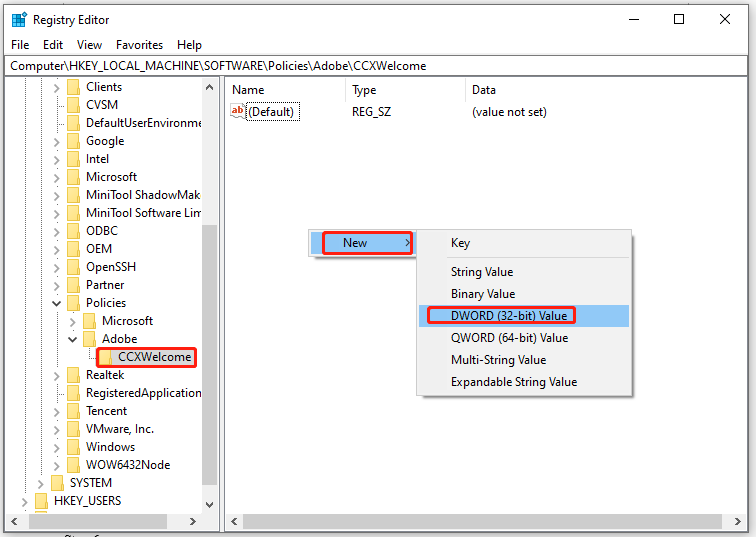
Step 5: Rename the DWORD value as Disabled. After that, double-click it to open the dialogue box and set the value data to O.
Step 6: Finally, click OK to save the changes and exit.
Step 7: Restart your computer to make the process take effect.
User Comments :