Are you using ASUS PCs? Does your PC support ASUS EZ Flash? This feature is offered by some ASUS motherboard, allowing you to easily update BIOS with USB drives. In this post, MiniTool Partition Wizard shows you how to update BIOS with ASUS EZ Flash.
What Is ASUS EZ Flash
ASUS EZ Flash is a feature in ASUS BIOS, allowing users to update BIOS easily with USB drives. BIOS updates will fix some security vulnerabilities and motherboard bugs, and expand motherboard functions. Therefore, it’s recommended to keep BIOS up to date.
In most cases, you can update BIOS by the Windows update Tool. You just need to go to ASUS website to download a proper BIOS update installer for Windows. Then unzip the file and execute the BIOS update installer file. After that, you just need to follow the on-screen instructions to complete the preparation work and then restart the PC to begin updating BIOS.
However, sometimes BIOS update may fail, because the operating system is poisoned, or there are a large number of resident programs and other unstable factors. In this case, you can use ASUS EZ Flash to update the BIOS version without entering the Windows operating system.
How To Check & Update BIOS On The Dell Computer
How to Update BIOS with ASUS EZ Flash
To update BIOS with ASUS EZ Flash, please follow steps below:
Step 1: Please back up your personal file before upgrading BIOS to prevent any unexpected issue.
Step 2: Keep the power supply / AC adapter connected during the BIOS update process.
Step 3: Prepare a USB drive. You should make sure this drive has only one partition on it and the partition should be FAT16/32. If necessary, you need to delete all partitions on the drive and then create a FAT32 partition, or you need to format the drive to FAT32 file system.
Step 4: Download the latest BIOS file corresponding to your motherboard model from ASUS Download Center. If you don’t what your motherboard model is, you can check that in BIOS, System Information, or DirectX Diagnostics Tool.
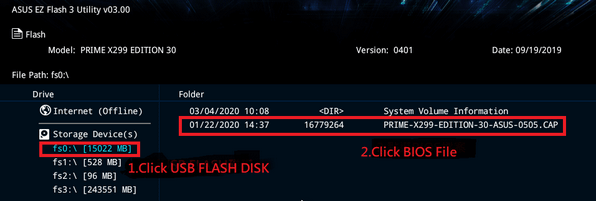
Step 5: Unzip the BIOS file. After unzip, a .CAP file will appear. This is the BIOS update file. Save it in the USB flash drive. Please make sure the .CAP file is in the root directory of the USB flash drive.
Step 6: Connect the USB flash drive to PC. Restart PC and then press the keyboard DEL key when ASUS LOGO appears, so that you can enter ASUS BIOS interface.
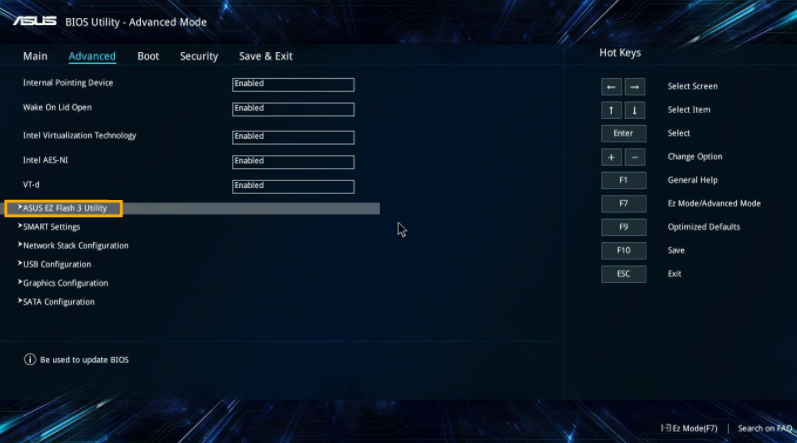
Step 7: In the BIOS screen, press F7 or click Advance Mode with the mouse to enter the advanced mode. Skip to Tools page and you can see ASUS EZ Flash Utility. Click this tool and then choose the USB drive > the .cap file. Then, after confirming some information, the BIOS update will start.
![How to Update BIOS on MSI Motherboard? [Complete Guide]](https://images.minitool.com/partitionwizard.com/images/uploads/2025/10/msi-bios-update-thumbnail.png)
About The Author

Position: Columnist
Linda has been an editor at MiniTool for seven years. She continuously learns about computers and puts her knowledge into practice. Moreover, she is particularly knowledgeable in disk management, data recovery, system installation, and PDF editing. Her articles typically reference multiple examples or are based on her own experience, providing users with the most suitable solutions.
User Comments :